
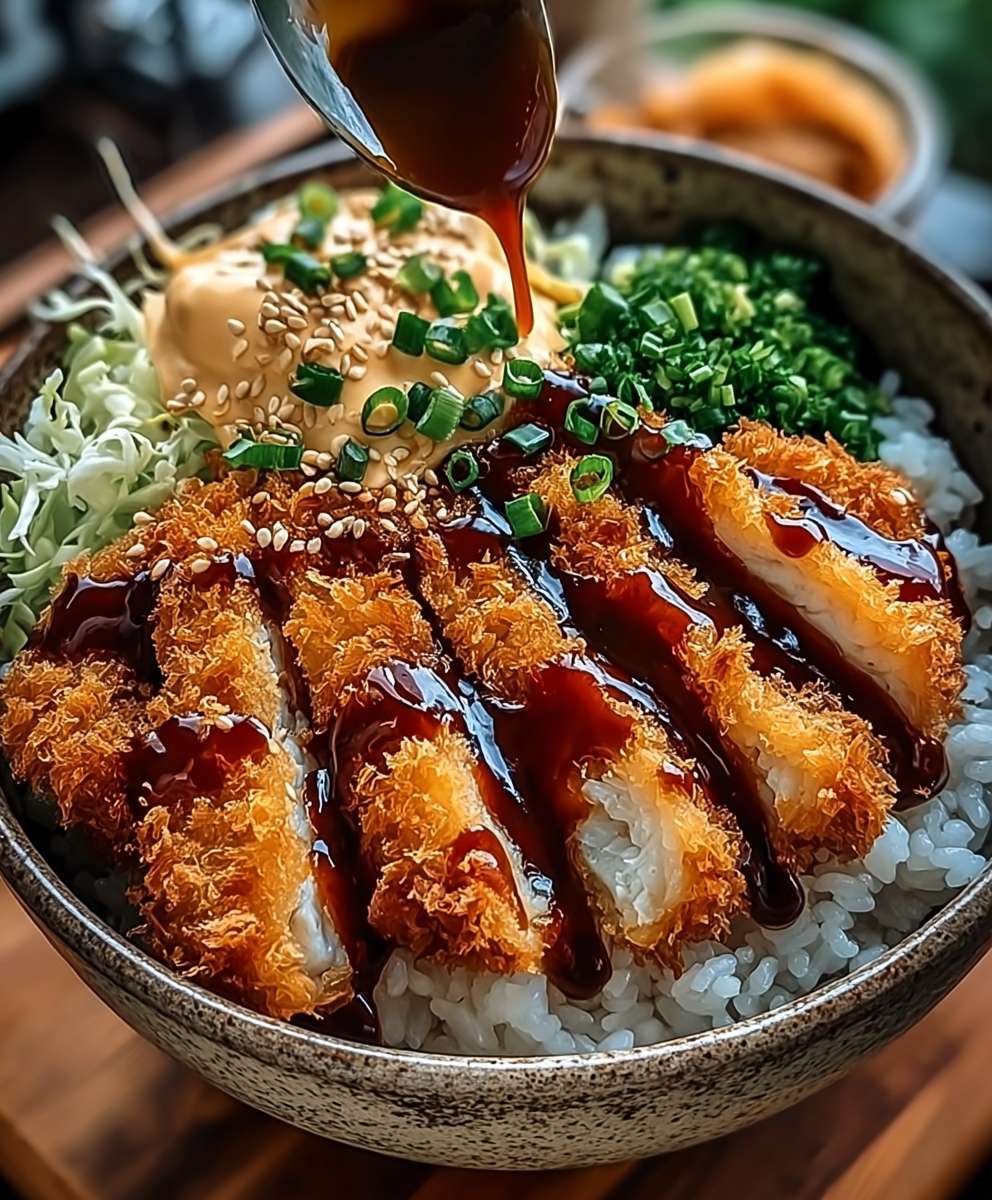
Japanese Katsu Bowls, a symphony of crispy, golden-brown cutlets nestled atop fluffy rice, drizzled with a savory-sweet sauce, are about to become your new weeknight obsession. Have you ever craved a meal that’s both comforting and exciting, familiar yet subtly exotic? Then prepare to be captivated! This isn’t just dinner; it’s a culinary journey to the heart of Japan, right in your own kitchen.
Katsu, the star of these delightful bowls, has a fascinating history. Introduced to Japan during the Meiji era (late 19th century) as a Western-inspired dish, it quickly evolved into a uniquely Japanese creation. Tonkatsu, the pork cutlet version, became a symbol of modernization and a popular choice for those seeking a taste of the new world. Over time, it found its way into bento boxes, restaurants, and eventually, the beloved Katsu Bowl, or Katsudon.
What makes Japanese Katsu Bowls so irresistible? It’s the perfect balance of textures and flavors. The satisfying crunch of the panko-crusted cutlet gives way to tender, juicy meat. The rich, umami-packed sauce, often made with soy sauce, mirin, and dashi, complements the savory cutlet and the subtly sweet rice. And let’s not forget the convenience! These bowls are surprisingly easy to assemble, making them ideal for busy weeknights or a quick and satisfying lunch. So, are you ready to experience the magic of Katsu? Let’s get cooking!

Ingredients:
- For the Chicken Katsu:
- 4 boneless, skinless chicken breasts (about 6 ounces each)
- 1 cup all-purpose flour
- 2 large eggs, beaten
- 2 cups panko breadcrumbs
- 1 teaspoon salt
- 1/2 teaspoon black pepper
- 1/2 teaspoon garlic powder
- 1/2 teaspoon onion powder
- Vegetable oil, for frying
- For the Katsu Sauce:
- 1/4 cup ketchup
- 2 tablespoons Worcestershire sauce
- 1 tablespoon oyster sauce
- 1 tablespoon soy sauce
- 1 tablespoon apple sauce or grated apple
- 1 teaspoon brown sugar
- 1/2 teaspoon Dijon mustard
- Pinch of ground ginger
- For the Rice Bowls:
- 4 cups cooked Japanese short-grain rice (sushi rice is ideal)
- 2 tablespoons rice vinegar
- 1 tablespoon sugar
- 1/2 teaspoon salt
- 1 large yellow onion, thinly sliced
- 1/4 cup soy sauce
- 2 tablespoons mirin
- 1 tablespoon sugar
- 1 cup water or dashi (Japanese soup stock)
- 4 large eggs, lightly beaten
- 2 green onions, thinly sliced, for garnish
- Optional: toasted sesame seeds, for garnish
Preparing the Chicken Katsu:
- Prepare the Chicken: First, we need to get our chicken ready for its panko bath! Place each chicken breast between two sheets of plastic wrap. Using a meat mallet or rolling pin, pound the chicken to an even thickness of about 1/2 inch. This ensures even cooking and tenderizes the chicken. Don’t overdo it, though; we don’t want to tear the chicken.
- Set up the Breading Station: Now, let’s create our breading assembly line. In three separate shallow dishes, place the flour, beaten eggs, and panko breadcrumbs. In the flour, mix in the salt, pepper, garlic powder, and onion powder. This will season the chicken beautifully.
- Bread the Chicken: Take one chicken breast and dredge it in the flour, making sure to coat it completely. Shake off any excess flour. Next, dip the floured chicken into the beaten eggs, ensuring it’s fully coated. Finally, transfer the chicken to the panko breadcrumbs and press firmly to coat both sides completely. The panko should adhere well to the egg-covered chicken. Repeat this process with the remaining chicken breasts.
- Rest the Breaded Chicken: Place the breaded chicken breasts on a wire rack and let them rest for about 10-15 minutes. This helps the breading adhere better during frying and prevents it from falling off in the oil. This is a crucial step for crispy katsu!
Frying the Chicken Katsu:
- Heat the Oil: Pour vegetable oil into a large, heavy-bottomed skillet or Dutch oven to a depth of about 1 inch. Heat the oil over medium-high heat until it reaches a temperature of 350°F (175°C). You can use a deep-fry thermometer to monitor the temperature. If you don’t have a thermometer, you can test the oil by dropping a small piece of breadcrumb into it. If it sizzles and turns golden brown in about 15-20 seconds, the oil is ready.
- Fry the Chicken: Carefully place the breaded chicken breasts into the hot oil, being careful not to overcrowd the pan. Fry for about 3-4 minutes per side, or until the chicken is golden brown and cooked through. The internal temperature of the chicken should reach 165°F (74°C).
- Drain the Chicken: Remove the fried chicken from the oil and place it on a wire rack lined with paper towels to drain excess oil. This will help keep the katsu crispy.
- Slice the Chicken: Once the chicken has cooled slightly, slice it into 1-inch thick strips. This makes it easier to eat in the bowls.
Making the Katsu Sauce:
- Combine Ingredients: In a small saucepan, combine the ketchup, Worcestershire sauce, oyster sauce, soy sauce, apple sauce (or grated apple), brown sugar, Dijon mustard, and ground ginger.
- Simmer the Sauce: Place the saucepan over medium heat and bring the sauce to a simmer. Reduce the heat to low and simmer for about 5-7 minutes, stirring occasionally, until the sauce has thickened slightly and the flavors have melded together.
- Taste and Adjust: Taste the sauce and adjust the seasonings as needed. If you prefer a sweeter sauce, add a little more brown sugar. If you want a tangier sauce, add a splash of rice vinegar.
- Set Aside: Remove the sauce from the heat and set aside until ready to use. The sauce can be made ahead of time and stored in the refrigerator for up to a week.
Preparing the Rice and Seasoning:
- Cook the Rice: If you haven’t already, cook the Japanese short-grain rice according to package directions. Sushi rice is ideal for this recipe because it’s sticky and holds its shape well.
- Season the Rice: While the rice is still warm, in a small bowl, whisk together the rice vinegar, sugar, and salt until the sugar and salt are dissolved.
- Combine Rice and Seasoning: Gently fold the vinegar mixture into the cooked rice, being careful not to mash the rice. This will give the rice a slightly sweet and tangy flavor.
Making the Egg Mixture (Tamago Toji):
- Prepare the Onion: Thinly slice the yellow onion. This will add a sweet and savory flavor to the egg mixture.
- Cook the Onion: In a large skillet or saucepan, combine the soy sauce, mirin, sugar, and water (or dashi). Bring the mixture to a simmer over medium heat.
- Add the Onion: Add the sliced onion to the simmering sauce and cook until the onion is softened and translucent, about 5-7 minutes.
- Pour in the Eggs: Gently pour the lightly beaten eggs over the onion mixture in an even layer. Reduce the heat to low and cover the skillet. Cook until the eggs are set but still slightly soft, about 3-5 minutes. You want the eggs to be custardy, not rubbery.
Assembling the Katsu Bowls:
- Portion the Rice: Divide the seasoned rice among four bowls.
- Top with Egg Mixture: Spoon the egg and onion mixture (tamago toji) over the rice in each bowl. Be generous with the sauce!
- Arrange the Katsu: Arrange the sliced chicken katsu over the egg mixture.
- Drizzle with Katsu Sauce: Drizzle the katsu sauce generously over the chicken katsu.
- Garnish: Garnish with thinly sliced green onions and toasted sesame seeds, if desired.
- Serve Immediately: Serve the katsu bowls immediately while the chicken is still crispy and the rice is warm. Enjoy!
Conclusion:
This isn’t just another recipe; it’s a passport to a comforting, flavorful experience. The crispy, golden-brown katsu, the fluffy rice, the savory-sweet sauce – it all comes together in a symphony of textures and tastes that will leave you craving more. Trust me, once you try these Japanese Katsu Bowls, they’ll become a regular fixture in your meal rotation. They’re surprisingly easy to make, even on a busy weeknight, and the satisfaction of creating something so delicious from scratch is truly rewarding.
But why is this recipe a must-try? Beyond the incredible flavor profile, it’s the versatility that truly shines. You can easily adapt it to your preferences and dietary needs. Feeling adventurous? Try adding a sprinkle of toasted sesame seeds or a dash of chili flakes for a little extra kick. Want to lighten things up? Use chicken or even tofu instead of pork for the katsu. The possibilities are endless!
And speaking of variations, let’s talk serving suggestions. While these bowls are fantastic on their own, they’re even better with a few simple additions. A side of miso soup is a classic pairing that complements the richness of the katsu perfectly. Or, for a refreshing contrast, try serving them with a crisp cucumber salad dressed with rice vinegar and sesame oil. If you’re looking to add some extra veggies, steamed broccoli or edamame are excellent choices.
For a truly authentic experience, consider using Japanese short-grain rice, which has a slightly sticky texture that’s ideal for bowls. And don’t skimp on the quality of the tonkatsu sauce – it’s the key to that signature sweet and savory flavor. You can find it at most Asian grocery stores or even online. If you can’t find tonkatsu sauce, you can make your own by combining ketchup, Worcestershire sauce, soy sauce, oyster sauce, and a touch of sugar.
These bowls are also incredibly customizable to individual preferences. Some people like a lot of sauce, while others prefer just a drizzle. Some like a mountain of cabbage, while others prefer just a sprinkle. The beauty of this recipe is that you can adjust everything to your liking. Don’t be afraid to experiment and find what works best for you.
I’m confident that you’ll love these Japanese Katsu Bowls as much as I do. They’re the perfect combination of comfort food and culinary adventure. So, what are you waiting for? Gather your ingredients, put on some music, and get cooking! I promise you won’t regret it.
And most importantly, I want to hear about your experience! Did you try any variations? Did you add any special ingredients? What did your family and friends think? Share your photos and comments below. I can’t wait to see what you create! Happy cooking! I hope you enjoy this recipe for Japanese Katsu Bowls as much as I do.
Japanese Katsu Bowls: A Delicious & Easy Recipe
Crispy Chicken Katsu served over seasoned rice and a savory egg and onion mixture, all drizzled with homemade Katsu sauce. A comforting and flavorful Japanese-inspired meal.
Ingredients
Instructions
Recipe Notes
- Resting the breaded chicken before frying helps the breading adhere better.
- Use a thermometer to ensure the oil is at the correct temperature for frying.
- Don’t overcrowd the pan when frying the chicken.
- Sushi rice is ideal for this recipe because it’s sticky and holds its shape well.
- The Katsu sauce can be made ahead of time and stored in the refrigerator for up to a week.
- Adjust the seasonings in the Katsu sauce to your liking.
- Dashi is a Japanese soup stock made from dried kelp and bonito flakes. It can be found in most Asian grocery stores.
Leave a Comment