
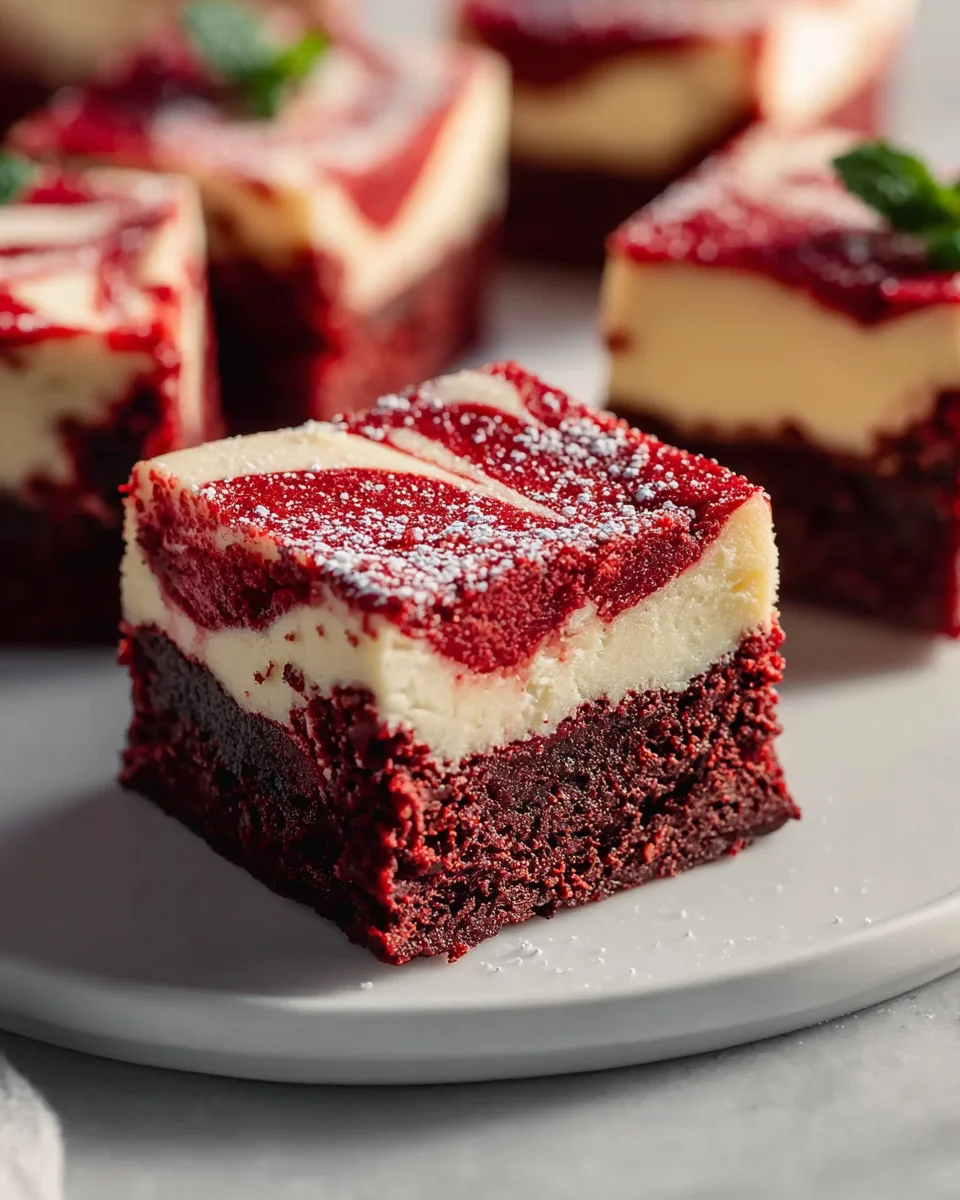
Classic Red Velvet Brownies With Cheesecake Layer
Oh my goodness, get ready to fall head over heels for something truly spectacular! I’m so excited to share my recipe for Classic Red Velvet Brownies With Cheesecake Layer. This isn’t just any ordinary brownie; we’re talking about a dessert mash-up that brings together the best of all worlds. Imagine the deep, rich cocoa notes and the iconic vibrant red hue of a classic red velvet, but in a fudgy, irresistible brownie form. Now, elevate that perfection even further with a luscious, tangy, and incredibly creamy cheesecake layer swirled right on top!
What makes this recipe so incredibly special? It’s the delightful dance of textures and flavors in every single bite. You get that satisfying chew from the fudgy brownie base, perfectly complemented by the silky smoothness and slight tang of the cheesecake. It’s a showstopper, a conversation starter, and guaranteed to impress anyone who tries it. You’ll absolutely love how these brownies manage to be both comforting and elegantly decadent all at once. They’re perfect for holidays, parties, or simply when you want to treat yourself to something extraordinary. Trust me, these aren’t just brownies; they’re an experience waiting to happen!

Ingredient Notes
Making these Classic Red Velvet Brownies with a luscious Cheesecake Layer is a true joy, and understanding your ingredients is the first step to perfection! I always emphasize using good quality ingredients, especially when it comes to a classic like this, as they truly make a difference in flavor and texture.
For the Red Velvet Brownie Layer:
- Unsweetened Cocoa Powder: For that signature red velvet flavor, a good quality unsweetened cocoa powder is essential. I personally love using Dutch-processed cocoa because it provides a darker, richer chocolate flavor and a more striking contrast to the red color. If you only have natural cocoa, it will still work beautifully, but the color might be slightly less intense.
- Red Food Coloring: This is where the “red” in red velvet comes from! I strongly recommend using a high-quality gel food coloring. It provides a much more vibrant and concentrated color without adding excess liquid to your batter, which can happen with liquid food coloring. A little goes a long way! While natural alternatives like beet powder exist, they often don’t achieve the classic vibrant red hue.
- Buttermilk: Don’t skip the buttermilk! It’s crucial for the tender crumb and the slight tang that balances the sweetness in red velvet. If you don’t have buttermilk on hand, you can easily make your own by adding 1 tablespoon of white vinegar or lemon juice to a measuring cup, then filling it with whole milk to the 1-cup line. Let it sit for 5-10 minutes until it slightly curdles before using.
- All-Purpose Flour: Standard all-purpose flour works perfectly here. Make sure to measure it correctly, either by weight or by the spoon-and-level method, to avoid dense brownies.
- Granulated Sugar & Brown Sugar: A combination provides the perfect balance of sweetness and moisture. The brown sugar adds a lovely chewiness to the brownies.
- Unsalted Butter: Always use unsalted butter so you can control the amount of salt in your recipe. If you only have salted butter, omit the added salt from the recipe.
- Eggs: Large eggs, at room temperature, help emulsify the batter smoothly.
- Vanilla Extract: Pure vanilla extract is always best for a rich, aromatic flavor.
- Chocolate Chips: Semi-sweet chocolate chips are my go-to for the brownie layer, adding extra pockets of melty chocolate goodness. You could also use dark chocolate chips if you prefer a less sweet brownie, or even white chocolate chips for a different flavor profile.
For the Cheesecake Layer:
- Full-Fat Cream Cheese: This is non-negotiable for a truly decadent cheesecake layer! Use brick-style, full-fat cream cheese, and make sure it’s softened to room temperature. This helps achieve a perfectly smooth, lump-free cheesecake batter. Avoid using spreadable cream cheese from a tub, as it has a different consistency and water content.
- Granulated Sugar: For sweetness.
- Large Egg: Binds the cheesecake layer together. Make sure it’s at room temperature for better incorporation.
- Vanilla Extract: Again, pure vanilla extract elevates the flavor of the cheesecake.
Step-by-Step Instructions
Get ready to create some magic in your kitchen! Follow these steps carefully, and you’ll be enjoying these incredible Red Velvet Brownies with a Cheesecake Layer in no time.
Step 1: Prepare Your Pan and Preheat Oven
- First things first, preheat your oven to 350°F (175°C).
- Line a 9×13 inch baking pan with parchment paper, leaving an overhang on the sides. This makes it super easy to lift the brownies out of the pan once they’re cooled. Lightly grease the parchment paper to prevent sticking.
Step 2: Make the Red Velvet Brownie Batter
- In a large microwave-safe bowl or a saucepan over low heat, melt the unsalted butter. Once melted, remove from heat and whisk in the granulated sugar and brown sugar until well combined.
- Allow the mixture to cool slightly for about 5 minutes. This prevents the eggs from scrambling when you add them.
- Once slightly cooled, whisk in the eggs one at a time, ensuring each egg is fully incorporated before adding the next. Stir in the vanilla extract, red gel food coloring (start with 1 teaspoon and add more if needed to reach your desired vibrancy), and buttermilk. Mix until everything is smooth and evenly colored.
- In a separate medium bowl, whisk together the all-purpose flour, unsweetened cocoa powder, baking soda, and salt.
- Gradually add the dry ingredients to the wet ingredients, mixing with a spatula or wooden spoon until just combined. Be careful not to overmix, as this can lead to tough brownies. A few streaks of flour are okay.
- Gently fold in the semi-sweet chocolate chips.
- Pour the red velvet brownie batter evenly into your prepared baking pan. Set aside.
Step 3: Prepare the Cheesecake Layer
- In a clean medium bowl, using an electric mixer, beat the softened full-fat cream cheese on medium speed until it’s completely smooth and creamy, with no lumps. This should take about 2-3 minutes.
- Add the granulated sugar to the cream cheese and beat again until well combined and smooth, scraping down the sides of the bowl as needed.
- Beat in the large egg and vanilla extract until just incorporated. Again, do not overmix at this stage; overmixing can introduce too much air, which can cause the cheesecake to crack during baking.
Step 4: Assemble and Swirl
- Carefully spoon dollops of the cheesecake mixture over the top of the red velvet brownie batter in the pan. Don’t worry about spreading it perfectly, as we’re going to swirl it.
- Using a knife or a skewer, gently swirl the cheesecake layer into the red velvet brownie batter. Create beautiful patterns by drawing lines and figure-eights, but avoid over-swirling, as you want distinct layers and swirls.
Step 5: Bake and Cool
- Place the pan into your preheated oven and bake for 35-45 minutes. The edges of the brownies should be set, the cheesecake layer should be mostly set with a slight jiggle in the center, and a toothpick inserted into the brownie portion (avoiding the cheesecake part) should come out with moist crumbs, not wet batter.
- Once baked, remove the pan from the oven and let the brownies cool completely on a wire rack at room temperature. This is crucial for the cheesecake layer to set properly.
- Once completely cool, transfer the pan to the refrigerator and chill for at least 3-4 hours, or ideally overnight, before slicing. Chilling makes them much easier to cut cleanly and ensures the cheesecake layer is firm.
Step 6: Slice and Serve
- Once thoroughly chilled, use the parchment paper overhang to lift the entire slab of brownies out of the pan.
- Using a sharp knife, cut into squares. For extra clean cuts, wipe your knife with a warm, damp cloth between each slice.
- Serve and enjoy these delightful treats!
Tips & Suggestions
To ensure your Classic Red Velvet Brownies with Cheesecake Layer turn out absolutely perfect every single time, I’ve gathered some of my favorite tips and suggestions. These small details can make a big difference!
- Room Temperature Ingredients are Key: For both the brownie and cheesecake layers, having your butter, eggs, and especially cream cheese at room temperature is crucial. Room temperature ingredients emulsify better, creating a smoother, more uniform batter for the brownies and a lump-free, silky cheesecake layer. Take your cream cheese out of the fridge at least an hour before you plan to bake.
- Don’t Overmix: This is a common pitfall! Overmixing the brownie batter can develop the gluten in the flour, resulting in tough, cakey brownies instead of fudgy ones. For the cheesecake layer, overmixing can incorporate too much air, which might lead to cracks on the surface during baking or cooling. Mix just until ingredients are combined.
- Quality Red Food Coloring: As mentioned in the ingredient notes, a good quality gel food coloring will give you the most vibrant and classic red velvet hue without affecting the batter consistency. Start with a teaspoon and add more in small increments until you achieve your desired shade.
- The Swirl: The beauty of these brownies is the marble effect. Don’t overdo the swirling! You want distinct streaks of red and white, not a fully mixed pink layer. A few gentle swirls with a knife or skewer are all you need.
- Patience is a Virtue (Especially with Cooling): I know it’s hard to wait, but allowing the brownies to cool completely at room temperature, and then chilling them in the refrigerator for at least 3-4 hours (or overnight), is non-negotiable. This allows the cheesecake layer to fully set, ensuring clean, beautiful slices and the best possible texture. Rushing this step will result in a messy, unset dessert.
- Clean Cuts Every Time: For picture-perfect squares, use a long, sharp knife. For the cleanest cuts, run the knife under hot water and wipe it clean between each slice. This prevents the cheesecake from sticking and dragging.
- Enhance the Flavor: For an even deeper chocolate flavor in the brownie layer, you can add about half a teaspoon of instant espresso powder or coffee granules to the dry ingredients. It won’t make the brownies taste like coffee, but it will intensify the chocolate.
- Variations & Toppings: While delicious on their own, you could drizzle melted white chocolate over the chilled brownies for an extra touch of decadence. A sprinkle of mini chocolate chips or a light dusting of powdered sugar before serving also looks lovely.
Storage
These Classic Red Velvet Brownies with Cheesecake Layer are absolutely irresistible, but if you happen to have any leftovers (which is rare in my house!), proper storage is key to keeping them fresh and delicious.
- Refrigeration is Essential: Because of the cream cheese in the cheesecake layer, these brownies must be stored in the refrigerator. Do not leave them out at room temperature for extended periods.
- Airtight Container: Place the sliced brownies in an airtight container. This prevents them from drying out, absorbing odors from other foods in the fridge, and helps maintain their moisture and texture.
- Shelf Life: Stored properly in the refrigerator, your Red Velvet Brownies with Cheesecake Layer will stay fresh and delicious for up to 5-7 days.
- Freezing for Longer Storage: If you want to enjoy them for an even longer period, these brownies freeze beautifully.
- Once the brownies are completely chilled and firm, cut them into individual squares.
- Wrap each square tightly in plastic wrap, then place the wrapped brownies in a freezer-safe airtight container or a heavy-duty freezer bag.
- They can be frozen for up to 2-3 months.
- To thaw, simply transfer the desired number of brownies from the freezer to the refrigerator and let them thaw overnight. You can also let them sit at room temperature for 30-60 minutes for a softer texture, but always bring them back to the fridge if not consumed immediately.
Final Thoughts
There’s something truly magical about the combination of flavors and textures in these Classic Red Velvet Brownies With Cheesecake Layer. The deep, rich cocoa of the fudgy red velvet brownie base pairs perfectly with the tangy, smooth cheesecake topping, creating a dessert that’s both elegant and incredibly comforting. It’s more than just a brownie; it’s a celebration of indulgence, a vibrant treat that promises to impress at any gathering or simply brighten your own day. I absolutely love how each bite of these Classic Red Velvet Brownies With Cheesecake Layer offers that signature red velvet tang, chocolate depth, and creamy cheesecake dreaminess all at once. Trust me, once you try them, you’ll understand why they’re destined to become a new favorite in your baking repertoire!
Irresistible Red Velvet Cheesecake Brownies Recipe
- Total Time: 1 hour 15 minutes
- Yield: 12 servings
Description
These Classic Red Velvet Brownies with a luscious Cheesecake Layer are a delightful mash-up of fudgy brownie and creamy cheesecake. Perfect for any occasion, they promise to impress with their vibrant color and rich flavors.
Ingredients
- Unsweetened Cocoa Powder
- Red Food Coloring
- Buttermilk
- All-Purpose Flour
- Granulated Sugar
- Brown Sugar
- Unsalted Butter
- Eggs
- Vanilla Extract
- Chocolate Chips
- Full-Fat Cream Cheese
- Granulated Sugar
- Large Egg
- Vanilla Extract
Instructions
- Preheat your oven to 350°F (175°C).
- Line a 9×13 inch baking pan with parchment paper, leaving an overhang on the sides. Lightly grease the parchment paper to prevent sticking.
- In a large microwave-safe bowl or a saucepan over low heat, melt the unsalted butter. Once melted, remove from heat and whisk in the granulated sugar and brown sugar until well combined.
- Allow the mixture to cool slightly for about 5 minutes.
- Once slightly cooled, whisk in the eggs one at a time, ensuring each egg is fully incorporated before adding the next. Stir in the vanilla extract, red gel food coloring, and buttermilk. Mix until everything is smooth and evenly colored.
- In a separate medium bowl, whisk together the all-purpose flour, unsweetened cocoa powder, baking soda, and salt.
- Gradually add the dry ingredients to the wet ingredients, mixing with a spatula or wooden spoon until just combined.
- Gently fold in the semi-sweet chocolate chips.
- Pour the red velvet brownie batter evenly into your prepared baking pan. Set aside.
- In a clean medium bowl, using an electric mixer, beat the softened full-fat cream cheese on medium speed until it's completely smooth and creamy.
- Add the granulated sugar to the cream cheese and beat again until well combined and smooth.
- Beat in the large egg and vanilla extract until just incorporated.
- Carefully spoon dollops of the cheesecake mixture over the top of the red velvet brownie batter in the pan.
- Using a knife or a skewer, gently swirl the cheesecake layer into the red velvet brownie batter.
- Place the pan into your preheated oven and bake for 35-45 minutes.
- Once baked, remove the pan from the oven and let the brownies cool completely on a wire rack at room temperature.
- Once completely cool, transfer the pan to the refrigerator and chill for at least 3-4 hours, or ideally overnight, before slicing.
- Once thoroughly chilled, use the parchment paper overhang to lift the entire slab of brownies out of the pan.
- Using a sharp knife, cut into squares. Serve and enjoy.
- Prep Time: 30 mins
- Cook Time: 45 mins
- Category: Dessert
- Method: Baking
- Cuisine: American
Nutrition
- Serving Size: 1 square
- Calories: 350
- Sugar: 25 g
- Sodium: 150 mg
- Fat: 20 g
- Saturated Fat: 10 g
- Unsaturated Fat: 8 g
- Trans Fat: 0 g
- Carbohydrates: 40 g
- Fiber: 2 g
- Protein: 5 g
- Cholesterol: 70 mg
Keywords: Ensure all ingredients are at room temperature for better emulsification. Avoid overmixing to maintain the fudgy texture of the brownies and prevent cracks in the cheesecake layer.
Leave a Comment