
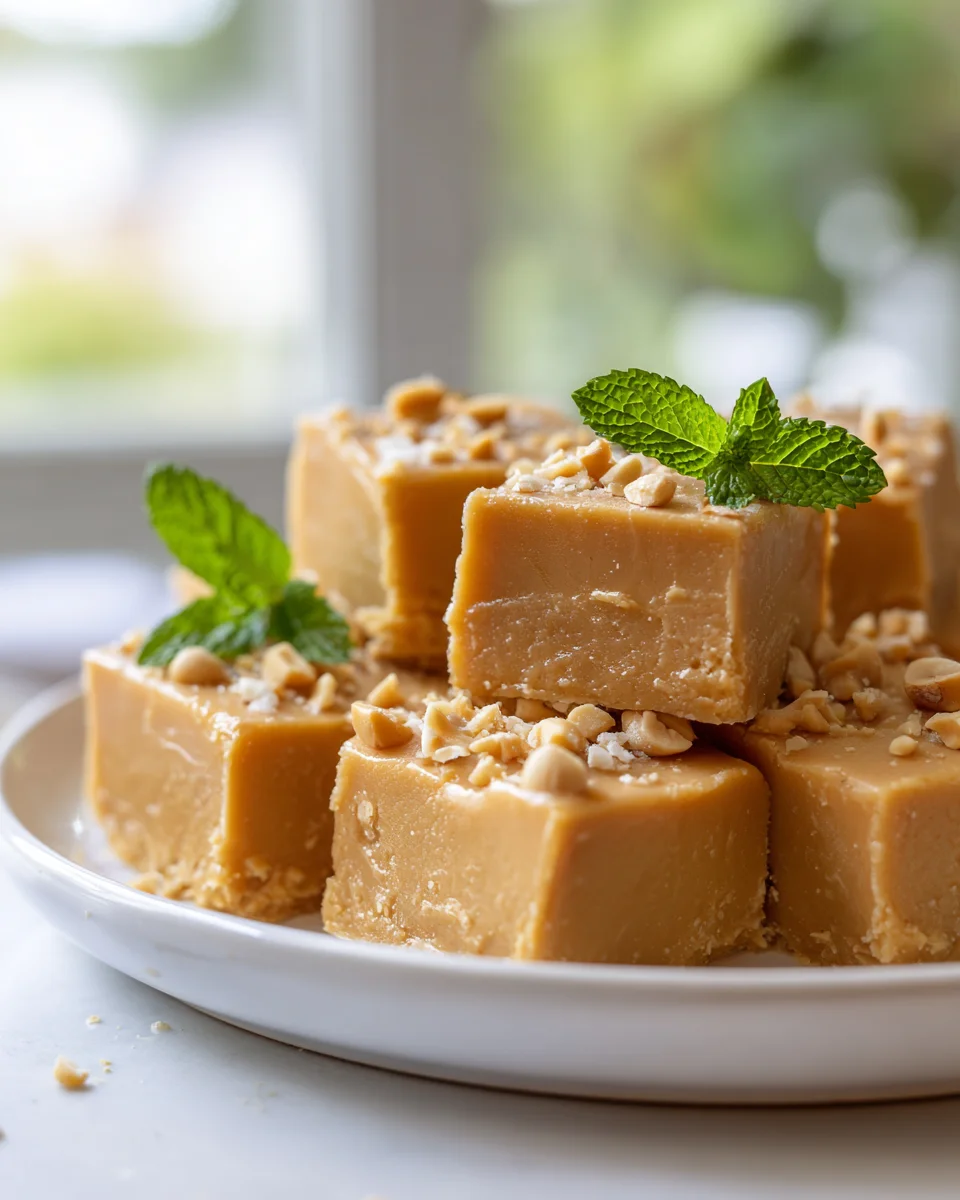
Peanut Butter Greek Yogurt Fudge (no Bake Dessert)
Hey there, dessert lovers! I’m absolutely thrilled to share one of my favorite go-to treats with you today: Peanut Butter Greek Yogurt Fudge (no Bake Dessert). Now, I know what you might be thinking – fudge sounds decadent and maybe a little complicated, but trust me, this recipe is a game-changer. What makes it so special, you ask? Well, for starters, it’s a no-bake wonder! That means no oven, no fuss, and minimal cleanup, which is a huge win in my book, especially when the sweet tooth strikes on a warm day.
You are going to absolutely adore this recipe because it perfectly marries the rich, comforting flavor of peanut butter with the tangy creaminess of Greek yogurt, creating a dessert that feels incredibly indulgent yet surprisingly light. It’s my secret weapon for satisfying those intense peanut butter cravings without feeling weighed down. This fudge is wonderfully creamy, melts in your mouth, and offers a delightful balance of sweet and slightly tart notes. Plus, with the Greek yogurt, you get a little protein boost in your dessert – how cool is that?
Essentially, we’re whipping up a dreamy blend of simple ingredients, pressing it into a pan, and letting the fridge do all the hard work. In just a short while, you’ll have a batch of irresistibly delicious fudge squares ready to enjoy, perfect for a quick snack, a delightful after-dinner treat, or even sharing with friends (if you can bear to part with them!). Get ready to fall in love with your new favorite easy dessert!

Ingredient Notes
I am so excited to share the ins and outs of making my absolutely delicious Peanut Butter Greek Yogurt Fudge! This no-bake dessert is a true lifesaver when you’re craving something sweet, creamy, and satisfying without needing to turn on the oven. The beauty of this fudge lies in its simplicity and the use of wholesome ingredients that come together to create a surprisingly decadent treat. Let’s dive into what you’ll need to make this magic happen in your kitchen.
Core Ingredients:
- Creamy Peanut Butter: This is the star of the show! I highly recommend using a natural, creamy peanut butter that has only peanuts and salt in its ingredient list. Avoid varieties with added sugars or oils if you can, as they can sometimes alter the texture and sweetness of the fudge. If your natural peanut butter has separated, be sure to give it a really good stir before measuring to ensure you get a consistent texture. You want that rich, deep peanut flavor to shine through!
- Plain Greek Yogurt: Another critical component. I always opt for full-fat plain Greek yogurt because it provides the ultimate creaminess and richness, which translates into a wonderfully smooth fudge texture. However, if you prefer, 0% or 2% fat plain Greek yogurt can certainly be used; just be aware that the fudge might be slightly less decadent and might require a tiny bit more thickener to reach the desired consistency. Make sure it’s plain and unsweetened, so you can control the sweetness yourself.
- Sweetener: My go-to choices are pure maple syrup or honey. Both add a lovely, natural sweetness and contribute to the smooth texture of the fudge. You can adjust the amount to your personal taste preference – I usually start with a conservative amount and add more if needed after a quick taste test. Agave nectar is another great alternative if you prefer.
- Vanilla Extract: A touch of vanilla goes a long way in enhancing all the other flavors and adding a warm, comforting note to the fudge. Don’t skip it!
- Pinch of Salt: Just a tiny pinch, especially if your peanut butter is unsalted, helps to balance the sweetness and really brings out the peanut butter flavor.
- Thickener (Optional but Recommended): For that perfect fudge-like texture, I often include a small amount of coconut flour or protein powder (vanilla or unflavored). Coconut flour is great because it’s super absorbent and helps firm up the mixture beautifully. Protein powder, especially a whey or casein blend, also works wonders for thickening and adds a little protein boost. If you’re using plant-based protein powder, make sure it’s one you enjoy the taste of. This ingredient is key if you want a firmer, more sliceable fudge.
Optional Add-Ins & Substitutions:
- Nut Butter Alternatives: If peanut butter isn’t your thing, or if you have an allergy, almond butter or cashew butter are fantastic substitutes. Just ensure they are creamy and natural for the best results.
- Yogurt Alternatives: While Greek yogurt is ideal, very thick plain dairy-free yogurts (like coconut or almond-based Greek-style yogurts) can also work. Just be mindful of their consistency and adjust the thickener as needed. Skyr is another excellent option for its thickness.
- Chocolate Topping: For an extra layer of deliciousness, you can melt some chocolate chips (dark, milk, or even white chocolate) with a tiny bit of coconut oil and spread it over the chilled fudge before cutting. It sets up beautifully and adds a lovely contrast.
- Cocoa Powder: For a chocolate peanut butter swirl or an all-out chocolate peanut butter fudge, mix in a tablespoon or two of unsweetened cocoa powder with the main ingredients.
- Chopped Nuts: Stir in some chopped peanuts, almonds, or walnuts for added crunch and texture.
Understanding these ingredients and their potential variations will help you tailor this no-bake Peanut Butter Greek Yogurt Fudge to your exact preferences. It’s all about creating a dessert that you absolutely love!
Step-by-Step Instructions
Making this no-bake Peanut Butter Greek Yogurt Fudge is incredibly straightforward, which is one of the reasons I love it so much! You’ll be amazed at how quickly these simple ingredients transform into a decadent treat. Here’s how I make it:
- Prepare Your Pan: First things first, you’ll want to get your pan ready. I usually use an 8×8 inch square baking pan or a loaf pan, depending on how thick I want my fudge. Line your chosen pan with parchment paper, leaving an overhang on the sides. This overhang is your best friend later on because it makes lifting the set fudge out of the pan incredibly easy. A little trick I use is to lightly spray the pan with cooking spray before laying down the parchment paper; this helps the paper stick and stay in place while you’re spreading the fudge mixture.
- Combine Wet Ingredients: In a medium-sized mixing bowl, combine the star ingredients: your creamy natural peanut butter, the plain Greek yogurt, maple syrup (or honey), and the vanilla extract. If your peanut butter is very thick or cold, you might find it easier to mix if it’s closer to room temperature.
- Mix Until Smooth: Using a spatula or a sturdy spoon, mix these ingredients together really well. You want to keep going until the mixture is completely smooth and uniform. There shouldn’t be any streaks of just yogurt or just peanut butter. It might take a minute or two of vigorous stirring to get it perfectly combined, but trust me, it’s worth the effort for that smooth fudge texture.
- Add Salt and Thickener: Now, add your pinch of salt. If you’re using coconut flour or protein powder as a thickener (which I highly recommend for a firmer fudge), gradually add it into the mixture while stirring continuously. Coconut flour, especially, is very absorbent, so I usually add it a tablespoon at a time until I reach a thick, spreadable consistency that resembles soft fudge or thick frosting. The mixture should be firm enough to hold its shape when you scoop it, but still smooth enough to spread easily. If it seems too thin, add a tiny bit more thickener; if too thick, a teaspoon of milk or a touch more yogurt can loosen it up.
- Taste and Adjust: This is your chance to make it perfect for your palate! Give the mixture a quick taste. Does it need more sweetness? Add another drizzle of maple syrup. Want more peanut butter intensity? Stir in another spoonful. Adjust until it’s just right for you.
- Press into Pan: Once you’re happy with the taste and consistency, spoon the fudge mixture into your prepared pan. Use your spatula to spread it evenly across the bottom, making sure to press it down firmly into all the corners. You want a compact, smooth layer. For an extra smooth top, you can lightly dampen your spatula or the back of a spoon and glide it over the surface.
- Optional Chocolate Topping: If you’re adding a chocolate topping, now’s the time! In a microwave-safe bowl, melt your chocolate chips with a tiny bit (about half a teaspoon) of coconut oil until smooth. Pour this melted chocolate over the peanut butter fudge layer and gently spread it to the edges. This adds a beautiful finish and another layer of flavor!
- Chill Time: This is a no-bake dessert, so chilling is crucial for setting. Place the pan in the refrigerator for at least 3-4 hours, but ideally overnight. The longer it chills, the firmer and more fudge-like it will become. Don’t rush this step!
- Cut and Serve: Once completely firm, use the parchment paper overhang to carefully lift the entire slab of fudge out of the pan onto a cutting board. Remove the parchment paper, and using a sharp knife, cut the fudge into squares or rectangles of your desired size. I usually wipe my knife clean between cuts for really neat edges. Now, it’s ready to enjoy!
There you have it! Delicious, no-bake Peanut Butter Greek Yogurt Fudge, ready to delight your taste buds. Enjoy every creamy bite!
Tips & Suggestions
I’ve made this Peanut Butter Greek Yogurt Fudge countless times, and over that time, I’ve picked up a few tips and tricks that really make a difference. These suggestions will help you achieve the perfect texture, explore flavor variations, and troubleshoot any little hiccups along the way. My goal is always to make sure your no-bake dessert experience is as fantastic as mine!
- Achieving the Perfect Consistency:
- If your mixture is too thin: Don’t panic! This usually means your yogurt might have been a bit too watery, or you might need a little more thickener. Simply add another tablespoon of coconut flour or protein powder, stir well, and let it sit for a few minutes to absorb before checking the consistency again. Remember, coconut flour is very absorbent, so add it gradually.
- If your mixture is too thick: If it’s more like a crumbly dough than a smooth spread, you can add a tiny splash (about a teaspoon at a time) of milk (dairy or non-dairy) or a little more Greek yogurt to loosen it up. Mix well until it reaches a smooth, spreadable fudge-like texture.
- Room Temperature Ingredients: Using peanut butter and yogurt that are closer to room temperature can make mixing much easier and result in a smoother, more uniform fudge mixture.
- Sweetness Adjustment is Key:
- Since plain Greek yogurt is tart and natural peanut butter can be unsweetened, tasting the mixture before chilling is crucial. I always start with the recommended amount of sweetener and then add more if I think it needs it. Keep in mind that flavors mellow slightly when chilled, so it’s okay if it tastes a tiny bit sweeter than perfect when you’re mixing.
- If you’re using a flavored protein powder, account for its sweetness and adjust your maple syrup or honey accordingly.
- Flavor Variations to Explore:
- Chocolate Swirl: After spreading the peanut butter fudge base, drizzle some melted chocolate or a spoonful of a cocoa powder/sweetener paste over the top. Use a knife or a skewer to swirl it through the peanut butter layer before chilling for a beautiful marble effect.
- Berry Blast: Swirl in a tablespoon or two of sugar-free berry jam or finely mashed fresh berries into the mixture for a fruity twist.
- Spiced Fudge: Add a pinch of cinnamon, nutmeg, or even a tiny amount of pumpkin pie spice for a warm, comforting flavor profile, especially during autumn.
- Nutty Crunch: Fold in some finely chopped peanuts, almonds, or even a handful of mini chocolate chips into the fudge mixture before pressing it into the pan for added texture.
- Pan Size Matters:
- A smaller pan (like a loaf pan or an 8×4 inch pan) will yield thicker fudge squares, while a larger pan (like an 8×8 inch square pan) will give you thinner pieces. Choose based on your preference for fudge thickness!
- For the Cleanest Cuts:
- Always ensure your fudge is thoroughly chilled and firm before attempting to cut it.
- Use a sharp knife, and for super neat edges, run the knife under hot water and wipe it clean between each cut. This helps prevent sticking and crumbling.
- Serving Suggestion:
- This fudge is definitely best served chilled, straight from the refrigerator. It softens quickly at room temperature, especially on a warm day.
With these tips in mind, you’re all set to create a perfect batch of Peanut Butter Greek Yogurt Fudge. Don’t be afraid to experiment and make it your own!
Storage
One of the many things I adore about this Peanut Butter Greek Yogurt Fudge is how wonderfully it stores. Being a no-bake dessert, its structure relies on chilling, and that makes it very fridge-friendly. It’s perfect for making ahead of time, which is a huge bonus when you’re planning for a party or just want to have a healthy-ish treat ready to go throughout the week. Here’s how I recommend storing your delicious fudge:
Refrigeration:
- How to Store: Once you’ve cut your fudge into squares, arrange them in a single layer in an airtight container. If you need to stack layers, I highly recommend placing a piece of parchment paper between each layer to prevent the fudge pieces from sticking to each other, especially if you have a chocolate topping.
- Duration: Stored correctly in the refrigerator, this Peanut Butter Greek Yogurt Fudge will stay fresh and delicious for about 5 to 7 days. The Greek yogurt keeps it moist, and the thick texture holds up beautifully.
- Best Served Chilled: This fudge is definitely at its best when enjoyed cold, straight from the fridge. If it sits out at room temperature for too long, especially on a warm day, it will start to soften quite a bit. If that happens, simply pop it back into the fridge for a short while to firm up again.
Freezing:
- How to Store: Yes, you can absolutely freeze this fudge! This is fantastic if you want to make a big batch or save some for a later craving. Place the individual fudge squares on a baking sheet lined with parchment paper and freeze them for about an hour, or until they are firm. This “flash freezing” prevents them from sticking together. Once firm, transfer the frozen fudge pieces to a freezer-safe airtight container or a heavy-duty freezer bag. Again, if stacking, use parchment paper between layers.
- Duration: When properly stored in the freezer, your Peanut Butter Greek Yogurt Fudge will keep well for up to 1 to 2 months. Beyond that, the quality might start to decline slightly, but it would likely still be safe to eat.
- Thawing and Enjoying: To enjoy frozen fudge, you have a couple of options. You can transfer a piece or two to the refrigerator and let it thaw for a few hours until it’s soft enough to eat. Alternatively, if you like a firmer, almost ice cream-like texture, you can eat it straight from the freezer – just let it sit out for about 5-10 minutes to soften slightly before biting into it. I often prefer it this way on a hot day!
Proper storage ensures that you can enjoy your homemade Peanut Butter Greek Yogurt Fudge for days, or even weeks, to come. It’s a convenient, healthy-ish, and incredibly satisfying treat to have on hand!
Final Thoughts
And there you have it! I truly hope you’re as excited as I am about this incredible Peanut Butter Greek Yogurt Fudge (no Bake Dessert). What makes this recipe a true standout in your dessert repertoire is its effortless combination of convenience, health benefits, and absolutely irresistible flavor. Forget turning on the oven or spending hours in the kitchen – this no-bake wonder comes together in a flash, making it perfect for those spontaneous sweet cravings or when you need a quick treat.
I find myself constantly reaching for this recipe because it strikes the perfect balance: the creamy richness of peanut butter meets the tangy goodness of Greek yogurt, all while delivering a satisfying fudge-like texture without any of the guilt. It’s packed with protein, incredibly versatile, and honestly, just a pure joy to eat. So, go ahead, treat yourself and your loved ones to a batch of this delightful Peanut Butter Greek Yogurt Fudge (no Bake Dessert). I promise you won’t be disappointed!
Irresistible No-Bake Peanut Butter Greek Yogurt Fudge
- Total Time: 15 minutes
- Yield: 16 servings 1x
Description
This no-bake Peanut Butter Greek Yogurt Fudge is a creamy, indulgent treat that satisfies your sweet tooth without the guilt. With its rich peanut butter flavor and a hint of tangy Greek yogurt, it’s the perfect dessert for any occasion.
Ingredients
- 1 cup Creamy Peanut Butter
- 1 cup Plain Greek Yogurt
- 1/4 cup Sweetener (pure maple syrup or honey)
- 1 teaspoon Vanilla Extract
- Pinch of Salt
- 1–2 tablespoons Thickener (coconut flour or protein powder, optional)
- Optional Add-Ins: Nut butter alternatives (almond butter or cashew butter), yogurt alternatives (thick plain dairy-free yogurts), chocolate topping (chocolate chips and coconut oil), cocoa powder, chopped nuts
Instructions
- Prepare Your Pan: Line an 8×8 inch square baking pan or a loaf pan with parchment paper, leaving an overhang on the sides.
- Combine Wet Ingredients: In a medium-sized mixing bowl, combine creamy peanut butter, plain Greek yogurt, maple syrup (or honey), and vanilla extract.
- Mix Until Smooth: Stir the mixture until it is completely smooth and uniform.
- Add Salt and Thickener: Add a pinch of salt and gradually mix in the thickener until you reach a thick, spreadable consistency.
- Taste and Adjust: Taste the mixture and adjust sweetness or peanut butter intensity as desired.
- Press into Pan: Spoon the mixture into the prepared pan and spread it evenly, pressing down firmly.
- Optional Chocolate Topping: Melt chocolate chips with a bit of coconut oil and pour over the fudge layer, spreading it gently.
- Chill Time: Refrigerate for at least 3-4 hours or ideally overnight until firm.
- Cut and Serve: Lift the fudge out of the pan using the parchment paper and cut into squares.
- Prep Time: 15 mins
- Cook Time: 0 mins
- Category: Dessert
- Method: No-Bake
- Cuisine: American
Nutrition
- Serving Size: 1 square
- Calories: 120
- Sugar: 6 g
- Sodium: 50 mg
- Fat: 8 g
- Saturated Fat: 2 g
- Unsaturated Fat: 6 g
- Trans Fat: 0 g
- Carbohydrates: 10 g
- Fiber: 1 g
- Protein: 4 g
- Cholesterol: 0 mg
Keywords: For a firmer fudge, use coconut flour or protein powder as a thickener. Adjust sweetness to your taste and experiment with add-ins like chocolate or nuts for variety.

Leave a Comment