
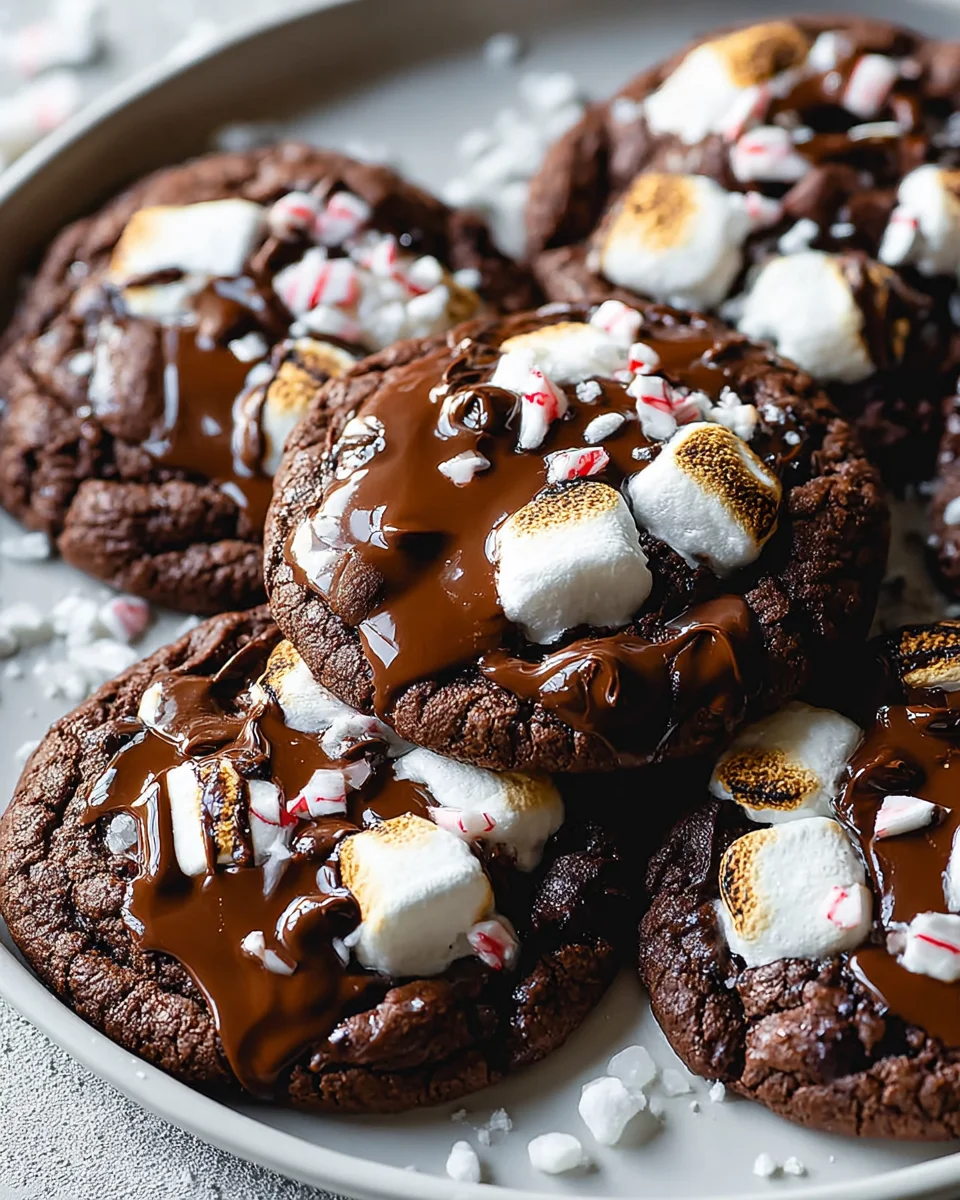
Hot Cocoa Cookies
Oh, my goodness, I am so excited to share this recipe with you! If you’re anything like me, there’s nothing quite like curling up with a warm mug of hot cocoa on a chilly day. But what if I told you we could capture all that comforting, chocolatey goodness, complete with those delightful gooey marshmallows, and transform it into a chewy, decadent cookie? That’s exactly what we’re doing with these incredible Hot Cocoa Cookies!
What makes these cookies so special, you ask? Well, it’s not just a chocolate cookie; it’s an experience. We’re talking rich, deep chocolate flavor that sings with cocoa, a delicate melt-in-your-mouth texture, and then – BAM! – that perfect, slightly toasted marshmallow surprise in every single bite. It’s like all the best parts of your favorite winter beverage decided to get together and become the most irresistible treat you’ve ever had.
You are absolutely going to adore these cookies because they bring pure joy and nostalgia with every bite. They’re unbelievably easy to whip up, making them perfect for a cozy afternoon bake, a holiday cookie swap, or just because you deserve a little extra warmth in your day. Imagine a soft, fudgy chocolate cookie, often with a lovely crackle top, bursting with that unmistakable hot cocoa vibe, crowned with a perfectly gooey, slightly caramelized marshmallow. It’s a hug in cookie form, and I promise, you’ll be making them again and again!

Ingredient Notes
Crafting the perfect batch of Hot Cocoa Cookies starts with understanding the role each ingredient plays. I always recommend using high-quality ingredients, as it truly makes a difference in the final flavor and texture of your cookies.
- Unsweetened Cocoa Powder: This is the star of our Hot Cocoa Cookies! Don’t skimp here; a good quality unsweetened cocoa powder will give you a deep, rich chocolate flavor that’s reminiscent of a gourmet hot cocoa. While you could use sweetened cocoa powder, you’d need to adjust the sugar content in the recipe significantly, which I don’t recommend as it can throw off the texture. If you only have Dutch-processed cocoa, that works beautifully too, often creating an even darker cookie.
- All-Purpose Flour: My go-to for most cookie recipes. It provides the structure for our delicious Hot Cocoa Cookies. If you’re looking for a gluten-free option, a 1:1 gluten-free baking blend that contains xanthan gum usually works well as a direct substitute. Just make sure to measure by weight (grams) if possible for accuracy.
- Unsalted Butter: Softened to room temperature, butter is crucial for a tender, chewy cookie. Using unsalted butter allows me to control the amount of salt in the recipe. If you only have salted butter, you can use it, but reduce the added salt by about ¼ teaspoon. For a dairy-free alternative, a good quality plant-based butter substitute that’s designed for baking can be used.
- Granulated Sugar & Light Brown Sugar: The combination of these two sugars is what gives these Hot Cocoa Cookies their incredible texture. Granulated sugar contributes to crisp edges, while light brown sugar, with its molasses content, keeps the cookies soft and chewy. Don’t skip the brown sugar, as it’s key for that delightful chewiness!
- Large Eggs: At room temperature, eggs emulsify better with the butter and sugar, leading to a smoother, more uniform dough. They add moisture, richness, and act as a binder. If you need an egg substitute, flax eggs (1 tablespoon ground flaxseed + 2.5 tablespoons water per egg, let sit for 5 minutes) can work, though they might slightly alter the texture of the cookies.
- Vanilla Extract: A touch of pure vanilla extract enhances all the other flavors, especially the chocolate. It’s a must-have for depth of flavor in these Hot Cocoa Cookies.
- Baking Soda: Our leavening agent! Baking soda reacts with the acidic cocoa powder and brown sugar to help the cookies rise and achieve that classic soft texture. Ensure your baking soda isn’t expired for the best results.
- Salt: A pinch of salt is essential to balance the sweetness and bring out the rich chocolate flavor. It really makes the cocoa sing!
- Semi-Sweet Chocolate Chips: While optional, I love folding in some semi-sweet chocolate chips into the dough. They melt beautifully, adding pockets of gooey chocolate to every bite, enhancing the “hot cocoa” experience. Dark chocolate chips would also be fantastic if you prefer a less sweet cookie.
- Mini Marshmallows: The quintessential topping for Hot Cocoa Cookies! These little guys are what truly transform a chocolate cookie into a “hot cocoa” cookie. I prefer mini marshmallows for their even melt and toasting, but you can certainly cut larger marshmallows into smaller pieces if that’s all you have.
Step-by-Step Instructions
Let’s get baking! Follow these steps to create a batch of incredibly delicious Hot Cocoa Cookies that will surely impress. Remember, baking is a joyful process, so have fun with it!
- Prepare Your Workspace: First things first, preheat your oven to 350°F (175°C). Line two large baking sheets with parchment paper or silicone baking mats. This ensures your Hot Cocoa Cookies won’t stick and makes for easy cleanup.
- Combine Dry Ingredients: In a medium bowl, whisk together the all-purpose flour, unsweetened cocoa powder, baking soda, and salt. Make sure there are no lumps, especially in the cocoa powder, to ensure even distribution throughout the dough. Set this bowl aside for now.
- Cream Wet Ingredients: In a large mixing bowl, using an electric mixer (stand mixer with paddle attachment or a hand mixer), cream together the softened unsalted butter, granulated sugar, and light brown sugar on medium speed until the mixture is light, fluffy, and pale in color, about 2-3 minutes. This step incorporates air, which is key for soft cookies.
- Add Eggs and Vanilla: Beat in the room temperature eggs one at a time, mixing well after each addition until fully incorporated. Scrape down the sides of the bowl as needed to ensure everything is well combined. Stir in the vanilla extract until just mixed through.
- Combine Wet and Dry: Gradually add the dry ingredient mixture to the wet ingredients, mixing on low speed until just combined. Be careful not to overmix! Overmixing develops the gluten in the flour, which can lead to tough Hot Cocoa Cookies. Stop mixing as soon as you no longer see streaks of flour.
- Fold in Chocolate Chips (Optional): If you’re using semi-sweet chocolate chips, gently fold them into the dough with a spatula until evenly distributed.
- Chill the Dough: This step is crucial for Hot Cocoa Cookies that hold their shape and have a richer flavor. Cover the bowl with plastic wrap and chill the dough in the refrigerator for at least 30 minutes, or up to 2 hours. Chilling prevents the cookies from spreading too much and allows the flavors to meld beautifully.
- Scoop and Bake: Once the dough is chilled, use a 1.5 to 2-tablespoon cookie scoop to drop rounded balls of dough onto the prepared baking sheets, leaving about 2 inches between each cookie.
- Bake the Hot Cocoa Cookies: Bake for 8-10 minutes, or until the edges are set but the centers still look slightly soft. The exact time can vary depending on your oven.
- Add Marshmallows: Immediately after taking the cookies out of the oven, quickly place 3-4 mini marshmallows on top of each warm cookie. Return the baking sheets to the oven for another 1-2 minutes, or until the marshmallows are puffed and slightly melted. For a toasted marshmallow look, you can briefly place them under the broiler for 30 seconds to 1 minute, but watch them very carefully as they can burn quickly! Alternatively, a kitchen torch works wonders here for that perfect golden brown toast.
- Cool and Enjoy: Let the Hot Cocoa Cookies cool on the baking sheets for 5 minutes before carefully transferring them to a wire rack to cool completely. The marshmallows will be sticky when warm, so handle with care!
Tips & Suggestions
I’ve learned a few tricks over the years that can elevate your Hot Cocoa Cookies from good to absolutely amazing. Here are my top tips and suggestions to help you achieve cookie perfection:
- Don’t Overmix the Dough: This is a golden rule for most cookie recipes, and it’s especially true for our Hot Cocoa Cookies. Overmixing develops the gluten in the flour, resulting in tough, dry cookies instead of the soft, chewy texture we’re aiming for. Mix until just combined, and no more!
- Embrace Room Temperature Ingredients: Believe me, it makes a huge difference! Softened butter and room temperature eggs create a smoother emulsion, leading to a more consistent dough and a better texture in your baked cookies. Plan ahead and take them out of the fridge about 30-60 minutes before you start.
- Quality Cocoa Powder Matters: Since cocoa powder is a primary flavor in these Hot Cocoa Cookies, investing in a good quality unsweetened cocoa powder will pay dividends. It provides a deeper, richer chocolate flavor that truly stands out.
- Chill Your Dough: While it might be tempting to skip this step, don’t! Chilling the dough for at least 30 minutes (or even longer!) helps prevent the cookies from spreading too much in the oven, leading to a thicker, chewier cookie. It also allows the flavors to deepen, making your Hot Cocoa Cookies taste even better.
- The Marshmallow Touch: For that ultimate “hot cocoa” experience, don’t just melt the marshmallows; give them a slight toast! A kitchen torch is my secret weapon for perfectly golden-brown, gooey marshmallows. If you don’t have one, a quick 30-second stint under the broiler (watch like a hawk!) will do the trick.
- Flavor Variations: Feel free to experiment! A pinch of cinnamon or a tiny bit of espresso powder can enhance the chocolate flavor. You could also try adding a few drops of peppermint extract to the dough for a delightful mint hot cocoa cookie twist. White chocolate chips or chunks would also be a lovely addition to the dough.
- Don’t Overbake: For soft and chewy Hot Cocoa Cookies, it’s better to slightly underbake them. The edges should be set, but the centers might still look a little soft. They will continue to set as they cool on the baking sheet.
- Portioning for Consistency: Using a cookie scoop ensures that all your Hot Cocoa Cookies are uniform in size. This means they’ll bake evenly, and you won’t have some burnt while others are still raw.
Storage
You’ve baked a delicious batch of Hot Cocoa Cookies, and now you want to make sure they stay fresh and delightful. Here’s how I handle storage to keep them tasting their best:
- At Room Temperature (Plain Cookies): If you’re storing the Hot Cocoa Cookies without the marshmallow topping (perhaps you’re adding it just before serving), they can be kept in an airtight container at room temperature for up to 3-4 days. Placing a slice of plain bread in the container can help keep them soft, as the cookies will absorb moisture from the bread.
- At Room Temperature (With Marshmallow Topping): Once the marshmallows are added and cooled, these Hot Cocoa Cookies are best enjoyed within 1-2 days. The marshmallows tend to get a bit sticky and can dry out or become chewier over time. Store them in an airtight container at room temperature, ideally in a single layer if possible, or with parchment paper between layers to prevent them from sticking together. Refrigerating cookies with marshmallows can sometimes make the marshmallows harden, so I usually avoid that unless absolutely necessary.
- Freezing Baked Hot Cocoa Cookies: These cookies freeze remarkably well, especially if they don’t have the marshmallow topping yet. Once completely cooled, place the cookies in a single layer on a baking sheet and freeze for about an hour until solid. Then, transfer them to a freezer-safe airtight container or heavy-duty freezer bag, separating layers with parchment paper. They will keep for up to 2-3 months. Thaw at room temperature. If you want to add marshmallows later, do so after thawing and just before serving, warming them slightly in the oven or using a torch.
- Freezing Unbaked Dough: This is a fantastic make-ahead option! Scoop the cookie dough into balls and place them on a parchment-lined baking sheet. Freeze until solid (about 1-2 hours). Then, transfer the frozen dough balls to a freezer-safe airtight container or freezer bag. The dough can be stored for up to 3 months. When you’re ready to bake, you can bake them directly from frozen, adding a couple of extra minutes to the baking time. Then, add your marshmallows as per the instructions above.
Final Thoughts
I truly believe these Hot Cocoa Cookies are more than just a sweet treat; they’re a warm hug in cookie form. What makes this recipe a definite must-try is its unique ability to perfectly capture the comforting essence of a steaming mug of hot cocoa, but in a delightfully chewy, chocolatey bite. I find myself reaching for them whenever I need a little moment of cozy bliss. They are wonderfully satisfying, easy to make, and always bring a smile. Go ahead, give these incredible Hot Cocoa Cookies a try – I promise you won’t regret it!
Hot Cocoa Cookies: The Ultimate Chocolate Winter Treat
- Total Time: 25 minutes
- Yield: 24 cookies 1x
Description
Indulge in the delightful experience of Hot Cocoa Cookies, capturing the comforting essence of a warm mug of hot cocoa in a chewy, chocolatey bite. These cookies are perfect for cozy afternoons, holiday gatherings, or simply treating yourself to a sweet moment.
Ingredients
- 1 cup Unsweetened Cocoa Powder
- 1 1/2 cups All-Purpose Flour
- 1/2 teaspoon Baking Soda
- 1/4 teaspoon Salt
- 1/2 cup Unsalted Butter, softened to room temperature
- 1/2 cup Granulated Sugar
- 1/2 cup Light Brown Sugar
- 2 Large Eggs, at room temperature
- 1 teaspoon Vanilla Extract
- 1 cup Semi-Sweet Chocolate Chips (optional)
- 1 cup Mini Marshmallows
Instructions
- Preheat your oven to 350°F (175°C). Line two large baking sheets with parchment paper or silicone baking mats.
- In a medium bowl, whisk together the all-purpose flour, unsweetened cocoa powder, baking soda, and salt. Set this bowl aside.
- In a large mixing bowl, cream together the softened unsalted butter, granulated sugar, and light brown sugar on medium speed until light and fluffy, about 2-3 minutes.
- Beat in the room temperature eggs one at a time, mixing well after each addition. Stir in the vanilla extract until just mixed through.
- Gradually add the dry ingredient mixture to the wet ingredients, mixing on low speed until just combined.
- If using, gently fold in the semi-sweet chocolate chips into the dough with a spatula until evenly distributed.
- Cover the bowl with plastic wrap and chill the dough in the refrigerator for at least 30 minutes, or up to 2 hours.
- Use a 1.5 to 2-tablespoon cookie scoop to drop rounded balls of dough onto the prepared baking sheets, leaving about 2 inches between each cookie.
- Bake for 8-10 minutes, or until the edges are set but the centers still look slightly soft.
- Immediately after taking the cookies out of the oven, place 3-4 mini marshmallows on top of each warm cookie. Return the baking sheets to the oven for another 1-2 minutes, or until the marshmallows are puffed and slightly melted.
- Let the Hot Cocoa Cookies cool on the baking sheets for 5 minutes before transferring them to a wire rack to cool completely.
- Prep Time: 15 mins
- Cook Time: 10 mins
- Category: Dessert
- Method: Baking
- Cuisine: American
Nutrition
- Serving Size: 1 cookie
- Calories: 150
- Sugar: 10 g
- Sodium: 50 mg
- Fat: 7 g
- Saturated Fat: 4 g
- Unsaturated Fat: 2 g
- Trans Fat: 0 g
- Carbohydrates: 20 g
- Fiber: 1 g
- Protein: 2 g
- Cholesterol: 20 mg
Keywords: Don't overmix the dough to ensure soft, chewy cookies. Use high-quality cocoa powder for the best flavor, and consider chilling the dough to prevent spreading.


Leave a Comment