
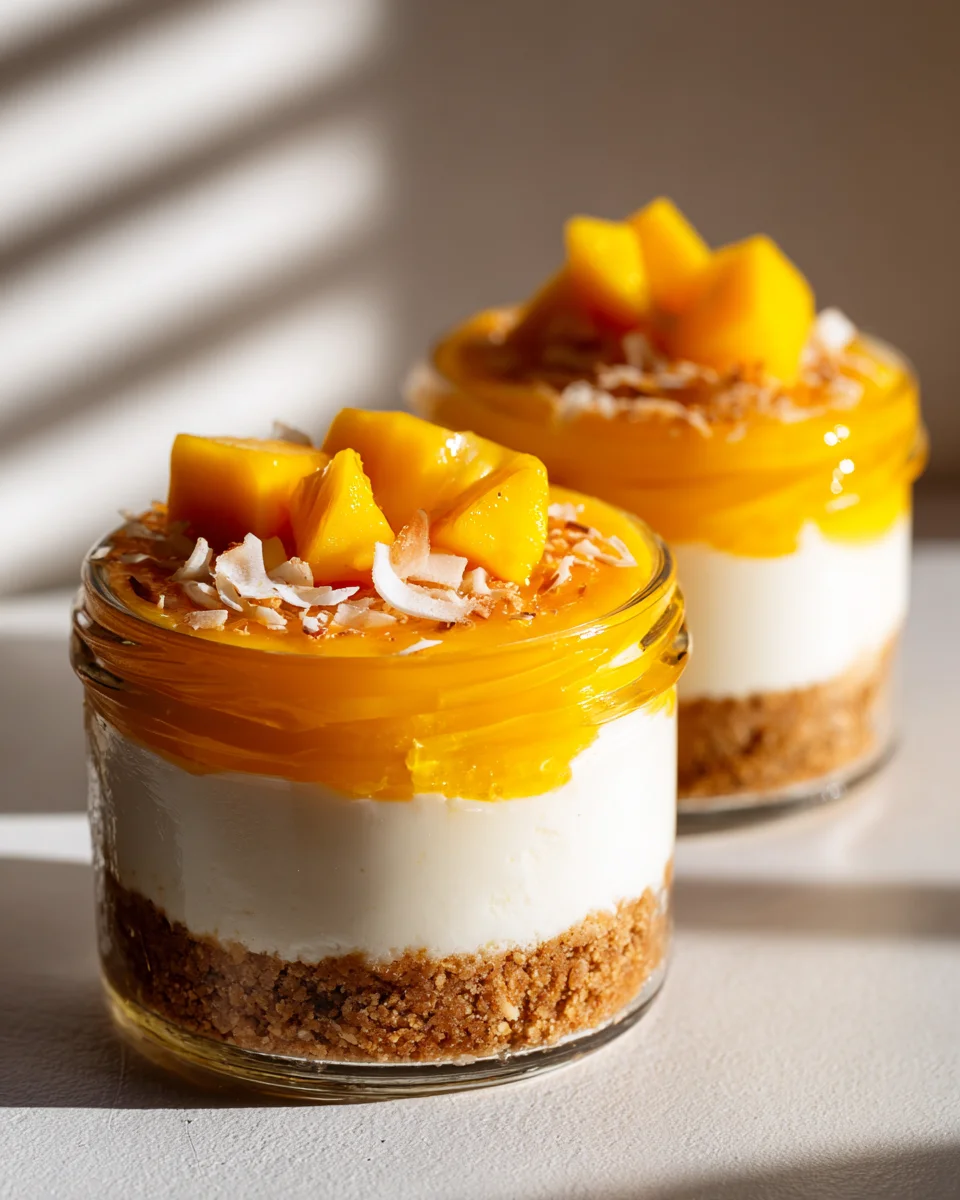
Tropical Mango High Protein Cheesecake Jars
Oh, prepare yourselves for a true game-changer in your dessert repertoire! I am absolutely thrilled to introduce you to a recipe that I know you’re going to fall head over heels for: Tropical Mango High Protein Cheesecake Jars.
What makes these jars so incredibly special, you ask? Well, imagine a burst of sun-drenched tropical mango flavor, combined with the creamy, dreamy texture of cheesecake, all while giving you a fantastic protein boost! This isn’t just any dessert; it’s a guilt-free indulgence that perfectly marries health and incredible taste. I’ve designed these to be a delightful escape, a mini vacation in every spoonful, without derailing your wellness goals.
You’ll absolutely adore these because they’re refreshingly light yet incredibly satisfying. They’re perfect for meal prep, making them an ideal grab-and-go snack or a decadent post-dinner treat without any fuss. No baking required, just simple layering of a luscious, high-protein mango cheesecake filling over a delightful crunchy base, often crowned with even more vibrant fresh mango. Each jar is a perfectly portioned, bright, and utterly delicious no-bake cheesecake experience that you can enjoy anytime, anywhere. Trust me, these are about to become your new favorite!

Ingredient Notes
Crafting these Tropical Mango High Protein Cheesecake Jars is an absolute joy, and it all starts with selecting the right ingredients. I’ve carefully chosen components that not only deliver on incredible flavor but also boost the nutritional profile, making these treats both indulgent and guilt-free. Here’s a breakdown of what we’ll need and some thoughts on substitutions.
Crust Essentials
- Graham Crackers: For our base, I love the classic crunch of graham crackers. They provide a sturdy, subtly sweet foundation. If you’re looking for a gluten-free option, a good quality gluten-free digestive biscuit or even a blend of finely ground oats and nuts (like almonds or cashews) works beautifully. Just ensure your oat flour is certified gluten-free if needed.
- Melted Coconut Oil: This is my go-to for binding the crust and adding a hint of tropical richness that complements the mango so well. If coconut oil isn’t your preference, unsalted butter is a perfectly fine substitute, though you’ll miss a touch of that subtle coconut aroma.
- Sweetener for Crust: A touch of maple syrup or agave nectar helps to sweeten the crust and bind it further. For a lower-sugar approach, erythritol or another granular sugar substitute can be used.
The High-Protein Cheesecake Filling
- Light Cream Cheese (Neufchâtel): To keep our cheesecake feeling light yet incredibly creamy, I opt for light cream cheese. It delivers that signature tangy cheesecake flavor with less fat. Full-fat cream cheese will yield a richer, denser filling if you prefer that indulgence. For a dairy-free or vegan version, you can experiment with a plant-based cream cheese substitute, ensuring it has a neutral flavor.
- Plain Greek Yogurt (0% or 2% fat): This is where a significant portion of our protein boost comes from! Greek yogurt contributes to the luscious texture and a wonderful tang. I usually go for 0% or 2% fat to keep things lighter, but feel free to use a higher fat percentage for a richer mouthfeel. If you need a dairy-free option, a thick, plain, unsweetened plant-based yogurt (like almond or cashew) can work, but choose one that isn’t too runny.
- Vanilla Protein Powder: This is the secret weapon for our “high protein” claim! A good quality vanilla whey protein powder is my preference as it blends smoothly and adds lovely vanilla notes. Casein protein powder can also be used for an even thicker, more mousse-like consistency. If you’re plant-based, a vanilla plant-based protein powder (like pea or a blend) will work just as well; just be mindful of its specific flavor profile, as some can be quite distinct.
- Sweetener for Filling: I typically use erythritol or a stevia blend for a sugar-free approach, which allows the natural sweetness of the mango to shine. Honey or maple syrup can also be used if you prefer, adjusting to your taste.
- Vanilla Extract: A crucial flavor enhancer that brings warmth and depth to our cheesecake layer. Always use pure vanilla extract for the best results.
- Lime Zest and Juice: A squeeze of fresh lime juice and a little zest brightens up the entire filling, cutting through the richness and really amplifying those tropical mango vibes. Don’t skip this; it makes a huge difference!
Tropical Mango Topping
- Ripe Fresh Mango: This is the star of the show! Choose a beautifully ripe mango – I love Ataulfo or Honey mangoes for their buttery texture and intense sweetness. Fresh is best for flavor and texture, but if mangos aren’t in season, you can use frozen mango chunks, thawed and gently puréed, or diced.
- Optional Sweetener for Topping: If your mango isn’t quite sweet enough, a tiny drizzle of maple syrup or a pinch of erythritol can be added to the diced mango topping, but often, a truly ripe mango needs no help at all.
Garnishes (Optional but Recommended)
- Toasted Shredded Coconut: A sprinkle of lightly toasted coconut flakes adds texture, another layer of tropical flavor, and a lovely visual appeal.
- Fresh Mint Leaves: A few small mint leaves not only look beautiful but also add a refreshing aroma and taste that complements the mango.
Step-by-Step Instructions
Let’s get those hands busy and assemble these delightful Tropical Mango High Protein Cheesecake Jars! I promise you, the process is straightforward, and the result is absolutely worth every moment. I like to think of this as a layered symphony of flavors and textures.
Step 1: Prepare Your Crust – The Crunchy Foundation
- First things first, I take about 8-10 graham cracker sheets (or your chosen alternative) and crush them until they resemble fine crumbs. You can do this by placing them in a Ziploc bag and crushing them with a rolling pin, or for speed, a food processor works wonders. I’m looking for about 1 ¼ cups of crumbs.
- Next, I melt 3 tablespoons of coconut oil until it’s liquid. In a bowl, I combine the graham cracker crumbs, the melted coconut oil, and a tablespoon of my preferred crust sweetener (like maple syrup or erythritol). I mix this thoroughly until all the crumbs are moistened and hold together when pressed.
- Now, for the jars! I grab four 8-ounce mason jars (or similar individual serving containers). I divide the crumb mixture evenly among them, usually about 2-3 tablespoons per jar. Then, using the back of a spoon or a small tamper, I press the crumbs firmly into an even layer at the bottom of each jar. This creates a solid base.
- Once the crusts are pressed, I pop the jars into the refrigerator for at least 15-20 minutes. This chilling time is important; it helps the crust set firmly before we add the creamy layers.
Step 2: Whisk Up the High-Protein Cheesecake Filling
- While the crusts are chilling, I move on to the star of the show: the cheesecake filling! In a medium-sized mixing bowl, I combine 8 ounces of light cream cheese (softened at room temperature is key for a smooth blend) with 1 cup of plain Greek yogurt.
- Then, I add my protein power: two scoops (or approximately 50-60g) of vanilla protein powder. If using a different brand or type, I’d check the serving size. I also add my chosen sweetener (usually 2-3 tablespoons of erythritol, adjusted to my sweetness preference), 1 teaspoon of pure vanilla extract, and a teaspoon of fresh lime zest along with a tablespoon of fresh lime juice.
- Using an electric hand mixer or a stand mixer with the whisk attachment, I beat these ingredients together on medium speed until the mixture is completely smooth, creamy, and lump-free. It usually takes about 2-3 minutes. I make sure to scrape down the sides of the bowl periodically to ensure everything is incorporated. The goal here is silky perfection!
Step 3: Assemble the Cheesecake Layers
- Now that our crusts are chilled and our filling is smooth, it’s assembly time! I retrieve the jars from the refrigerator.
- I carefully spoon or pipe the cheesecake filling evenly over the chilled crusts in each jar. I leave about an inch of space from the top of the jar to allow for our mango topping. If you’re using a piping bag, it makes for a very neat layer, but a spoon works perfectly fine. I gently tap the jars on the counter a few times to settle the filling and remove any air bubbles.
- Once the filling is in, back into the refrigerator they go! I recommend chilling them for at least 2-4 hours, but ideally, overnight. This allows the cheesecake filling to firm up properly and for the flavors to meld beautifully. Patience is a virtue when making cheesecake!
Step 4: Prepare and Add the Tropical Mango Topping
- When the cheesecake jars are almost ready for serving (or have sufficiently chilled), I prepare the mango topping. I carefully peel and dice one large, ripe mango into small, uniform cubes. I’m looking for about 1 to 1 ½ cups of diced mango.
- In a small bowl, I gently toss the diced mango with an additional teaspoon of fresh lime juice and, if needed, a tiny pinch of my sweetener. The lime juice really makes the mango pop!
- Just before serving, I spoon a generous amount of the diced mango topping over the set cheesecake layer in each jar.
Step 5: Garnish and Serve
- To elevate the presentation and add another layer of flavor, I like to garnish each jar. A sprinkle of lightly toasted shredded coconut and a few fresh mint leaves make these jars look absolutely irresistible.
- These Tropical Mango High Protein Cheesecake Jars are best enjoyed cold. Dive in and savor the tropical goodness!
Tips & Suggestions
Making these Tropical Mango High Protein Cheesecake Jars is a delightful process, and over time, I’ve picked up a few tricks that I think will help you make yours absolutely perfect. It’s all about getting those textures and flavors just right!
Mastering the Cheesecake Filling
- Room Temperature Cream Cheese: This is a non-negotiable for me! Starting with room temperature cream cheese ensures a super smooth, lump-free filling. If it’s too cold, you’ll end up with lumps, and no one wants lumpy cheesecake. I usually take it out about 30-60 minutes before I plan to mix.
- Protein Powder Choice: The type of protein powder can slightly affect the texture. Whey protein tends to make a creamier, slightly softer filling, which I love. Casein protein, on the other hand, absorbs more liquid and will result in a thicker, more mousse-like consistency. Both are fantastic, so choose based on your texture preference. If using a plant-based protein, some can be a bit grittier, so ensure you blend it well, perhaps even adding a tiny splash more Greek yogurt or non-dairy milk if needed to achieve a smooth consistency.
- Don’t Overmix: While you want a smooth filling, avoid overmixing once everything is combined. Overmixing can incorporate too much air, which might lead to a less dense, almost airy texture that isn’t quite as rich as we want. Mix until just combined and smooth.
Perfecting Your Mango Elements
- Ripe Mango is Key: For the best flavor, always choose a perfectly ripe mango. It should yield slightly to gentle pressure and have a fragrant, sweet aroma near the stem. An unripe mango will be tart and fibrous, which won’t give us that beautiful tropical sweetness we’re aiming for. If your mango is slightly underripe, let it sit on the counter for a day or two.
- Mango Puree Option: While I love the texture of diced mango on top, for an even smoother cheesecake, you could blend some of the mango into the cheesecake filling itself. I would recommend about ¼ cup of very ripe mango puree folded gently into the filling for an extra mango punch within the creamy layer. Just be careful not to make the filling too thin.
- Zest it Up: Don’t underestimate the power of lime zest! Zesting a fresh lime directly into the cheesecake filling and over the mango topping releases aromatic oils that significantly brighten and enhance the tropical notes of the mango. It’s a small step that makes a huge difference.
Assembly and Chilling Wisdom
- Jar Sizes: I typically use 8-ounce mason jars, which are perfect for individual portions. However, feel free to use smaller 4-ounce jars for mini cheesecakes or larger ones if you want a more substantial treat. Adjust the ingredient distribution accordingly.
- Piping Bag for Neatness: For a super clean and professional look, I sometimes use a piping bag with a large round tip to pipe the cheesecake filling into the jars. It’s not necessary, but it certainly makes for neat layers, especially if you’re serving these for guests.
- Chill, Chill, Chill!: I cannot stress this enough – adequate chilling time is crucial! This allows the cheesecake filling to set properly, firm up, and for all the flavors to fully meld. Rushing this step will result in a softer, less satisfying texture. Aim for at least 4 hours, but I often make these the night before and let them chill overnight for the best results.
Flavor Variations and Dietary Tweaks
- Other Tropical Fruits: Feel free to experiment with other tropical fruits! Passion fruit pulp, finely diced pineapple, or even a mix of berries (though less tropical) could be wonderful alternatives or additions to the mango topping.
- Crust Variations: Beyond graham crackers, consider a nut-based crust using finely ground almonds or walnuts mixed with a touch of coconut oil and sweetener for a different flavor profile and added healthy fats. For a stricter keto option, use almond flour, sweetener, and coconut oil.
- Spice it Up: A tiny pinch of ground ginger or cardamom can add a warm, exotic note to the mango topping, complementing the tropical flavors beautifully.
Storage
Once you’ve gone through the effort of creating these delightful Tropical Mango High Protein Cheesecake Jars, I want to make sure you know how to keep them fresh and delicious for as long as possible. Proper storage is key to enjoying these treats over several days!
Refrigeration is Your Friend
- Airtight is Best: These cheesecake jars absolutely need to be stored in the refrigerator. I always make sure each jar is tightly covered. If your mason jars come with lids, use them! If you’re using other containers, cover them snugly with plastic wrap or aluminum foil to prevent them from absorbing any odors from the fridge and to keep them from drying out.
- Shelf Life: When stored properly in the refrigerator, these Tropical Mango High Protein Cheesecake Jars will stay fresh and delicious for about 3 to 4 days. The mango topping is best added fresh right before serving if you want the absolute peak of texture and vibrancy, but it will still hold up well if added a day in advance.
- Serving Temperature: These jars are definitely best served chilled, straight from the fridge. The cold temperature really enhances the refreshing quality of the mango and the firm, creamy texture of the cheesecake.
Freezing – Proceed with Caution
- Not Recommended for Optimal Texture: While technically you could freeze these cheesecake jars, I generally don’t recommend it for the best eating experience. Freezing can alter the texture of both the cream cheese/Greek yogurt filling and the fresh mango, potentially making the filling a bit grainy or watery upon thawing, and the mango mushy.
- If You Must Freeze: If you find yourself with an abundance of jars and absolutely need to freeze them, I would suggest freezing them before adding the fresh mango topping. Cover the cheesecake-filled jars very tightly with plastic wrap directly touching the surface of the filling, then add the lid or another layer of wrap. They might last for up to a month. When you’re ready to enjoy, thaw them slowly in the refrigerator overnight. Add fresh mango and any garnishes just before serving. Be prepared for a slight change in texture compared to a freshly made and refrigerated jar.
Preparation Ahead of Time
These jars are fantastic for meal prep! I often prepare the crust and cheesecake filling layers the day before I plan to serve them. This allows ample time for the cheesecake to set perfectly. On the day of serving, all I have to do is dice my fresh mango, spoon it on top, add my garnishes, and they’re ready to impress. It takes the stress out of last-minute dessert preparations!
Final Thoughts
And there you have it! I truly hope you enjoy making and savoring these Tropical Mango High Protein Cheesecake Jars as much as I do. What makes this recipe an absolute game-changer is the way it perfectly marries that luscious, creamy cheesecake indulgence with the vibrant, sun-kissed sweetness of mango, all while packing a serious protein punch. They’re not just a dessert; they’re a smart, satisfying treat you can feel great about, whether you’re fueling up after a workout or simply craving something delightful. These convenient jars make portion control a breeze and are perfect for grab-and-go deliciousness. Trust me, your taste buds and your body will thank you for whipping up a batch of these incredible Tropical Mango High Protein Cheesecake Jars!

Healthy Tropical Mango High Protein Cheesecake Jars
- Total Time: 30 minutes
- Yield: 4 servings 1x
Description
Indulge in these Tropical Mango High Protein Cheesecake Jars that combine creamy cheesecake with the vibrant flavor of fresh mango. Perfect for meal prep, these no-bake jars are a guilt-free treat that delivers a protein boost in every spoonful.
Ingredients
- 8–10 graham cracker sheets (or alternative)
- 3 tablespoons melted coconut oil
- 1 tablespoon sweetener for crust (maple syrup or erythritol)
- 8 ounces light cream cheese (Neufchâtel)
- 1 cup plain Greek yogurt (0% or 2% fat)
- 2 scoops (approximately 50-60g) vanilla protein powder
- 2–3 tablespoons sweetener for filling (erythritol or stevia blend)
- 1 teaspoon pure vanilla extract
- 1 teaspoon lime zest
- 1 tablespoon fresh lime juice
- 1 to 1 ½ cups diced ripe fresh mango
- 1 teaspoon fresh lime juice (for mango topping)
- Optional sweetener for topping (maple syrup or erythritol)
- Toasted shredded coconut (for garnish)
- Fresh mint leaves (for garnish)
Instructions
- Prepare the crust by crushing graham crackers into fine crumbs, then mix with melted coconut oil and sweetener. Press the mixture into the bottom of mason jars and refrigerate for 15-20 minutes.
- In a mixing bowl, combine softened cream cheese, Greek yogurt, protein powder, sweetener, vanilla extract, lime zest, and lime juice. Mix until smooth and creamy.
- Spoon or pipe the cheesecake filling over the chilled crusts in each jar, leaving space for the mango topping. Refrigerate for at least 2-4 hours, preferably overnight.
- Prepare the mango topping by dicing a ripe mango and tossing it with lime juice and optional sweetener. Spoon the mango topping over the cheesecake layer just before serving.
- Garnish with toasted coconut and fresh mint leaves, then serve chilled.
- Prep Time: 30 mins
- Cook Time: 0 mins
- Category: Dessert
- Method: No-bake
- Cuisine: Tropical
Nutrition
- Serving Size: 1 jar
- Calories: 250
- Sugar: 10 g
- Sodium: 150 mg
- Fat: 12 g
- Saturated Fat: 8 g
- Unsaturated Fat: 4 g
- Trans Fat: 0 g
- Carbohydrates: 30 g
- Fiber: 2 g
- Protein: 15 g
- Cholesterol: 30 mg
Keywords: Ensure cream cheese is at room temperature for a smooth filling. Use ripe mango for the best flavor, and feel free to experiment with other tropical fruits or crust variations.


Leave a Comment