
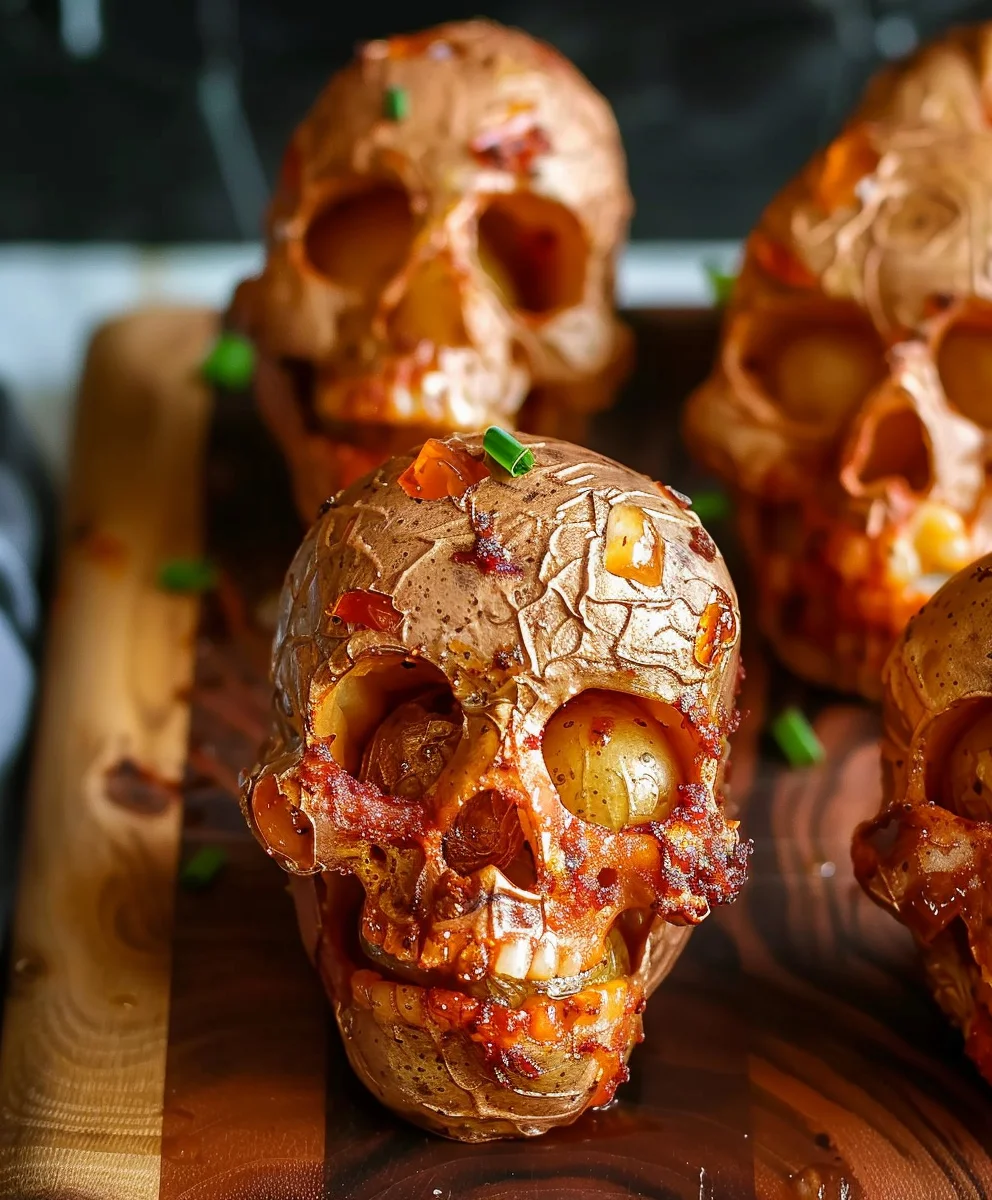
Halloween Skull Potatoes are here to transform your spooky season snacks into an unforgettable culinary experience! Prepare to enchant your taste buds and thrill your guests with a truly captivating creation that perfectly embodies the spirit of October 31st. I’ve always found immense joy in crafting dishes that are not only delicious but also visually spectacular, and this recipe delivers on both fronts, making it a guaranteed centerpiece for any ghoulish gathering.
Why Everyone Adores These Spooky Spuds
Halloween, a time for playful frights and imaginative treats, truly comes alive in our kitchens, and these potatoes are a testament to that festive creativity. People absolutely adore this dish because it masterfully combines the comforting, savory appeal of perfectly cooked potatoes – think fluffy interiors with a delightful hint of crispness – with an undeniably charming, albeit eerie, skull shape. It’s an easy way to elevate your Halloween party food beyond the usual, offering both incredible flavor and an irresistible, spooky aesthetic that delights both adults and children alike. These Halloween Skull Potatoes are truly a frightfully good feast!

Ingredients:
- 8-10 medium-sized Russet or Yukon Gold potatoes (about 3-4 pounds), which are perfect for a smooth, creamy mash.
- ½ cup unsalted butter, softened. I find using good quality butter makes all the difference in the richness of our Halloween Skull Potatoes.
- ½ cup whole milk or heavy cream, warmed. Adding it warm helps it incorporate beautifully without cooling down your potatoes too much.
- 1 teaspoon fine sea salt, plus more to taste.
- ½ teaspoon freshly ground black pepper, or to your preference.
- ¼ teaspoon garlic powder (optional, but I absolutely love the subtle warmth it adds).
- 1 large egg yolk, beaten (this acts as a fantastic binder and helps achieve that beautiful golden-brown crust when baked).
- 2 tablespoons fresh chives or parsley, finely chopped (optional, for mixing into the mash or as a garnish).
For Decoration:
- Sweet paprika or smoked paprika, for dusting (gives a lovely, slightly aged look).
- Whole black olives, pitted, for eyes.
- Small pieces of red bell pepper, for a striking nose hole or other features.
- Sour cream or plain Greek yogurt, in a small piping bag with a fine tip (for intricate skull details like cracks or teeth).
- Ketchup or sriracha in a squeeze bottle (for a “bloody” effect, if you’re feeling extra ghoulish!).
- Fresh rosemary sprigs or finely chopped chives, for garnish around the serving platter.
Tools You’ll Need:
- Large stockpot.
- Vegetable peeler.
- Sharp paring knife.
- Potato ricer or sturdy potato masher. I highly recommend a ricer for the smoothest, lump-free mash.
- Large mixing bowl.
- Baking sheets.
- Parchment paper.
- Pastry brush.
- Small spoon or clean crafting knife for shaping details (like the eye sockets and teeth).
- Piping bag with a small, round tip (for decorative elements).
Phase 1: Preparing and Mashing the Potatoes for Our Skull Base
This initial stage is crucial for ensuring your Halloween Skull Potatoes have the perfect texture and flavor. A good mash is the foundation of a fantastic sculpted potato.
-
Peel and Prepare the Potatoes:
First things first, let’s get those potatoes ready! Grab your vegetable peeler and carefully remove the skin from all 8-10 potatoes. Once peeled, give them a quick rinse under cold water. Next, with your paring knife, cut each potato into roughly 1-inch to 1 ½-inch chunks. Uniform size is key here, as it ensures all the potato pieces cook evenly. No one wants crunchy bits in their smooth skull mash!
-
Boil Until Tender:
Place your chopped potatoes into the large stockpot. Cover them with cold water by about an inch. Add a generous pinch of salt to the water – this seasons the potatoes from the inside out, making them taste incredible even before you add anything else. Bring the water to a boil over medium-high heat, then reduce the heat to a simmer. Let them cook for about 15-20 minutes, or until they are fork-tender. You should be able to easily pierce them with a fork without resistance. Be careful not to overcook them, or they’ll become waterlogged and your mash won’t be as firm, which is essential for sculpting our Halloween Skull Potatoes.
-
Drain Thoroughly:
Once tender, carefully drain the potatoes completely in a colander. This step is incredibly important! We want dry potatoes for a fluffy mash. To ensure they’re as dry as possible, I like to return the drained potatoes to the empty hot pot over very low heat for 1-2 minutes, shaking the pot occasionally. This allows any residual moisture to steam off. Trust me, it makes a world of difference.
-
Mash to Perfection:
Transfer the hot, dry potatoes to your large mixing bowl. Now, it’s mashing time! If you have a potato ricer, now is its moment to shine. Pass the potatoes through the ricer directly into the bowl. This creates the lightest, fluffiest, and most lump-free mash imaginable. If you’re using a potato masher, mash them thoroughly until smooth, trying to break down any stubborn lumps. Avoid over-mashing, as this can activate the starches and make your potatoes gummy. We’re aiming for light and airy, not heavy and sticky.
-
Incorporate Flavors and Binder:
To the hot mashed potatoes, add the softened unsalted butter, warm milk or cream, sea salt, black pepper, and garlic powder (if using). Gently fold these ingredients into the potatoes until just combined and smooth. Taste and adjust seasoning as needed – remember, this is your base, so make it delicious! Finally, add the beaten egg yolk. The egg yolk isn’t just for flavor; it’s a secret weapon for binding the potatoes, making them easier to sculpt and helping them hold their shape beautifully during baking. Mix it in until fully incorporated. If you’re adding fresh chives or parsley, gently fold them in now. Your potato mixture should be pliable, firm enough to hold its shape, but still wonderfully creamy. This is the perfect consistency for creating our Halloween Skull Potatoes!
Phase 2: Sculpting Your Spooky Halloween Skull Potatoes
This is where the magic truly happens! We’re going to transform a humble potato mash into impressive, ghoulish Halloween Skull Potatoes. Get ready to unleash your inner artist!
-
Prepare Your Workspace:
Line two large baking sheets with parchment paper. This prevents sticking and makes cleanup a breeze. Have a small bowl of water nearby to lightly moisten your hands as you sculpt; this prevents the potato mixture from sticking too much to your fingers and helps create a smoother surface.
-
Form the Basic Skull Shape:
Take about ½ cup of the potato mixture for each skull. The exact size is up to you – larger skulls will be more dramatic, smaller ones cuter. Roll the potato mixture between your palms to form an oval shape, slightly flattened on one side, which will be the base. Think of it like a slightly elongated egg. Place this oval onto your prepared baking sheet. Repeat this process until you’ve used all the potato mixture, leaving a little space between each potential skull.
-
Refine the Head and Jawline:
Now, let’s start defining the skull features. Gently pinch and pull the top portion of the oval upwards slightly to create the dome of the cranium. Below that, on what will be the face, slightly indent the area where the eye sockets will go. For the jawline, gently pull a small amount of potato down from the front of the “face” and subtly flatten the sides to suggest cheekbones and a lower jaw. You’re aiming for a slightly elongated, somewhat flattened base for the jaw, differentiating it from the rounder upper skull. Don’t worry about perfection right now; we’ll add details later.
Tips for Sculpting:
- Keep Hands Moist: If the potato mixture starts to stick, lightly dampen your hands with water.
- Gentle Pressure: Use gentle but firm pressure. You want to shape, not squish.
- Reference Image: If you’re unsure, keep a simple skull image open on your phone or printed out for reference. It helps tremendously!
-
Carve the Eye Sockets:
Using the back of a small spoon or your clean paring knife, gently scoop out two almond-shaped or circular indentations where the eyes would be. Make them deep enough to create a shadow but not so deep that you poke through the potato. You can use your finger to smooth the edges of the sockets. These hollows will eventually hold our olive eyes.
-
Create the Nose Opening:
For the nose, make an inverted heart shape or a simple small triangle directly below the eye sockets. Use the tip of your paring knife or the edge of a small spoon to carefully carve out this small indentation. Again, smooth the edges with your finger. This is a characteristic feature of a skull, so take your time to get the shape right.
-
Detailing the Teeth (Optional but Recommended!):
This is where your Halloween Skull Potatoes truly come alive! Using the side of your paring knife or even a toothpick, gently score horizontal lines across the lower jaw area to define the teeth. Then, add short vertical lines to separate individual teeth. You can make them straight or slightly jagged for a more ancient, worn look. Don’t press too hard; you’re just creating surface marks. For a more pronounced effect, you can gently push a tiny bit of potato upwards between the teeth lines to create a slight ridge for each tooth.
-
Add Surface Details (Cracks and Blemishes):
If you want your skulls to look even more realistic and ancient, use the tip of your knife or a toothpick to gently etch small cracks or lines onto the forehead and sides of the skull. These don’t need to be perfect; irregular lines will give a more organic, bone-like appearance. This attention to detail truly elevates your Halloween Skull Potatoes.
Phase 3: Baking Our Skulls to Perfection
Baking is key to giving our Halloween Skull Potatoes a beautiful golden crust, ensuring they hold their shape, and adding another layer of deliciousness. Plus, the aroma filling your kitchen will be absolutely inviting!
-
Preheat the Oven:
Preheat your oven to 400°F (200°C). This temperature is ideal for getting a nice crisp exterior without overcooking the inside.
-
Egg Wash for a Golden Glow:
In a small bowl, lightly beat another egg yolk with a teaspoon of water. This creates an egg wash. Using a pastry brush, gently brush the entire surface of each sculpted potato skull with this egg wash. The egg wash will give your skulls a beautiful golden-brown color as they bake and a slight sheen, making them look even more appetizing (in a spooky way!). Be sure to get into all the nooks and crannies for even browning.
-
Bake Until Golden:
Carefully transfer the baking sheets to the preheated oven. Bake for 20-30 minutes, or until the skulls are beautifully golden brown and heated through. The exact time will depend on the size of your skulls and your oven. Keep an eye on them towards the end of the baking time to prevent over-browning. You want that perfect balance of a slightly crisp exterior and a tender, creamy interior. Once baked, remove them from the oven and let them cool on the baking sheets for a few minutes before moving them. This allows them to firm up slightly and makes them easier to handle.
Phase 4: Bringing Your Halloween Skull Potatoes to Life with Decorations
Now that our skulls are baked and golden, it’s time for the final, most fun step: decorating them to truly embody the spirit of Halloween Skull Potatoes!
-
Dust with Paprika for an Aged Look:
Once the skulls have cooled slightly (they should still be warm), take a pinch of sweet or smoked paprika and gently dust it over the surface of each skull. You can use a small, clean brush or even your fingertips. The paprika settles into the crevices and gives the skulls an “aged” or “bone-like” appearance, adding depth and visual interest. It’s a simple trick that makes a big impact!
-
Place the Eyes:
Take your pitted black olives. Depending on the size of your eye sockets, you might use a whole olive or cut them in half. Carefully place one or two olive pieces into each eye socket you carved earlier. The dark color of the olives provides a fantastic contrast, making the eyes truly stand out. For a more menacing look, you can even cut tiny slivers of olives for pupils and place them centrally.
-
Insert the Nose:
For the nose, carefully press a small, triangular or inverted heart-shaped piece of red bell pepper into the nose cavity. The vibrant red color offers a stark, ghoulish contrast and makes the nose hole more pronounced.
-
Add Intricate Details with Sour Cream (Optional):
If you’re feeling particularly artistic, now’s the time to use your piping bag filled with sour cream or Greek yogurt. With a fine round tip, you can pipe delicate lines to emphasize the cracks you etched, or even draw more detailed bone structures. You can also use the sour cream to define the teeth even further, piping thin lines for separation or tiny dots for highlights. This step truly elevates the realism of your Halloween Skull Potatoes. Just be careful not to use too much pressure; a light hand is best for fine lines.
-
Create a “Bloody” Effect (If Desired):
For a truly gruesome touch, drizzle a tiny bit of ketchup or sriracha around the base of the skull or dripping from the mouth area. Use a squeeze bottle for precision. This adds a vivid “bloody” element that’s perfect for a Halloween feast. Remember, a little goes a long way to make a dramatic statement!
-
Garnish and Serve:
Carefully transfer your finished Halloween Skull Potatoes to a serving platter. Arrange them artfully. For a final flourish, scatter some fresh rosemary sprigs or finely chopped chives around the platter. The green against the golden skulls creates a wonderful visual. Serve these spooky delights warm, perhaps alongside a savory main course or as a standalone, conversation-starting appetizer. They are sure to be the star of any Halloween gathering!
Tips for Success and Variations:
-
Potato Choice Matters:
For the best results with your Halloween Skull Potatoes, always opt for starchy potatoes like Russets or Yukon Golds. They break down beautifully when cooked, leading to a fluffy, non-gummy mash that’s perfect for sculpting. Waxy potatoes tend to yield a denser, stickier mash that is harder to shape.
-
Don’t Skimp on Draining:
I cannot emphasize this enough – dry potatoes are happy potatoes! Excess moisture is the enemy of perfectly firm and fluffy mashed potatoes, making them difficult to sculpt and prone to falling apart. Take the extra minute to let them steam dry in the hot pot.
-
Flavor Boosts:
Beyond garlic powder, consider incorporating other flavors into your mash. A pinch of onion powder, a dash of smoked paprika, or even a tablespoon of cream cheese can add richness and depth. For a more luxurious skull, try stirring in some finely grated Parmesan cheese or a dollop of crème fraîche.
-
Freezer Friendly (Pre-Bake):
You can prepare your Halloween Skull Potatoes ahead of time! Sculpt them, egg wash them, and then arrange them on a baking sheet. Freeze them uncovered until solid, then transfer them to an airtight container or freezer bag. When ready to bake, place them frozen onto a parchment-lined baking sheet and bake at 400°F (200°C) for 35-45 minutes, or until golden brown and heated through. This is a fantastic time-saver for party prep!
-
Alternative Cooking Methods:
While baking gives the best texture and browning, you could also gently pan-fry individual skulls in a little butter or oil until golden on all sides, then finish with decoration. This creates a crispier exterior but might be more challenging for larger batches and maintaining perfect skull shapes.
-
Vegetarian/Vegan Adaptations:
To make these Halloween Skull Potatoes vegan, substitute the butter with a plant-based butter alternative, the milk/cream with unsweetened plant-based milk (like almond or oat milk), and omit the egg yolk. You may need to add a tablespoon of cornstarch or tapioca starch to help with binding, or rely solely on chilling the mixture well before sculpting. For the egg wash, you can use a plant-based milk wash for browning.
-
Serving Suggestions:
These spooky potato skulls are incredibly versatile. Serve them as a playful side dish to a hearty Halloween-themed meal, such as a “Witch’s Brew” chili or “Monster” meatloaf. They also make an excellent appetizer for a party, perhaps arranged on a platter with some dipping sauces like a green “slime” (pesto mayo) or a red “blood” (spicy tomato dip). They are guaranteed to be a conversation starter and a memorable part of your Halloween celebration!
-
Kid-Friendly Decorating:
Get the kids involved in the decorating! Provide them with small bowls of paprika, olive slices, bell pepper pieces, and safe-to-use piping bags. It’s a fun, hands-on activity that encourages creativity and adds a personal touch to each skull. They’ll love bringing their own unique monsters to life!
Conclusion:
I have shared this recipe with you because I truly believe it is one of those rare dishes that hits all the right notes for a special occasion, particularly during the spooky season. It’s more than just a side dish; it’s an edible centerpiece, a conversation starter, and an absolute delight for both the eyes and the palate. The combination of creamy, fluffy potato on the inside with a perfectly crisp, golden exterior is simply irresistible. And let us be honest, the visual impact of these intricately carved, slightly eerie, yet utterly charming potato skulls makes them an instant hit. They embody the spirit of Halloween in a way that very few dishes can, transforming a humble vegetable into a work of culinary art that is both impressive and surprisingly approachable to make. Think of the gasps of delight and the inevitable “How did you do that?!” questions you will get when you present these at your next gathering. It’s not just about the flavor, which is wonderfully savory and comforting, but also about the fun and theatricality they bring to the table. This recipe allows you to unleash your inner artist while still delivering on taste, making it an absolute triumph for any festive spread. These potatoes are a guaranteed showstopper that will have everyone reaching for more, making your Halloween celebrations truly memorable.
Now that you have mastered the art of creating these delightful morsels, let us talk about how to elevate them further and make them truly your own. For serving, these are phenomenal as a standalone appetizer, perhaps with a trio of dipping sauces – a smoky chipotle aioli, a zesty sour cream and chive, or even a classic ketchup for the purists. Imagine platters piled high with these ghostly treats, disappearing as quickly as you can put them out! As a side dish, they pair beautifully with virtually any roasted meat, from a juicy turkey or a succulent pork loin to a rich beef roast. Their creamy interior perfectly complements the richness of a main course, while their crispy exterior adds a delightful textural contrast. Do not limit yourself to just dinner, though; these could even make a quirky addition to a themed brunch spread. They are incredibly versatile and adaptable to almost any meal.
But the fun does not stop there. Let us explore some exciting variations. For a spicy kick, try adding a pinch of smoked paprika or a dash of cayenne pepper to your potato mixture. Want to make them even richer? Incorporate some finely grated Parmesan or aged cheddar into the mash before shaping. For a different textural experience, consider adding finely chopped chives, spring onions, or even some crispy bacon bits into the potato mix – just be sure they are small enough not to interfere with the carving process. You could also experiment with different types of potatoes; Yukon Golds offer a buttery richness, while Russets provide that classic fluffy texture. For an extra ghoulish touch, a tiny drop of green or purple food coloring mixed into a portion of the mash could create truly unsettling (and delicious!) effects. Or, for a truly decadent treat, you could even create a small hollow in the base before baking and fill it with a dollop of cheese sauce or a seasoned ground meat mixture for a surprise burst of flavor. These Halloween Skull Potatoes are incredibly versatile, inviting you to experiment and infuse your unique culinary flair into every bite. Do not be afraid to play with herbs like rosemary or thyme, either, finely minced and folded into the mix for an aromatic twist. The possibilities for customization are endless, allowing your creativity to shine through.
I genuinely hope this recipe inspires you to step into your kitchen and get creative. There is something incredibly satisfying about transforming simple ingredients into something truly extraordinary, and these potatoes offer that opportunity in spades. Do not be intimidated by the carving; it is far easier than it looks, and even slightly imperfect skulls have a charm all their own – after all, is not a little bit of imperfection part of what makes Halloween so wonderfully spooky? I promise you, the effort is well worth the reward. The smiles, the gasps, and the sheer enjoyment from your family and friends will be your greatest testament. So, please, gather your ingredients, set aside some time for some kitchen fun, and embark on this delightful culinary adventure. Once you have brought these incredible Halloween Skull Potatoes to life in your own home, I would absolutely love to hear about your experience. Did you add your own unique twist? What did your guests think? Share your photos, your stories, and your clever variations in the comments below. Let us create a community of spooky season food enthusiasts who are passionate about making memorable meals. Your feedback and creativity not only inspire me but also provide wonderful ideas for other home cooks looking to make their celebrations extra special. Happy cooking, and may your Halloween be filled with delicious treats and unforgettable moments!
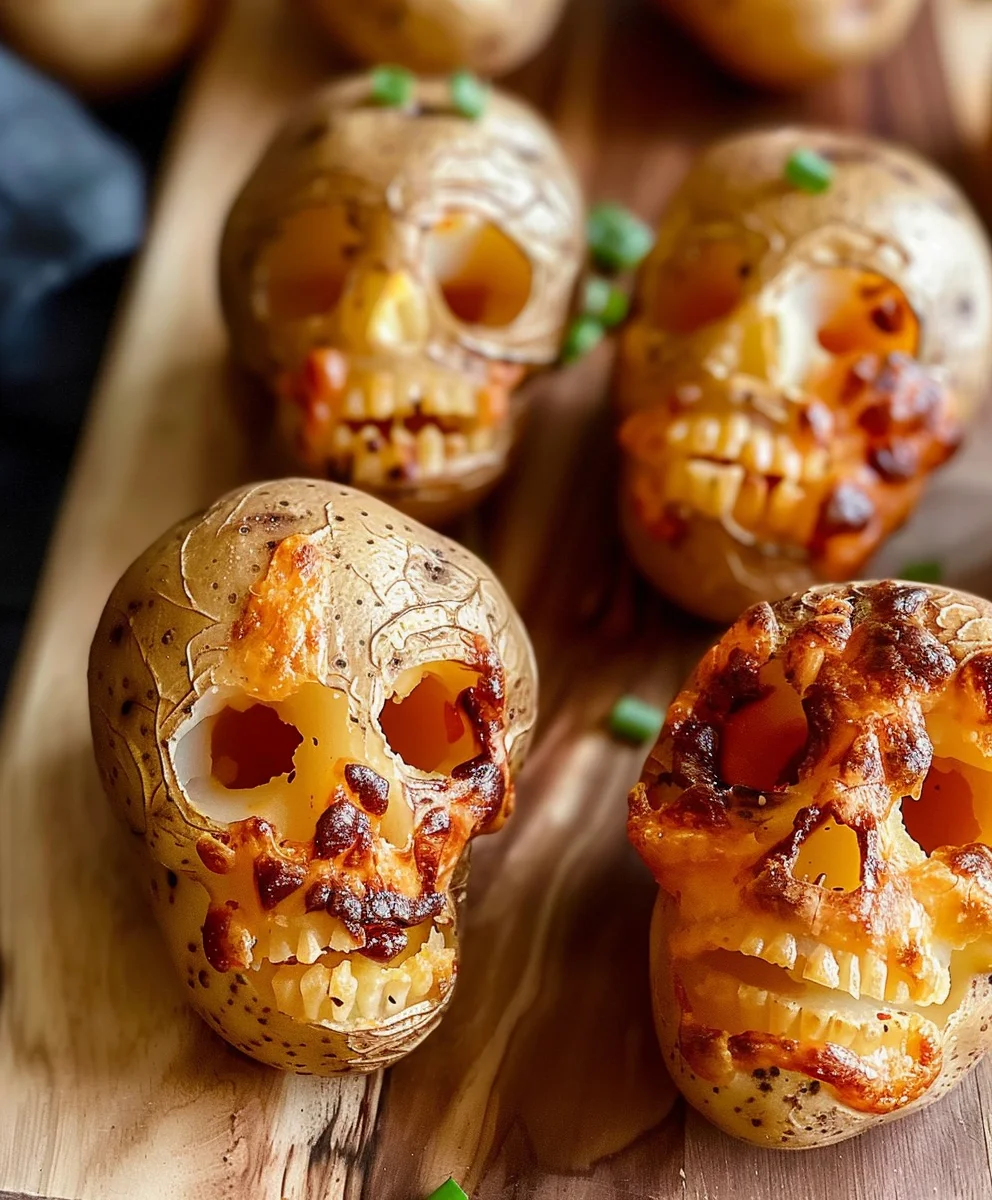
Halloween Skull Potatoes
Transform your spooky season snacks into an unforgettable culinary experience with these charming, eerie skull-shaped potatoes. Perfect for any Halloween gathering, these potatoes combine comforting flavors with a frightfully fun aesthetic.
Ingredients
-
Mini creamer potatoes
-
2 tablespoons lemon juice
-
2 tablespoons olive oil
-
Salt & freshly ground pepper
-
1 tsp onion powder
-
1 tsp garlic powder
-
1 tsp smoked paprika
-
Optional: chopped parsley
-
Optional: shredded cheese
-
Optional: crispy beef bits
-
Optional: green onions
Instructions
-
Step 1
Peel and chop mini creamer potatoes into 1-inch chunks. Place in a stockpot, cover with salted cold water, and boil until fork-tender (15-20 min). Drain thoroughly, then return to the hot pot over low heat for 1-2 minutes to steam dry any residual moisture. -
Step 2
Transfer hot potatoes to a mixing bowl and mash until smooth. Mix in lemon juice, olive oil, salt, pepper, onion powder, garlic powder, and 1 tsp smoked paprika until just combined. The mixture should be pliable. -
Step 3
Line baking sheets with parchment paper. Take about ½ cup of the potato mixture per skull. Roll into an oval shape, slightly flattened at the base. Place on the prepared baking sheet. Gently pinch and pull the top to form a cranium dome and subtly define a jawline. -
Step 4
Using a small spoon or knife, scoop out two almond-shaped or circular indentations for the eye sockets. Carve an inverted heart or small triangle for the nose opening below the eyes. Score horizontal and vertical lines on the lower jaw area to define teeth. Optionally, etch small cracks or lines on the skull surface for an aged look. -
Step 5
Preheat oven to 400°F (200°C). Lightly brush the sculpted skulls with olive oil for browning. Bake for 20-30 minutes, or until beautifully golden brown and heated through. Remove from oven and let cool slightly on the baking sheets. -
Step 6
Dust the warm skulls with additional smoked paprika. For decoration, optionally garnish with chopped parsley, shredded cheese, crispy beef bits, or green onions. Arrange on a platter and serve warm as a spooky side or appetizer.
Important Information
Nutrition Facts (Per Serving)
It is important to consider this information as approximate and not to use it as definitive health advice.
Allergy Information
Please check ingredients for potential allergens and consult a health professional if in doubt.


Leave a Comment