
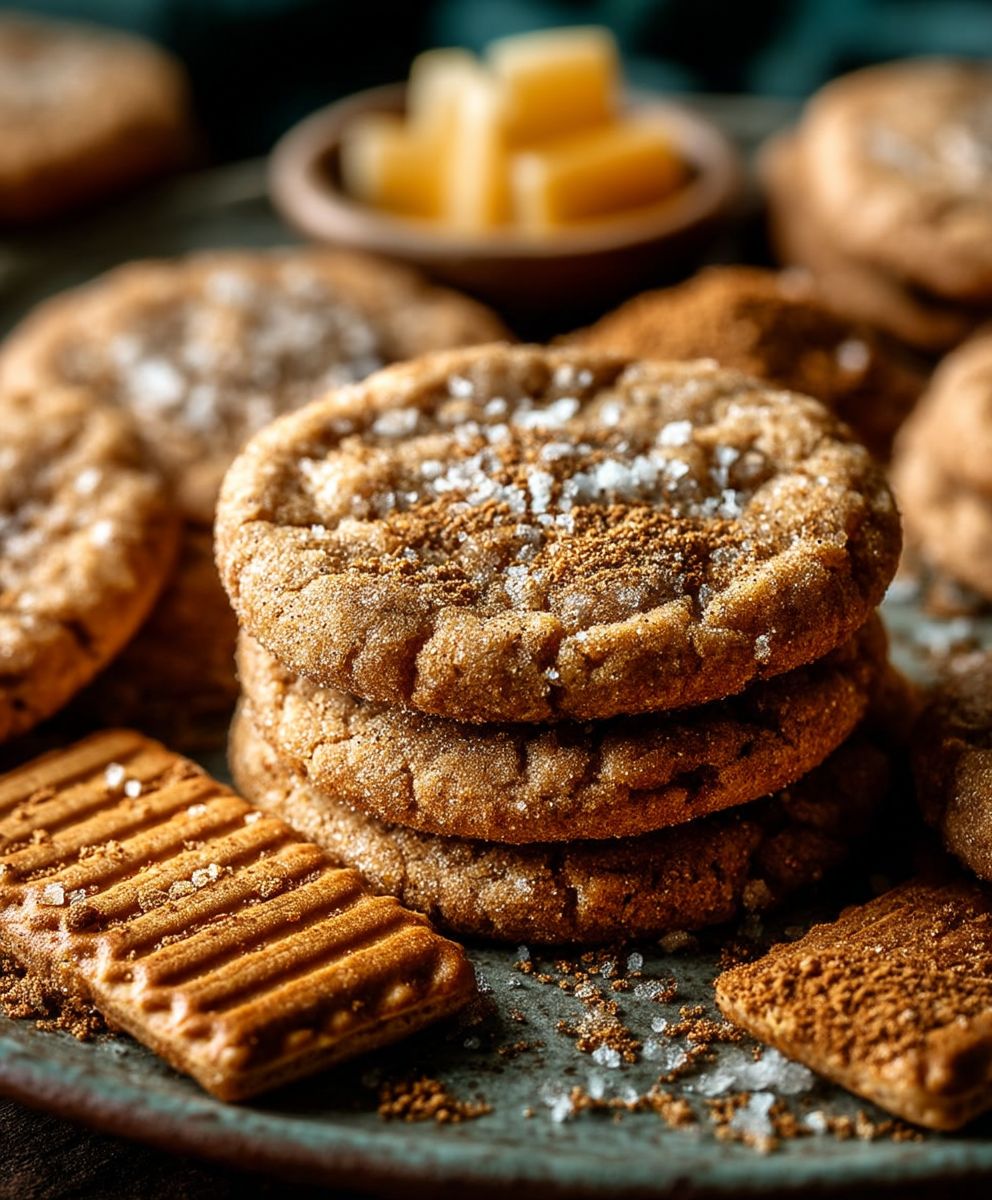
Graham Cracker Cookies: Prepare to unlock a nostalgic flavor explosion with a recipe that transforms humble graham crackers into irresistible treats! Forget everything you thought you knew about these simple snacks; we’re elevating them to a whole new level of deliciousness. Imagine biting into a soft, chewy cookie, infused with the subtle sweetness of honey and the comforting warmth of cinnamon, all resting on the familiar, slightly sandy texture of a graham cracker base.
While not steeped in centuries of tradition like some baked goods, graham cracker cookies hold a special place in American culinary history. Graham crackers themselves were originally conceived in the 1800s by Sylvester Graham as a health food, but thankfully, their destiny took a much sweeter turn! These cookies are a testament to the power of simple ingredients and creative adaptation.
What makes these cookies so universally loved? It’s the perfect combination of textures and flavors. The slight crunch of the graham cracker contrasts beautifully with the soft, yielding cookie topping. The honeyed sweetness is balanced by the warm spice, creating a flavor profile that’s both comforting and exciting. Plus, they’re incredibly easy to make, requiring minimal ingredients and effort. Whether you’re looking for a quick after-school snack, a delightful addition to a dessert platter, or simply a taste of childhood nostalgia, these graham cracker cookies are guaranteed to satisfy!

Ingredients:
- 1 ½ cups all-purpose flour
- 1 teaspoon baking soda
- ½ teaspoon salt
- ¾ cup (1 ½ sticks) unsalted butter, softened
- ¾ cup packed light brown sugar
- ½ cup granulated sugar
- 1 large egg
- 1 teaspoon vanilla extract
- 6 graham crackers, finely crushed (about ½ cup)
- ½ cup semi-sweet chocolate chips (optional)
- ¼ cup chopped walnuts or pecans (optional)
Preparing the Dough:
- Combine Dry Ingredients: In a medium bowl, whisk together the flour, baking soda, and salt. Make sure everything is evenly distributed so your cookies rise properly and have a consistent texture. Whisking helps to aerate the flour a bit too, which is always a good thing!
- Cream Butter and Sugars: In a large bowl (or the bowl of your stand mixer), cream together the softened butter, brown sugar, and granulated sugar until light and fluffy. This usually takes about 3-5 minutes. Don’t rush this step! The creaming process incorporates air into the butter and sugar, which is crucial for creating a tender cookie. Scrape down the sides of the bowl occasionally to ensure everything is evenly mixed. You’ll know it’s ready when the mixture is noticeably lighter in color and has a fluffy texture.
- Add Egg and Vanilla: Beat in the egg and vanilla extract until well combined. Again, scrape down the sides of the bowl to make sure everything is incorporated. The egg adds moisture and richness to the dough, while the vanilla extract enhances the overall flavor.
- Gradually Add Dry Ingredients: Gradually add the dry ingredients to the wet ingredients, mixing on low speed until just combined. Be careful not to overmix! Overmixing develops the gluten in the flour, which can result in tough cookies. Mix until the flour is *almost* completely incorporated, leaving just a few streaks of flour visible.
- Stir in Graham Cracker Crumbs: Stir in the crushed graham crackers until evenly distributed throughout the dough. This is what gives these cookies their signature graham cracker flavor and slightly sandy texture. Make sure the crumbs are finely crushed so they blend seamlessly into the dough. I like to use a food processor to crush mine, but you can also put them in a zip-top bag and crush them with a rolling pin.
- Add Chocolate Chips and Nuts (Optional): If you’re using chocolate chips and nuts, gently fold them into the dough until evenly distributed. I love the combination of graham cracker, chocolate, and nuts, but feel free to customize this step with your favorite mix-ins! Dried cranberries, white chocolate chips, or even a sprinkle of cinnamon would also be delicious.
- Chill the Dough: Cover the bowl with plastic wrap and chill the dough in the refrigerator for at least 30 minutes, or up to 2 hours. Chilling the dough helps to prevent the cookies from spreading too much during baking and also allows the flavors to meld together. If you’re short on time, 30 minutes is sufficient, but I find that chilling the dough for a longer period of time (up to 2 hours) results in even better cookies. The longer the dough chills, the less it will spread and the more intense the graham cracker flavor will be.
Baking the Cookies:
- Preheat Oven: Preheat your oven to 375°F (190°C). Line baking sheets with parchment paper or silicone baking mats. Parchment paper or silicone mats prevent the cookies from sticking to the baking sheet and also make cleanup a breeze.
- Scoop and Shape the Dough: Use a cookie scoop or spoon to drop rounded tablespoons of dough onto the prepared baking sheets, leaving about 2 inches between each cookie. I like to use a cookie scoop to ensure that all of my cookies are the same size, which helps them to bake evenly. If you don’t have a cookie scoop, you can use a regular spoon, but try to make sure that each cookie is roughly the same size.
- Bake: Bake for 9-11 minutes, or until the edges are golden brown and the centers are set. Keep a close eye on the cookies while they’re baking, as they can burn easily. The baking time will vary depending on your oven, so start checking them at 9 minutes and adjust the baking time accordingly. You want the edges to be golden brown and the centers to be set, but not overly browned.
- Cool: Let the cookies cool on the baking sheets for a few minutes before transferring them to a wire rack to cool completely. This allows the cookies to firm up a bit and prevents them from breaking when you transfer them to the wire rack. Once the cookies are completely cool, they’re ready to eat!
Tips and Variations:
For a Chewier Cookie: Substitute bread flour for half of the all-purpose flour. Bread flour has a higher protein content, which will result in a chewier cookie.
For a Crispier Cookie: Use melted butter instead of softened butter. Melted butter will cause the cookies to spread more, resulting in a thinner, crispier cookie.
Add a Glaze: Drizzle the cooled cookies with a simple glaze made from powdered sugar and milk. You can also add a touch of vanilla extract or almond extract to the glaze for extra flavor.
Make Graham Cracker Sandwiches: Spread frosting or Nutella between two cookies to make delicious graham cracker sandwiches.
Storage: Store the cookies in an airtight container at room temperature for up to 3 days. You can also freeze the cookies for up to 2 months. To freeze, place the cooled cookies in a single layer on a baking sheet and freeze for 30 minutes. Then, transfer the frozen cookies to a freezer-safe bag or container. When you’re ready to eat them, simply thaw them at room temperature.
High Altitude Adjustments: If you live at a high altitude, you may need to adjust the recipe slightly. Try reducing the amount of baking soda by ¼ teaspoon and increasing the amount of flour by 1-2 tablespoons. You may also need to reduce the baking time by a minute or two.
Don’t Overbake: Overbaked cookies will be dry and crumbly. It’s better to slightly underbake the cookies than to overbake them. The cookies will continue to bake on the baking sheet as they cool.
Use Quality Ingredients: The quality of your ingredients will affect the taste of your cookies. Use good quality butter, vanilla extract, and chocolate chips for the best results.
Experiment with Flavors: Don’t be afraid to experiment with different flavors and mix-ins. Try adding cinnamon, nutmeg, or cardamom to the dough. You can also add different types of nuts, dried fruit, or chocolate chips.
Make it Gluten-Free: Substitute the all-purpose flour with a gluten-free all-purpose flour blend. Be sure to use a blend that contains xanthan gum for best results.
Vegan Option: Substitute the butter with a vegan butter alternative. Use an egg replacement like flaxseed meal mixed with water (1 tablespoon flaxseed meal + 3 tablespoons water = 1 egg). Ensure your chocolate chips are dairy-free.
Double the Batch: This recipe can easily be doubled or tripled to make a larger batch of cookies. Just be sure to adjust the baking time accordingly.
Make Cookie Bars: Press the dough into a greased 9×13 inch baking pan and bake for 20-25 minutes, or until golden brown. Let cool completely before cutting into bars.
Graham Cracker Crust: Use these cookies to make a graham cracker crust for pies or cheesecakes. Simply crush the cookies and mix them with melted butter and sugar. Press the mixture into the bottom of a pie plate or springform pan and bake for 8-10 minutes, or until lightly golden brown.
Enjoy! These graham cracker cookies are best enjoyed fresh out of the oven, but they’re also delicious at room temperature. Serve them with a glass of milk, a cup of coffee, or a scoop of ice cream.
Conclusion:
And there you have it! These Graham Cracker Cookies are more than just a simple treat; they’re a nostalgic trip down memory lane with a delicious, modern twist. The ease of preparation, combined with the irresistible flavor, makes this recipe a true winner in my book, and I’m confident it will be in yours too.
Why is this a must-try? Well, beyond the sheer deliciousness, these cookies are incredibly versatile. They’re perfect for a quick afternoon snack, a delightful addition to a lunchbox, or even a sophisticated dessert served with a scoop of vanilla ice cream. The subtle cinnamon notes and the satisfying crunch of the graham crackers create a symphony of textures and flavors that will leave you wanting more. Plus, let’s be honest, who can resist a cookie that’s ready in under 30 minutes?
But the fun doesn’t stop there! Feel free to get creative with your serving suggestions and variations. For a truly decadent experience, try dipping these cookies in melted chocolate – dark, milk, or white, the choice is yours! A sprinkle of sea salt on the chocolate-covered cookies adds a delightful salty-sweet contrast that elevates them to a whole new level.
Serving Suggestions and Variations:
* Ice Cream Sandwiches: Use these cookies as the base for ice cream sandwiches. Vanilla, chocolate, or even strawberry ice cream would be fantastic choices.
* Cookie Crumble Topping: Crumble these cookies and use them as a topping for yogurt, parfaits, or even ice cream sundaes.
* S’mores Inspired: Add a marshmallow to the top of the cookie during the last few minutes of baking for a s’mores-inspired treat.
* Nutty Delight: Mix chopped nuts, such as pecans or walnuts, into the dough for added texture and flavor.
* Spiced Up: Add a pinch of nutmeg or cloves to the dough for a warmer, more festive flavor.
* Frosting Fun: Once cooled, frost the cookies with a simple glaze or buttercream frosting. Get creative with sprinkles and decorations!
I truly believe that this recipe for Graham Cracker Cookies is a game-changer. It’s simple enough for beginner bakers, yet satisfying enough for even the most discerning palates. It’s a recipe that you’ll find yourself reaching for time and time again, whether you’re baking for yourself, your family, or a crowd.
So, what are you waiting for? Preheat your oven, gather your ingredients, and get ready to experience the joy of baking these incredible cookies. I’m absolutely certain you’ll love them as much as I do.
And now, for the most important part: I want to hear about your experience! Did you try the recipe? What variations did you make? What did your family and friends think? Share your photos, comments, and feedback in the comments section below. I can’t wait to see your creations and hear your stories. Happy baking, and enjoy every delicious bite of these amazing Graham Cracker Cookies! I’m confident that this will become a staple recipe in your household, bringing smiles and sweet moments for years to come. Don’t forget to rate the recipe if you enjoyed it!
Graham Cracker Cookies: The Ultimate Guide to Baking Delicious Treats
Soft, chewy graham cracker cookies with vanilla, optional chocolate chips, and nuts. Easy to make and perfect for a sweet treat!
Ingredients
Instructions
Recipe Notes
- For a Chewier Cookie: Substitute bread flour for half of the all-purpose flour.
- For a Crispier Cookie: Use melted butter instead of softened butter.
- Add a Glaze: Drizzle the cooled cookies with a simple glaze made from powdered sugar and milk.
- Make Graham Cracker Sandwiches: Spread frosting or Nutella between two cookies.
- Storage: Store in an airtight container at room temperature for up to 3 days or freeze for up to 2 months.
- High Altitude Adjustments: Reduce baking soda by ¼ teaspoon and increase flour by 1-2 tablespoons. May need to reduce baking time.
- Don’t Overbake: Slightly underbake for best results.
- Use Quality Ingredients: For the best flavor.
- Experiment with Flavors: Add cinnamon, nutmeg, cardamom, different nuts, dried fruit, or chocolate chips.
- Make it Gluten-Free: Substitute with a gluten-free all-purpose flour blend (with xanthan gum).
- Vegan Option: Substitute butter with vegan butter, use flaxseed meal egg replacement, and dairy-free chocolate chips.
- Double the Batch: Easily doubled or tripled.
- Make Cookie Bars: Press into a 9×13 inch pan and bake for 20-25 minutes.
- Graham Cracker Crust: Crush and mix with melted butter and sugar for pie or cheesecake crust.

Leave a Comment