
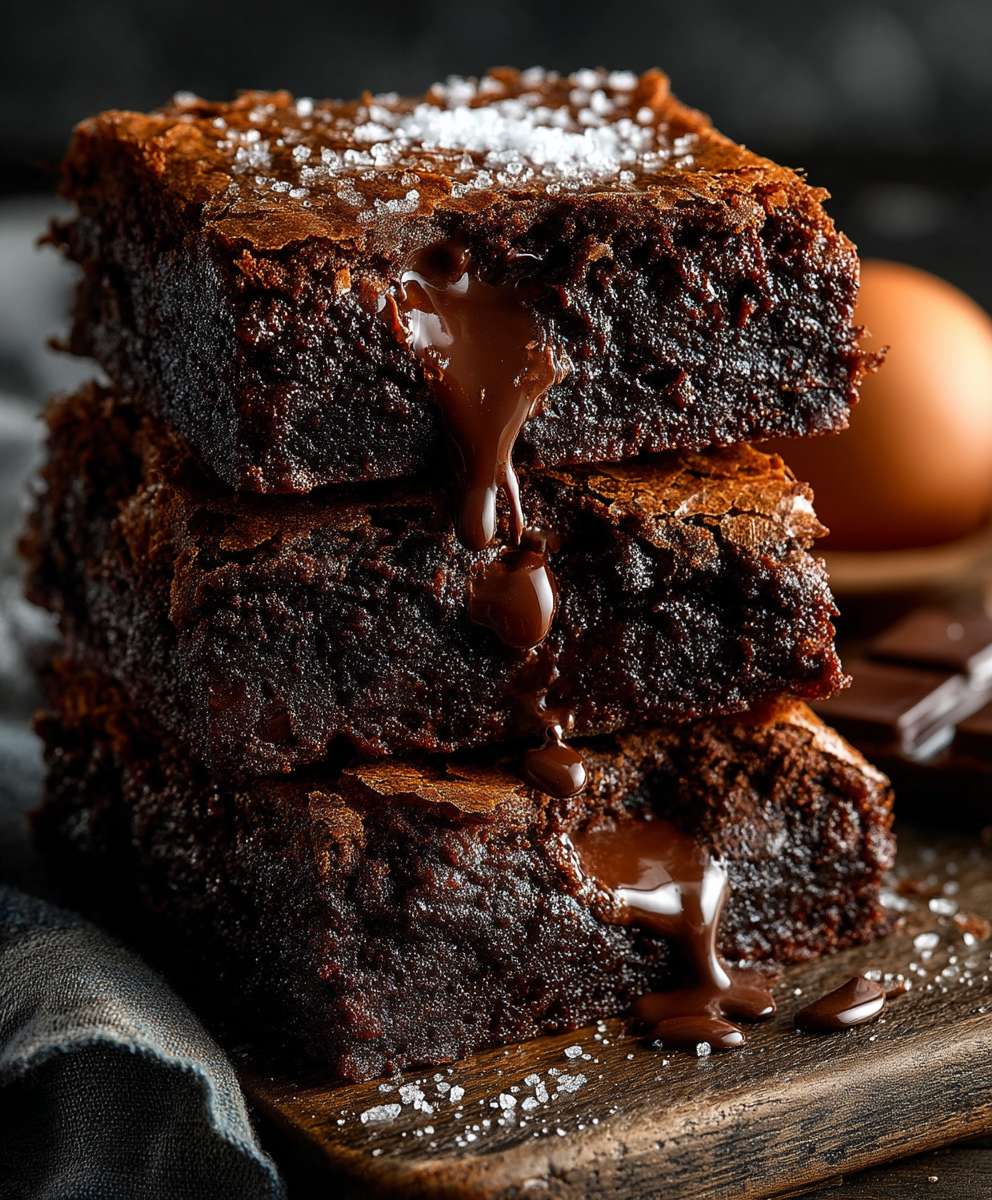
Gordon Ramsay Chocolate Brownies: Prepare to indulge in a symphony of rich, decadent flavors! Imagine sinking your teeth into a fudgy, intensely chocolatey brownie, its surface boasting a delicate, crackled crust. This isn’t just any brownie; it’s a Gordon Ramsay Chocolate Brownie, and it’s about to redefine your definition of the perfect sweet treat.
While the exact origins of the brownie are debated, its popularity exploded in the late 19th century in the United States. It quickly became a beloved dessert, cherished for its simplicity and satisfyingly dense texture. Over the years, countless variations have emerged, but few can rival the sheer indulgence of a brownie crafted with the expertise of a culinary master like Gordon Ramsay.
What makes these brownies so irresistible? It’s the perfect balance of textures – the chewy edges, the fudgy center, and that signature crackled top. The intense chocolate flavor, achieved through high-quality ingredients and Ramsay’s meticulous attention to detail, is simply divine. Plus, they’re surprisingly easy to make, making them the ideal treat for both experienced bakers and kitchen novices alike. Get ready to experience brownie perfection!

Ingredients:
- For the Brownies:
- 250g (8.8 oz) unsalted butter, plus extra for greasing
- 250g (8.8 oz) dark chocolate (70% cocoa solids), broken into pieces
- 3 large eggs
- 200g (7 oz) golden caster sugar
- 100g (3.5 oz) light muscovado sugar
- 85g (3 oz) plain flour
- 40g (1.4 oz) cocoa powder
- ½ tsp baking powder
- Pinch of sea salt
- 100g (3.5 oz) chopped walnuts or pecans (optional, but highly recommended!)
- For the Optional Chocolate Ganache:
- 150g (5.3 oz) dark chocolate (70% cocoa solids), finely chopped
- 150ml (5 fl oz) double cream
- 1 tbsp unsalted butter
Preparing the Brownie Batter:
- Preheat the Oven and Prepare the Baking Tin: First things first, let’s get the oven ready. Preheat your oven to 180°C (350°F/Gas Mark 4). While the oven is heating up, grease and line a 20cm (8 inch) square baking tin with baking parchment. Make sure the parchment overhangs the sides – this will make it much easier to lift the brownies out later. I like to grease the tin first so the parchment sticks nicely.
- Melt the Butter and Chocolate: Now for the good stuff! In a heatproof bowl set over a pan of simmering water (make sure the bottom of the bowl doesn’t touch the water!), melt the butter and dark chocolate together. Stir occasionally until smooth and glossy. Once melted, remove the bowl from the heat and let it cool slightly for about 5-10 minutes. This is important because you don’t want to cook the eggs in the next step!
- Whisk the Eggs and Sugars: In a separate large bowl, whisk the eggs, golden caster sugar, and light muscovado sugar together until pale and slightly thickened. You can use an electric whisk for this, or do it by hand if you’re feeling energetic! The mixture should be light and airy.
- Combine the Wet and Dry Ingredients: Gently fold the cooled melted chocolate mixture into the egg and sugar mixture. Be careful not to overmix at this stage, as you want to keep the mixture light and airy. In a separate bowl, sift together the plain flour, cocoa powder, baking powder, and sea salt. Gradually fold the dry ingredients into the wet ingredients, again being careful not to overmix. Just combine until you no longer see streaks of flour.
- Add the Nuts (Optional): If you’re using nuts, gently fold them into the brownie batter. I love the added texture and flavor that walnuts or pecans bring to these brownies.
Baking the Brownies:
- Pour into the Baking Tin: Pour the brownie batter into the prepared baking tin and spread it evenly.
- Bake in the Oven: Bake in the preheated oven for 25-30 minutes. The brownies are ready when the top is slightly cracked and a skewer inserted into the center comes out with a few moist crumbs attached. Don’t overbake them, as you want them to be fudgy and gooey in the middle.
- Cool Completely: Once baked, remove the brownies from the oven and let them cool completely in the tin before cutting. This is crucial! If you try to cut them while they’re still warm, they’ll be too soft and will fall apart. I know it’s tempting, but patience is key!
Making the Optional Chocolate Ganache:
This step is optional, but trust me, it takes these brownies to a whole new level of decadence!
- Heat the Cream: In a small saucepan, heat the double cream over medium heat until it just comes to a simmer. Don’t let it boil!
- Pour over the Chocolate: Remove the saucepan from the heat and pour the hot cream over the finely chopped dark chocolate in a heatproof bowl.
- Let it Sit: Let the mixture sit for a minute or two to allow the heat of the cream to melt the chocolate.
- Stir Until Smooth: Stir the mixture gently until the chocolate is completely melted and the ganache is smooth and glossy.
- Add the Butter: Stir in the unsalted butter until it’s melted and incorporated into the ganache. This will give the ganache a beautiful shine.
Assembling and Serving:
- Remove the Brownies from the Tin: Once the brownies are completely cool, use the overhanging baking parchment to lift them out of the tin.
- Cut into Squares: Cut the brownies into squares. I usually cut them into 16 squares, but you can make them smaller or larger depending on your preference.
- Add the Ganache (Optional): If you’re using the chocolate ganache, spread it evenly over the top of the brownies. You can let the ganache set slightly before serving, or serve them with the ganache still soft and gooey.
- Serve and Enjoy! Serve the brownies and enjoy! They’re delicious on their own, or you can serve them with a scoop of vanilla ice cream or a dollop of whipped cream. They’re also great with a cup of coffee or tea.
Tips for Perfect Brownies:
- Don’t Overmix: Overmixing the batter will develop the gluten in the flour, resulting in tough brownies. Mix just until the ingredients are combined.
- Use Good Quality Chocolate: The quality of the chocolate will greatly affect the flavor of the brownies. Use a good quality dark chocolate with at least 70% cocoa solids.
- Don’t Overbake: Overbaking the brownies will result in dry, crumbly brownies. Bake them until the top is slightly cracked and a skewer inserted into the center comes out with a few moist crumbs attached.
- Cool Completely: Let the brownies cool completely in the tin before cutting. This will prevent them from falling apart.
- Get Creative with Toppings: Feel free to add other toppings to your brownies, such as chocolate chips, caramel sauce, or a sprinkle of sea salt.
Storage Instructions:
These brownies can be stored in an airtight container at room temperature for up to 3 days, or in the refrigerator for up to a week. They can also be frozen for up to 3 months. If freezing, wrap them individually in plastic wrap and then place them in a freezer-safe bag or container. Thaw them overnight in the refrigerator before serving.
Variations:
- Nutella Brownies: Swirl a few tablespoons of Nutella into the brownie batter before baking.
- Peanut Butter Brownies: Swirl a few tablespoons of peanut butter into the brownie batter before baking.
- Salted Caramel Brownies: Drizzle salted caramel sauce over the brownies after baking.
- Espresso Brownies: Add a teaspoon of instant espresso powder to the dry ingredients for a coffee-flavored brownie.
- White Chocolate Brownies (Blondies): Substitute the dark chocolate with white chocolate for a blondie version.
Enjoy baking these delicious brownies! I hope you love them as much as I do. They’re perfect for any occasion, from a simple weeknight dessert to a special celebration.
Conclusion:
And there you have it! I truly believe this Gordon Ramsay Chocolate Brownies recipe is a game-changer. It’s not just about following instructions; it’s about experiencing the rich, decadent, and utterly irresistible flavors that only a perfectly executed brownie can deliver. The fudgy center, the slightly crisp edges, and the intense chocolate hit – it’s a symphony of textures and tastes that will leave you wanting more.
But why is this recipe a must-try? Well, beyond the celebrity chef endorsement (which, let’s be honest, adds a certain allure!), it’s the simplicity combined with the incredible results. You don’t need to be a seasoned baker to achieve brownie perfection with this method. The ingredients are readily available, the steps are straightforward, and the reward is a batch of brownies that rivals anything you’d find in a high-end bakery. Trust me, your friends and family will be singing your praises!
Now, let’s talk about serving suggestions and variations because, while these brownies are divine on their own, there’s always room for a little creativity! For a classic indulgence, serve them warm with a scoop of vanilla ice cream and a drizzle of chocolate sauce. The contrast between the warm brownie and the cold ice cream is simply heavenly. Alternatively, you could dust them with powdered sugar for an elegant touch or pair them with a strong cup of coffee for an afternoon pick-me-up.
If you’re feeling adventurous, why not try adding some mix-ins? Chopped walnuts or pecans would add a delightful crunch, while a swirl of peanut butter would create a Reese’s-inspired masterpiece. For a festive twist, consider adding some peppermint extract and crushed candy canes during the holiday season. And if you’re a fan of salted caramel, a drizzle of homemade caramel sauce and a sprinkle of sea salt would elevate these brownies to a whole new level of deliciousness. Don’t be afraid to experiment and find your own signature brownie creation!
Another variation I love is adding a layer of cream cheese frosting on top. It adds a tangy sweetness that perfectly complements the richness of the chocolate. You can even swirl some raspberry jam into the cream cheese for a fruity twist. The possibilities are endless!
I’m so excited for you to try this recipe and experience the joy of baking (and devouring!) these incredible brownies. I’ve poured my heart and soul into perfecting this recipe, and I’m confident that you’ll love it as much as I do.
So, what are you waiting for? Preheat your oven, gather your ingredients, and get ready to bake the best brownies of your life! And most importantly, don’t forget to share your experience with me! I’d love to hear your feedback, see your photos, and learn about any variations you’ve tried. You can tag me on social media using [Your Social Media Handle] or leave a comment below. Happy baking, and enjoy every single bite of these decadent Gordon Ramsay Chocolate Brownies! I can’t wait to hear what you think!
Gordon Ramsay Chocolate Brownies: The Ultimate Recipe & Baking Tips
Fudgy and decadent dark chocolate brownies, optionally topped with a rich chocolate ganache. Perfect for any occasion!
Ingredients
Instructions
Recipe Notes
- Don’t Overmix: Overmixing the batter will develop the gluten in the flour, resulting in tough brownies. Mix just until the ingredients are combined.
- Use Good Quality Chocolate: The quality of the chocolate will greatly affect the flavor of the brownies. Use a good quality dark chocolate with at least 70% cocoa solids.
- Don’t Overbake: Overbaking the brownies will result in dry, crumbly brownies. Bake them until the top is slightly cracked and a skewer inserted into the center comes out with a few moist crumbs attached.
- Cool Completely: Let the brownies cool completely in the tin before cutting. This will prevent them from falling apart.
- Get Creative with Toppings: Feel free to add other toppings to your brownies, such as chocolate chips, caramel sauce, or a sprinkle of sea salt.
- Storage Instructions: These brownies can be stored in an airtight container at room temperature for up to 3 days, or in the refrigerator for up to a week. They can also be frozen for up to 3 months. If freezing, wrap them individually in plastic wrap and then place them in a freezer-safe bag or container. Thaw them overnight in the refrigerator before serving.
- Variations:
- Nutella Brownies: Swirl a few tablespoons of Nutella into the brownie batter before baking.
- Peanut Butter Brownies: Swirl a few tablespoons of peanut butter into the brownie batter before baking.
- Salted Caramel Brownies: Drizzle salted caramel sauce over the brownies after baking.
- Espresso Brownies: Add a teaspoon of instant espresso powder to the dry ingredients for a coffee-flavored brownie.
- White Chocolate Brownies (Blondies): Substitute the dark chocolate with white chocolate for a blondie version.

Leave a Comment