
Marshmallow Rice Krispies Halloween Brains are arguably the most deliciously ghoulish treat you can whip up for your spooky celebrations! Are you ready to impress (and perhaps slightly gross out in the best way) your party guests with a dessert that’s as frightfully fun as it is undeniably delicious? I know I am! This season, why settle for ordinary sweets when you can craft something truly memorable?
This classic no-bake confection, a staple of childhoods and potlucks, gets a spectacularly spooky makeover just in time for Halloween. While the original Rice Krispies treat holds a cherished spot in American culinary history for its simple joy and irresistible texture, transforming it into a “brain” brings a whole new level of playful macabre to the table. It’s the ultimate combination of nostalgia and novelty, perfect for any Halloween gathering.
People absolutely adore this dish for so many reasons. The familiar sweet, gooey marshmallow combined with the satisfying crunch of puffed rice cereal creates an unbeatable texture and flavor profile that’s universally loved. But beyond the taste, the convenience is unmatched – no oven required, making it a fantastic last-minute option for busy hosts. Plus, let’s be honest, the sheer delight of presenting a tray of realistic (but edible!) “brains” is simply unmatched. Get ready to create some truly unforgettable Marshmallow Rice Krispies Halloween Brains that will have everyone reaching for a second gruesome bite!

Ingredients:
- For the Marshmallow Rice Krispies Halloween Brains Base:
- 6 tablespoons (85g) unsalted butter, divided (I like to use a good quality butter for that rich flavor!)
- 2 (10 ounce) bags mini marshmallows (about 8-10 cups total, depending on how gooey you like them – I always lean towards more!)
- 12 cups crispy rice cereal (like Rice Krispies, of course!)
- 1/2 teaspoon vanilla extract (pure vanilla extract really elevates the flavor)
- Red and/or pink gel food coloring (gel colors provide intense, vibrant hues without thinning the mixture)
- For the “Bloody” Glaze & Decorations:
- 2 cups powdered sugar, sifted (this prevents lumps, which is crucial for a smooth glaze)
- 3-4 tablespoons milk or water (start with 3 and add more a tiny bit at a time until you reach your desired consistency)
- 1/2 teaspoon vanilla extract (again, for that lovely aroma and taste)
- Red gel food coloring (you’ll want a good amount to achieve that deep, spooky red)
- A few drops of blue or black gel food coloring (to deepen the red and give it a more realistic, darker blood look, if desired)
Equipment You’ll Need:
- Large non-stick pot or Dutch oven (for melting marshmallows)
- Large mixing bowl (to combine everything)
- 9×13 inch baking dish or several smaller baking sheets (for cooling)
- Parchment paper or wax paper (to prevent sticking)
- Non-stick cooking spray or a little extra butter for greasing
- Rubber spatula or wooden spoon (for stirring – a sturdy one is best!)
- Brain-shaped silicone mold(s) (these are key for getting that perfect brain shape! I usually use one that makes individual brains, or a larger one that you can cut from)
- Small mixing bowls (for coloring the Rice Krispies mix and for the glaze)
- Whisk (for the glaze)
- Pastry brush or spoon (for applying the “blood”)
- Gloves (optional, but highly recommended when working with gel food coloring, especially red!)
Phase 1: Preparing Your Brain Mold and Workspace
- First things first, let’s get our workspace ready. These Marshmallow Rice Krispies Halloween Brains are a bit sticky, so preparation is key!
- Prepare Your Mold(s): Generously grease your brain-shaped silicone mold(s) with non-stick cooking spray or a light coating of butter. Make sure to get into all the nooks and crannies to ensure your brains release easily later. If you’re using a larger brain mold, ensure it’s on a sturdy baking sheet for easy transfer to the fridge.
- Prepare Your Cooling Surface: Line a large baking sheet or a 9×13 inch baking dish with parchment paper or wax paper. Lightly spray this with non-stick cooking spray as well. This will be where any excess brains or pieces go, or if you’re making free-form brains.
- Measure Your Cereal: Measure out your 12 cups of crispy rice cereal and place it in a very large mixing bowl. Having it ready to go is crucial because once the marshmallows are melted, things move quickly!
- Get Your Coloring Ready: Have your red and pink gel food coloring tubes open and ready to use. You won’t want to be fumbling with caps when the marshmallow mixture is hot.
Phase 2: Melting the Marshmallows and Butter
- Melt the Butter: In your large non-stick pot or Dutch oven, melt 6 tablespoons of unsalted butter over low to medium-low heat. You want it fully melted, but not browned. I find that low heat is best to prevent scorching, giving you more control.
- Add the Marshmallows: Once the butter is melted, add the two bags of mini marshmallows to the pot. Stir them gently with your rubber spatula or wooden spoon, coating them in the melted butter.
- Melt Slowly and Steadily: Continue stirring constantly over low heat. This is the most important part for a smooth, homogenous base. The marshmallows will slowly begin to melt and expand. Keep stirring until the mixture is about 75% melted.
- Remove from Heat and Finish Melting: Once the marshmallows are mostly melted, remove the pot from the heat. The residual heat will continue to melt the remaining lumps. Continue stirring vigorously until the marshmallow mixture is completely smooth and glossy, with no lumps remaining. This step is important for a perfectly gooey Rice Krispies treat.
- Stir in Vanilla Extract: Now, quickly stir in the 1/2 teaspoon of vanilla extract until it’s fully incorporated. The aroma alone will tell you you’re on the right track!
Phase 3: Combining and Coloring the Rice Krispies Mixture
- Pour Over Cereal: Immediately pour the warm, melted marshmallow mixture over the crispy rice cereal in your large mixing bowl.
- Begin Mixing: Using your greased rubber spatula or spoon, gently fold and stir the cereal into the marshmallow mixture. Work quickly but thoroughly to ensure every single piece of cereal gets coated. It will be sticky and a bit challenging, but persevere!
- Time to Color! This is where our Marshmallow Rice Krispies Halloween Brains truly come to life. Once the cereal is mostly coated, it’s time to add the color. I like to divide my mixture into two or three smaller bowls at this point if I’m using multiple colors, or you can do it all in one if you want a single base color.
- Add Red Gel Food Coloring: For a realistic brain color, you’ll want a pale, slightly pinkish-red hue. Add a generous squirt of red gel food coloring (and a tiny dot of pink if you have it) to the mixture. Start with a smaller amount, mix it in, and then add more if you want a deeper color. Remember, it’s easier to add more color than to take it away! Keep stirring until the color is evenly distributed throughout the cereal mixture. The goal is a slightly unsettling, fleshy tone.
- Be Quick and Firm: The mixture will cool and become harder to work with as time passes, so work with purpose! Press it down firmly to ensure it’s well-mixed and cohesive.
Phase 4: Molding and Chilling the Halloween Brains
- Press into Molds: Now for the fun part – molding! Lightly grease your hands with butter or cooking spray (this is crucial for preventing sticking) or wear food-safe gloves. Take small portions of the colored Rice Krispies mixture and press it firmly into your prepared brain molds.
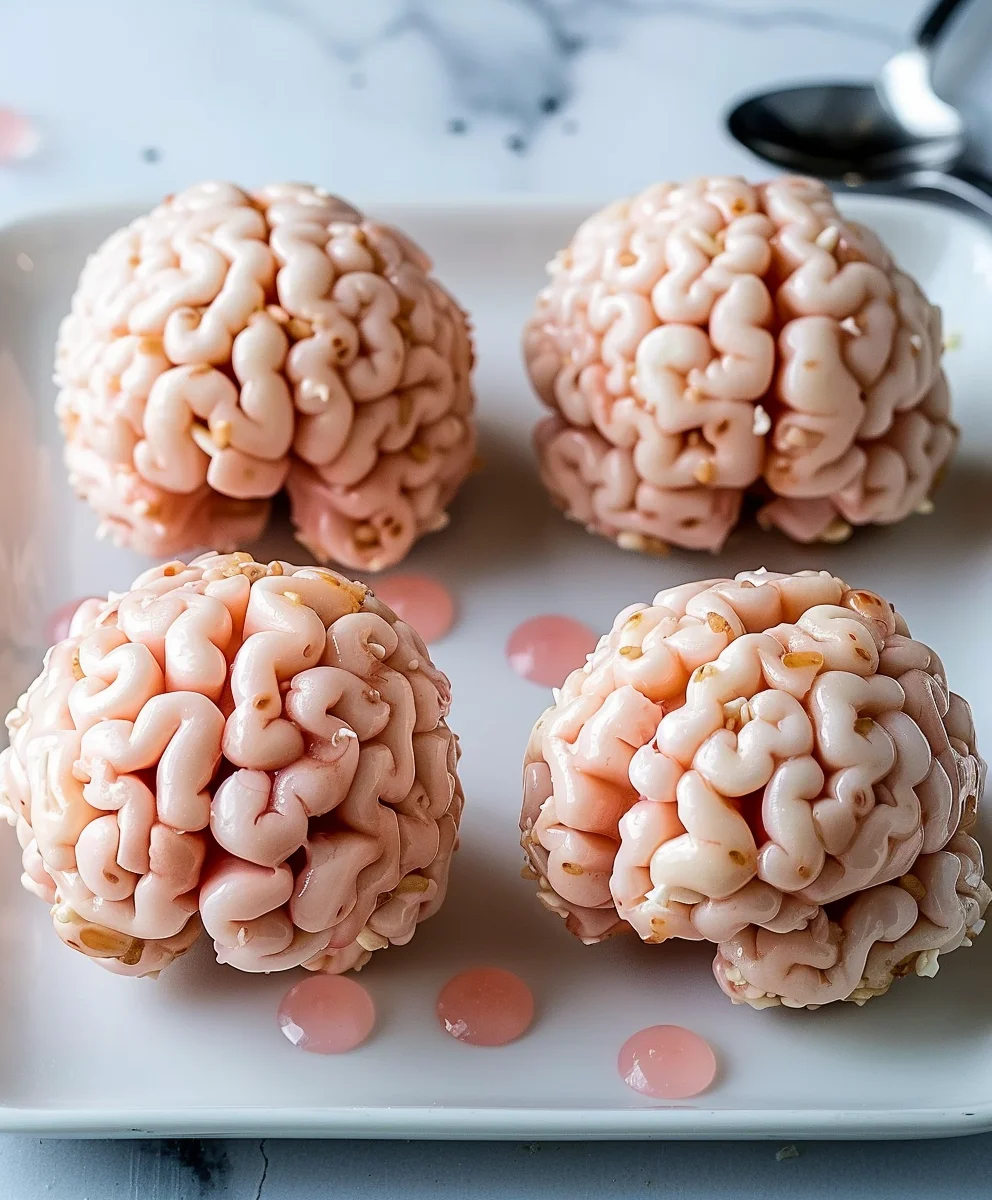
- Ensure Tight Packing: It’s important to pack the mixture in tightly. Really press it down into every crevice and curve of the mold. This will give you well-defined “gyri and sulci” (the squiggly bits of the brain) and a firm, stable brain shape. If you don’t pack it tightly enough, your brains might be too crumbly.
- Level the Back: Use your greased spatula or the palm of your hand to smooth and level the back of each brain, ensuring it has a flat base.
- Repeat for All Brains: Continue until all your brain molds are filled, or you’ve run out of mixture. Depending on the size of your molds, you might yield anywhere from 6 to 12 individual brains. If you have extra mixture, you can press it into a small baking dish to make traditional Rice Krispies treats, or even free-form some smaller, squigglier “brain matter” pieces!
- Chill to Set: Place your filled brain molds (on their baking sheet, if applicable) into the refrigerator. Let them chill for at least 30-60 minutes, or until they are firm and hold their shape beautifully. Chilling makes them much easier to unmold and handle without distortion. Patience here is rewarded with perfectly gruesome brains!
- Unmolding Your Creations: Once thoroughly chilled, gently flex the silicone molds to release your Marshmallow Rice Krispies Halloween Brains. They should pop out quite easily. Place them onto your parchment-lined cooling rack or platter, ready for their bloody makeover.
Phase 5: Decorating Your Spooky Creations (The Bloody Brain Effect!)
- Prepare the “Bloody” Glaze: In a small mixing bowl, combine the sifted powdered sugar with 3 tablespoons of milk or water and 1/2 teaspoon of vanilla extract. Whisk thoroughly until smooth. The consistency should be thick but pourable. If it’s too thick, add more liquid a tiny bit at a time (like half a teaspoon) until it reaches your desired consistency. If it’s too thin, whisk in a little more sifted powdered sugar.
- Color the Glaze: Now for the blood! Add generous drops of red gel food coloring to the glaze. Stir well. I like to add a tiny drop or two of blue or black gel food coloring as well – this deepens the red and gives it a more realistic, darker, almost coagulated blood color that’s truly unsettling. Mix until you achieve a truly spooky, deep red hue.
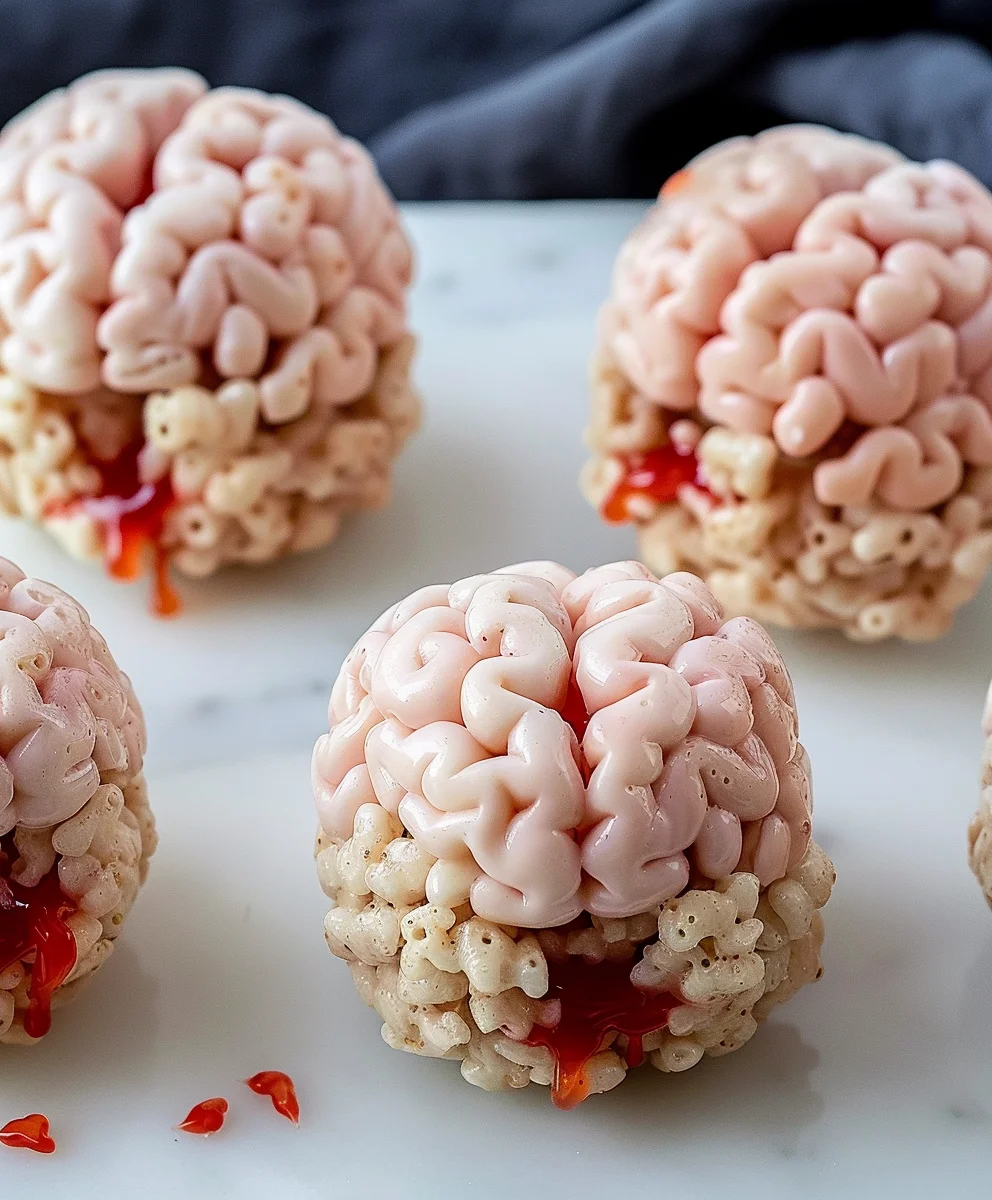
- Apply the “Blood”: Place your firm, chilled Rice Krispies brains on a cooling rack set over a piece of parchment paper or a tray (to catch drips). Using a spoon or a clean pastry brush, carefully drizzle and brush the “bloody” glaze over the brains. You want to focus on making it look like it’s oozing from the crevices. Don’t cover the entire brain perfectly; let some of the “fleshy” Rice Krispies base show through for contrast.
- Create Drips and Pools: For maximum effect, let some of the glaze drip down the sides of the brains. You can even create small pools of “blood” around the base of the brains on your serving platter for an extra gruesome touch.
- Allow to Set: Let the decorated Marshmallow Rice Krispies Halloween Brains sit at room temperature for about 15-30 minutes, or until the glaze has slightly set. This prevents stickiness and ensures your “blood” stays put. For faster setting, you can return them to the refrigerator for a brief period.
- Final Touches (Optional): For an even more terrifying look, you could add tiny edible “worms” or “maggots” (made from gummy candies or fondant) onto the brains before the glaze fully sets, or drizzle a little extra “blood” just before serving.
Chef’s Tips for Perfect Marshmallow Rice Krispies Halloween Brains:
- Fresh Marshmallows are Key: Always use fresh marshmallows! Old, stale marshmallows tend to be harder to melt and can result in a tougher, less gooey treat. Trust me, it makes a huge difference in the texture.
- Low Heat for Melting: When melting butter and marshmallows, always keep the heat on low. High heat can burn the marshmallows, giving them a bitter taste and a hard texture. Gentle heat ensures a smooth, stretchy base.
- Grease Everything: This mixture is incredibly sticky! Grease your pot, spatula, hands, and molds liberally with butter or non-stick spray. This will save you a lot of frustration and make cleanup much easier.
- Work Quickly: Marshmallow Rice Krispies treats set up fast once they start to cool. Have all your ingredients measured and tools ready before you begin the melting process. Speed is your friend!
- Don’t Overmix the Cereal: Once you add the cereal to the marshmallow mixture, mix just until it’s evenly coated. Overmixing can crush the cereal, leading to a less crispy texture.
- Pack Firmly into Molds: To get those distinct brain-like ridges and a sturdy final product, you need to press the mixture very firmly into the molds. Don’t be shy about it!
- Gel Food Coloring is Best: For vibrant, concentrated colors without adding too much liquid, always opt for gel food coloring over liquid drops. This is especially important for achieving the intense reds and pinks needed for our “Marshmallow Rice Krispies Halloween Brains.”
- Chill for Easy Unmolding: Chilling your molded brains in the refrigerator for at least 30 minutes is non-negotiable. It makes them firm, easy to handle, and ensures they pop out of the molds cleanly without losing their spooky shape.
- Consistency of the “Blood”: When making your “bloody” glaze, adjust the milk/water amount carefully. You want it thick enough to coat but thin enough to drizzle and create realistic drips. Too thin, and it will run off; too thick, and it won’t look like blood.
- Storage: Store your Marshmallow Rice Krispies Halloween Brains in an airtight container at room temperature for up to 2-3 days. If stored in the fridge, they can become a bit firm, so let them come to room temperature for about 15 minutes before serving for optimal chewiness.
Storage and Serving Suggestions:
- Airtight Storage: Store your completed Marshmallow Rice Krispies Halloween Brains in an airtight container at room temperature. They are best enjoyed within 2-3 days for optimal freshness and chewiness. If you store them in the refrigerator, they tend to firm up quite a bit. If you do chill them for longer storage, let them sit at room temperature for about 15-30 minutes before serving to soften slightly.
- Presentation is Key: Arrange your spooky brains on a platter. For an extra ghoulish touch, line the platter with dark fabric, fake cobwebs, or even some dry ice (handle with extreme care and ensure proper ventilation!) for a foggy, eerie effect.
- Creative Displays: Consider placing them amongst other Halloween treats like gummy worms, candy corn, or even fake spider webs to create a truly terrifying dessert tableau. A shallow pool of extra “blood” glaze on the serving platter can enhance the macabre aesthetic.
- Individual Servings: These are perfect as individual, grab-and-go treats at a Halloween party, or as a fun, unique dessert to bring to a potluck. Their individual brain shape makes them easy to portion.
- Pairing Suggestions: Serve these creepy treats with a spooky punch, a witch’s brew cocktail (for adults!), or simply a glass of milk for the kids. The sweet, gooey texture pairs wonderfully with any beverage.
Why These Marshmallow Rice Krispies Halloween Brains Are a Must-Make:
- Unforgettable Impression: These Marshmallow Rice Krispies Halloween Brains are guaranteed to be the talking point of any Halloween gathering. Their realistic (and slightly unsettling!) appearance will delight and gross out your guests in the best possible way.
- Delicious and Classic: Beneath their gruesome exterior, these are still the beloved, classic crispy, gooey, and sweet Rice Krispies treats that everyone adores. It’s comfort food with a spooky twist!
- Kid-Friendly Fun: While they look spooky, the process of making these can be a fantastic, hands-on activity for kids (with adult supervision, especially for the hot marshmallow melting!). They’ll love helping to color and mold their “Marshmallow Rice Krispies Halloween Brains.”
- Simple Ingredients: You don’t need fancy, hard-to-find ingredients to create these impressive treats. Most of what you need is likely already in your pantry or easily found at any grocery store.
- Customizable Spookiness: You can adjust the “blood” level to your liking – from a light drizzle to a truly gory, dripping effect. Add other edible decorations like gummy worms or candy eyeballs for extra creepy customization.
- Perfect for Any Halloween Event: Whether it’s a themed party, a school celebration, or just a fun family activity, these “Marshmallow Rice Krispies Halloween Brains” fit right in with the spooky season’s festivities.
Conclusion:
And there you have it, my friends! We’ve journeyed through the simple, wonderfully gooey steps to create a Halloween treat that’s guaranteed to be the talk of any spooky gathering. I truly hope you’ve enjoyed this recipe as much as I have enjoyed sharing it. What makes this recipe a true standout, a definite must-try in my book, isn’t just its undeniable visual appeal, though let’s be honest, those edible brains are delightfully gruesome. It’s the perfect combination of ease, speed, and that universally loved, crispy-chewy texture. You don’t need to be a master chef to whip up a batch, making it an ideal project for busy parents, enthusiastic kids, or anyone looking for a quick yet impactful contribution to a Halloween party spread.
Forget complicated baking or intricate decorating; these Marshmallow Rice Krispies Halloween Brains deliver maximum spooky impact with minimal effort. They are a fantastic hands-on activity, allowing for creative expression with the molding and decoration, and the resulting treats are not only incredibly fun to look at but utterly delicious to devour. The sweet, buttery marshmallow binding the crispy cereal creates an irresistible bite that will have both kids and adults reaching for “just one more.” Plus, the sheer joy of watching guests’ reactions as they realize they’re about to eat a “brain” is a reward in itself! It truly captures the playful spirit of Halloween, blending a bit of macabre humor with nostalgic, comforting flavors.
Unleash Your Inner Mad Scientist: Serving Suggestions and Spooky Variations
Now, let’s talk about making these creepy creations truly your own! While I’ve given you the core recipe, there’s so much room to play and personalize. For serving, these brains are fantastic piled high on a platter, perhaps nestled on a bed of “graveyard dirt” (crushed Oreo cookies) for an extra eerie effect. You could also place individual brains into clear plastic treat bags tied with orange or black ribbons for party favors. Imagine them as the centerpiece of a dessert table, surrounded by other ghoulish delights, instantly drawing all eyes and sparking conversations. They’re sturdy enough to transport easily, making them perfect for potlucks or school parties.
When it comes to variations, don’t hold back! Instead of just red gel, consider a vibrant green for a “zombie brain” look, or a deep purple for an “alien brain.” You could drizzle them with melted chocolate for a contrasting texture and flavor, or sprinkle them with black or orange sanding sugar before they fully set for extra sparkle. Think about adding a few drops of peppermint extract to your melted marshmallows for a minty twist, or almond extract for a marzipan-like nuance – just be careful not to overpower the classic flavor. For those who love a bit of tang, a thin glaze made from powdered sugar and lemon juice, dyed red, could offer a deliciously gruesome “bloody” topping that’s a little different from the gel. If you’re feeling extra adventurous, try swapping out a portion of the Rice Krispies for Cocoa Krispies to create dark, ominous brains, or add a handful of mini chocolate chips to the mixture for hidden treasures.
Another fun idea is to experiment with different “eyeballs.” While candy eyes are classic, you could use M&Ms, small gumballs, or even dollops of white frosting with a black dot for pupils. Don’t limit yourself to just brains, either! Using the same base recipe, you could mold them into spooky fingers, severed ears, or even tiny ghosts and pumpkins using cookie cutters. The possibilities are truly endless, limited only by your imagination and how much fun you want to have in the kitchen!
Your Turn: Share Your Spooky Creations!
So, now it’s your turn. I truly encourage you to step into the kitchen, gather your ingredients, and give this recipe a whirl. It’s a fantastic way to add a homemade, personal touch to your Halloween festivities without any stress. The smiles and gasps of delight (or disgust, in the best possible way!) will be well worth the minimal effort. Whether you stick precisely to my instructions or decide to unleash your inner mad scientist with some wild variations, I have no doubt you’ll create something spectacular and delicious.
Once you’ve conjured up your batch of frightfully delightful treats, I would absolutely love to hear about your experience! Did you try a new color? Did you add a secret ingredient? What kind of reactions did they get? Please don’t keep your culinary triumphs (or hilarious mishaps!) to yourself. Share your photos, your stories, and your unique twists in the comments below. Let’s build a little community of spooky bakers and inspire each other with our creative genius. Happy Halloween, and happy baking!
Marshmallow Rice Krispies Halloween Brains
Marshmallow Rice Krispies Halloween Brains are the most deliciously ghoulish treat you can whip up for your spooky celebrations! This classic no-bake confection gets a spectacularly spooky makeover, combining nostalgia and novelty perfect for any Halloween gathering.
Ingredients
-
6 tablespoons unsalted butter
-
6 cups regular marshmallows
-
4 cups crispy rice cereal
-
1/2 teaspoon salt
-
Red gel food coloring, as needed
-
2 cups powdered sugar, sifted
-
3-4 tablespoons milk or water
-
1/2 teaspoon vanilla extract
-
Blue or black gel food coloring, a few drops (optional)
Instructions
-
Step 1
Generously grease brain-shaped silicone mold(s) and line a baking sheet. Measure 4 cups crispy rice cereal into a very large mixing bowl. -
Step 2
In a large non-stick pot, melt 6 tablespoons unsalted butter over low heat. Add 6 cups regular marshmallows; stir gently until 75% melted. Remove from heat, stir vigorously until completely smooth. Quickly stir in 1/2 teaspoon vanilla extract and 1/2 teaspoon salt. -
Step 3
Immediately pour the warm marshmallow mixture over the crispy rice cereal. Gently fold until cereal is mostly coated. Add red gel food coloring until a pale, fleshy hue is achieved and color is evenly distributed. Work quickly before the mixture cools. -
Step 4
Lightly grease hands or wear gloves. Firmly press small portions of the colored Rice Krispies mixture into prepared brain molds, ensuring tight packing into all crevices. Level the back. Place filled molds in the refrigerator for 30-60 minutes to chill and set. Gently unmold once firm. -
Step 5
In a small bowl, combine 2 cups sifted powdered sugar, 3-4 tablespoons milk or water, and 1/2 teaspoon vanilla extract. Whisk thoroughly until smooth and thick but pourable. Add red gel food coloring (and optional few drops of blue or black) to achieve a deep, spooky red color. -
Step 6
Place chilled Rice Krispies brains on a cooling rack set over parchment paper. Using a spoon or pastry brush, drizzle and brush the ‘bloody’ glaze over the brains, focusing on crevices and allowing drips for a gruesome effect. Let sit at room temperature for 15-30 minutes, or refrigerate briefly, until the glaze has slightly set before serving or storing.
Important Information
Nutrition Facts (Per Serving)
It is important to consider this information as approximate and not to use it as definitive health advice.
Allergy Information
Please check ingredients for potential allergens and consult a health professional if in doubt.
Leave a Comment