
Bat Oreos are more than just a sweet treat; they’re a delightful invitation to embrace the playful spirit of the spooky season! As someone who adores bringing a touch of whimsy to any celebration, I find these charmingly ghoulish cookies to be an absolute showstopper. While the iconic Oreo cookie has delighted palates since 1912, these creative bat variations have emerged as a beloved modern tradition, particularly during Halloween, transforming a classic into a thematic masterpiece.
People absolutely adore this dish because it masterfully combines the universally cherished chocolatey crunch and creamy filling of an Oreo with an irresistibly cute and easy-to-create design. The sheer joy of seeing faces light up—especially children’s—when presented with these adorable little winged cookies is truly unmatched. I particularly love their convenience; they are incredibly simple and quick to assemble, making them the perfect last-minute addition to a Halloween party spread or a fun, interactive baking project with family. If you’re searching for a dessert that is both deliciously familiar and delightfully thematic, these Bat Oreos are, without a doubt, a must-try for your next autumnal gathering.

Ingredients:
- Standard Chocolate Sandwich Cookies: Approximately 36-40 cookies (two standard packages), such as Oreos. These will form the body of our fantastic Bat Oreos.
- Mini Chocolate Sandwich Cookies: Approximately 72-80 mini cookies (two standard packages). These little beauties are going to be transformed into our adorable bat wings.
- Black Candy Melts: One 12-ounce bag (about 340g). This will provide that classic dark, mysterious coating for our Bat Oreos, making them truly stand out.
- White Candy Melts: A small handful, about 2-3 ounces (approximately 50-85g). We’ll use these to create the signature “glue” for our googly eyes, though a bit of the black can work in a pinch.
- Edible Googly Eyes: Around 72-80 small edible googly eyes. These are non-negotiable for bringing our Bat Oreos to life with so much personality!
- Vegetable Shortening or Coconut Oil (optional): 1-2 teaspoons. This is my secret weapon for achieving the perfect smooth consistency in our melted candy melts, ensuring a beautiful, even coating for your Bat Oreos.
- Parchment Paper or Wax Paper: Several sheets. Essential for a non-stick surface, making cleanup a breeze and ensuring your Bat Oreos don’t stick to your work surface.
- Baking Sheets: Two large baking sheets. These will be your drying racks for the newly assembled Bat Oreos.
- Toothpicks or Small Offset Spatula: Useful tools for delicate handling and applying small dabs of chocolate.
- Shallow, Microwave-Safe Bowls: Two, one for the black candy melts and one for the white.
- A Fork or Dipping Tools: For easily submerging and retrieving your cookies from the melted candy.
Preparation Phase: Setting Up for Success
Alright, my fellow culinary adventurers, before we dive into the delicious world of crafting our stunning Bat Oreos, let’s get our workspace perfectly organized. This initial setup might seem simple, but trust me, it’s the cornerstone of a smooth, stress-free, and ultimately successful baking experience. Taking a few extra minutes now will save you from sticky fingers and frantic searches later!
- First things first, clear a good amount of counter space. You’re going to need room for your ingredients, your melting station, and especially your drying station for the finished Bat Oreos. I usually lay down a clean kitchen towel just to protect my countertops from any potential drips, though parchment paper is our primary shield here.
- Line two large baking sheets with parchment paper or wax paper. This is absolutely crucial! The candy melts can be quite sticky, and having a non-stick surface ensures that your beautiful Bat Oreos can be easily lifted off once they’ve set. Plus, it makes cleanup incredibly simple, which is always a win in my book.
- Next, let’s prepare our mini sandwich cookies. These are destined to become the magnificent wings for our Bat Oreos. Carefully twist apart each mini cookie. You want to aim for clean halves, with the cream filling ideally sticking to one side. If it breaks unevenly, don’t fret too much; you can gently scrape off excess cream or just use the cleaner half. You’ll need two halves for each regular-sized cookie you plan to turn into a bat, so if you’re making 36 Bat Oreos, you’ll need 72 mini cookie halves. This step can be a little tedious, so put on some music or an engaging podcast and enjoy the process. I often enlist the help of my family for this part – it’s a great way to get everyone involved! Once separated, arrange these mini cookie halves on a third piece of parchment paper, ready to be dipped.
- Measure out your black candy melts into one of your shallow, microwave-safe bowls. Don’t overload the bowl; it’s better to melt in batches if you have a very large bag, as this helps prevent overheating and ensures more even melting. In another small, separate bowl, place a handful of your white candy melts. These will be used specifically for attaching the edible googly eyes, and melting them separately prevents accidental mixing of colors and keeps our black candy pristine for the main coating of our Bat Oreos.
- Have your edible googly eyes ready and within easy reach. They should be in a small bowl or on a plate, close to your dipping station, because you’ll need to place them quickly once the main Bat Oreo body is dipped.
By taking the time to set up meticulously, you’re not just organizing your space; you’re setting yourself up for a delightful and seamless crafting experience. You’ll find that when every component is prepped and within arm’s reach, the actual assembly of your Bat Oreos flows beautifully and without a hitch.
Melting the Candy Melts: The Bat Coating
Now that our workstation is perfectly prepped, it’s time for one of the most crucial steps in creating our stunning Bat Oreos: melting the candy melts. Achieving the right consistency is key for a smooth, glossy finish that makes these treats truly shine. Trust me, a perfectly melted coating makes all the difference in the final presentation of your Bat Oreos.
- Melting the Black Candy Melts: Place your black candy melts in a microwave-safe bowl. I highly recommend melting in short intervals to prevent scorching. Start by microwaving on 50% power for 30 seconds. Remove the bowl and stir the melts vigorously with a spoon or rubber spatula, even if they don’t look like they’ve melted much. The residual heat will continue the melting process.
- Return the bowl to the microwave and continue heating at 50% power for 15-second intervals, stirring thoroughly after each interval. It’s absolutely vital to stir after every short burst of heat. This distributes the warmth evenly and prevents the candy from becoming clumpy or seizing. You’re looking for a smooth, pourable consistency, similar to slightly thick paint. It should be fluid enough to easily coat the cookies without being too thin or too thick.
- Adjusting Consistency (The Secret Weapon): If, after several intervals and thorough stirring, your candy melts still seem a little too thick or pasty, this is where our optional vegetable shortening or coconut oil comes into play. Add about half a teaspoon of shortening or coconut oil to the melted candy melts. Stir it in thoroughly until completely incorporated. If needed, add another half teaspoon, stirring well after each addition, until you achieve that perfect velvety smooth texture. Be cautious not to add too much at once, as it can thin the candy too much and make it difficult to coat your Bat Oreos effectively. This step is a game-changer for achieving that professional-looking finish.
- Maintaining Temperature: As you work, the candy melts might start to thicken. If this happens, simply pop the bowl back into the microwave for another 10-15 seconds at 50% power, stir well, and it should return to its ideal consistency. A warm, fluid coating is essential for dipping your Bat Oreos smoothly.
- Melting the White Candy Melts: While the black candy melts are our star, the white melts are equally important for the smaller details. Using a separate, small microwave-safe bowl, melt the white candy melts using the same low-and-slow microwave method: 15-second intervals at 50% power, stirring diligently after each. You only need a small amount, so it will melt quickly. We don’t need to worry as much about consistency here as we’re just using it for tiny dabs to adhere the eyes. Keep this bowl close but separate from your main dipping station.
Having perfectly melted candy melts is the foundation for creating beautiful, professional-looking Bat Oreos. This attentive approach ensures your chocolate coating is flawless, smooth, and sets up beautifully, making your Halloween treats truly spectacular. Resist the urge to rush this stage; patience here will be richly rewarded with perfectly coated Bat Oreos.
Assembling Your Bat Oreos: The Creative Touch
This is where the magic truly happens! With our perfectly melted candy and prepped ingredients, we’re ready to transform simple cookies into adorable, spooky Bat Oreos. This phase is all about precision, speed, and a touch of artistic flair. Each step contributes to making your Bat Oreos look their best, so let’s take our time and enjoy the creative process!
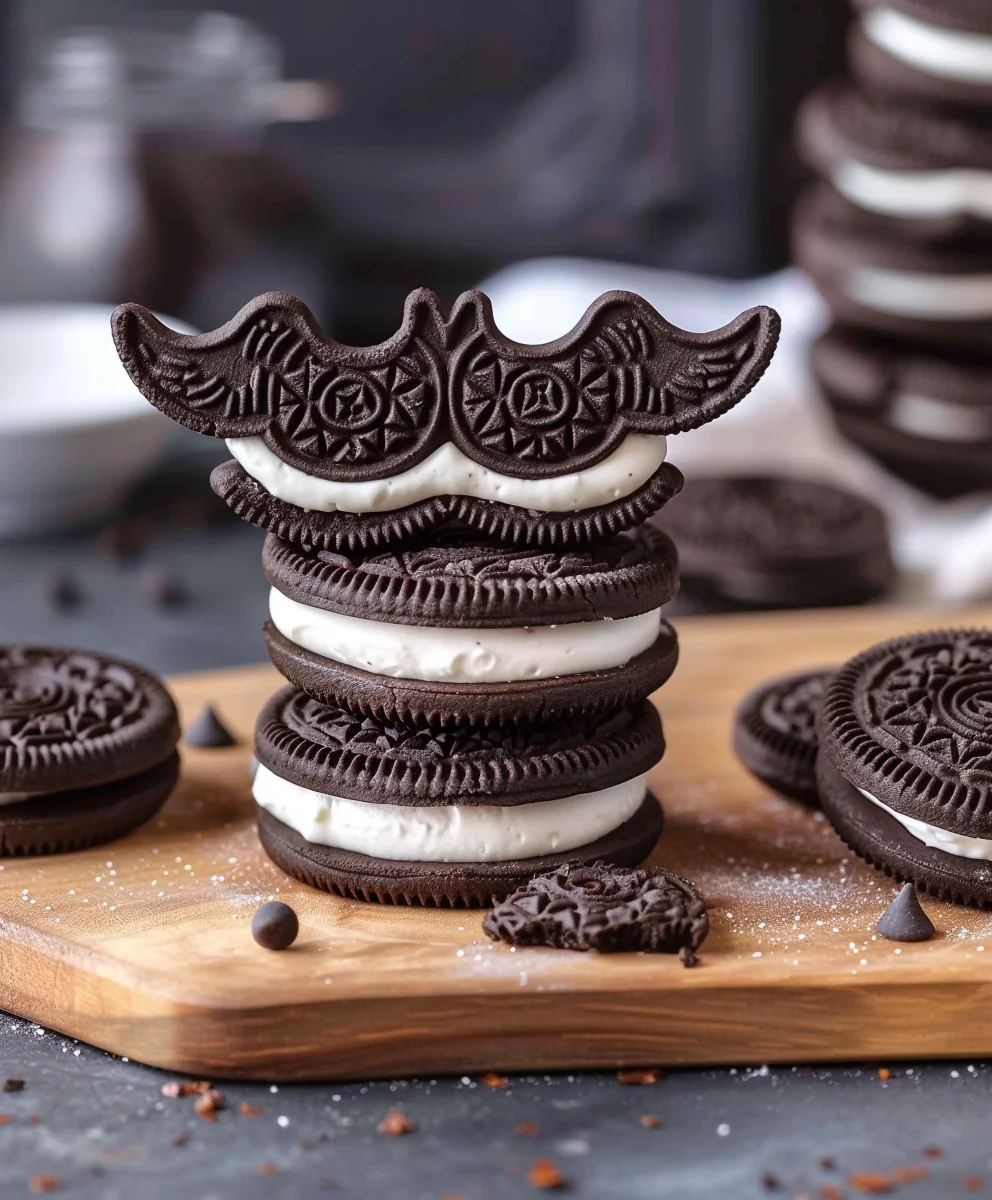
- Dipping the Bat Oreo Bodies: Take one of your standard-sized chocolate sandwich cookies. Using a fork or a specialized dipping tool, carefully submerge the entire cookie into the bowl of melted black candy melts. Make sure it’s fully coated. Lift the cookie out and gently tap the fork against the side of the bowl, allowing any excess candy to drip off. This is important for achieving a smooth, even coating without thick puddles forming underneath. You want just enough coating to make it look sleek and neat, like a true bat silhouette.
- Attaching the Wings: Immediately after dipping the cookie and while the black candy is still wet and pliable, carefully pick up two of your prepared mini cookie halves (the ones with the cream side facing up, if possible, for better adhesion). Gently press one mini cookie half into each side of the freshly dipped standard cookie, positioning them near the top half to resemble bat wings. The wet candy will act as the glue. Make sure they are pressed firmly enough to adhere but not so hard that they break or dislodge too much of the coating. This is the defining moment for your Bat Oreos, giving them their iconic shape!
- Placing on Parchment: Carefully transfer your newly winged Bat Oreo onto one of your prepared parchment-lined baking sheets. Leave a little space between each cookie to allow for proper setting and to prevent them from sticking together.
- Adding the Googly Eyes: Now for the personality! While the black candy coating is still somewhat wet (but starting to set), it’s time for the eyes. Dip a toothpick or the very tip of a clean, small offset spatula into your melted white candy melts. Dab a tiny dot of white candy onto the front of the Bat Oreo where you want an eye to go. Immediately press one edible googly eye onto that white dot. Repeat for the second eye. The white candy acts as a strong adhesive, ensuring your googly eyes stay firmly in place. If you wait too long, the black candy will set, and the eyes won’t stick properly, so work relatively quickly from dipping to eye placement for each Bat Oreo. If the black candy sets too fast, you can use a tiny dab of the melted white candy to “glue” the eyes on top of the set black coating.
- Repeating the Process: Continue this delightful process, dipping each standard cookie, attaching the mini cookie wings, placing it on the parchment, and then adding the googly eyes. Work in batches that feel comfortable for you. The key is to keep the candy melts warm and fluid and to work efficiently so that each component sets together beautifully.
As you meticulously assemble each of these Bat Oreos, you’ll see their character emerge. This isn’t just baking; it’s bringing tiny, delicious creatures to life! The combination of the rich chocolate coating, the crisp cookie texture, and those playful googly eyes makes these Bat Oreos irresistible. It’s truly a rewarding experience to watch your tray fill up with these charming Halloween treats.
Finishing Touches and Storage: The Grand Reveal
You’ve done it! Your baking sheets are now adorned with a delightful army of spooky-cute Bat Oreos. But our journey isn’t quite over. We need to ensure they set properly and are stored in a way that preserves their deliciousness and adorable appearance. This final stage is all about perfection and preparing for the grand reveal of your handcrafted treats.
- Allowing to Set: Once all your Bat Oreos are assembled, complete with their wings and googly eyes, it’s crucial to give them ample time to set. The candy melts need to cool completely and harden. You can simply leave the baking sheets on your counter at room temperature for about 30-60 minutes, depending on the warmth of your kitchen. For a faster set, especially if you’re in a hurry or your kitchen is particularly warm, you can carefully transfer the baking sheets to the refrigerator for about 10-15 minutes. Just be mindful not to leave them in the fridge for too long, as extreme cold can sometimes cause the chocolate to “bloom” (develop a whitish film), though this is less common with candy melts than with real chocolate. The key is to ensure the coating is completely firm to the touch before handling them further.
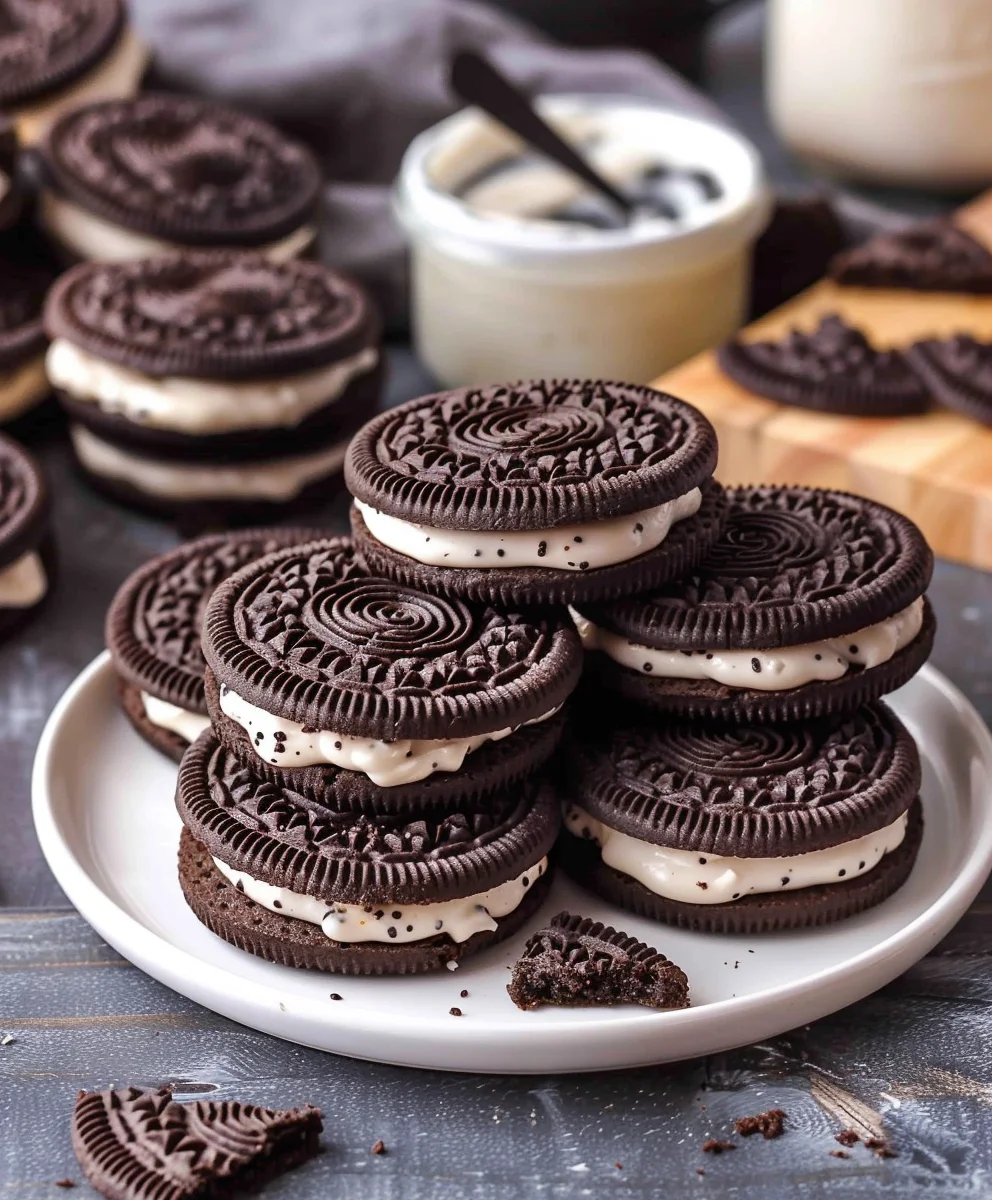
- Careful Removal: Once fully set, carefully peel the Bat Oreos off the parchment paper. They should lift off easily without sticking, thanks to our initial preparation. If any small bits of candy have pooled around the base, you can gently trim them with a small, sharp knife, but often, the tapping-off process during dipping prevents this. Admire your handiwork! Each of these Bat Oreos is a testament to your patience and creativity.
- Presentation Ideas: Now for the fun part – showcasing your masterpieces! Bat Oreos are fantastic for Halloween parties, school events, or just as a fun, spooky snack at home. Arrange them on a festive platter, perhaps alongside other Halloween-themed treats. They look especially charming when nestled among faux cobwebs, plastic spiders, or dried leaves to create a truly atmospheric display. You can stack them on a cake stand or arrange them individually on small, decorative plates. They also make wonderful edible gifts; simply place a few in a cellophane bag tied with a spooky ribbon.
- Storage: To keep your Bat Oreos fresh and delicious, store them in an airtight container at room temperature. Layer them gently between sheets of parchment paper if you need to stack them, to prevent any sticking or damage to the delicate wings and eyes. Stored correctly, they will remain fresh for up to one week. Avoid refrigerating them for extended periods, as it can cause condensation when they return to room temperature, which might make the cookies soft or affect the candy coating’s appearance.
- Troubleshooting (Just in Case!):
- Candy Melts Seizing: If your candy melts ever become thick, grainy, or clumpy despite adding shortening, they might have seized, often due to a tiny bit of water getting in or being overheated. Unfortunately, seized candy melts are usually beyond repair. It’s best to discard them and start with a fresh batch. This is why short, careful heating intervals are so important!
- Wings Falling Off: If the mini cookie wings aren’t sticking, it’s usually because the black candy coating has started to set too quickly. Next time, work a little faster when dipping and attaching the wings, or ensure your candy melts are warm and fluid enough. You can always use a tiny dab of additional melted candy (black or white) as extra “glue” if you have a rogue wing.
- Googly Eyes Not Sticking: Similar to the wings, this happens if the base coating is too dry. Make sure to place the eyes immediately after dipping, or use a fresh dab of white candy melts as your adhesive.
Each Bat Oreo you’ve created is not just a delicious treat but a small piece of edible art, perfect for adding a touch of whimsy and spookiness to any occasion. I absolutely adore making these, and I hope you’ve found as much joy in crafting your own batch of delightful Bat Oreos as I do!
Conclusion:
Well, my friends, we’ve reached the sweet finale of our delicious journey, and I genuinely hope you’re feeling inspired and excited to get into your kitchen! What we’ve explored today isn’t just another recipe; it’s an invitation to create something truly special, something that brings smiles, laughter, and a touch of delightful whimsy to any gathering. I truly believe this recipe is an absolute gem, a standout dish that promises both ease in preparation and an explosion of flavor. It’s not often you find a treat that so perfectly balances simplicity with a gourmet touch, and that’s precisely why it’s a must-try in my book.
From the first glance, its visual appeal is captivating, drawing you in with vibrant colors and textures that hint at the deliciousness within. But beyond its stunning looks, it’s the incredible blend of flavors that truly makes this recipe unforgettable. We’re talking about a symphony on your palate – a perfect harmony of sweet and savory, a delightful crunch followed by a smooth, melting sensation. Each bite offers a satisfying experience, leaving you craving just one more. It’s the kind of dish that makes people ask for the recipe, that becomes a talking point at dinner parties, and that you’ll find yourself wanting to make again and again.
Serving Suggestions & Creative Variations:
Now that you’ve mastered the art of creating this masterpiece, let’s talk about how to present it and even take it to the next level. For an elegant presentation, consider arranging individual servings on small dessert plates, perhaps with a delicate dusting of cocoa powder or a simple drizzle of a contrasting sauce – a vibrant raspberry coulis or a rich caramel would be exquisite. If you’re serving it buffet-style, a beautiful tiered stand can really elevate its visual impact, making it feel like a centerpiece. For a more casual, fun vibe, especially if you’re making the delightful Bat Oreos, arrange them artfully on a large platter with other themed treats, perhaps alongside some ghost-shaped cookies for Halloween or colorful sprinkles for a birthday party. Imagine a festive spread, with these charming treats taking center stage, inviting everyone to indulge!
But don’t stop there! The true beauty of this recipe lies in its incredible versatility, allowing for endless creative variations to suit any taste or occasion. Feeling adventurous? Try incorporating different extracts into the base mixture – a hint of almond, a touch of peppermint, or even a bright orange zest can completely transform the flavor profile and offer a delightful surprise. For an extra layer of texture that truly elevates each bite, consider folding in finely chopped nuts, a generous sprinkle of toasted coconut flakes, or mini chocolate chips just before the final chilling stage. If you’re looking for a seasonal twist, think about infusing it with warm pumpkin spice during autumn or aromatic gingerbread flavors around the holidays – it’s a fantastic way to celebrate the seasons. And for those with dietary considerations, please don’t shy away from experimenting with high-quality gluten-free alternatives for the main components, or dairy-free substitutions where applicable. The core technique remains wonderfully adaptable, allowing you to tailor it to almost any preference or dietary need without compromising on flavor or fun.
For a truly memorable dessert spread, consider pairing this dish with a complementary beverage that enhances its unique qualities. A rich, dark roast coffee or a delicate herbal tea would perfectly balance its sweetness, offering a sophisticated counterpoint. For a more festive and celebratory occasion, a sparkling wine or a light, crisp fruit punch can create a wonderful contrast, lifting the flavors and adding to the merriment. If you’re enjoying it as a cozy after-dinner treat, a small glass of dessert wine or even a creamy liqueur would be a decadent accompaniment, making the moment feel truly special. And for that ultimate comforting, cozy feel, a warm mug of spiced cider or luxurious hot chocolate would be an absolute dream pairing, perfect for snuggling up and savoring every bite.
This recipe isn’t just about following steps; it’s about embracing the sheer joy of creation, the immense satisfaction of making something beautiful and delicious with your own hands. It’s about the pure delight of sharing that joy with others, watching their faces light up as they take their first bite, experiencing that moment of pure bliss. It’s a versatile canvas for your culinary imagination, ready to be adapted for birthdays, holidays, special celebrations, or simply a delightful weekend treat that makes an ordinary day feel extraordinary. The possibilities are truly endless, limited only by your creativity and willingness to experiment.
So, I implore you, don’t just read about it – try it! Roll up your sleeves, gather your ingredients, and embark on this wonderful cooking adventure. I promise you, the reward is well worth the effort, delivering both a sense of accomplishment and an absolutely delicious outcome. And when you do, please, please share your experiences with me! Did you add a secret ingredient that blew everyone away? Did you come up with a brilliant new serving suggestion that I haven’t even thought of? Or perhaps you found an even simpler way to tackle a particular step that you’d love to pass on? Your insights, your tips, and your unique creations inspire not just me, but the entire community of home cooks who are always looking for new ways to make magic in their kitchens. Tag me in your photos, leave a comment below, or send me an email – I absolutely love seeing your culinary masterpieces come to life and hearing about your triumphs. Let’s celebrate the magic of homemade treats together!
Happy cooking, and even happier eating!
Easy Bat Oreos Recipe
Transform classic Oreos into charmingly spooky Bat Oreos, perfect for Halloween! This delightful treat combines the beloved chocolatey crunch of an Oreo with an irresistibly cute design, making it a simple, quick, and fun project for all ages.
Ingredients
-
30 Double Stuf Oreo cookies
-
30 Mini Chocolate Sandwich Cookies (for wings)
-
12 ounces (340g) Black Candy Melts
-
¾ cup Mini Semisweet Chocolate Chips
-
40 Edible Googly Eyes
-
1-2 teaspoons Vegetable Shortening or Coconut Oil (optional)
-
2-3 ounces (50-85g) White Candy Melts (optional, for eye adhesive)
Instructions
-
Step 1
Line two large baking sheets with parchment paper. Carefully twist apart 30 mini chocolate sandwich cookies to yield 60 clean halves for bat wings. Set aside. -
Step 2
In a shallow, microwave-safe bowl, melt the black candy melts in 30-second intervals at 50% power, stirring vigorously after each, until smooth. If too thick, stir in 1-2 teaspoons of vegetable shortening or coconut oil. In separate small bowls, melt the mini semisweet chocolate chips and optionally the white candy melts using the same low-and-slow method. Keep all melted chocolates warm and fluid. -
Step 3
Using a fork or dipping tool, carefully submerge one Double Stuf Oreo cookie into the melted black candy melts, ensuring it’s fully coated. Lift and gently tap the fork against the bowl to remove excess coating. -
Step 4
Immediately after dipping, while the black candy is still wet, gently press one mini cookie half onto each side of the dipped Oreo to form wings. Carefully transfer the winged Oreo to a parchment-lined baking sheet. Using a toothpick, dab a tiny bit of melted white candy melts (or chocolate chips) onto the front of the bat and adhere two edible googly eyes. (Note: With 40 eyes, you can make 20 bats with two eyes each, or 30 bats with a mix of one and two eyes, or just ensure 40 eyes are used across 30 bats as desired). Repeat for all 30 Oreo cookies. -
Step 5
Allow the Bat Oreos to set completely at room temperature (30-60 minutes) or in the refrigerator (10-15 minutes). Once the coating is firm, gently peel them off the parchment. Store in an airtight container at room temperature for up to one week.
Important Information
Nutrition Facts (Per Serving)
It is important to consider this information as approximate and not to use it as definitive health advice.
Allergy Information
Please check ingredients for potential allergens and consult a health professional if in doubt.


Leave a Comment