
French Toast Waffles are a delightful twist on two beloved breakfast classics, combining the rich, custardy goodness of French toast with the crispy, golden texture of waffles. Imagine waking up to the aroma of cinnamon and vanilla wafting through your kitchen, as you prepare this mouthwatering dish that is sure to impress family and friends alike. The history of French toast dates back to ancient times, but when it was transformed into waffles, it became a breakfast sensation that has captured hearts around the world.
People love French Toast Waffles not only for their incredible taste but also for their versatility. You can top them with fresh fruits, maple syrup, or even a dollop of whipped cream, making each bite a unique experience. Plus, the convenience of preparing these waffles in a matter of minutes makes them a go-to choice for busy mornings or leisurely brunches. Join me as we dive into this scrumptious recipe that will elevate your breakfast game and leave you craving more!

Ingredients:
- 4 large eggs
- 1 cup milk (whole or 2% for creaminess)
- 1 teaspoon vanilla extract
- 1 teaspoon ground cinnamon
- 1/4 teaspoon nutmeg (optional)
- 1 tablespoon sugar (adjust to taste)
- 8 slices of thick bread (brioche or challah work wonderfully)
- Butter or non-stick spray for the waffle iron
- Maple syrup, for serving
- Fresh berries or sliced bananas, for topping (optional)
- Powdered sugar, for dusting (optional)
Preparing the Batter
1. In a large mixing bowl, crack the 4 large eggs. I like to use a whisk for this part, as it helps to break up the yolks and combine everything smoothly. 2. Add 1 cup of milk to the eggs. You can use whole milk for a richer flavor or 2% if you prefer something lighter. 3. Pour in 1 teaspoon of vanilla extract. This adds a lovely aroma and flavor to the batter. 4. Sprinkle in 1 teaspoon of ground cinnamon and 1/4 teaspoon of nutmeg if you’re using it. The spices will give your French toast waffles that classic warm flavor. 5. Add 1 tablespoon of sugar. You can adjust this based on your sweetness preference. If you’re planning to top your waffles with syrup or fruit, you might want to reduce the sugar a bit. 6. Whisk everything together until the mixture is well combined and slightly frothy. This should take about 1-2 minutes.Preparing the Waffle Iron
7. Preheat your waffle iron according to the manufacturer’s instructions. If you have a non-stick waffle iron, you might not need to grease it, but I like to use a little butter or non-stick spray to ensure the waffles come out easily. 8. While the waffle iron is heating up, let’s prepare the bread. I recommend using thick slices of bread like brioche or challah, as they soak up the batter beautifully without falling apart.Soaking the Bread
9. Take your 8 slices of bread and dip each slice into the egg mixture. Make sure to coat both sides well, but don’t let them soak for too long; about 10-15 seconds per side should be enough. You want them to be saturated but not falling apart. 10. As you soak each slice, place them on a plate or a clean surface, ready to go into the waffle iron.Cooking the Waffles
11. Once your waffle iron is preheated, carefully place 2-3 slices of the soaked bread into the waffle iron, depending on its size. Make sure not to overcrowd it; you want each slice to have enough space to cook evenly. 12. Close the waffle iron and cook according to the manufacturer’s instructions. Typically, this will take about 3-5 minutes. You’ll know they’re done when they’re golden brown and crispy on the outside. 13. Carefully remove the waffles using a fork or tongs. Be cautious, as they will be hot! Place them on a wire rack or a plate to keep them warm while you cook the remaining slices.Assembling and Serving
14. Once all the waffles are cooked, it’s time to serve! I love to stack them up on a plate. You can serve them as is or add a dusting of powdered sugar for a touch of sweetness. 15. Drizzle warm maple syrup over the top. If you’re feeling fancy, you can also add fresh berries or sliced bananas for a pop of color and flavor. 16. For an extra indulgent treat, consider adding a dollop of whipped cream or a scoop of vanilla ice cream on top. It’s a delightful way to elevate your French toast waffles!Storing Leftovers
17. If you have any leftovers (which is rare in my house!), let the waffles cool completely. Then, store them in an airtight container in the refrigerator for up to 3 days. 18. To reheat, simply pop them in a toaster or toaster oven until they’re warmed through and crispy again. You can also reheat them in the oven at 350°F (175°C) for about 10 minutes.Tips and Variations
19. Feel free to experiment with different types of bread! Sourdough, whole wheat, or even gluten-free bread can work well. 20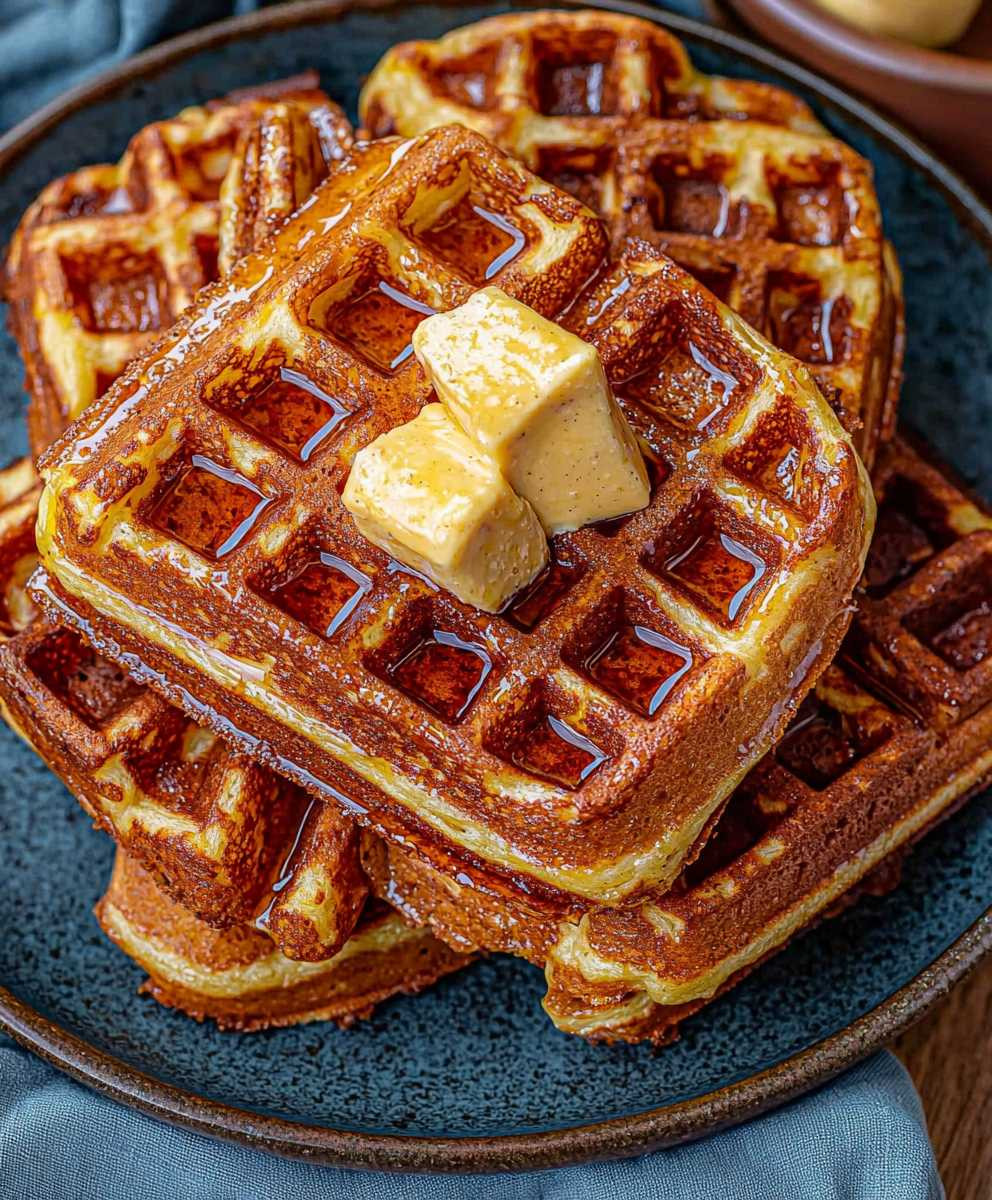
Conclusion:
In summary, these French Toast Waffles are an absolute must-try for anyone looking to elevate their breakfast game. The delightful combination of crispy edges and fluffy centers creates a texture that is simply irresistible. Plus, the versatility of this recipe means you can easily customize it to suit your taste. Whether you prefer a classic maple syrup drizzle, a sprinkle of powdered sugar, or a dollop of fresh fruit and whipped cream, the possibilities are endless. You can even experiment with different types of bread, like brioche or challah, to add your own unique twist. I encourage you to give this recipe a go and experience the joy of making French Toast Waffles in your own kitchen. Trust me, once you take that first bite, you’ll understand why this dish is a breakfast favorite. Don’t forget to share your experience with friends and family, and let them in on the secret of this delicious recipe. I can’t wait to hear how your French Toast Waffles turn out! Happy cooking! Print
French Toast Waffles: The Perfect Breakfast Recipe to Start Your Day
- Total Time: 35 minutes
- Yield: 4 servings 1x
Description
Enjoy a delicious twist on breakfast with these crispy French Toast Waffles, combining the best of both worlds. Easy to make and customizable with your favorite toppings, they are perfect for any brunch occasion. Serve warm with maple syrup and fresh fruit for a delightful treat!
Ingredients
- 4 large eggs
- 1 cup milk (whole or 2% for creaminess)
- 1 teaspoon vanilla extract
- 1 teaspoon ground cinnamon
- 1/4 teaspoon nutmeg (optional)
- 1 tablespoon sugar (adjust to taste)
- 8 slices of thick bread (brioche or challah work wonderfully)
- Butter or non-stick spray for the waffle iron
- Maple syrup, for serving
- Fresh berries or sliced bananas, for topping (optional)
- Powdered sugar, for dusting (optional)
Instructions
- In a large mixing bowl, crack the 4 large eggs and whisk until smooth.
- Add 1 cup of milk to the eggs and mix well.
- Pour in 1 teaspoon of vanilla extract, followed by 1 teaspoon of ground cinnamon and 1/4 teaspoon of nutmeg (if using). Mix to combine.
- Stir in 1 tablespoon of sugar, adjusting to your taste preference.
- Whisk the mixture until well combined and slightly frothy (about 1-2 minutes).
- Preheat your waffle iron according to the manufacturer’s instructions. Lightly grease with butter or non-stick spray if necessary.
- Dip each of the 8 slices of thick bread into the egg mixture, coating both sides for about 10-15 seconds without soaking too long.
- Place the soaked slices on a plate, ready for the waffle iron.
- Once preheated, place 2-3 slices of soaked bread in the waffle iron, ensuring not to overcrowd.
- Close the waffle iron and cook according to the manufacturer’s instructions (typically 3-5 minutes) until golden brown and crispy.
- Carefully remove the waffles using a fork or tongs and keep warm on a wire rack or plate.
- Serve the waffles stacked on a plate, dusted with powdered sugar, and drizzled with warm maple syrup.
- Add fresh berries or sliced bananas for extra flavor, and consider topping with whipped cream or vanilla ice cream for a special treat.
Notes
- Experiment with different types of bread like sourdough, whole wheat, or gluten-free options.
- Store any leftovers in an airtight container in the refrigerator for up to 3 days. Reheat in a toaster or oven until crispy.
- Prep Time: 15 minutes
- Cook Time: 20 minutes


Leave a Comment