
Eggnog Poke Cake, oh how I adore you! This isn’t just any cake; it’s a holiday miracle in dessert form. I promise, you are going to fall head over heels for this incredibly moist and festive treat.
Why You’ll Love This Eggnog Poke Cake
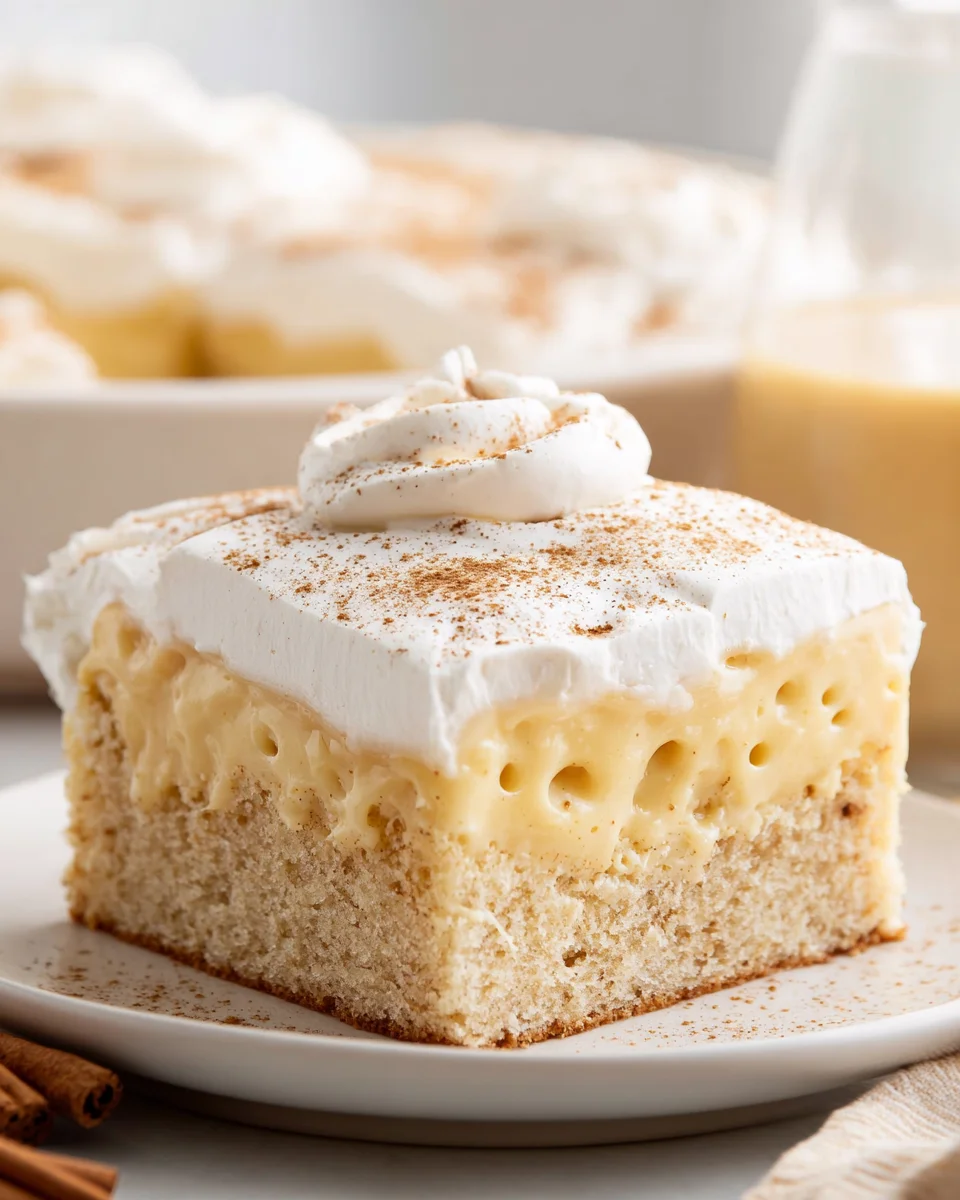
What makes it so special, you ask? Well, imagine a tender vanilla or yellow cake, poked full of holes, then drenched in a rich, creamy, non-alcoholic eggnog mixture that seeps into every nook and cranny, making it unbelievably moist and packed with that signature holiday spice flavor. Then, it’s crowned with a light, airy whipped topping and a generous dusting of fresh nutmeg.
You’ll love this recipe because it’s surprisingly easy to assemble, yet tastes like something straight out of a professional bakery. It’s the perfect way to enjoy all the comforting, spiced goodness of eggnog, but in a sliceable, shareable cake that’s ideal for festive gatherings or a cozy night in. Get ready to impress your friends and family – this is a guaranteed crowd-pleaser that brings all the warm, cozy holiday vibes!

Ingredient Notes
Creating a delightful Eggnog Poke Cake is all about balancing convenience with incredible flavor. I love how simple yet impressive this dessert is, and getting the right ingredients makes all the difference. Here’s a rundown of what you’ll need, along with some helpful substitutions to fit your preferences or dietary needs.
- Yellow Cake Mix: This is my go-to for the base of our poke cake. A classic yellow or vanilla cake mix provides a sturdy yet moist foundation that perfectly complements the rich eggnog flavor. You can absolutely make a cake from scratch if you prefer, using your favorite vanilla or butter cake recipe – just ensure it bakes up in a 9×13 inch pan. For a gluten-free option, simply choose a gluten-free yellow cake mix and follow the package directions.
- Eggs, Oil, and Water: You’ll need these standard additions to prepare your cake mix. Always follow the specific quantities listed on your cake mix box for the best results.
- Eggnog: This is the star of the show! Use a good quality, creamy dairy eggnog. Since we’re keeping things family-friendly, I always opt for a non-alcoholic version, which is widely available during the holiday season. If you’re looking for a dairy-free alternative, many brands now offer excellent almond milk, oat milk, or coconut milk eggnog varieties that work wonderfully in this recipe. Just make sure it’s a full-bodied, flavorful eggnog.
- Instant Vanilla Pudding Mix: A small 3.4-ounce box of instant vanilla pudding mix is what gives our eggnog filling that luxurious, thick consistency. French vanilla is also a fantastic choice if you can find it. Do make sure it’s instant pudding, not cook-and-serve, as it needs to set without heat. If you’re managing sugar intake, sugar-free instant vanilla pudding mix works perfectly well here too.
- Whipped Topping: For that iconic, fluffy frosting, I often reach for a container of frozen whipped topping, like Cool Whip, thawed according to package directions. It’s light, airy, and easy to spread. If you prefer a homemade touch, you can certainly whip up some fresh heavy cream with a little powdered sugar and a dash of non-alcoholic rum extract for an extra layer of eggnog flavor. For dairy-free versions, coconut cream whipped topping is an excellent alternative.
- Freshly Grated Nutmeg: This isn’t just a garnish; it’s essential for that authentic eggnog aroma and taste! Trust me, freshly grated nutmeg elevates this cake from good to unforgettable. A microplane zester makes quick work of this.
Step-by-Step Instructions
Alright, let’s get baking! This Eggnog Poke Cake is incredibly fun to assemble, and each step brings us closer to that festive, creamy deliciousness. Follow along, and you’ll have a stunning dessert in no time.
- Prepare and Bake Your Cake: First things first, preheat your oven to the temperature specified on your yellow cake mix box. Lightly grease and flour a 9×13 inch baking pan (or spray with non-stick baking spray). In a large bowl, prepare your yellow cake mix according to the package directions, adding the required eggs, oil, and water. Pour the batter evenly into your prepared pan and bake for the recommended time, usually around 28-32 minutes, or until a wooden skewer inserted into the center comes out clean.
- Cool and Poke: Once your cake is baked, remove it from the oven and let it cool on a wire rack for about 15-20 minutes. It should still be warm, but not piping hot. This slight warmth helps it absorb the eggnog goodness better. Now for the fun part: using the handle of a wooden spoon (or a large skewer), poke holes all over the top of the cake. I aim for holes about 1 inch apart, going about two-thirds of the way down into the cake. Don’t be shy, but don’t poke all the way through to the bottom either!
- Whisk Up the Eggnog Filling: While your cake is cooling and you’re poking holes, grab a medium-sized bowl. Pour in your non-alcoholic eggnog. Add the instant vanilla pudding mix. Now, whisk vigorously for about 2-3 minutes until the mixture thickens and is smooth. It should resemble a pourable, yet thick, pudding.
- Pour and Soak: Carefully and evenly pour the thickened eggnog pudding mixture over the entire warm, poked cake. Use a spatula to gently spread it, ensuring that the pudding seeps down into all those wonderful holes you just created. You’ll literally see the cake drinking up all that eggy goodness!
- Chill Time is Crucial: This step is non-negotiable! Cover the pan loosely with plastic wrap and transfer it to the refrigerator. Let the cake chill for at least 4 hours, but honestly, overnight is even better. This chilling time allows the pudding to fully set, the cake to become incredibly moist, and all those beautiful eggnog flavors to meld together. Patience, my friend, it’s worth it!
- Frost and Garnish: Once the cake is thoroughly chilled and set, remove it from the refrigerator. Spread your thawed whipped topping evenly over the entire surface of the cake. For the grand finale, generously sprinkle freshly grated nutmeg all over the top. This not only makes it look gorgeous but also provides that signature eggnog aroma and flavor burst.
- Serve and Enjoy: Slice into generous squares and serve immediately. Prepare for rave reviews!
Tips & Suggestions
Making an Eggnog Poke Cake is a true delight, and over the years, I’ve picked up a few tricks that really elevate this dessert. Here are some of my favorite tips and suggestions to ensure your cake is nothing short of spectacular:
- Perfecting the Poke: The key to a great poke cake is consistent holes. I find that the handle of a wooden spoon is ideal because it creates a wide enough channel for the pudding to seep in effectively without making the holes too large. If using a skewer, try to make a slightly larger hole by wiggling it gently once inserted. Aim for holes that are about 1 inch apart and go about two-thirds of the way down into the cake. This ensures every bite gets a good dose of that creamy filling.
- The Art of Cooling: Don’t pour the eggnog mixture over a cake that’s still piping hot from the oven; it might break down the pudding too quickly. Conversely, if the cake is completely cold, it won’t absorb the liquid as efficiently. That 15-20 minute cooling window is perfect – the cake is still warm enough to be absorbent but cool enough to hold its structure.
- Don’t Skimp on Chilling: I cannot stress this enough – the chilling time is absolutely vital for a poke cake. It allows the pudding to fully set, the cake to become incredibly moist, and for the flavors to truly develop and marry. While 4 hours is the minimum, an overnight chill truly yields the best results, transforming the cake into an unbelievably tender and flavorful dessert.
- Fresh Nutmeg is a Game Changer: Please, please, please use freshly grated nutmeg for garnish! The aroma and intensity of flavor from a whole nutmeg pod grated with a microplane far surpass any pre-ground variety. It adds an authentic warmth and spice that is synonymous with eggnog and really takes the cake to the next level.
- Flavor Boosters: For those who love a deeper, more traditional eggnog flavor without the alcohol, consider adding a tiny dash of non-alcoholic rum extract or brandy extract (about 1/2 to 1 teaspoon) to either the eggnog pudding mixture or the whipped topping. It provides that classic nuanced “kick” that perfectly complements the rich eggnog.
- Presentation Power: Beyond nutmeg, consider other festive garnishes! A dusting of ground cinnamon, a sprinkle of holiday-themed sprinkles, or even some white chocolate shavings can add extra visual appeal. A few whole cinnamon sticks placed strategically on top also look beautiful.
- Make Ahead Magic: This cake is a fantastic make-ahead dessert, which is perfect for holiday entertaining! Prepare it the day before your event, let it chill overnight, and then simply add the whipped topping and nutmeg just before serving. This frees up your time on the day of your gathering.
Storage
After all that effort (and delightful anticipation!), you’ll want to make sure your Eggnog Poke Cake stays fresh and delicious. Proper storage is key, especially with a cake that incorporates dairy and pudding. Here’s how I recommend storing it to maintain its wonderful texture and flavor:
- Refrigeration is a Must: Due to the dairy in the eggnog, the pudding filling, and the whipped topping, this cake absolutely needs to be stored in the refrigerator at all times. Leaving it out at room temperature for extended periods is not advised.
- Keep it Covered: To prevent the cake from drying out, absorbing any unwanted odors from your fridge, or developing a film on the whipped topping, make sure it’s tightly covered. You can do this by wrapping the entire 9×13 inch pan securely with plastic wrap. Alternatively, if you’ve transferred slices to a container, ensure it’s an airtight one.
- Shelf Life: When stored properly in the refrigerator, your Eggnog Poke Cake will generally stay fresh and delicious for about 3 to 4 days. Beyond that, the texture of the cake and the freshness of the whipped topping may begin to decline, though it might still be safe to eat for a little longer.
- Serving Temperature: I find this cake is best enjoyed chilled, straight from the refrigerator. The cool temperature really enhances the refreshing quality of the eggnog and the creamy texture of the pudding.
- Freezing – Generally Not Recommended: While many cakes can be frozen, I typically advise against freezing an Eggnog Poke Cake, particularly once it has the whipped topping on it. Whipped topping, especially the store-bought variety, can sometimes weep or become watery and lose its fluffy texture once thawed. The cake itself might also undergo some textural changes, potentially becoming a bit crumbly or less moist. If you absolutely must freeze it, I would suggest freezing the cake before adding the whipped topping and then adding fresh topping after it has thawed in the refrigerator. Wrap the unfrosted cake very tightly in plastic wrap, then a layer of aluminum foil, and it might last for up to a month. Thaw in the refrigerator overnight before frosting and serving.
Final Thoughts
Well, there you have it! My absolute favorite way to bring that classic holiday cheer into a dessert. This Eggnog Poke Cake truly is a revelation. I just love how the rich, spiced non-alcohol eggnog soaks into every crevice, making each bite incredibly moist and flavorful. It’s the perfect balance of festive spices and creamy sweetness, topped with that delightful whipped topping. Trust me, if you’re looking for a show-stopping yet surprisingly easy treat that embodies the spirit of the season, this Eggnog Poke Cake is an absolute must-try. It’s destined to become a beloved tradition in your home, just like it has in mine!
Eggnog Poke Cake: A Festive, Family-Friendly Dessert!
- Total Time: 50 minutes
- Yield: 12 servings 1x
Description
This Eggnog Poke Cake is a holiday miracle in dessert form, combining a moist cake with rich, creamy eggnog flavor. It’s the perfect festive treat for gatherings or cozy nights in.
Ingredients
- 1 box yellow cake mix
- 3 eggs (or as specified on cake mix box)
- 1/2 cup oil (or as specified on cake mix box)
- 1 cup water (or as specified on cake mix box)
- 2 cups non-alcoholic eggnog
- 1 (3.4-ounce) box instant vanilla pudding mix
- 1 container frozen whipped topping (like Cool Whip), thawed
- Freshly grated nutmeg
Instructions
- Preheat your oven to the temperature specified on your yellow cake mix box. Lightly grease and flour a 9×13 inch baking pan.
- In a large bowl, prepare your yellow cake mix according to the package directions, adding the required eggs, oil, and water. Pour the batter evenly into your prepared pan and bake for the recommended time, usually around 28-32 minutes, or until a wooden skewer inserted into the center comes out clean.
- Once your cake is baked, remove it from the oven and let it cool on a wire rack for about 15-20 minutes. Using the handle of a wooden spoon (or a large skewer), poke holes all over the top of the cake, about 1 inch apart and going about two-thirds of the way down into the cake.
- In a medium-sized bowl, pour in your non-alcoholic eggnog and add the instant vanilla pudding mix. Whisk vigorously for about 2-3 minutes until the mixture thickens and is smooth.
- Carefully and evenly pour the thickened eggnog pudding mixture over the entire warm, poked cake. Use a spatula to gently spread it, ensuring that the pudding seeps down into all the holes.
- Cover the pan loosely with plastic wrap and transfer it to the refrigerator. Let the cake chill for at least 4 hours, but overnight is even better.
- Once the cake is thoroughly chilled and set, remove it from the refrigerator. Spread your thawed whipped topping evenly over the entire surface of the cake. Generously sprinkle freshly grated nutmeg on top.
- Slice into generous squares and serve immediately.
- Prep Time: 20 mins
- Cook Time: 30 mins
- Category: Dessert
- Method: Baking
- Cuisine: American
Nutrition
- Serving Size: 1 slice
- Calories: 350
- Sugar: 25 g
- Sodium: 200 mg
- Fat: 15 g
- Saturated Fat: 8 g
- Unsaturated Fat: 5 g
- Trans Fat: 0 g
- Carbohydrates: 50 g
- Fiber: 1 g
- Protein: 4 g
- Cholesterol: 50 mg
Keywords: Ensure to use freshly grated nutmeg for the best flavor. The chilling time is crucial for the pudding to set and the flavors to meld together.


Leave a Comment