
Pumpkin Spice Pancake Poppers
Pumpkin Spice Pancake Poppers are about to become your new favorite fall tradition, and honestly, a year-round obsession! I don’t know about you, but sometimes I want all the cozy, warm flavors of pumpkin spice pancakes without the fuss of flipping full-sized pancakes. That’s exactly why I dreamed up these delightful little bites.
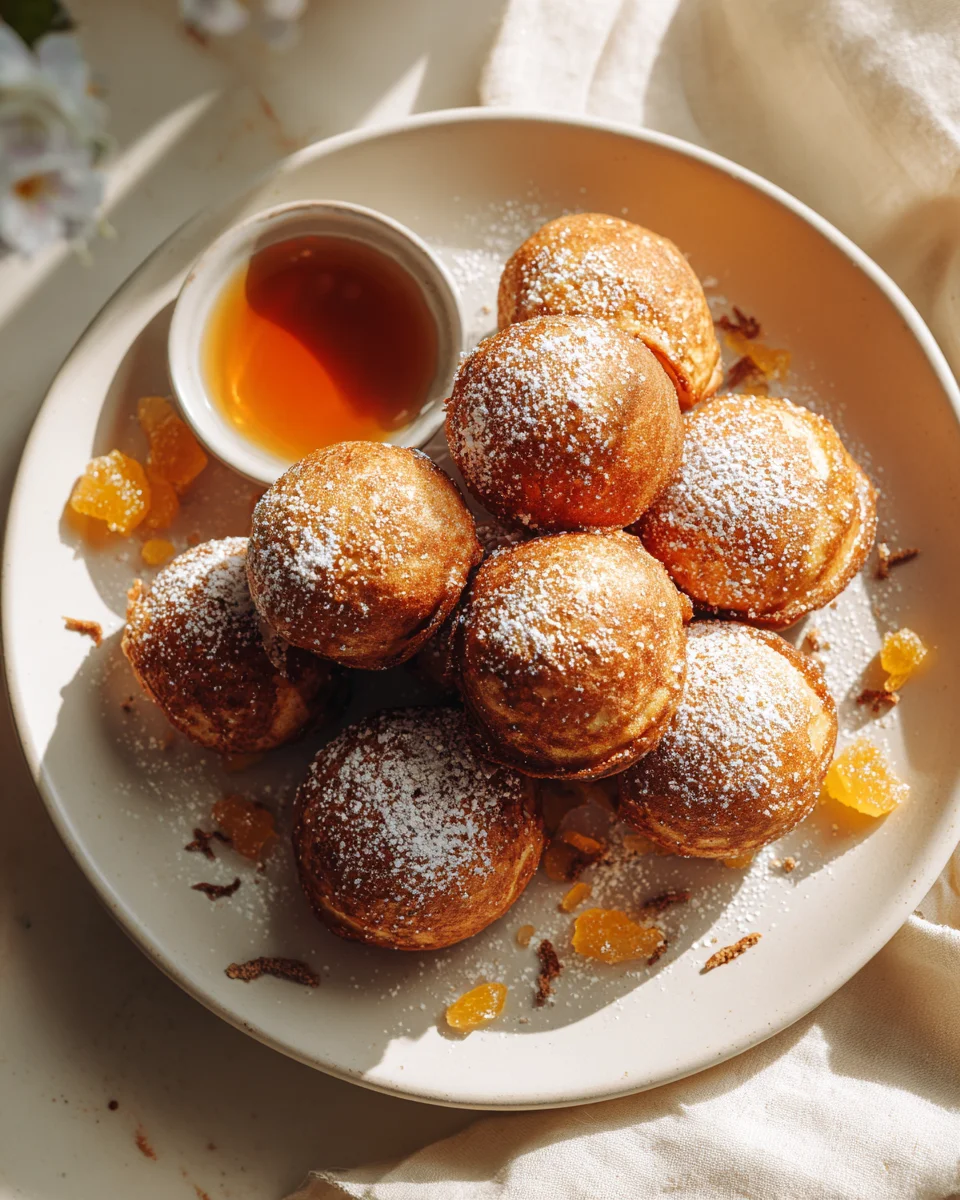
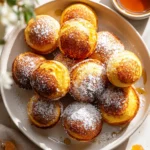
What makes these Pumpkin Spice Pancake Poppers so incredibly special? Well, for starters, they’re perfectly pop-able! Imagine fluffy, golden-brown spheres, each bursting with the comforting aroma of pumpkin puree and a medley of cinnamon, nutmeg, and cloves. They’re mess-free, ridiculously easy to eat, and absolutely adorable, making them perfect for breakfast on the go, a fun brunch spread, or even a unique dessert. You’re going to love how these poppers transform your breakfast routine into a fun, bite-sized celebration of autumn flavors. Just dip them in maple syrup or a dollop of whipped cream, and prepare for pure joy!

Ingredient Notes
There’s nothing quite like the cozy, warm hug of Pumpkin Spice Pancake Poppers on a chilly morning, and getting the ingredients just right makes all the difference! Here’s a quick guide to what you’ll need and some handy substitutions I’ve discovered along the way.
Key Ingredients for Perfect Pumpkin Spice Pancake Poppers
- Pumpkin Puree: This is the heart of our poppers! Always make sure you’re grabbing 100% pure pumpkin puree from the can, not pumpkin pie filling. Pie filling has added spices and sweeteners that will throw off our recipe. If you’re feeling ambitious, homemade pumpkin puree works beautifully, too!
- All-Purpose Flour: My go-to for a tender crumb. If you’re looking for a gluten-free option, a good 1:1 gluten-free baking blend should work wonderfully here. Just make sure it contains xanthan gum for structure.
- Brown Sugar: I prefer light brown sugar for its subtle molasses notes, which really complement the pumpkin and spices. Granulated white sugar can be used in a pinch, but you might lose a little of that deep, caramel-like flavor. For an unrefined option, coconut sugar is a great alternative.
- Pumpkin Pie Spice: This is where the magic happens! A good quality store-bought blend is convenient. If you don’t have any, you can easily make your own. My personal blend is usually 1 teaspoon ground cinnamon, ½ teaspoon ground ginger, ¼ teaspoon ground nutmeg, and ⅛ teaspoon ground cloves for every teaspoon of pumpkin pie spice needed.
- Milk: Any milk you have on hand will work. Whole milk makes them extra rich, but skim, almond, oat, or soy milk are fantastic dairy-free alternatives that won’t compromise the texture or flavor.
- Eggs: Large eggs are standard here. They help bind everything together and give the poppers their light, fluffy texture. For a vegan option, you can try using a flax egg (1 tablespoon ground flaxseed meal mixed with 3 tablespoons water, let sit for 5 minutes) per egg.
- Baking Powder & Baking Soda: These are our leavening agents, crucial for that delightful fluffiness! Make sure yours aren’t expired – old leavening agents mean flat poppers, and nobody wants that.
- Vanilla Extract: A touch of vanilla rounds out all the flavors. If you’re avoiding alcohol, there are many excellent non-alcohol vanilla flavorings available that work just as well.
Optional Add-Ins & Toppings
To take your Pumpkin Spice Pancake Poppers to the next level, consider folding in some mini chocolate chips for an extra treat, or a sprinkle of finely chopped pecans or walnuts for a delightful crunch. For serving, I always have maple syrup and a dusting of powdered sugar ready, but a dollop of whipped cream or a drizzle of simple cream cheese glaze takes them over the top!
Step-by-Step Instructions
Making these adorable Pumpkin Spice Pancake Poppers is surprisingly easy, especially once you get the hang of your popper maker! I find the process quite meditative and rewarding. Let’s get cooking!
Prepping Your Workspace
- Step 1: Get Ready! First things first, gather all your ingredients. This makes the whole process smoother and ensures you don’t forget anything.
- Step 2: Preheat Your Popper Maker. Whether you’re using an Aebleskiver pan (my favorite for these!), a mini muffin tin, or a specific cake pop maker, preheat it according to the manufacturer’s instructions to a medium heat. For an Aebleskiver pan, I aim for medium-low to medium. Lightly grease each well with a little butter or non-stick spray, even if it’s non-stick. This helps with that beautiful golden crust and easy turning.
Mixing the Batter
- Step 3: Combine Dry Ingredients. In a large bowl, whisk together your all-purpose flour, brown sugar, pumpkin pie spice, baking powder, baking soda, and a pinch of salt. Whisking ensures everything is evenly distributed, which is key for consistent flavor and rise.
- Step 4: Combine Wet Ingredients. In a separate medium bowl, whisk together the pumpkin puree, milk, egg (or egg substitute), and vanilla extract until smooth and well combined.
- Step 5: Marry the Ingredients. Pour the wet ingredients into the dry ingredients. Now, here’s my golden rule for pancakes (and poppers): mix gently until just combined. A few small lumps are perfectly fine! Overmixing will develop the gluten in the flour, leading to tough, chewy poppers instead of light, fluffy ones. We want fluffy!
Cooking Your Poppers
- Step 6: Fill the Wells. This is the fun part! I find that using a piping bag with the end snipped off, a small cookie scoop, or even just a spoon works best for filling the small wells of your popper maker. Fill each well about ¾ full. Don’t overfill, or your poppers will lose their perfectly round shape and spill over.
- Step 7: Cook the First Side. Let them cook undisturbed for about 2-4 minutes, depending on your heat and maker. You’ll know they’re ready to turn when you see small bubbles forming on the surface and the edges look set and lightly golden. For an Aebleskiver pan, the bottom will be a lovely golden brown.
- Step 8: Turn and Finish Cooking. Using a wooden skewer, a small knitting needle, or a chopstick (my preferred tools for an Aebleskiver pan), gently poke into the edge of each popper and turn it about halfway, then fully rotate it to cook the other side. This takes a little practice but becomes intuitive. Continue cooking for another 2-4 minutes, or until the poppers are golden brown all over and cooked through. If you’re unsure, you can always poke one with a skewer – if it comes out clean, they’re done!
- Step 9: Serve Immediately. Transfer the cooked poppers to a serving plate and repeat with the remaining batter. These are best enjoyed warm, right off the maker, with your favorite toppings!
Tips & Suggestions
I’ve made my fair share of pancake poppers over the years, and I’ve picked up a few tricks to ensure they turn out perfectly every time. Here are my favorite tips and suggestions to help you master these delightful Pumpkin Spice Pancake Poppers!
Mastering the Poppers
- Equipment Matters (But Don’t Stress!): An Aebleskiver pan is truly the star for getting those perfectly round poppers. However, if you don’t have one, don’t fret! A mini muffin tin works great – they’ll be more like mini cupcakes, but just as delicious. A dedicated cake pop maker also does the trick, often without needing to turn them manually. Just adjust cooking times accordingly.
- Batter Consistency is Key: Your batter should be pourable but not watery. If it seems too thick, add a tablespoon of milk at a time until it reaches a good consistency. If it’s too thin, you can whisk in a tablespoon of flour. This can sometimes happen if your pumpkin puree is particularly watery.
- Don’t Overfill the Wells: I can’t stress this enough! Filling the wells about ¾ full ensures they have enough room to expand and become beautifully round without overflowing. Overfilling leads to misshapen poppers and a messy pan.
- The Turning Technique: For Aebleskiver pans, a wooden skewer or a thin chopstick is your best friend. When the first side is golden, gently poke the edge of the popper and rotate it so the uncooked batter flows into the bottom of the well. This helps create that perfect spherical shape. It might take a couple of tries, but you’ll get the hang of it!
- Maintain Consistent Heat: Keep your heat at a steady medium-low to medium. Too high, and they’ll burn on the outside before cooking through. Too low, and they’ll take ages and might become dry.
Flavor Enhancements & Serving Ideas
- Boost the Spice: For an extra layer of warmth, I sometimes add a tiny pinch of freshly grated black pepper or even a whisper of cayenne to my pumpkin pie spice blend. It won’t make them spicy, but it really highlights the other flavors!
- Zesty Kick: A little orange or lemon zest folded into the batter can add a bright, fresh counterpoint to the rich pumpkin and spices.
- Dipping Fun: These poppers are fantastic for dipping! Think warm maple syrup, a rich caramel sauce, or even a simple cream cheese glaze. Melted white chocolate or dark chocolate for dipping also makes them feel extra special.
- Breakfast Board Perfection: Arrange your Pumpkin Spice Pancake Poppers on a platter with bowls of fresh berries, sliced bananas, whipped cream, and various syrups for a fun, interactive breakfast or brunch spread. They’re also adorable for holiday breakfasts!
- Get the Kids Involved: This is such a fun recipe for little helpers! Kids can help measure ingredients, gently stir the batter, and certainly enjoy decorating and eating the finished poppers.
Storage
One of the best things about Pumpkin Spice Pancake Poppers is how well they store, making them perfect for meal prep or a quick weekday breakfast on the go! I often make a big batch so I can enjoy them throughout the week.
Cooling and Short-Term Storage
- Cool Completely: Before storing, always allow your Pumpkin Spice Pancake Poppers to cool completely on a wire rack. Storing warm poppers will create condensation, making them soggy.
- Airtight Container: Once cooled, place the poppers in an airtight container. They will stay fresh at room temperature for up to 1-2 days. If your kitchen is particularly warm, or if you plan to keep them longer, I recommend refrigerating them.
Refrigeration and Freezing for Longer
- Refrigeration: For longer storage, keep them in an airtight container in the refrigerator for up to 3-4 days.
- Freezing: These poppers freeze beautifully! To freeze them, first arrange the completely cooled poppers in a single layer on a baking sheet. Freeze for about 1-2 hours, or until solid. This prevents them from sticking together. Once frozen solid, transfer them to a freezer-safe bag or airtight container. They will keep well in the freezer for up to 2-3 months.
Reheating Your Poppers
- From Refrigerator: You can reheat them quickly in the microwave for 15-30 seconds, or in a toaster oven or oven at 350°F (175°C) for about 5-7 minutes, until warmed through.
- From Freezer: For frozen poppers, either microwave them for 30-60 seconds (or until hot), or bake them in a preheated oven at 350°F (175°C) for 10-15 minutes, or until thoroughly heated. A toaster oven also works great for a few at a time! They’ll taste almost as fresh as the day you made them.
Final Thoughts
And there you have it, my friends! These Pumpkin Spice Pancake Poppers are truly a revelation. They capture everything we adore about the cozy autumn season in one delightful, bite-sized package. I promise you, these aren’t just any pancakes; they’re a burst of warm, comforting spice and fluffy goodness that will make your mornings – or any time of day, really – feel extra special.
Why are Pumpkin Spice Pancake Poppers a must-try? Because they’re incredibly fun to make and even more enjoyable to eat, perfect for sharing (or not!). They’re ideal for a festive breakfast, a charming brunch addition, or simply a treat to brighten any day. Get ready to impress your taste buds and everyone at your table with these irresistible little wonders. I can’t wait for you to experience the joy of these poppers!
Easy Pumpkin Spice Pancake Poppers for Fall Mornings
- Total Time: 35 minutes
- Yield: 4 servings 1x
Description
These Pumpkin Spice Pancake Poppers are a delightful bite-sized treat that captures the cozy flavors of fall. Perfect for breakfast on the go or as a fun brunch addition, they’re sure to become a favorite!
Ingredients
- 1 cup Pumpkin Puree
- 1 cup All-Purpose Flour
- 1/4 cup Brown Sugar
- 1 teaspoon Pumpkin Pie Spice
- 1/2 cup Milk
- 2 Large Eggs
- 1 teaspoon Baking Powder
- 1/2 teaspoon Baking Soda
- 1 teaspoon Vanilla Extract
- Pinch of Salt
- Optional: Mini chocolate chips, finely chopped pecans or walnuts, maple syrup, powdered sugar, whipped cream, cream cheese glaze
Instructions
- Step 1: Get Ready! First things first, gather all your ingredients.
- Step 2: Preheat Your Popper Maker. Preheat it according to the manufacturer's instructions to a medium heat and lightly grease each well.
- Step 3: Combine Dry Ingredients. In a large bowl, whisk together your all-purpose flour, brown sugar, pumpkin pie spice, baking powder, baking soda, and a pinch of salt.
- Step 4: Combine Wet Ingredients. In a separate medium bowl, whisk together the pumpkin puree, milk, egg (or egg substitute), and vanilla extract until smooth.
- Step 5: Marry the Ingredients. Pour the wet ingredients into the dry ingredients and mix gently until just combined.
- Step 6: Fill the Wells. Fill each well about ¾ full with the batter.
- Step 7: Cook the First Side. Let them cook undisturbed for about 2-4 minutes until small bubbles form on the surface.
- Step 8: Turn and Finish Cooking. Gently poke into the edge of each popper and turn it to cook the other side for another 2-4 minutes.
- Step 9: Serve Immediately. Transfer the cooked poppers to a serving plate and enjoy warm with your favorite toppings.
- Prep Time: 15 mins
- Cook Time: 20 mins
- Category: Breakfast
- Method: Cooking
- Cuisine: American
Nutrition
- Serving Size: 2 poppers
- Calories: 150
- Sugar: 8 g
- Sodium: 200 mg
- Fat: 5 g
- Saturated Fat: 2 g
- Unsaturated Fat: 3 g
- Trans Fat: 0 g
- Carbohydrates: 22 g
- Fiber: 1 g
- Protein: 3 g
- Cholesterol: 50 mg
Keywords: For a gluten-free option, use a 1:1 gluten-free baking blend. You can substitute eggs with a flax egg for a vegan option.

Leave a Comment