
Pumpkin Oreo Balls are truly a delightful invention, capturing the essence of autumn in a single, bite-sized treat. I find myself reaching for these irresistible no-bake confections year after year, and I’m sure you will too once you discover their magic. While they might not boast centuries of history like some traditional desserts, these whimsical balls have quickly become a modern staple, especially during the fall season and holiday gatherings. Their rise to popularity stems from their incredible convenience and undeniably delicious flavor profile.
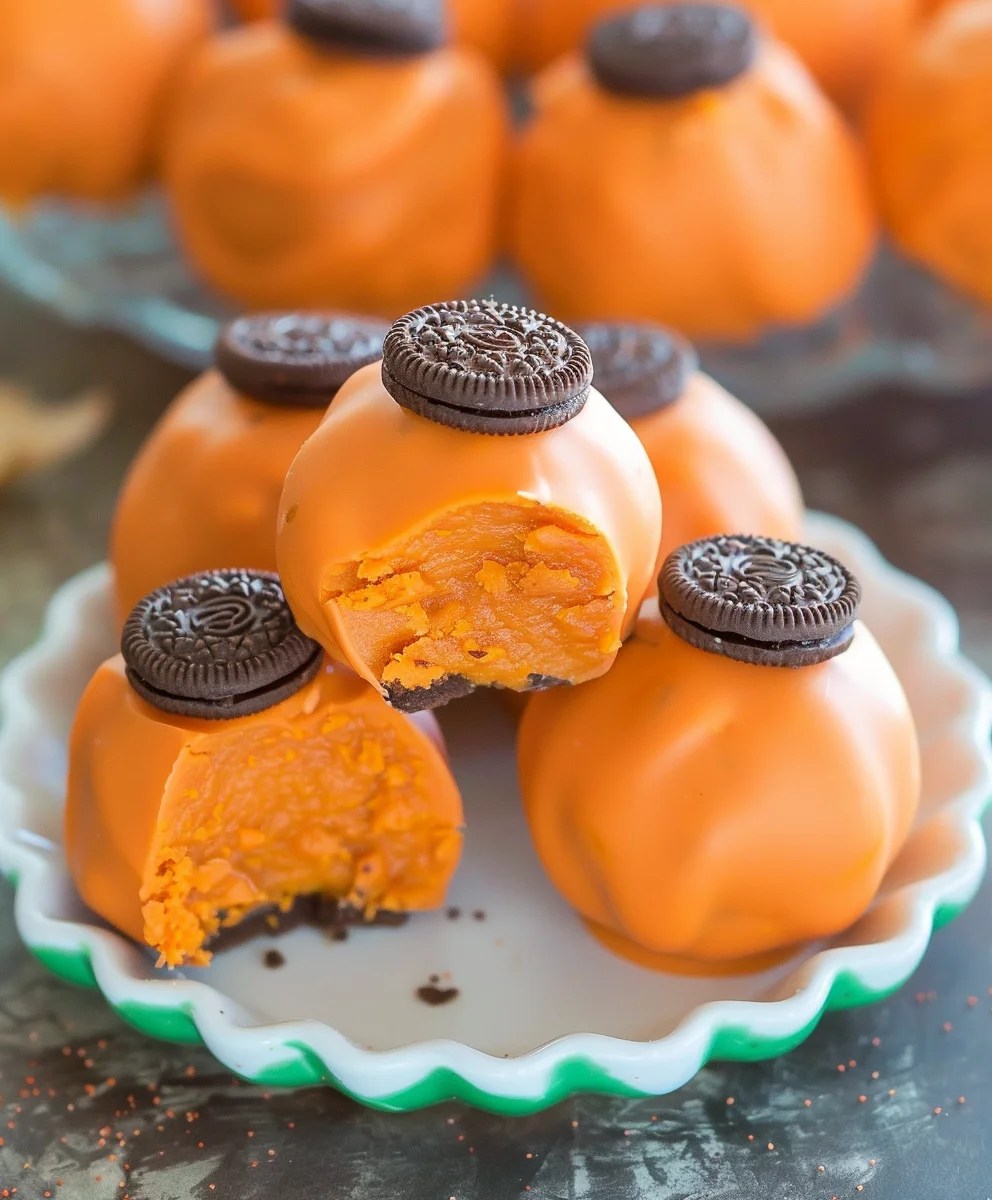
Imagine the perfect fusion of creamy pumpkin spice, crushed chocolatey Oreo cookies, and a smooth, sweet coating – that’s precisely what awaits you with our Pumpkin Oreo Balls recipe. People absolutely adore this dish not just for its festive appeal and gorgeous autumnal hues, but also for its wonderful blend of textures and the sheer simplicity of preparation. They are the ideal make-ahead dessert, perfect for busy hosts or anyone craving a quick, satisfying treat without turning on the oven. Get ready to experience a new favorite!

Ingredients:
- 1 (14.3-ounce) package of original Oreo sandwich cookies (about 36 cookies)
- 8 ounces (1 block) full-fat cream cheese, softened to room temperature
- 2 teaspoons pumpkin pie spice, or more to taste (this is where our “pumpkin” flavor truly shines!)
- 24 ounces white confectionery coating, white chocolate melting wafers, or orange candy melts (divided if using multiple colors)
- Optional: Additional candy melts in green or dark chocolate for decorative drizzles, festive sprinkles (e.g., orange, black, white, fall-themed), or pumpkin-shaped edible decorations.
Equipment You’ll Need:
- Food processor or a large resealable plastic bag and a rolling pin
- Large mixing bowl
- Electric mixer (stand or hand mixer) is highly recommended, but a sturdy spoon or spatula can work
- Baking sheets or cookie sheets
- Parchment paper or wax paper
- Small microwave-safe bowls or a double boiler setup (saucepan and heat-safe bowl) for melting chocolate
- Fork or a candy dipping tool
- Toothpicks (for touching up)
- Spatula or spoon
- Measuring spoons
Phase 1: Crushing the Oreos and Preparing the Base
Hello, fellow dessert enthusiast! Let’s get started on these incredibly delicious and fun-to-make Pumpkin Oreo Balls. This first phase is all about creating that rich, chocolatey, crumbly base that forms the heart of our delightful treats. It’s surprisingly simple, but paying attention to the details here will ensure the perfect texture for rolling later on.
- Crush the Oreo Cookies: This is where the magic begins! You have a couple of options here, both equally effective.
- Using a Food Processor: If you have a food processor, this is undoubtedly the quickest and easiest method. Place the entire package of Oreo cookies (yes, cream filling and all!) into the bowl of your food processor. Pulse the cookies until they are finely ground into a consistent crumb. You want a texture similar to fine sand, with no large chunks remaining. It’s important to get them really fine, as this will ensure your Pumpkin Oreo Balls have a smooth, uniform consistency when you mix them with the cream cheese. Make sure to scrape down the sides of the bowl a few times to ensure everything is evenly processed.
- Using a Resealable Bag and Rolling Pin: No food processor? No problem! Place the entire package of Oreo cookies into a large, sturdy resealable plastic bag. Seal the bag, pressing out as much air as possible. Now comes the fun part: grab a rolling pin, a meat mallet, or even a heavy can, and start crushing those cookies! Work out any stress you might have by pounding and rolling over the bag until the cookies are reduced to a fine crumb. This might take a little longer and require more elbow grease, but the result will be just as good. Be patient and thorough – those fine crumbs are key to a smooth texture!
Once crushed, set aside about 2 tablespoons of the fine Oreo crumbs. We’ll use these later for an optional garnish or to add back if the mixture becomes too wet.
- Soften the Cream Cheese: While you’re crushing the cookies, ensure your full-fat cream cheese is at true room temperature. This is absolutely crucial for a smooth mixture. If it’s too cold, it will be lumpy and difficult to incorporate evenly with the cookie crumbs, leading to an inconsistent texture in your Pumpkin Oreo Balls. You can leave it on the counter for about an hour, or if you’re in a hurry, you can carefully soften it in the microwave in 10-second intervals until pliable, but not melted.
- Combine Oreo Crumbs, Cream Cheese, and Pumpkin Spice: In a large mixing bowl, combine the finely crushed Oreo crumbs with the softened cream cheese and the pumpkin pie spice.
- If using an electric mixer (stand mixer with paddle attachment or a hand mixer): Begin mixing on low speed until the cream cheese starts to break down and combine with the crumbs. Increase the speed to medium and continue mixing until the mixture is thoroughly combined, smooth, and forms a thick, uniform “dough.” Scrape down the sides of the bowl frequently to ensure everything is incorporated.
- If mixing by hand: Use a sturdy spatula or spoon to press and fold the cream cheese into the Oreo crumbs and pumpkin spice. This will take a bit more effort and time, but keep working at it until you have a cohesive, thick mixture. It should be pliable enough to roll into a ball, but not sticky or greasy.
Your goal is a thick, chocolatey “dough” that holds its shape. The pumpkin pie spice should be evenly distributed, giving your Pumpkin Oreo Balls that wonderful, warm fall flavor. If the mixture seems too wet, you can add back a teaspoon or two of the reserved Oreo crumbs. If it seems too dry, a tiny bit more cream cheese (half a teaspoon at a time) can help, but this is rarely necessary if your cream cheese was properly softened.
Phase 2: Chilling and Shaping the Pumpkin Oreo Balls
Now that we have our delicious base, it’s time to prepare it for rolling. Chilling is a non-negotiable step here; it firms up the mixture, making it much easier to handle and ensuring your Pumpkin Oreo Balls hold their shape beautifully. Don’t skip this, I promise the wait is worth it!
- Chill the Mixture: Cover the bowl with plastic wrap and refrigerate the Oreo mixture for at least 30 minutes to 1 hour. This chilling step is crucial! It allows the cream cheese to firm up and the flavors to meld, making the mixture much easier to roll into neat, uniform balls without becoming sticky or messy. You can even chill it for longer, up to several hours, or overnight if you prefer to break up the recipe steps.
- Prepare for Rolling: While the mixture is chilling, line a baking sheet or two with parchment paper or wax paper. This will be where your Pumpkin Oreo Balls rest after being rolled and later after being dipped.
- Scoop and Roll the Balls: Once the mixture is thoroughly chilled and firm, remove it from the refrigerator. Using a small cookie scoop (about 1 tablespoon in size) or simply a spoon, scoop out portions of the mixture.
- For uniform size: A cookie scoop is your best friend here, helping to create consistently sized Pumpkin Oreo Balls, which not only looks professional but also ensures even coating later.
- Rolling technique: Gently roll each scooped portion between the palms of your hands to form a smooth, compact ball. Aim for a diameter of about 1 to 1.5 inches. Work relatively quickly, as the warmth of your hands can soften the mixture. If the mixture becomes too soft to handle, pop the bowl back into the fridge for 10-15 minutes to firm up again.
Place the rolled balls onto your prepared baking sheets, leaving a little space between each one. You should get approximately 36-40 Pumpkin Oreo Balls from this recipe.
- Second Chill (Optional but Recommended): Once all the balls are rolled, I highly recommend placing the baking sheets back into the refrigerator for another 15-20 minutes. This extra chill ensures they are nice and firm before dipping, which helps prevent them from falling apart or creating a lumpy coating when they hit the warm melted chocolate. A truly firm ball makes for a beautifully smooth, chocolate-coated treat.
Phase 3: Melting the Coating and Dipping
This is arguably the most exciting part, where our Pumpkin Oreo Balls get their beautiful outer shell! Choosing the right melting method and technique for dipping will make all the difference in achieving a professional-looking finish. We’re aiming for a smooth, even, and relatively thin coating that sets up nicely.
- Prepare Your Coating: It’s time to get our candy melts or white confectionery coating ready.
- Using a Microwave: Place about two-thirds of your chosen coating (e.g., 16 ounces if you have 24 total) in a microwave-safe bowl. Microwave on high for 30 seconds. Remove, stir well with a dry spoon or spatula. Return to the microwave for another 20-30 seconds, stir again. Continue heating in 15-20 second intervals, stirring vigorously after each, until the coating is mostly melted and smooth. Be extremely careful not to overheat the chocolate, as it can seize and become unusable. Stirring is key to distributing the heat and melting any remaining lumps with residual warmth. Once smooth, add the remaining one-third of the coating and stir until fully melted and smooth. This “temper-like” method helps keep the chocolate at a workable temperature longer.
- Using a Double Boiler: This method offers more gentle and controlled melting, reducing the risk of burning or seizing. Fill a saucepan with about an inch or two of water and bring it to a simmer over medium-low heat. Place a heat-safe bowl (make sure it’s larger than the saucepan and won’t touch the simmering water) on top of the saucepan. Add your coating to the bowl. Stir constantly with a dry spoon or spatula until the coating is completely melted and smooth. Ensure absolutely no water or steam gets into your coating, as even a tiny drop can cause it to seize and become thick and unusable.
If using white confectionery coating or white chocolate, you can add a few drops of orange gel food coloring (oil-based, not water-based, to prevent seizing) to achieve that vibrant pumpkin color. Stir until evenly colored. Keep the melted coating warm and fluid during the dipping process. If it starts to thicken, you can gently reheat it using your chosen method for a few seconds.
- Dip the Pumpkin Oreo Balls: Retrieve your chilled Pumpkin Oreo Balls from the refrigerator. This step requires a bit of speed and finesse.
- Using a fork or dipping tool: Place one Oreo ball on the tines of a fork or a candy dipping tool. Submerge the ball completely into the melted coating. Lift the ball out, gently tapping the fork against the side of the bowl to allow any excess coating to drip off. You want a smooth, even coating without thick puddles at the bottom.
- Careful placement: Carefully transfer the coated ball to your prepared parchment-lined baking sheet. As you release it from the fork, you might need to use a toothpick to gently push it off and smooth any small imperfections where the fork tines were.
Continue this process with all the Pumpkin Oreo Balls, working steadily. If you notice your melted coating starting to thicken or cool too much, briefly reheat it. If your Oreo balls are getting too warm and soft, return the undipped ones to the refrigerator for a few minutes.
- Optional: First Layer Decoration (e.g., Sprinkles): If you plan to add sprinkles or other small, edible decorations that need to adhere directly to the coating, do so immediately after dipping each ball, while the coating is still wet. This ensures they stick securely before the coating sets.
Phase 4: Decorating and Final Chill
Now for the artistic touch! This is where you can truly customize your Pumpkin Oreo Balls and make them visually stunning. Whether you opt for a simple drizzle or an array of festive sprinkles, this step adds character and charm.
- Allow to Set: Once all your Pumpkin Oreo Balls are dipped and any immediate sprinkles have been added, let them sit at room temperature for about 10-15 minutes to allow the coating to begin setting. If your kitchen is warm, you can transfer them back to the refrigerator after this initial setting time.
- Apply Additional Decorations (Drizzles, etc.): If you wish to add contrasting drizzles (e.g., using dark chocolate or green candy melts), wait until the main orange coating is completely set and firm to the touch.
- Melt a small amount of your contrasting coating (e.g., dark chocolate or green candy melts) using the microwave or double boiler method, as described earlier.
- Transfer the melted coating to a small piping bag, a resealable plastic bag with a tiny corner snipped off, or simply use a fork to drizzle.
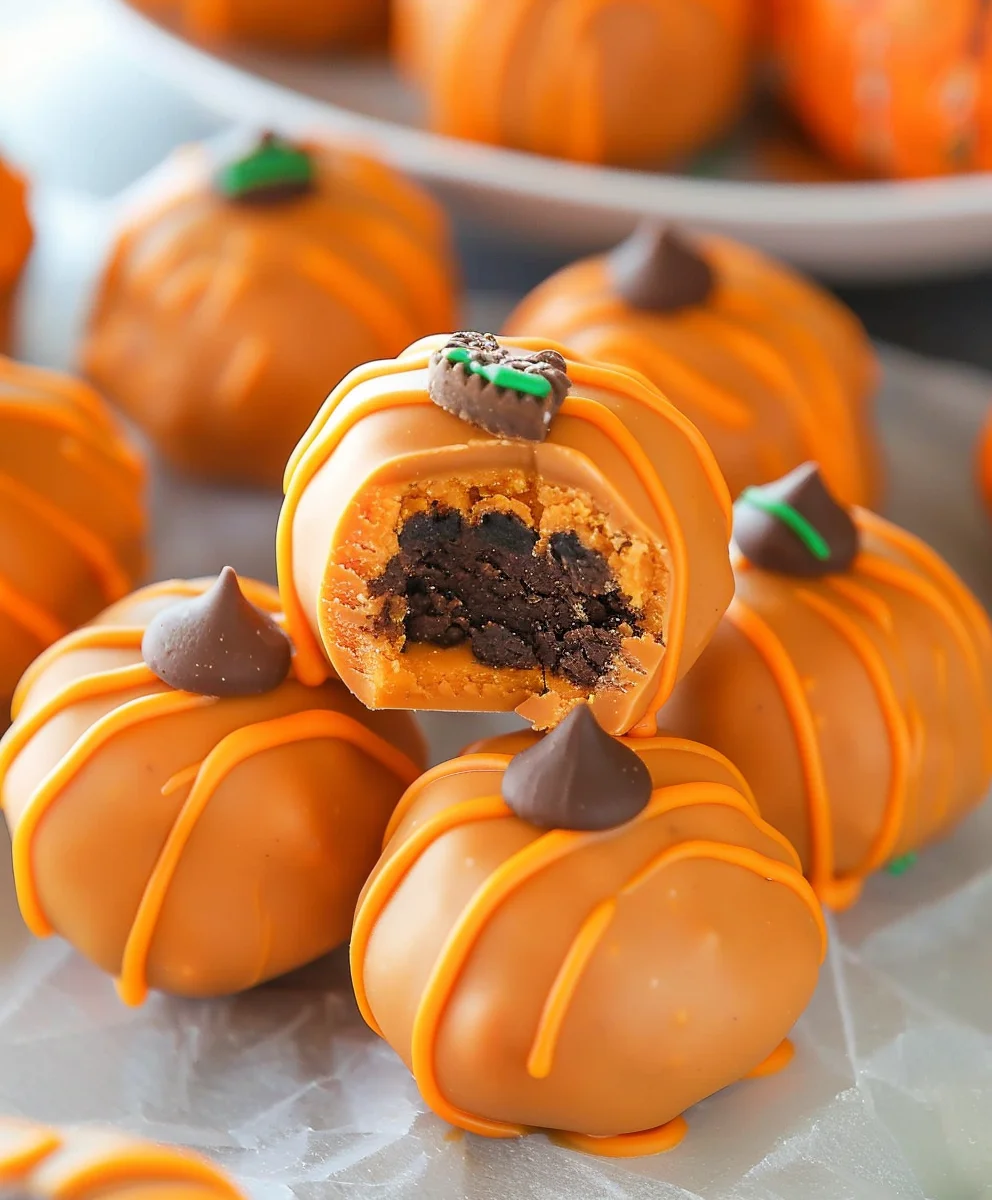
- Hold the bag or fork a few inches above the set Pumpkin Oreo Balls and drizzle back and forth in a zigzag pattern, or create circular patterns. Get creative! You can also use green candy melts to create small leaf shapes or stems if you want to make them look more like mini pumpkins.
This step really elevates the presentation, making your Pumpkin Oreo Balls look even more festive and inviting.
- Final Chill for Setting: Once all decorations are applied, place the baking sheets with your finished Pumpkin Oreo Balls back into the refrigerator for at least another 30 minutes. This final chill ensures that the coating is completely hardened and set, making them easy to handle, store, and serve.
Tips for Success with Your Pumpkin Oreo Balls:
Making these delicious Pumpkin Oreo Balls is a joyful experience, and with a few extra tips, you’ll be a pro in no time! I’ve learned a few things over the years that can help you achieve perfect results every time.
Keeping Your Coating Smooth:
- Prevent Seizing: The absolute golden rule when melting chocolate or candy melts is to keep it away from water. Even a tiny drop can cause it to “seize,” turning it into a thick, clumpy, unusable mess. Ensure your bowls and utensils are perfectly dry. If using a double boiler, make sure the water doesn’t boil too vigorously and steam doesn’t escape into your chocolate.
- Maintain Temperature: If your coating starts to thicken while dipping, gently reheat it for short bursts (5-10 seconds in the microwave) and stir well. Avoid continuously keeping it on high heat, which can scorch it. Some people like to work with two bowls of melted coating, rotating them to keep one warm while dipping from the other.
- Thinning if Necessary: If your candy melts are too thick to begin with, you can often thin them out with a tiny amount of a neutral oil like coconut oil (about ½ teaspoon at a time) or a specialized candy melt thinning agent. Do not use water or milk!
Achieving Perfect Balls:
- Chilling is Your Friend: I cannot stress this enough – proper chilling of the Oreo mixture is the most critical step for easy rolling and dipping. Cold balls mean less stickiness and a smoother coating. If you’re struggling, just pop them back in the fridge for a bit.
- Working Cleanly: Keep a clean damp cloth nearby to wipe your hands if they get sticky during rolling. Some people even like to lightly dust their hands with a little powdered sugar or cocoa powder to prevent sticking, but generally, a properly chilled mixture shouldn’t require this.
- Uniformity: Using a small cookie scoop really helps to make all your Pumpkin Oreo Balls the same size, which is great for presentation and ensures they all set at a similar rate.
Storage and Serving:
- Refrigeration: Pumpkin Oreo Balls should always be stored in an airtight container in the refrigerator. Due to the cream cheese, they need to be kept cold. They will last beautifully for up to 1-2 weeks in the fridge.
- Serving Temperature: While they need to be stored cold, I find that letting them sit at room temperature for about 10-15 minutes before serving allows the flavors and textures to truly shine. The cream cheese softens just slightly, creating a more delightful bite.
- Freezing: These are also fantastic for freezing! Place the set Pumpkin Oreo Balls in a single layer on a baking sheet to freeze solid, then transfer them to a freezer-safe airtight container or bag. They can be frozen for up to 1-2 months. Thaw them in the refrigerator before serving.
Variations and Customizations:
- Different Oreo Flavors: Feel free to experiment with different Oreo flavors! Golden Oreos, Mint Oreos (for a holiday twist), or even Peanut Butter Oreos could create unique variations of these delightful truffles. Just be mindful of how the flavor combination with pumpkin spice works.
- Spice Level: If you adore pumpkin pie spice as much as I do, don’t hesitate to add an extra half teaspoon or even a full teaspoon to the mixture. Taste a tiny bit of the mixture before rolling to adjust.
- Different Coatings: While orange candy melts give them that quintessential pumpkin look, you could also dip them in milk chocolate, dark chocolate, or even white chocolate tinted with other fall colors like yellow or brown.
- Creative Toppings: Beyond sprinkles and drizzles, consider crushed nuts, a dusting of cinnamon, or even mini chocolate chips pressed onto the wet coating for added texture and flavor. For a more elaborate “pumpkin” look, you can add a tiny piece of pretzel stick or a green candy melt leaf on top before the coating sets to resemble a pumpkin stem.
I hope these detailed instructions and tips help you create the most magnificent Pumpkin Oreo Balls! They are truly a crowd-pleaser and a perfect no-bake treat for any fall gathering or simply to enjoy at home. Happy baking (or rather, no-baking)!
Conclusion:
And there you have it! We’ve journeyed through the delightful process of creating what I truly believe is one of the most irresistible treats you’ll ever encounter. This recipe isn’t just about mixing a few ingredients; it’s about crafting moments of pure joy, surprising your taste buds with an unexpected yet harmonious blend of flavors, and effortlessly becoming the star of any gathering. If you’re looking for that one dessert that consistently delivers on taste, texture, and sheer convenience, then I can wholeheartedly assure you, these are absolutely a must-try. The magical combination of creamy pumpkin spice and the familiar, comforting crunch of Oreo cookies creates an experience that is both novel and nostalgic. Trust me when I say, once you try these, you’ll wonder how you ever lived without them.
What makes them so utterly irresistible? It’s the perfect balance. You get the earthy, subtly spiced notes of pumpkin, beautifully complemented by the rich, chocolatey goodness of the crushed Oreos. Then, there’s the delightful creaminess of the filling, all encased in a smooth, vibrant candy coating. They’re surprisingly easy to make, requiring no baking, which means less time in the kitchen and more time enjoying the fruits of your labor. Whether you’re a seasoned baker or a complete novice, these Pumpkin Oreo Balls are incredibly forgiving and always turn out spectacularly. They’re a celebration of seasonal flavors, making them an ideal treat for autumn gatherings, holiday parties, or simply a cozy evening in with a cup of your favorite warm beverage. Each bite is a little burst of happiness, a testament to how simple ingredients can come together to create something truly extraordinary.
Presenting Your Masterpiece: Serving Suggestions & Creative Twists
When it comes to serving these delectable morsels, the possibilities are as endless as your imagination! For a festive touch, arrange them artfully on a tiered serving tray, perhaps alongside some autumn leaves or small decorative pumpkins. They make a fantastic addition to any dessert bar, where their vibrant colors and unique appeal are sure to catch every eye. Consider pairing them with a warm cup of coffee, a frothy latte, or a steaming mug of hot chocolate for an ultimate cozy treat. They also make incredibly thoughtful homemade gifts; simply place a few in a decorative box or cellophane bag tied with a pretty ribbon, and you’ve got a present that speaks volumes of love and effort. Don’t forget they’re perfect for school bake sales or office potlucks – prepare to be bombarded with requests for the recipe!
But why stop there? Let your culinary creativity shine with a few variations. While the classic coating is wonderful, try dipping some in white chocolate and drizzling with milk chocolate for a striking contrast, or vice-versa. For an extra textural element, sprinkle some finely chopped pecans, walnuts, or even toasted coconut flakes onto the wet coating before it sets. A dash of pumpkin pie spice mixed into the white chocolate coating can intensify the pumpkin flavor even further. If you’re feeling adventurous, experiment with different Oreo flavors – Golden Oreos could offer a delightful vanilla twist, or Mint Oreos for a surprising holiday kick. You could even incorporate a tiny amount of cream cheese into the mixture before rolling for an added layer of tangy richness. For a fun party idea, insert lollipop sticks into the centers before chilling and coating them, turning them into adorable cake pops that are easy to handle for little hands and big kids alike.
I truly hope you’ll take the plunge and give this incredible recipe a try. There’s immense satisfaction in creating something so utterly delicious from scratch, and I promise you, these delightful treats will not disappoint. Once you’ve whipped up your batch of these amazing Pumpkin Oreo Balls, I would absolutely love to hear all about your experience! Did you stick to the classic? Did you get creative with coatings or add-ins? Please feel free to share your thoughts, your photos, and any unique twists you came up with in the comments below or on social media. Your culinary adventures inspire me, and I can’t wait to see your wonderful creations. Happy baking (or rather, no-baking) and even happier eating!
Easy No-Bake Pumpkin Oreo Balls
Capture the essence of autumn in a single, bite-sized treat with these Pumpkin Oreo Balls. This no-bake recipe features a perfect fusion of creamy pumpkin spice, crushed chocolatey Oreo cookies, and a smooth, sweet coating, making it an irresistible modern holiday staple.
Ingredients
-
36 Oreo cookies
-
8 oz cream cheese, softened
-
2 tsp pumpkin pie spice
-
12 oz orange candy melts
Instructions
-
Step 1
Finely crush 36 Oreo cookies, including the cream filling, into fine crumbs using a food processor or by hand. In a large bowl, combine the crushed Oreo crumbs, 8 oz softened cream cheese, and 2 tsp pumpkin pie spice. Mix until a thick, uniform dough forms. -
Step 2
Cover the bowl and refrigerate the mixture for at least 30 minutes to 1 hour until firm. Meanwhile, line baking sheets with parchment paper. -
Step 3
Scoop the chilled mixture using a 1-tablespoon scoop and gently roll into 1 to 1.5-inch balls between your palms. Place the rolled balls on the prepared baking sheets. Refrigerate the rolled balls for another 15-20 minutes to firm up. -
Step 4
Melt 12 oz orange candy melts according to package directions (microwave in short intervals or use a double boiler), stirring until smooth. Using a fork or dipping tool, submerge each chilled Oreo ball into the melted coating. Tap off excess and place on parchment-lined baking sheets. Add sprinkles or decorations immediately while the coating is wet, if desired. -
Step 5
Let the coated balls sit at room temperature for 10-15 minutes to begin setting. Once the main coating is set, melt additional candy melts (e.g., green/dark chocolate) and drizzle decoratively, if desired. Refrigerate for a final 30 minutes until completely set.
Important Information
Nutrition Facts (Per Serving)
It is important to consider this information as approximate and not to use it as definitive health advice.
Allergy Information
Please check ingredients for potential allergens and consult a health professional if in doubt.
Leave a Comment