
Cheesecake Stuffed Stuffed Crescent Rolls
Cheesecake Stuffed Stuffed Crescent Rolls – oh my goodness, where do I even begin with this absolute masterpiece? This isn’t just another sweet treat; it’s a delightful adventure for your taste buds, combining some of my very favorite things into one incredible, irresistible package. What makes this recipe truly special, you ask? Well, it’s all in that wonderfully whimsical name! We’re not just stuffing a simple crescent roll with cheesecake; we’re talking about a generously “stuffed stuffed” situation, where every flaky, buttery bite is bursting with a luscious, creamy cheesecake filling, perhaps even with a delightful little secret tucked within the cheesecake itself to make it extra special.
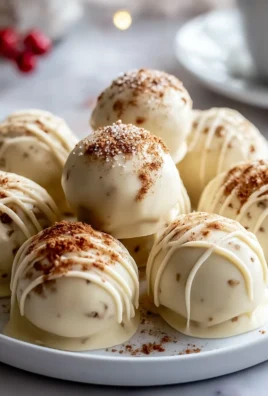
I can practically guarantee you’re going to fall head over heels for these because they perfectly marry the comforting ease of a crescent roll with the sophisticated indulgence of cheesecake. Imagine: a warm, golden-brown, wonderfully flaky pastry exterior that gives way to a soft, sweet, and tangy cheesecake center that just melts in your mouth. It’s the ultimate harmony of textures and flavors – the crispness of the pastry beautifully contrasting with the rich, smooth, and utterly delicious cheesecake. These are perfect for elevating your breakfast, making brunch truly unforgettable, or serving as a simple yet elegant dessert that will have everyone asking for more. Get ready to experience pure joy with your new favorite, sensationally stuffed pastry!

Ingredient Notes
Alright, let’s talk about the stars of our show for these truly unique Cheesecake Stuffed Stuffed Crescent Rolls! Given the nested nature of this dish, each component plays a crucial role in creating that surprising combination of savory, sweet, and flaky goodness. My goal here is to guide you to the best ingredients for success, along with some handy swaps.
For the Cheesecake Filling:
- Full-Fat Cream Cheese: This is non-negotiable for that rich, creamy cheesecake texture. Make sure it’s softened to room temperature for smooth mixing, free of any lumps. Low-fat varieties simply won’t give you the same decadent center.
- Granulated Sugar: Just enough to sweeten our mini cheesecake dollop. You can adjust this slightly to your preference, but remember it’s a small amount for a small filling.
- Egg Yolk: A single egg yolk is key here! It provides binding and helps set the cheesecake filling, preventing it from completely melting and oozing out during baking. It also adds a beautiful richness.
- Vanilla Extract: Pure vanilla extract will give our cheesecake that classic, comforting aroma and flavor.
- Substitution Tip: For a hint of citrus brightness, a tiny pinch of lemon zest can be added to the cheesecake filling, though I prefer to keep it simple to let all the flavors shine.
For the Savory Beef & Cheese Stuffing (the ‘first’ stuffing):
- Ground Beef: Lean ground beef (85-90% lean) works best here. You want enough flavor but not excessive grease, as we’ll be wrapping other ingredients. If you opt for a higher fat content, be sure to drain it very well after cooking. This is our beef replacement for any pork suggestions.
- Onion & Garlic: Finely minced, these aromatics lay a foundational savory base. Sauté them until softened before adding the beef for maximum flavor.
- Shredded Cheese: A good melting cheese is essential. Sharp cheddar, mozzarella, or a blend of both would be fantastic. The cheese binds the beef mixture and adds another layer of savory goodness.
- Seasonings: Salt, black pepper, garlic powder, onion powder, and a touch of dried Italian herbs (like oregano and basil) will make our beef mixture truly flavorful. Feel free to adjust these to your taste preferences.
- Non-Alcoholic Umami Boost: A dash of Worcestershire sauce (check for non-alcohol versions if concerned, though most standard ones contain negligible alcohol) or even a splash of a non-alcoholic cooking wine alternative can add a wonderful depth of flavor to the beef.
- Substitution Tip: While beef is our primary focus, if you wanted a different protein for the savory stuffing, finely crumbled cooked turkey or a hearty plant-based ground meat alternative could also work. Just ensure it’s well-seasoned and able to hold its shape.
For the Crescent Roll Wrapper:
- Refrigerated Crescent Roll Dough: This is our convenient outer layer! I recommend using the standard, flaky variety, not the seamless sheets, as the pre-cut triangles make assembly much easier. Look for brands known for good flakiness.
- Egg Wash (Optional but Recommended): A lightly beaten egg with a tablespoon of water, brushed over the rolls before baking, will give them a beautiful golden-brown, shiny finish.
Step-by-Step Instructions
Get ready for a unique culinary adventure! Making these Cheesecake Stuffed Stuffed Crescent Rolls involves a few steps, but following them carefully will ensure your success in creating this delightful, surprising treat. The key is preparation and gentle handling.
Step 1: Prepare the Cheesecake Filling (and Chill!)
- In a small bowl, combine the softened full-fat cream cheese, granulated sugar, and vanilla extract. Beat with a spoon or a hand mixer on low speed until smooth and no lumps remain.
- Stir in the egg yolk until just combined. Be careful not to overmix, as we don’t want to incorporate too much air.
- Cover the bowl and refrigerate the cheesecake filling for at least 30-60 minutes. This chilling step is absolutely crucial; it will firm up the filling, making it much easier to handle and less likely to melt prematurely during assembly.
Step 2: Prepare the Savory Beef & Cheese Stuffing (and Chill!)
- In a medium skillet, cook the finely minced onion over medium heat with a tablespoon of oil until softened, about 3-5 minutes. Add the minced garlic and cook for another minute until fragrant.
- Add the ground beef to the skillet. Break it up with a spoon and cook until it’s fully browned. Drain off any excess fat thoroughly. This is very important to prevent soggy crescent rolls.
- Remove the beef from the heat. Stir in the shredded cheese, salt, black pepper, garlic powder, onion powder, and dried Italian herbs (and your non-alcoholic umami boost, if using). Mix well until the cheese is melted and evenly distributed throughout the beef mixture.
- Transfer the beef mixture to a clean bowl, cover, and refrigerate for at least 30-60 minutes, or until completely cool and firm. Like the cheesecake, chilling this mixture makes it much easier to form and handle.
Step 3: Assemble the Cheesecake Stuffed Beef Stuffing
This is where the ‘stuffed stuffed’ magic happens!
- Line a baking sheet with parchment paper.
- Scoop out a small, roughly 1-tablespoon portion of the chilled beef and cheese stuffing. Using your clean hands, flatten it gently into a small disc, about 1.5 inches in diameter.
- Take a tiny, approximately 1/2-teaspoon dollop of the chilled cheesecake filling and place it right in the center of the beef disc.
- Carefully, using your fingers, bring the edges of the beef mixture up and around the cheesecake filling. Gently pinch and mold the beef mixture to completely enclose the cheesecake, forming a small, sealed ball. It’s okay if it’s not perfectly round, but ensure the cheesecake is fully encased. This is your ‘Cheesecake Stuffed Beef Ball’. Place these prepared balls back into the fridge for 10-15 minutes while you prepare the crescent dough if you find them too soft to handle.
Step 4: Wrap in Crescent Rolls & Bake
- Preheat your oven to 375°F (190°C). Line a large baking sheet with parchment paper.
- Unroll the refrigerated crescent roll dough onto your prepared baking sheet or a clean surface. Separate the dough into individual triangles.
- Working with one crescent triangle at a time, place one of your chilled ‘Cheesecake Stuffed Beef Balls’ at the wide end of the triangle.
- Starting from the wide end, gently roll up the crescent dough over the beef ball towards the narrow point. As you roll, carefully tuck in the sides of the dough to fully enclose the stuffing. Pinch the seams and edges securely to prevent any filling from escaping during baking. This is crucial for keeping your cheesecake surprise inside!
- Repeat with the remaining dough and stuffing balls.
- Arrange the assembled crescent rolls on the prepared baking sheet, leaving some space between each.
- If desired, brush the tops of the crescent rolls with an egg wash (1 egg beaten with 1 tbsp water) for a golden, shiny finish.
- Bake for 12-18 minutes, or until the crescent rolls are golden brown and puffed, and the filling is heated through. Baking time may vary slightly depending on your oven and the size of your stuffed rolls. Keep an eye on them!
- Remove from the oven and let them cool on the baking sheet for 5-10 minutes before serving. The internal cheesecake filling will be very hot and soft, so allowing it to set slightly will improve the experience.
Tips & Suggestions
Making these Cheesecake Stuffed Stuffed Crescent Rolls is a fun challenge, and I’ve picked up a few tricks that will really help you nail it. Given the unique structure of this dish, attention to detail in these areas makes a big difference.
- Chill Everything Thoroughly: I can’t stress this enough! Both your cheesecake filling and your beef mixture must be well-chilled before assembly. This makes them much easier to handle and prevents them from becoming too soft and messy, which is especially important when you’re trying to encase one filling within another.
- Work with Cold Crescent Dough: Keep your crescent roll dough cold right up until you’re ready to use it. Cold dough is less sticky and easier to manipulate, making the wrapping process smoother. If your kitchen is warm, you might even want to work in batches, keeping unused dough in the fridge.
- Seal Those Seams! This is absolutely critical for keeping that delicious cheesecake surprise inside. When you’re forming the beef around the cheesecake, and then again when you’re rolling the crescent dough around the beef ball, pinch and seal all seams very tightly. Any small opening can lead to leaks, especially from the melty cheesecake.
- Don’t Overfill: It can be tempting to put more filling, but resist! Stick to the suggested amounts (1 tablespoon of beef, 1/2 teaspoon of cheesecake) to ensure you can properly seal everything and that your crescent rolls bake evenly without bursting.
- Mind the Beef Size: When creating your beef disc for the inner stuffing, try to make it as thin as possible while still being able to enclose the cheesecake. This helps ensure the beef cooks through properly within the crescent roll’s baking time.
- Use Parchment Paper: Lining your baking sheet with parchment paper is a lifesaver. It prevents sticking and makes cleanup a breeze, especially if you have any minor leaks (though we’re trying our best to prevent those!).
- Let Them Rest: After baking, let your rolls cool on the baking sheet for 5-10 minutes. The cheesecake filling will be extremely hot and molten right out of the oven. A short rest allows it to set slightly, making for a much better eating experience and preventing burnt tongues!
- Experiment with Seasonings: While I’ve given you a solid base for the beef, don’t be afraid to play with your favorite savory seasonings. A little smoked paprika, a dash of chili powder, or different herb blends can all add wonderful twists.
- Serving Suggestion: These are truly a dish on their own, offering both savory and sweet. They make an excellent brunch item, a unique appetizer, or even a fun, unexpected dessert course!
Storage
Once you’ve gone to the effort of creating these incredible Cheesecake Stuffed Stuffed Crescent Rolls, you’ll want to make sure you store any leftovers properly to enjoy them later. While they are definitely best enjoyed fresh from the oven, they still make for a delicious treat the next day!
- Cool Completely: Before storing, ensure your crescent rolls have cooled completely to room temperature. Storing them warm will create condensation, leading to soggy rolls.
- Airtight Container: Place the cooled rolls in an airtight container. This will help maintain their freshness and prevent them from drying out or absorbing other odors from your fridge.
- Refrigeration: Store the crescent rolls in the refrigerator for up to 2-3 days. Because of the beef and cream cheese fillings, refrigeration is a must.
- Reheating: To reheat, I recommend using an oven or a toaster oven.
- Oven/Toaster Oven: Preheat to 300-325°F (150-160°C). Place the crescent rolls on a baking sheet and heat for 10-15 minutes, or until warmed through and the pastry is crisp again. This method will help restore some of their original texture.
- Microwave (Use with Caution): While you can microwave them, I generally don’t recommend it for crescent rolls. Microwaving can make the pastry soft and chewy, losing that lovely flakiness, and the cheesecake filling might become overly liquid. If you do use a microwave, heat in short bursts (30 seconds at a time) until just warm.
- Freezing (Unbaked): If you want to prepare these ahead of time, you can freeze them unbaked! After assembling the rolls and sealing them securely, place them on a baking sheet and freeze until solid. Once frozen, transfer them to a freezer-safe bag or container. They can be frozen for up to 1 month. When ready to bake, place the frozen rolls directly on a baking sheet (no need to thaw) and bake in a preheated oven at 375°F (190°C), adding an extra 5-10 minutes to the baking time, or until golden brown and cooked through.

Final Thoughts
There’s just something magical about biting into a warm, golden pastry that surprises you with a delightful creamy center, and that’s precisely what you’ll find with these Cheesecake Stuffed Stuffed Crescent Rolls. I truly believe this recipe is a game-changer for anyone looking for a dessert that’s both simple to make and incredibly impressive to serve.
The beauty of the Cheesecake Stuffed Stuffed Crescent Rolls lies in their unique double-stuffed nature – you get that perfect flaky crescent roll exterior giving way to a rich, tangy cheesecake filling, all in one perfect bite. It’s not just another dessert; it’s an experience!
So, go ahead and give these Cheesecake Stuffed Stuffed Crescent Rolls a try. Whether you’re treating yourself, surprising family, or impressing guests, I promise you won’t regret the joy these little parcels of deliciousness bring. They’re a definite must-try addition to your baking repertoire!

Easy Cheesecake Stuffed Crescent Rolls: Sweet & Simple Treat
- Total Time: 48 minutes
- Yield: 12 servings
Description
These Cheesecake Stuffed Crescent Rolls are a delightful combination of flaky pastry and creamy cheesecake filling. Perfect for breakfast, brunch, or dessert, they are sure to impress everyone with their unique flavors and textures.
Ingredients
- Full-Fat Cream Cheese
- Granulated Sugar
- Egg Yolk
- Vanilla Extract
- Ground Beef
- Onion
- Garlic
- Shredded Cheese
- Salt
- Black Pepper
- Garlic Powder
- Onion Powder
- Dried Italian Herbs
- Worcestershire Sauce
- Refrigerated Crescent Roll Dough
- Egg Wash (1 egg beaten with 1 tbsp water)
Instructions
- In a small bowl, combine the softened full-fat cream cheese, granulated sugar, and vanilla extract. Beat with a spoon or a hand mixer on low speed until smooth and no lumps remain.
- Stir in the egg yolk until just combined. Be careful not to overmix, as we don't want to incorporate too much air.
- Cover the bowl and refrigerate the cheesecake filling for at least 30-60 minutes.
- In a medium skillet, cook the finely minced onion over medium heat with a tablespoon of oil until softened, about 3-5 minutes. Add the minced garlic and cook for another minute until fragrant.
- Add the ground beef to the skillet. Break it up with a spoon and cook until it's fully browned. Drain off any excess fat thoroughly.
- Remove the beef from the heat. Stir in the shredded cheese, salt, black pepper, garlic powder, onion powder, and dried Italian herbs. Mix well until the cheese is melted and evenly distributed throughout the beef mixture.
- Transfer the beef mixture to a clean bowl, cover, and refrigerate for at least 30-60 minutes.
- Line a baking sheet with parchment paper.
- Scoop out a small, roughly 1-tablespoon portion of the chilled beef and cheese stuffing. Flatten it gently into a small disc, about 1.5 inches in diameter.
- Take a tiny, approximately 1/2-teaspoon dollop of the chilled cheesecake filling and place it right in the center of the beef disc.
- Carefully bring the edges of the beef mixture up and around the cheesecake filling. Pinch and mold the beef mixture to completely enclose the cheesecake, forming a small, sealed ball.
- Place these prepared balls back into the fridge for 10-15 minutes.
- Preheat your oven to 375°F (190°C). Line a large baking sheet with parchment paper.
- Unroll the refrigerated crescent roll dough onto your prepared baking sheet. Separate the dough into individual triangles.
- Working with one crescent triangle at a time, place one of your chilled 'Cheesecake Stuffed Beef Balls' at the wide end of the triangle.
- Starting from the wide end, gently roll up the crescent dough over the beef ball towards the narrow point. Tuck in the sides of the dough to fully enclose the stuffing. Pinch the seams and edges securely.
- Repeat with the remaining dough and stuffing balls.
- Arrange the assembled crescent rolls on the prepared baking sheet, leaving some space between each.
- If desired, brush the tops of the crescent rolls with an egg wash for a golden, shiny finish.
- Bake for 12-18 minutes, or until the crescent rolls are golden brown and puffed.
- Remove from the oven and let them cool on the baking sheet for 5-10 minutes before serving.
- Prep Time: 30 mins
- Cook Time: 18 mins
- Category: Dessert
- Method: Baking
- Cuisine: American
Nutrition
- Serving Size: 1 roll
- Calories: 250
- Sugar: 3 g
- Sodium: 300 mg
- Fat: 15 g
- Saturated Fat: 7 g
- Unsaturated Fat: 6 g
- Trans Fat: 0 g
- Carbohydrates: 20 g
- Fiber: 1 g
- Protein: 10 g
- Cholesterol: 45 mg
Keywords: Chill everything thoroughly, work with cold crescent dough, and seal seams tightly to keep the cheesecake filling inside. Don't overfill the rolls to ensure even baking.

Leave a Comment