
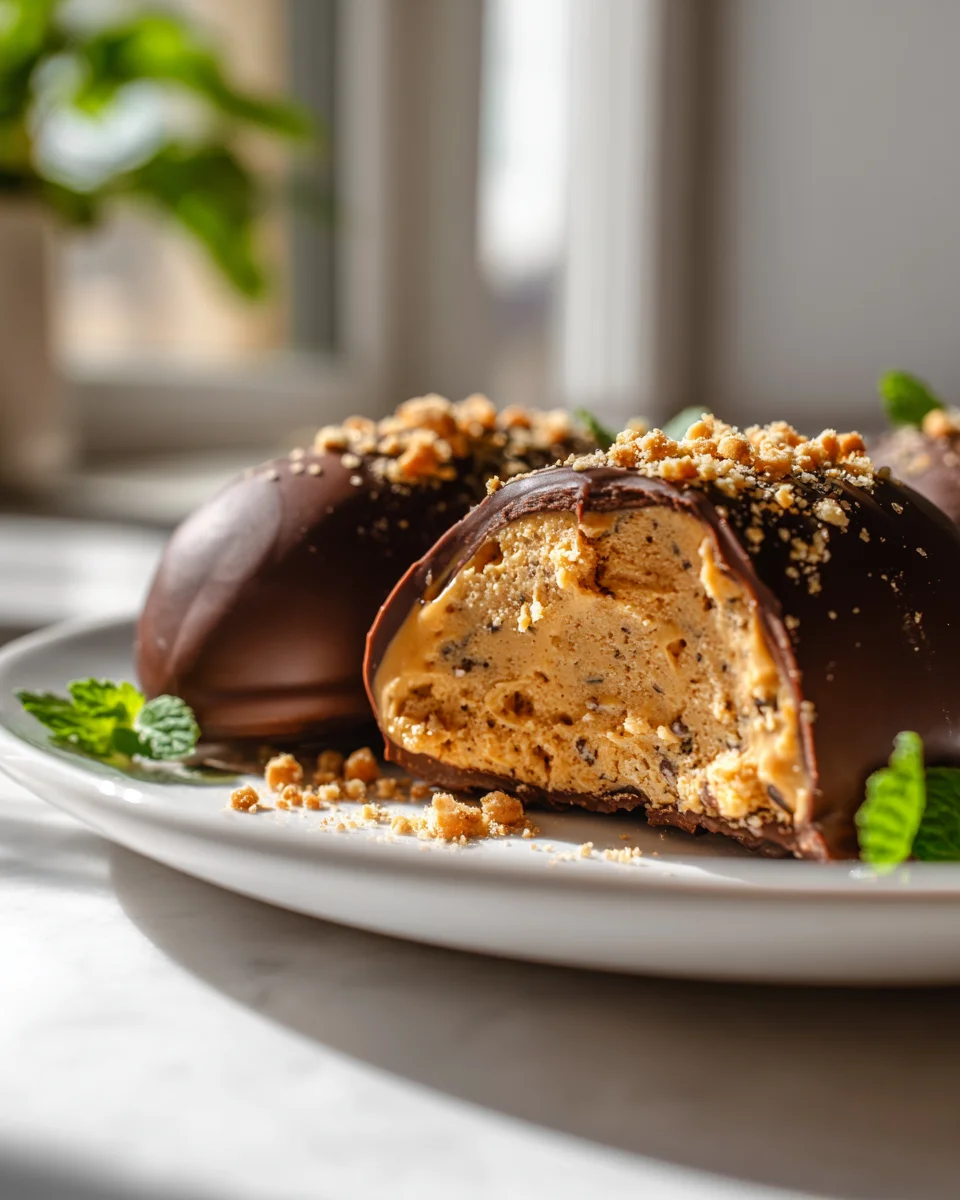
One of my fondest childhood memories is of warm afternoons spent in the kitchen with my mom, who had a knack for whipping up the most delightful treats. On one particularly rainy day, she decided to experiment with a recipe she had found tucked away in an old cookbook. That day, she introduced me to the magic of Peanut Butter Egg Cakesicles, and I was instantly enchanted. The sight of those golden-brown cakes, coated in a glossy layer of chocolate, was enough to make anyone’s mouth water. The rich aroma of peanut butter mingling with sweet chocolate filled our home, enveloping us in a comforting embrace.
These Peanut Butter Egg Cakesicles aren’t just a treat; they’re a nostalgic journey back to those carefree days. Each bite is a delightful balance of creamy peanut butter and moist cake, all wrapped up in a luscious chocolate shell that melts in your mouth. The crunch of the chocolate contrasts beautifully with the soft, fluffy interior, creating a symphony of textures that dance on your palate. What makes my version special is the addition of a hint of sea salt, which elevates the sweetness and brings out the rich flavors even more.
Whether you’re looking for a fun dessert to share with friends or a sweet escape on a quiet evening, these cakesicles are sure to bring joy to any occasion. Let me show you exactly how to make it.

Why You’ll Love This Recipe
- Indulge in a creamy, dreamy peanut butter filling that perfectly contrasts with the moist chocolate cake base, offering a delightful mouthfeel.
- Ready in just about 45 minutes, including cooling time, making it a perfect last-minute dessert or treat.
- Budget-friendly with simple, accessible ingredients that you likely already have in your pantry.
- Customizable to your taste — easily adjust sweetness or try different nut butters for a unique twist.
- Perfectly portable; these cakesicles are great for parties, picnics, or a fun snack on the go!
Ingredients
- For the Cake Base:
- 1 ½ cups all-purpose flour
- 1 cup granulated sugar
- ½ cup unsweetened cocoa powder
- 1 tsp baking powder
- 1 tsp baking soda
- ½ tsp salt
- 2 large eggs
- ½ cup whole milk
- ½ cup vegetable oil
- 2 tsp vanilla extract
- ½ cup boiling water
- For the Peanut Butter Filling:
- 1 cup creamy peanut butter
- ½ cup powdered sugar
- 1 tsp vanilla extract
- 2-3 tbsp milk (as needed for consistency)
- For the Chocolate Coating:
- 1 ½ cups semi-sweet chocolate chips
- 1 tbsp coconut oil (optional, for smoothness)
- For Assembly:
- 12 popsicle sticks
When it comes to making the Peanut Butter Egg Cakesicles, each ingredient plays a crucial role. The all-purpose flour is the backbone of the cake base, providing structure and stability. Opt for a high-quality flour to ensure a light texture. If you’re looking for a gluten-free option, almond flour or a gluten-free blend can work, but the texture may vary.
The creamy peanut butter offers not just flavor but also a rich, smooth texture that brings the filling to life. Look for a natural peanut butter without added sugars or oils for the best taste and health benefits. If you have a nut allergy, sunflower seed butter is a fantastic alternative that mimics that creamy texture.
Lastly, the semi-sweet chocolate chips in the coating add a rich, sweet finish that balances the savory peanut butter filling. For a dairy-free option, choose dairy-free chocolate chips. Adding a tablespoon of coconut oil can enhance the coating’s smoothness, making it easier to dip.
Step-by-Step Instructions
- Preheat your oven to 350°F (175°C). This ensures that your cakes bake evenly. While it’s heating, gather your ingredients for the cake base.
- In a large mixing bowl, whisk together the all-purpose flour, granulated sugar, cocoa powder, baking powder, baking soda, and salt until well combined. This dry mix should look uniform in color.
- In another bowl, beat the two large eggs until frothy. Then add the whole milk, vegetable oil, and vanilla extract, mixing until everything is smooth.
- Gradually pour the wet ingredients into the dry ingredients, stirring gently until just combined. Be careful not to over-mix, which can lead to a dense cake.
- Next, carefully add the ½ cup of boiling water to the batter. This step helps create a moist cake. The batter will be thin, but that’s okay!
- Pour the batter into a greased 9×13 inch baking pan. Bake for 25-30 minutes or until a toothpick inserted in the center comes out clean. Look for a slight spring-back when you gently press the top.
- Once baked, allow the cake to cool in the pan for about 10 minutes, then transfer it to a wire rack to cool completely, which will take approximately 30 minutes.
- While the cake cools, prepare the peanut butter filling. In a medium bowl, mix the creamy peanut butter, powdered sugar, vanilla extract, and milk. Adjust the milk as needed to achieve a smooth, spreadable consistency.
- Once the cake has cooled, cut it into equal rectangles (about 2×3 inches) to form the cakesicles. Place each piece onto a baking sheet lined with parchment paper.
- Take a popsicle stick and insert it into the bottom of each rectangle, pushing it halfway through.
- Spread a generous layer of the peanut butter filling on top of each cake rectangle, smoothing it out evenly.
- Now, place the cakesicles in the freezer for about 30 minutes to allow the filling to firm up.
- While the cakesicles are in the freezer, melt the semi-sweet chocolate chips and coconut oil (if using) in a microwave-safe bowl in 30-second intervals, stirring in between until smooth.
- Once the cakesicles are firm, dip each one into the melted chocolate, making sure to coat it evenly. Allow the excess chocolate to drip off.
- Return the coated cakesicles to the baking sheet and let them set at room temperature or refrigerate until the chocolate hardens, which should take about 15-20 minutes.
- Enjoy your Peanut Butter Egg Cakesicles immediately or store them in an airtight container in the fridge!
Pro Tips for the Best Peanut Butter Egg Cakesicles
- One common mistake is overmixing the batter. This can make your cakes dense rather than light and fluffy. Mix until just combined to achieve the best texture.
- Use a quality silicone mold if you want to make these cakesicles even more fun. It allows for easy removal and prevents sticking.
- For a richer chocolate coating, consider tempering your chocolate. This might take a bit more time but will give your cakesicles a professional finish.
- When making the peanut butter filling, taste it and adjust the powdered sugar to your desired sweetness. This way, you can personalize the flavors to your liking.
- Don’t rush the cooling process. Allow the cake to cool completely before adding the filling. This prevents the filling from melting and ensures a perfect bite.
Variations & Serving Ideas
If you’re feeling adventurous, here are some creative variations for your Peanut Butter Egg Cakesicles:
- Chocolate Chip Cookies Version: Add mini chocolate chips to your peanut butter filling for an extra burst of flavor.
- Nut-Free Option: Substitute the peanut butter with sunbutter or soy nut butter to make it nut-free while still ensuring a creamy texture.
- Seasonal Spice: For a festive touch, incorporate pumpkin spice or cinnamon into the peanut butter filling during the fall.
- Fruit Add-Ins: Fold in chopped dried fruits like cranberries or raisins into the filling for a chewy texture contrast.
As for serving ideas, consider pairing your cakesicles with:
- Fresh Berries: Strawberries or raspberries add a refreshing tartness that complements the rich flavors.
- Vanilla Ice Cream: A scoop of ice cream makes for an indulgent dessert experience, especially on a hot day.
- Nutty Granola: A sprinkle of granola adds a crunchy texture, enhancing the overall experience.
Storage, Make-Ahead & Reheating
For the best storage, keep your Peanut Butter Egg Cakesicles in an airtight container in the refrigerator, where they will last for up to one week. If you want to enjoy them later, these cakesicles freeze beautifully! Just wrap each one individually in plastic wrap and place them in a freezer-safe bag. They can last up to three months in the freezer.
When you’re ready to enjoy a frozen treat, remove the cakesicle from the freezer and let it sit at room temperature for about 5-10 minutes until slightly softened for easier biting. Interestingly, these cakesicles often taste even better the next day, as the flavors have more time to meld together, enhancing that delicious peanut butter goodness.
Frequently Asked Questions
Can I make Peanut Butter Egg Cakesicles ahead of time?
Yes — in fact, they taste even better the next day as the flavors meld. You can prepare the cakesicles and store them in the fridge or freezer, making them an excellent make-ahead treat for parties or gatherings.
What can I use instead of all-purpose flour?
If you’re looking for a gluten-free option, almond flour or a gluten-free all-purpose flour blend can work well. However, be mindful that the texture may differ slightly, so adjustments might be necessary.
How do I ensure my chocolate coating is smooth?
Using coconut oil in your melted chocolate can help create a smoother, more glossy finish. Also, make sure to melt the chocolate gently, either in a microwave or a double boiler, to prevent it from seizing.
Final Thoughts
Peanut Butter Egg Cakesicles are truly a delightful treat that perfectly balances creamy peanut butter with soft, cake-like goodness. The combination of flavors and textures makes them not only satisfying to eat but also a joy to share with family and friends.
This is the kind of recipe I come back to again and again, especially when I want to indulge in something sweet yet wholesome. Whether it’s for a special occasion or simply a cozy night in, these cakesicles are sure to impress. I encourage you to give them a try! Don’t hesitate to share your results or put your own spin on the recipe. Happy baking!

Delicious Peanut Butter Egg Cakesicles Recipe for Sweet Treats
- Total Time: 45 minutes
- Yield: 12 servings 1x
Description
These Peanut Butter Egg Cakesicles are a delightful balance of creamy peanut butter and moist chocolate cake, all wrapped in a luscious chocolate shell. Perfect for sharing with friends or enjoying on a quiet evening, they are sure to bring joy to any occasion.
Ingredients
- 1 ½ cups all-purpose flour
- 1 cup granulated sugar
- ½ cup unsweetened cocoa powder
- 1 tsp baking powder
- 1 tsp baking soda
- ½ tsp salt
- 2 large eggs
- ½ cup whole milk
- ½ cup vegetable oil
- 2 tsp vanilla extract
- ½ cup boiling water
- 1 cup creamy peanut butter
- ½ cup powdered sugar
- 1 tsp vanilla extract
- 2–3 tbsp milk (as needed for consistency)
- 1 ½ cups semi-sweet chocolate chips
- 1 tbsp coconut oil (optional, for smoothness)
- 12 popsicle sticks
Instructions
- Preheat your oven to 350°F (175°C). This ensures that your cakes bake evenly. While it’s heating, gather your ingredients for the cake base.
- In a large mixing bowl, whisk together the all-purpose flour, granulated sugar, cocoa powder, baking powder, baking soda, and salt until well combined. This dry mix should look uniform in color.
- In another bowl, beat the two large eggs until frothy. Then add the whole milk, vegetable oil, and vanilla extract, mixing until everything is smooth.
- Gradually pour the wet ingredients into the dry ingredients, stirring gently until just combined. Be careful not to over-mix, which can lead to a dense cake.
- Next, carefully add the ½ cup of boiling water to the batter. This step helps create a moist cake. The batter will be thin, but that’s okay!
- Pour the batter into a greased 9×13 inch baking pan. Bake for 25-30 minutes or until a toothpick inserted in the center comes out clean. Look for a slight spring-back when you gently press the top.
- Once baked, allow the cake to cool in the pan for about 10 minutes, then transfer it to a wire rack to cool completely, which will take approximately 30 minutes.
- While the cake cools, prepare the peanut butter filling. In a medium bowl, mix the creamy peanut butter, powdered sugar, vanilla extract, and milk. Adjust the milk as needed to achieve a smooth, spreadable consistency.
- Once the cake has cooled, cut it into equal rectangles (about 2×3 inches) to form the cakesicles. Place each piece onto a baking sheet lined with parchment paper.
- Take a popsicle stick and insert it into the bottom of each rectangle, pushing it halfway through.
- Spread a generous layer of the peanut butter filling on top of each cake rectangle, smoothing it out evenly.
- Now, place the cakesicles in the freezer for about 30 minutes to allow the filling to firm up.
- While the cakesicles are in the freezer, melt the semi-sweet chocolate chips and coconut oil (if using) in a microwave-safe bowl in 30-second intervals, stirring in between until smooth.
- Once the cakesicles are firm, dip each one into the melted chocolate, making sure to coat it evenly. Allow the excess chocolate to drip off.
- Return the coated cakesicles to the baking sheet and let them set at room temperature or refrigerate until the chocolate hardens, which should take about 15-20 minutes.
- Enjoy your Peanut Butter Egg Cakesicles immediately or store them in an airtight container in the fridge!
- Prep Time: 15 mins
- Cook Time: 30 mins
- Category: Dessert
- Method: Baking
- Cuisine: American
Nutrition
- Serving Size: 1 cakesicle
- Calories: 250
- Sugar: 20 g
- Sodium: 150 mg
- Fat: 15 g
- Saturated Fat: 5 g
- Unsaturated Fat: 10 g
- Trans Fat: 0 g
- Carbohydrates: 30 g
- Fiber: 2 g
- Protein: 5 g
- Cholesterol: 40 mg
Keywords: Be careful not to overmix the batter to achieve a light and fluffy texture. You can use a quality silicone mold for easy removal, and consider tempering your chocolate for a professional finish.

Leave a Comment