
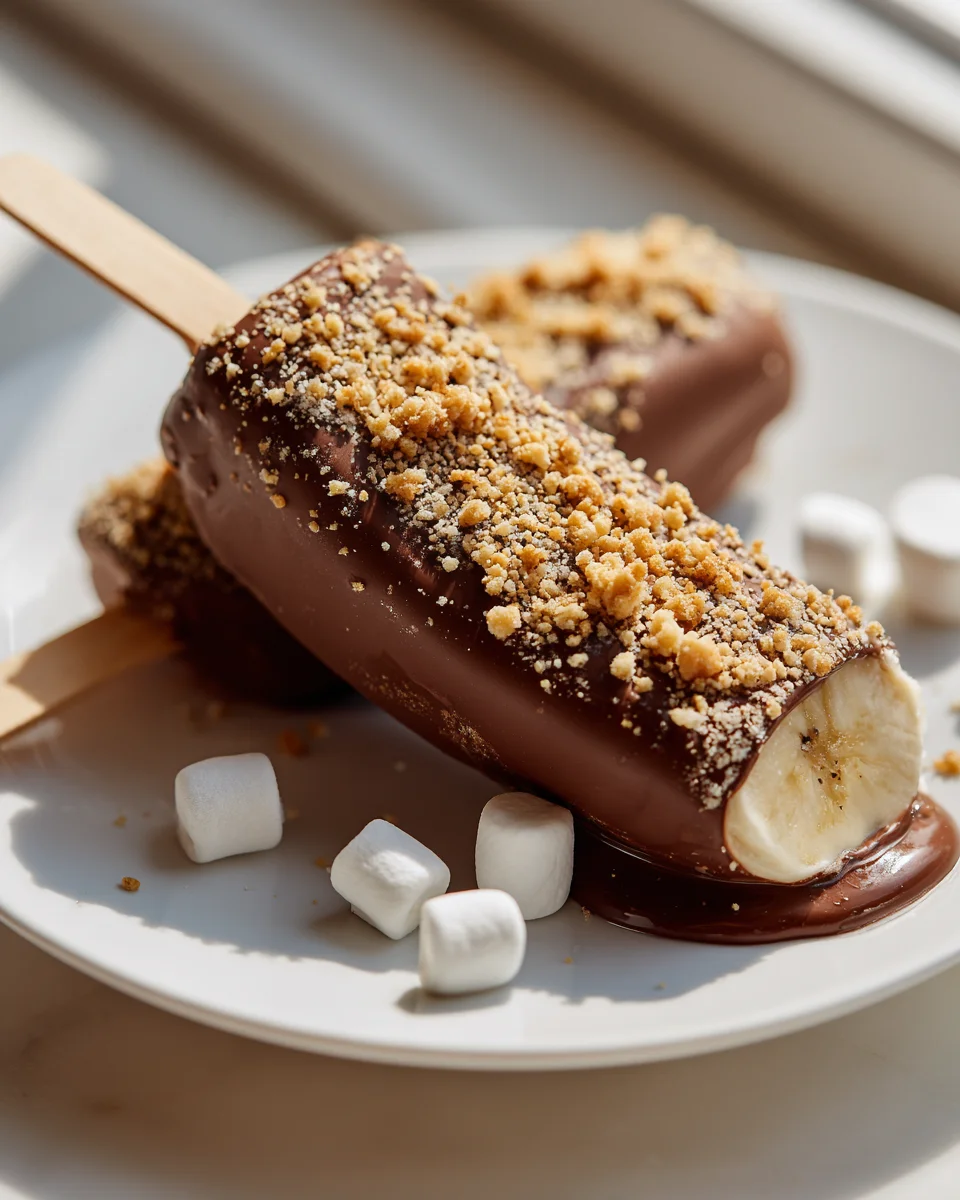
Frozen S’mores Banana Pops
Hey there, fellow foodies! I’m so excited to share one of my absolute favorite frosty treats with you today. You know how much I love a good s’mores, but sometimes the campfire isn’t an option, or maybe you just want something a little… cooler. Well, get ready because my Frozen S’mores Banana Pops are here to save the day (and your dessert cravings)! This isn’t just any old frozen banana, my friends. Oh no! We’re taking ripe, sweet bananas and transforming them into a delightful, no-bake s’mores experience that’s truly special. Imagine the gooey goodness of roasted marshmallows, the satisfying crunch of graham crackers, and the rich melt of chocolate – all perfectly chilled and ready to enjoy on a stick, without a lick of smoke or sticky fingers from a real campfire. It’s the ultimate combination of classic s’mores charm with a refreshing, fruity twist.
I know you’re going to love these because they are incredibly fun, ridiculously easy to make, and a fantastic way to enjoy a guilt-free-ish indulgence. What makes these pops so irresistible? It’s simple: we coat slices of banana in a dreamy chocolate shell, then shower them with crunchy graham cracker crumbs and adorable mini marshmallows. A quick freeze, and voilà! You’ve got a handheld dessert that’s bursting with flavor, incredibly fun to make (and eat!), and surprisingly easy. Trust me, your taste buds (and anyone you share these with!) will be singing. They’re perfect for hot summer days, a fun activity with the kids, or just a sweet treat any time you’re craving something cool and comforting.

Ingredient Notes
Creating these delightful Frozen S’mores Banana Pops truly begins with selecting the right ingredients. Each component plays a vital role in achieving that perfect s’mores experience, with a frosty banana twist. Here’s what you’ll need, along with some friendly substitution ideas to suit your pantry and preferences!
The Stars: Bananas
- Bananas: You’ll want ripe, but still firm, bananas for this recipe. If they’re too green, they lack sweetness; if they’re too overripe, they can become mushy when frozen and harder to handle on a stick. Look for bananas with a few small brown speckles – that’s usually a good sign of ideal ripeness. I typically use medium-sized bananas, cutting each into two or three pieces, depending on how large I want my pops to be. Remember, the colder the banana, the faster your chocolate will set, so a quick pre-freeze after slicing is a great idea!
The S’mores Trio: Chocolate, Graham Crackers, and Marshmallows
- Melting Chocolate: This is where the magic happens! I highly recommend using good quality melting wafers, chocolate chips, or a chopped chocolate bar (like semi-sweet or dark chocolate). For best results, look for chocolate that’s specifically designed for melting and coating, as it tends to be smoother and sets beautifully. You can use milk chocolate for a sweeter pop, dark chocolate for a richer flavor, or even white chocolate for a different aesthetic. If you’re feeling adventurous, try a mix! For dietary needs, sugar-free chocolate can work wonderfully too.
- Graham Crackers: The quintessential crunch of s’mores! You’ll need to finely crush these. I find the easiest way is to place them in a zip-top bag and crush them with a rolling pin, or pulse them quickly in a food processor. The goal is fine crumbs, but a few slightly larger pieces add nice texture.
- Mini Marshmallows: These are perfect for scattering over the pops, offering that characteristic fluffy, chewy s’mores texture. If you only have regular-sized marshmallows on hand, simply snip them into smaller pieces with kitchen shears. If you’re looking for a vegan option, there are excellent plant-based marshmallows available that work just as well!
Essential Tools
- Popsicle Sticks: Standard wooden popsicle sticks are perfect for this. They provide a sturdy handle for dipping and enjoying your frozen treats.
- Parchment Paper or Wax Paper: Crucial for lining your baking sheets, preventing the pops from sticking during freezing.
With these ingredients ready, you’re well on your way to creating a batch of irresistibly delicious Frozen S’mores Banana Pops!
Step-by-Step Instructions
Get ready to assemble some serious s’mores magic! These Frozen S’mores Banana Pops are not only a joy to eat but also incredibly fun to make. Follow these simple steps for perfect frosty treats every time.
Step 1: Prepare Your Bananas
- First things first, let’s get those bananas ready. Carefully peel your bananas. If using medium bananas, I like to cut each one into two or three shorter pieces. This makes them easier to handle and a great snack size.
- Next, gently insert a popsicle stick into the cut end of each banana piece, pushing it about halfway through so it’s secure.
- Arrange the banana pieces on a baking sheet lined with parchment paper or wax paper. This is a crucial step! Place the entire tray into your freezer for at least 30 minutes. This pre-freezing makes the bananas firm, which helps the chocolate set much faster and prevents the banana from getting too soft during the dipping process.
Step 2: Get Your Toppings Ready
- While your bananas are chilling, prepare your s’mores toppings. In a shallow dish or plate, spread out your finely crushed graham crackers.
- In another shallow dish, have your mini marshmallows (or cut-up regular marshmallows) ready. You’ll want to work quickly after dipping, so having these organized beforehand is key.
Step 3: Melt the Chocolate
- Now for the chocolate! There are a couple of great ways to melt your chocolate.
- Microwave Method: Place your chocolate chips or chopped chocolate in a microwave-safe bowl. Heat in 30-second intervals, stirring well after each interval, until the chocolate is smooth and fully melted. Be careful not to overheat it, as chocolate can seize up and become clumpy.
- Double Boiler Method: If you prefer a stovetop method, set a heat-proof bowl over a pot of simmering water (make sure the bottom of the bowl doesn’t touch the water). Add your chocolate to the bowl and stir constantly until it’s completely melted and smooth. This method provides more gentle, even heat.
- Once melted, transfer the chocolate to a deeper, narrow glass or mug. This makes dipping the banana pops much easier and ensures good coverage.
Step 4: Dip and Decorate
- Retrieve your frozen bananas from the freezer. Working one at a time, dip a banana pop into the melted chocolate, rotating it to fully coat the banana. Let any excess chocolate drip off briefly.
- Immediately after dipping, gently roll or sprinkle the chocolate-coated banana in the crushed graham crackers, then sprinkle with or press on the mini marshmallows. Make sure to get good coverage with both toppings to achieve that authentic s’mores look and taste!
- Place the decorated banana pop back onto the parchment-lined baking sheet.
- Repeat this process with all remaining banana pops, working fairly quickly so the chocolate doesn’t set too much on the cold banana before you get the toppings on.
Step 5: Final Freeze and Enjoy!
- Once all your Frozen S’mores Banana Pops are dipped and decorated, return the baking sheet to the freezer.
- Freeze them for at least another 1-2 hours, or until the chocolate coating is completely firm and the bananas are solid.
- When you’re ready to enjoy, simply grab one from the freezer and dive into this delightful frosty s’mores treat!
I promise, these steps are straightforward, and the delicious results are absolutely worth it!
Tips & Suggestions
Making these Frozen S’mores Banana Pops is a blast, and with a few handy tips, you can ensure your batch turns out perfectly every time. I’ve learned a few tricks along the way that I’m excited to share with you!
Banana Best Practices
- Choose Wisely: As I mentioned in the ingredient notes, the ideal banana is ripe but firm. Avoid overly soft or bruised bananas, as they can become mushy when frozen and might slip off the stick.
- Pre-Freeze is Your Friend: Seriously, don’t skip the initial 30-minute freeze after putting the bananas on sticks. It makes an enormous difference! The firm, cold banana provides an excellent base for the warm chocolate, helping it set almost instantly and preventing it from melting the banana too much.
- Size Matters: Consider the size of your bananas. If they’re quite large, cutting them into three pieces might be better for snack-sized portions and easier dipping. Smaller bananas can just be cut in half.
Chocolate Coating Mastery
- Perfect Consistency: If your melted chocolate seems a little too thick for smooth dipping, you can stir in a tiny bit of coconut oil or a neutral-flavored vegetable shortening (about 1 teaspoon per cup of chocolate chips). This helps thin it out slightly, giving you a much smoother, more even coating.
- Keep it Warm: As you’re dipping, especially if you’re making a big batch, your chocolate might start to cool and thicken. If this happens, simply pop it back in the microwave for 10-15 seconds (or back over the double boiler) and stir until smooth again.
- Deep Dive: Using a deeper, narrower container for your melted chocolate (like a tall mug) is a game-changer. It allows you to fully submerge the banana pop in one go, ensuring a complete and even chocolate layer without having to spoon chocolate over.
Topping Techniques
- Work Fast: The moment that cold banana hits the warm chocolate, the chocolate starts to set rapidly. Have your graham crackers and marshmallows ready and waiting. Dip, sprinkle, and place back on the tray with purpose!
- Gentle Pressure: When rolling or pressing on the toppings, be gentle. You want them to adhere without squishing the banana or dislodging the popsicle stick.
- Full Coverage: Don’t be shy with the toppings! The more graham cracker crumbs and mini marshmallows, the more authentic that s’mores experience will be.
Fun Variations and Additions
- Extra Drizzle: Once the pops are fully frozen, you could drizzle them with a bit of melted caramel, peanut butter, or even a contrasting chocolate color for an extra touch of decadence.
- Sprinkle of Salt: A tiny sprinkle of flaky sea salt on the chocolate just after dipping can really enhance the flavors.
- Nutty Crunch: While not traditional s’mores, finely chopped nuts (like pecans or peanuts) can be added to the graham cracker mixture for an extra layer of crunch and flavor.
- Kid-Friendly Activity: These are fantastic to make with kids! Let them help with crushing the graham crackers, arranging the bananas, and especially with the decorating part (under supervision, of course, with the hot chocolate!).
Following these tips will not only make the process smoother but also guarantee you have a batch of incredibly delicious and visually appealing Frozen S’mores Banana Pops that everyone will love!
Storage
Once you’ve gone through all the fun of making your Frozen S’mores Banana Pops, you’ll want to ensure they stay fresh and delicious for future enjoyment. Proper storage is key to maintaining their delightful texture and preventing them from sticking together or developing freezer burn.
Immediate Storage
- Freeze Until Solid: After dipping and decorating, ensure your banana pops are completely frozen solid on the parchment-lined baking sheet. This usually takes at least 1-2 hours, but longer is fine. This step is important because it prevents the chocolate coating from smudging or cracking when you transfer them.
Long-Term Storage
- Airtight Container is Best: Once the pops are fully frozen, carefully transfer them from the baking sheet to an airtight freezer-safe container. This is crucial for protecting them from absorbing odors from other freezer items and preventing freezer burn, which can dry them out and affect their taste and texture.
- Prevent Sticking with Layers: To keep your pops from freezing together in a big clump (which can be super frustrating!), I recommend placing a piece of parchment paper or wax paper between layers of the banana pops in your container. This way, you can easily grab one without struggling to separate it from its neighbors.
- Freezer Bags Work Too: If you don’t have a suitable container, a heavy-duty freezer-safe zip-top bag can also work. Just try to remove as much air as possible before sealing. Again, a piece of parchment paper between each pop is a good idea, especially if they aren’t fully solid yet when transferred.
How Long Do They Last?
- For the best quality, I recommend enjoying your Frozen S’mores Banana Pops within 2-3 weeks of making them. While they will remain safe to eat for longer, the texture of the banana and the freshness of the toppings might start to diminish after this period.
- They are designed to be eaten directly from the freezer, so no thawing is needed. Just grab and enjoy that frosty s’mores goodness!
Properly storing your Frozen S’mores Banana Pops ensures that every time you reach for one, it’s just as perfect as the day you made it. Happy freezing!
Final Thoughts
I hope you’re as excited about trying these Frozen S’mores Banana Pops as I am about sharing the recipe! Seriously, if you’re looking for a dessert that’s both wonderfully nostalgic and incredibly refreshing, you’ve found your perfect match. The simple magic of combining creamy banana, melted chocolate, crunchy graham crackers, and gooey marshmallow into a perfectly frozen treat is truly irresistible.
These Frozen S’mores Banana Pops are more than just a sweet bite; they’re a little escape to a happy memory, made perfectly portable and delightfully chill. They are fantastically easy to assemble, making them a brilliant project for a hot afternoon or a quick-prep dessert that will genuinely impress. I promise you, one bite of these delightful Frozen S’mores Banana Pops and you’ll understand why they’ve become a new favorite in my repertoire. Get ready to experience a taste of summer joy, no campfire required!
Cool Off with Frozen S’mores Banana Pops – No-Bake Dessert
- Total Time: 15 minutes
- Yield: 8 pops
Description
These Frozen S’mores Banana Pops are a delightful, no-bake treat that combines the classic flavors of s’mores with the refreshing taste of frozen bananas. Perfect for hot summer days, they are easy to make and incredibly fun to eat!
Ingredients
- Ripe bananas
- Melting chocolate (good quality melting wafers, chocolate chips, or chopped chocolate bar)
- Graham crackers (finely crushed)
- Mini marshmallows
- Popsicle sticks
- Parchment paper or wax paper
Instructions
- Carefully peel the bananas and cut each into two or three shorter pieces.
- Insert a popsicle stick into the cut end of each banana piece, pushing it about halfway through.
- Arrange the banana pieces on a baking sheet lined with parchment paper or wax paper and freeze for at least 30 minutes.
- Prepare the toppings by spreading out finely crushed graham crackers in a shallow dish and having mini marshmallows ready in another dish.
- Melt the chocolate using either the microwave method or double boiler method until smooth.
- Transfer the melted chocolate to a deeper, narrow glass or mug for easier dipping.
- Retrieve the frozen bananas and dip each one into the melted chocolate, rotating to fully coat.
- Immediately roll or sprinkle the chocolate-coated banana in the crushed graham crackers and then sprinkle with mini marshmallows.
- Place the decorated banana pop back onto the parchment-lined baking sheet.
- Repeat the process with all remaining banana pops, working quickly to prevent the chocolate from setting too much.
- Return the baking sheet to the freezer and freeze for at least another 1-2 hours until the chocolate coating is firm and the bananas are solid.
- Enjoy your Frozen S’mores Banana Pops straight from the freezer!
- Prep Time: 15 mins
- Cook Time: 0 mins
- Category: Dessert
- Method: No-Bake
- Cuisine: American
Nutrition
- Serving Size: 1 pop
- Calories: 150
- Sugar: 15 g
- Sodium: 50 mg
- Fat: 7 g
- Saturated Fat: 4 g
- Unsaturated Fat: 2 g
- Trans Fat: 0 g
- Carbohydrates: 20 g
- Fiber: 2 g
- Protein: 2 g
- Cholesterol: 0 mg
Keywords: Choose ripe but firm bananas for the best texture. Pre-freezing the bananas helps the chocolate set quickly and prevents them from becoming mushy.

Leave a Comment