
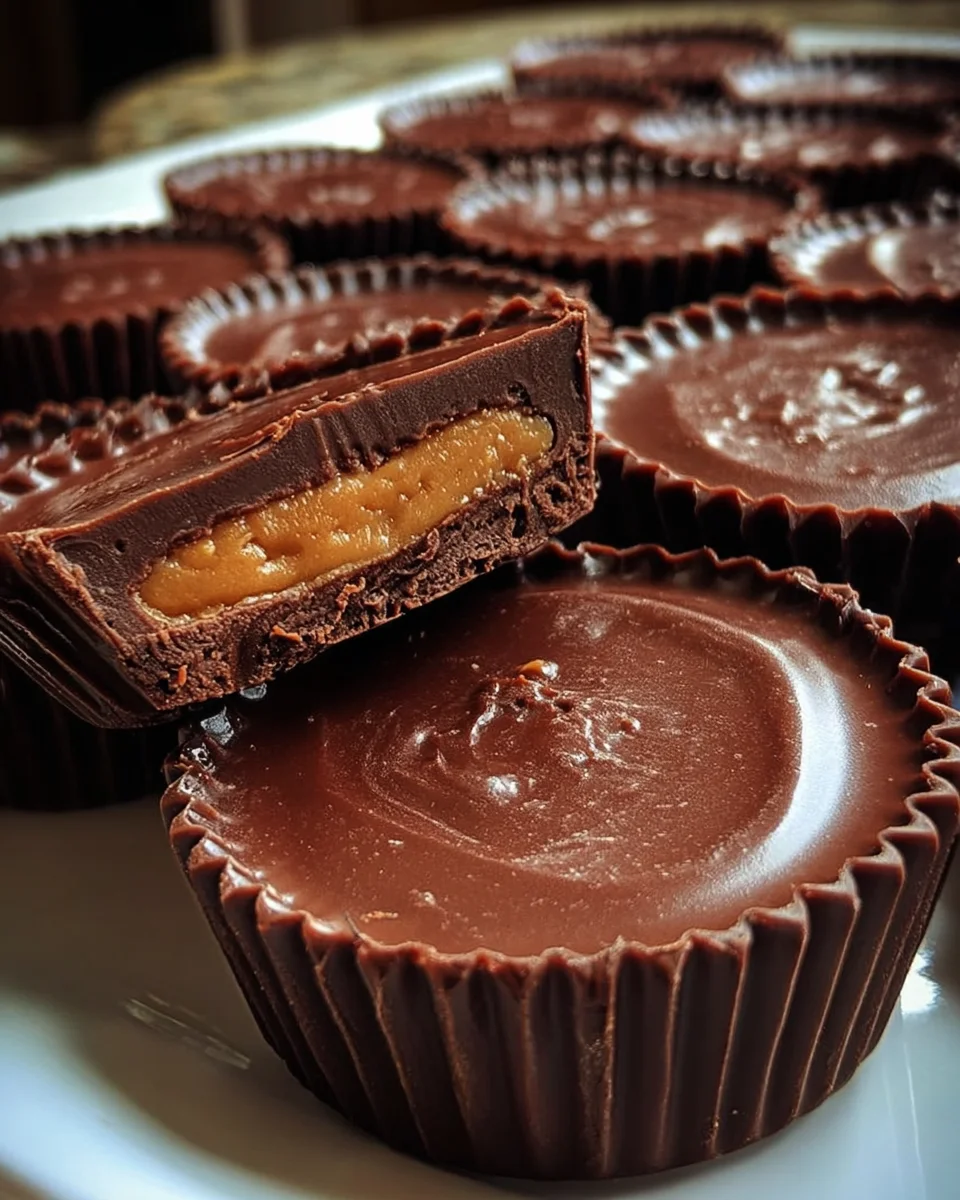
Homemade Peanut Butter Cups A Classic Chocolate Treat Made Simple – just uttering those words conjures up images of gooey peanut butter and rich, melted chocolate, doesn’t it? I know for me, there’s a unique kind of joy that comes from recreating a beloved treat in my own kitchen. This iconic American confection, with its perfectly balanced salty-sweet allure and delightful texture contrast, has been a staple in candy dishes and lunchboxes for generations. We’ve all experienced that moment of bliss biting into a store-bought peanut butter cup, but I promise you, the homemade version elevates that experience to an entirely new level.
There’s a reason why this particular combination of flavors has stood the test of time and captured countless hearts globally. It’s the irresistible interplay between the creamy, nutty filling and the crisp, often bittersweet, chocolate shell. Beyond the incredible taste, making them at home offers the freedom to control ingredients, adjust sweetness, and even experiment with different types of chocolate or peanut butter. You’ll find that crafting your own Homemade Peanut Butter Cups A Classic Chocolate Treat Made Simple is not only surprisingly easy but also incredibly rewarding, transforming a simple dessert into a personalized masterpiece perfect for sharing or savoring all to yourself.

Ingredients:
- For the Chocolate Shell:
- 16 ounces (approximately 450g) good quality chocolate (I love using a mix of semi-sweet and milk chocolate chips, about 10 oz semi-sweet and 6 oz milk, for that classic balance of sweetness and deep cocoa flavor. High-quality baking bars chopped into small pieces also work beautifully and melt more evenly).
- 1 tablespoon coconut oil or unsalted butter (This is my secret ingredient! It helps thin the chocolate slightly for a smoother pour and a beautiful, glossy finish, making it easier to unmold your finished peanut butter cups. If using unsalted butter, make sure it’s softened).
- For the Peanut Butter Filling:
- 1 ½ cups creamy peanut butter (I always go for natural, unsweetened creamy peanut butter, but any creamy variety you love will do. Just be aware that very oily, unstirred natural peanut butter might require a bit more powdered sugar to achieve the right consistency. Avoid chunky, as it makes the filling harder to spread neatly).
- ½ cup unsalted butter, softened to room temperature (This adds richness and helps create that melt-in-your-mouth texture. Make sure it’s properly softened, not melted, for optimal mixing).
- 1 ½ cups powdered sugar (also known as confectioners’ sugar) (This is crucial for sweetness and gives the filling its signature firm-yet-creamy texture. Sifting it beforehand can prevent lumps, though I often just whisk it well into the mixture).
- 1 teaspoon vanilla extract (Pure vanilla extract elevates the flavor profile, adding a warm, aromatic note that complements the peanut butter and chocolate beautifully).
- ¼ teaspoon salt (Just a pinch! Salt is a flavor enhancer, and in sweet recipes like this, it balances the sweetness and brings out the nutty notes of the peanut butter. Don’t skip it!).
- Equipment You’ll Need:
- Mini muffin liners or silicone mini muffin molds (I prefer silicone molds for easy release and reusability, but paper liners in a mini muffin tin work perfectly too).
- A mini muffin tin (if using paper liners).
- A double boiler setup (a heatproof bowl nested over a saucepan with simmering water) or a microwave-safe bowl.
- Rubber spatulas and a whisk.
- A small scoop or two spoons for portioning the filling.
- A baking sheet or flat plate that fits in your freezer or refrigerator.
Phase 1: Preparing Your Workstation and Ingredients for Homemade Peanut Butter Cups
Gathering Your Tools
Before you even think about melting chocolate or mixing peanut butter, let’s get everything in order. This is key to a smooth and enjoyable baking experience, especially when working with chocolate, which can be a bit finicky. I always lay out all my ingredients and tools, almost like a chef’s mise en place. Make sure your mini muffin liners or silicone molds are ready. If you’re using paper liners, place them snugly into a mini muffin tin. If you’re using silicone molds, simply arrange them on a baking sheet or a flat surface that you can easily transfer to the refrigerator or freezer. This prep work ensures that once your chocolate is melted and your filling is ready, you can move directly into the assembly phase without any frantic searching for equipment.
Prepping Your Molds
This step is often overlooked but is so important for the final presentation of your Homemade Peanut Butter Cups. If you’re using paper liners, make sure they are fully seated in your mini muffin tin. If you’re using silicone molds, give them a quick wipe to ensure they are clean and dry. Sometimes, I even lightly spray my silicone molds with a non-stick cooking spray, especially if I’m using a very sticky peanut butter, just for extra assurance that they’ll pop out perfectly. However, with the coconut oil or butter in the chocolate, this is often not necessary. Having your molds ready to go means you won’t have to pause during the layering process, which is critical when dealing with setting chocolate.
Phase 2: Crafting the Silky Chocolate Shell – The Foundation of Your Homemade Peanut Butter Cups
The chocolate shell is what truly makes these a “cup.” Getting this right is paramount for both taste and texture. I find that a mix of semi-sweet and milk chocolate provides the best balance, giving you that rich, dark chocolate flavor without being overly bitter, complemented by the creamy sweetness of milk chocolate.
Melting the Chocolate Using a Double Boiler Method (My Preferred Way)
- Set Up Your Double Boiler: Fill a medium saucepan with about an inch or two of water. Place a heatproof glass or metal bowl over the saucepan, ensuring the bottom of the bowl does not touch the water. The steam from the simmering water will gently and evenly melt the chocolate, preventing it from scorching or seizing, which is a common pitfall when melting chocolate directly over heat.
- Add Chocolate and Coconut Oil/Butter: Place your chopped chocolate (or chocolate chips) and the tablespoon of coconut oil or unsalted butter into the bowl. The coconut oil or butter is optional but highly recommended; it makes the chocolate smoother and easier to work with, giving your cups a lovely sheen and a more satisfying snap.
- Gentle Melting Process: Bring the water in the saucepan to a gentle simmer over medium-low heat. Stir the chocolate occasionally with a rubber spatula. It’s important to be patient here; you want the chocolate to melt slowly and smoothly. This usually takes about 5-8 minutes. As the chocolate begins to melt, you’ll see it transform into a glossy, liquid state.
- Achieve Smoothness: Continue stirring until the chocolate is completely smooth and there are no lumps remaining. Remove the bowl from the heat as soon as it’s fully melted to prevent overheating, which can cause the chocolate to become thick and grainy. Keep the bowl over the warm water if you need to maintain its fluidity during assembly, but be careful not to get any steam or water into the chocolate, as even a tiny drop can cause it to seize and become unusable.
Alternatively: Melting Chocolate in the Microwave (A Quick Option)
- Choose a Microwave-Safe Bowl: Place your chopped chocolate and coconut oil/butter into a microwave-safe bowl.
- Short Bursts are Key: Microwave on 50% power for 30-second intervals, stirring thoroughly after each interval. This method requires vigilance. Chocolate retains its shape even when melted, so it might not look ready until you stir it.
- Prevent Scorching: Continue microwaving and stirring in short bursts until the chocolate is smooth and completely melted. Be extremely careful not to overheat it, as microwave-melted chocolate can scorch very easily, leading to a burnt taste and a grainy texture. As soon as it’s smooth, stop microwaving.
Phase 3: Creating the Irresistible Peanut Butter Filling
This is where the magic happens for the “Peanut Butter Cups” part of our “Homemade Peanut Butter Cups A Classic Chocolate Treat Made Simple.” The filling is truly the heart of the treat, and achieving that perfect creamy, slightly firm, yet melt-in-your-mouth consistency is what we’re aiming for.
Mixing the Core Ingredient
- Combine Wet Ingredients: In a medium-sized mixing bowl, combine the softened unsalted butter and the creamy peanut butter. Make sure your butter is truly at room temperature; it should be soft enough to easily dent with a finger, but not melted. This ensures it creams beautifully with the peanut butter.
- Cream Together: Using a hand mixer (or a stand mixer with the paddle attachment), beat the butter and peanut butter together on medium speed until the mixture is smooth and light. This usually takes about 2-3 minutes. Scrape down the sides of the bowl occasionally to ensure everything is fully incorporated. This creaming process adds air and lightness to the filling.
- Add Flavorings: Stir in the vanilla extract and the salt. Give it another quick beat to combine these flavor boosters evenly throughout the mixture. The vanilla adds warmth, and the salt is a crucial counterbalance to the sweetness, enhancing the overall peanut butter flavor.
Achieving the Perfect Consistency and Flavor
- Incorporate Powdered Sugar: Gradually add the powdered sugar to the peanut butter mixture, about ½ cup at a time. Beat on low speed until each addition is fully incorporated before adding more. As you add the sugar, the mixture will thicken significantly. I find that if I add it all at once, I end up with a cloud of powdered sugar in my kitchen, so smaller additions are definitely the way to go!
- Adjusting for Texture: Continue beating until the filling is thick, smooth, and easily moldable. It should be firm enough to hold its shape when rolled or pressed, but still soft and pliable. If your peanut butter was particularly oily, or if you’re finding the mixture too sticky, you can add a tiny bit more powdered sugar (a tablespoon at a time) until it reaches the desired consistency. Conversely, if it seems too dry or crumbly, a tiny splash of milk or a touch more softened butter can help bring it together. You’re looking for something akin to a very thick cookie dough.
- Taste Test and Adjust: This is the fun part! Take a small spoonful and taste it. Does it need more salt? A touch more vanilla? More sweetness? Adjust to your preference. Remember, it will be encased in chocolate, so a slightly sweeter or saltier filling can stand up well to the cocoa.
Phase 4: Assembling Your Delicious Homemade Peanut Butter Cups
Now comes the moment of truth – bringing both delicious components together to form your ultimate Homemade Peanut Butter Cups A Classic Chocolate Treat Made Simple. This process requires a bit of speed and precision, but don’t worry, it’s quite forgiving!
The First Chocolate Layer
- Spoon in the Base: Take your melted chocolate (ensuring it’s still warm and fluid) and carefully spoon about 1 to 1 ½ teaspoons into the bottom of each mini muffin liner or silicone mold. The goal here is to create a thin, even layer that will form the base of your peanut butter cup.
- Swirl to Coat: Gently swirl the mold or tilt the muffin tin to spread the chocolate evenly across the bottom and slightly up the sides of each liner. This creates a small “cup” for your peanut butter filling. If using paper liners, you might need to use the back of a small spoon to encourage the chocolate up the sides a bit.
- Chill Briefly: Place the muffin tin or baking sheet with the chocolate-lined molds into the refrigerator or freezer for about 5-10 minutes. This quick chill allows the bottom chocolate layer to set firm enough to hold the peanut butter filling without it sinking or mixing. You want it firm, but not brittle.
Adding the Creamy Peanut Butter Filling
- Prepare the Filling Portions: While the chocolate bases are chilling, take your peanut butter filling. You have a couple of options here: you can roll small balls of the filling (about 1 teaspoon each) between your palms, or you can use a small scoop (like a melon baller or a small cookie scoop) to portion it out. I often just press it lightly into a disc shape with my fingers. The size should be slightly smaller than the diameter of your chocolate cups.
- Place the Filling: Once the chocolate bases are set, retrieve them from the fridge/freezer. Carefully place one portion of peanut butter filling into the center of each chocolate cup. Gently press down on the filling to flatten it slightly, leaving a small gap around the edges and ensuring it doesn’t touch the very top edge of the liner. This gap is important for allowing the top chocolate layer to seal properly around the peanut butter.
Capping with More Chocolate
- Top with Chocolate: Take your remaining melted chocolate. If it has started to firm up, gently reheat it in your double boiler or microwave for a few seconds until it’s fluid again. Spoon another 1 to 1 ½ teaspoons of melted chocolate over each peanut butter filling, ensuring it completely covers the filling and meets the chocolate layer on the sides. You want a nice, even top that seals in all that peanut buttery goodness.
- Smooth the Tops: Gently tap the muffin tin or baking sheet on your countertop a few times. This helps to settle the chocolate, release any air bubbles, and create a smooth, flat top for your peanut butter cups. You can also use the back of a spoon or a small offset spatula to gently smooth the surface if needed.
- Optional Embellishments: If you’re feeling fancy, you can sprinkle a tiny pinch of sea salt on top of some of the cups for a gourmet touch, or even a few decorative sprinkles before the chocolate sets completely.
Phase 5: Chilling and Finishing Your Homemade Peanut Butter Cups A Classic Chocolate Treat Made Simple
The final crucial step is the chill time, which solidifies our beautiful creations and makes them ready for enjoyment!
The Essential Chill Time
- Final Chill: Once all your Homemade Peanut Butter Cups are assembled, place the entire muffin tin or baking sheet back into the refrigerator. Let them chill for at least 30 minutes, or until the chocolate is completely firm and hard to the touch. You can also place them in the freezer for about 15-20 minutes for a quicker set, but be mindful not to leave them in the freezer too long, as the chocolate can “bloom” (develop a whitish coating) if subjected to extreme temperature changes for extended periods, though this is purely cosmetic.
- Check for Firmness: Gently touch one of the cups. If the chocolate is firm and no longer tacky, they are ready.
Unmolding and Enjoying Your Creation
- Release from Molds: If you used paper liners, simply lift them out of the muffin tin. If you used silicone molds, gently peel the mold away from each peanut butter cup. The beauty of silicone is how easily they pop out, leaving you with perfectly formed cups.
- Serve and Enjoy: Your glorious Homemade Peanut Butter Cups are now ready to be devoured! The satisfaction of biting into one of these, knowing you made it yourself, is unparalleled. The rich chocolate shell gives way to that creamy, sweet-and-salty peanut butter center – it’s truly a classic treat made simple.
Tips and Tricks for Perfect Homemade Peanut Butter Cups
Storage Suggestions
Once you’ve made these delectable treats, you’ll want to store them properly to maintain their freshness and texture. I always keep my Homemade Peanut Butter Cups in an airtight container. They are perfectly happy at room temperature for up to a week, especially if your kitchen isn’t overly warm. However, for a firmer texture and extended freshness, I prefer to store them in the refrigerator. Chilled peanut butter cups offer a delightful snap from the chocolate and a slightly firmer, more decadent filling. They will last beautifully in the fridge for up to two weeks. If you want to make a big batch, these also freeze exceptionally well! Place them in a single layer on a baking sheet to freeze solid, then transfer them to a freezer-safe bag or container. They can be stored in the freezer for up to three months. Just let them thaw for a few minutes at room temperature before enjoying, or eat them straight from the freezer for a super-firm, chewy treat!
Creative Variations to Explore
While the classic Homemade Peanut Butter Cups are utterly divine, there’s no harm in getting a little creative and trying some variations! This is where you can truly make them your own.
- Different Nut Butters: Why stick to just peanut butter? Experiment with almond butter, cashew butter, or even sunflower seed butter for a nut-free alternative. Each will bring its unique flavor profile, and you might discover a new favorite. Just be aware that some natural nut butters can be oilier, so you might need to adjust the amount of powdered sugar slightly to get the right consistency for the filling.
- Toppings and Mix-ins: Before the final chocolate layer sets, sprinkle a little flaky sea salt on top for a sophisticated salty-sweet contrast. You could also add a tiny pinch of chili powder to the peanut butter filling for a surprising spicy kick, or mix in some finely chopped pretzels for an added layer of crunch and saltiness. A drizzle of caramel or white chocolate on top once they’re set also makes for a beautiful presentation.
- Spiced Peanut Butter: Elevate your peanut butter filling by adding a tiny dash of cinnamon, nutmeg, or even a hint of cardamom. These warm spices complement the peanut butter and chocolate wonderfully, especially during colder months.
- Darker Chocolate: If you’re a true dark chocolate aficionado, go for a higher percentage cocoa chocolate for your shells (70% or higher). This will create a more intense, less sweet treat that pairs wonderfully with the creamy peanut butter filling. You might find you want to slightly increase the sweetness in your peanut butter filling to balance the bitterness of the dark chocolate.
- White Chocolate Peanut Butter Cups: For a completely different flavor profile, use white chocolate for your shells. The creamy sweetness of white chocolate with the salty peanut butter is a delightful combination, though it will be a much sweeter treat overall.
Remember, the beauty of “Homemade Peanut Butter Cups A Classic Chocolate Treat Made Simple” is not just in their deliciousness but also in the endless possibilities for customization. Don’t be afraid to experiment and find your perfect version!
Conclusion:
And so, we arrive at the sweet culmination of our chocolatey adventure! If there’s one recipe I genuinely urge you to try, it’s this one. Seriously, forget everything you thought you knew about making confections from scratch; this approach is designed to be utterly foolproof, delivering pure delight with minimal fuss. This isn’t just a recipe; it’s an invitation to experience the sheer joy of creating something truly special in your own kitchen. The satisfaction of biting into a perfectly crafted treat that you made yourself, knowing exactly what went into it, is unparalleled. This is why our recipe for Homemade Peanut Butter Cups A Classic Chocolate Treat Made Simple stands out as an absolute must-try.
I can confidently say that the rich, creamy peanut butter filling, encased in a crisp, decadent chocolate shell, will utterly captivate your taste buds. The balance of salty and sweet is simply divine, and the texture combination is nothing short of addictive. Beyond the incredible flavor, what makes these so irresistible is their incredible ease of preparation. You don’t need fancy equipment or a pastry chef’s degree; just a few simple ingredients and a little bit of love are all it takes to transform basic components into something extraordinary. This recipe empowers you to create a gourmet-level dessert that tastes infinitely better than anything you can buy in a store, and it does so without demanding hours of your precious time.
Now, let’s talk about how to enjoy these little marvels. While they are, of course, absolutely perfect straight from the fridge (the chill enhances the snap of the chocolate!), consider serving them at room temperature for a softer, melt-in-your-mouth experience. They make an excellent after-dinner treat with a strong cup of coffee or a glass of cold milk. For a truly indulgent experience, crumble one over a scoop of vanilla ice cream for an instant sundae upgrade! Thinking of gifting? Arrange a few in a decorative box or clear bag tied with a ribbon – they make heartfelt, impressive presents for birthdays, holidays, or just because. They’re also a fantastic addition to any dessert platter, guaranteed to be the first to disappear.
Unleash Your Creativity: Exciting Variations to Try!
But the fun doesn’t stop there! One of my favorite things about this recipe is its incredible versatility. Don’t be afraid to experiment and make it your own. For a different nut butter experience, try swapping out peanut butter for almond butter, cashew butter, or even sunflower seed butter for a nut-free option (just ensure your chocolate is also nut-free if catering to allergies). You can play with the chocolate too: use dark chocolate for a more intense, less sweet treat, milk chocolate for classic comfort, or even white chocolate for a creamy, distinct flavor profile. A combination of dark and milk chocolate is also wonderful, offering a balanced sweetness.
Want to add some crunch? Mix finely chopped pretzels, rice cereal, or a sprinkle of flaky sea salt into your peanut butter filling before shaping. For an extra layer of decadence, fold in a tablespoon of mini chocolate chips or a touch of cocoa powder into the peanut butter. You could even infuse the peanut butter with a hint of flavor – a drop of peppermint extract for a festive twist, or a dash of pumpkin spice for an autumnal delight. Once your cups are set, consider garnishing them with a sprinkle of flaky sea salt, a drizzle of contrasting chocolate, or even some colorful sprinkles for a festive touch. The possibilities are truly endless, and each variation offers a unique experience.
So, what are you waiting for? I sincerely hope you’re feeling inspired to roll up your sleeves and give this wonderful recipe a go. There’s an immense sense of accomplishment and pure joy that comes from creating these delightful treats. I encourage you to embrace the process, have fun with it, and savor every single bite. When you do make them, please come back and share your experience with me! What variations did you try? Did you discover a new favorite? Your successes and creative twists truly inspire me and the rest of our community. Happy baking, and get ready to enjoy the most incredible homemade peanut butter cups you’ve ever tasted!
Homemade Peanut Butter Cups: A Classic Chocolate Treat Made Simple
Recreate a beloved treat at home with these classic homemade peanut butter cups. Enjoy the perfect balance of salty-sweet allure and delightful texture contrast with rich chocolate and creamy peanut butter.
Ingredients
Instructions
Important Information
Nutrition Facts (Per Serving)
It is important to consider this information as approximate and not to use it as definitive health advice.
Allergy Information
Please check ingredients for potential allergens and consult a health professional if in doubt.

Leave a Comment