
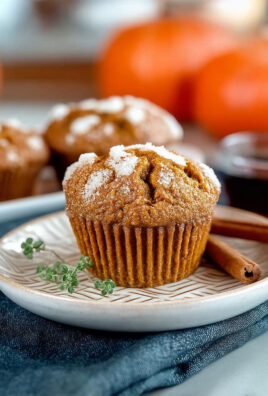
Chocolate Cream Cheese Danish: Just the name alone conjures up images of flaky pastry, rich chocolate, and creamy, tangy filling, doesn’t it? I know I’m instantly transported to a cozy bakery, the aroma of warm dough and sweet treats filling the air. But what if I told you that you could recreate that bakery experience right in your own kitchen?
The Danish pastry, or simply “Danish,” as it’s often called, has a fascinating history. While we associate it with Denmark, its origins can actually be traced back to Austria! In the mid-19th century, Danish bakers went on strike, leading bakery owners to hire bakers from Austria. These Austrian bakers brought with them their own pastry techniques, including the use of laminated dough, which is the key to that signature flaky texture. The Danes, of course, put their own spin on it, and the rest, as they say, is delicious history.
What is it about a Chocolate Cream Cheese Danish that makes it so irresistible? For me, it’s the perfect balance of textures and flavors. The buttery, flaky pastry gives way to a smooth, decadent chocolate layer, followed by the tangy sweetness of the cream cheese filling. It’s a symphony of sensations in every bite! Plus, while it might seem intimidating to make, this recipe is surprisingly straightforward, making it a perfect treat for a weekend brunch or a special occasion. Get ready to impress your friends and family with your newfound baking skills!

Ingredients:
- For the Dough:
- 2 1/4 cups (281g) all-purpose flour, plus more for dusting
- 1/4 cup (50g) granulated sugar
- 1/4 teaspoon salt
- 1 package (2 1/4 teaspoons) active dry yeast
- 1/2 cup (120ml) warm milk (105-115°F)
- 1/4 cup (60ml) water
- 1 large egg
- 4 tablespoons (57g) unsalted butter, softened
- For the Butter Block:
- 1 cup (2 sticks, 226g) unsalted butter, cold
- 1/4 cup (30g) all-purpose flour
- For the Cream Cheese Filling:
- 8 ounces (226g) cream cheese, softened
- 1/4 cup (50g) granulated sugar
- 1 large egg yolk
- 1 teaspoon vanilla extract
- For the Chocolate Ganache:
- 4 ounces (113g) semi-sweet chocolate, finely chopped
- 1/4 cup (60ml) heavy cream
- For Egg Wash:
- 1 large egg
- 1 tablespoon milk
Making the Dough:
- Combine Dry Ingredients: In the bowl of a stand mixer fitted with the dough hook attachment, whisk together the flour, sugar, and salt.
- Activate the Yeast: In a separate small bowl, dissolve the yeast in the warm milk and water. Let it stand for 5-10 minutes, or until foamy. This indicates that the yeast is active and ready to go. If it doesn’t foam, your yeast might be old and you’ll need to start over with fresh yeast.
- Add Wet Ingredients: Pour the yeast mixture into the dry ingredients. Add the egg and softened butter.
- Knead the Dough: Knead the dough on low speed for 8-10 minutes, or until it forms a smooth and elastic ball. The dough should pull away from the sides of the bowl. If the dough is too sticky, add a tablespoon of flour at a time until it reaches the right consistency.
- First Rise: Place the dough in a lightly greased bowl, turning to coat. Cover with plastic wrap and let rise in a warm place for 1-1.5 hours, or until doubled in size. This is crucial for developing the flavor and texture of the danish.
Preparing the Butter Block:
- Combine Butter and Flour: In a medium bowl, combine the cold butter (cut into cubes) and flour.
- Mix the Butter Block: Using a pastry blender or your fingers, work the butter and flour together until it forms a cohesive mass. It should be pliable but still cold. Don’t overmix it; you want small pieces of butter visible throughout the flour. This is what creates the flaky layers in the danish.
- Shape the Butter Block: Place the butter mixture between two sheets of parchment paper. Use a rolling pin to roll it into a 6×8 inch rectangle. Make sure the edges are even. Refrigerate the butter block for at least 30 minutes to firm up. This is a very important step!
Laminating the Dough:
- Roll Out the Dough: On a lightly floured surface, roll out the risen dough into a 12×16 inch rectangle.
- Place the Butter Block: Place the cold butter block in the center of the dough rectangle.
- Fold the Dough: Fold one side of the dough over the butter block, and then fold the other side over, creating a tri-fold. This encases the butter within the dough.
- First Turn: Gently press down on the dough with the rolling pin to seal the edges. Roll the dough into a 10×18 inch rectangle. Fold the dough into thirds again, like a letter. This is your first “turn.”
- Refrigerate: Wrap the dough tightly in plastic wrap and refrigerate for 30 minutes. This allows the gluten to relax and the butter to firm up, preventing it from melting during the next rolling.
- Second Turn: Repeat steps 4 and 5. Roll the dough into a 10×18 inch rectangle, fold into thirds, wrap in plastic wrap, and refrigerate for another 30 minutes.
- Third Turn: Repeat steps 4 and 5 one more time. This final turn creates the maximum number of layers for a truly flaky danish. After the third turn and refrigeration, the dough is ready to be shaped.
Making the Cream Cheese Filling:
- Cream Together: In a medium bowl, beat the softened cream cheese and sugar together until smooth and creamy.
- Add Egg Yolk and Vanilla: Beat in the egg yolk and vanilla extract until well combined. Be sure to scrape down the sides of the bowl to ensure everything is evenly mixed.
- Set Aside: Cover the bowl and set aside until ready to use.
Shaping the Danishes:
- Roll Out the Dough: On a lightly floured surface, roll out the chilled dough into a 12×18 inch rectangle.
- Cut into Squares: Use a sharp knife or pizza cutter to cut the dough into 3×3 inch squares. You should get about 24 squares.
- Add Filling: Place a spoonful (about 1 tablespoon) of the cream cheese filling in the center of each square.
- Fold the Corners: Fold two opposite corners of each square towards the center, overlapping slightly. Press gently to seal. This creates the classic danish shape. You can also experiment with other shapes, like pinwheels or braids.
- Arrange on Baking Sheet: Place the shaped danishes on a baking sheet lined with parchment paper, leaving some space between each one.
- Second Rise: Cover the baking sheet loosely with plastic wrap and let the danishes rise in a warm place for 30-45 minutes, or until slightly puffed.
Baking the Danishes:
- Preheat Oven: Preheat your oven to 375°F (190°C).
- Prepare Egg Wash: In a small bowl, whisk together the egg and milk.
- Brush with Egg Wash: Gently brush the tops of the risen danishes with the egg wash. This will give them a beautiful golden-brown color.
- Bake: Bake for 15-20 minutes, or until the danishes are golden brown and the filling is set. Keep a close eye on them to prevent burning.
- Cool: Remove the danishes from the oven and let them cool on the baking sheet for a few minutes before transferring them to a wire rack to cool completely.
Making the Chocolate Ganache:
- Heat the Cream: Place the heavy cream in a small saucepan and heat over medium heat until it just begins to simmer. Do not boil.
- Pour Over Chocolate: Pour the hot cream over the finely chopped chocolate in a heatproof bowl.
- Let Stand: Let the mixture stand for 1 minute to allow the heat to melt the chocolate.
- Stir Until Smooth: Gently stir the mixture until the chocolate is completely melted and the ganache is smooth and glossy.
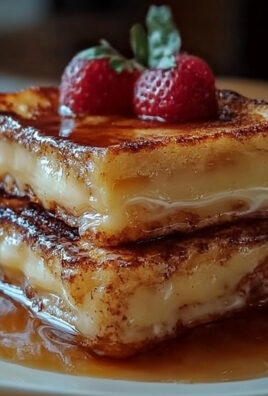
Assembling the Chocolate Cream Cheese Danishes:
- Drizzle with Ganache: Once the danishes are completely cooled, drizzle them generously with the chocolate ganache. You can use a spoon or a piping bag for a more precise application.
- Optional Toppings: If desired, sprinkle the danishes with chopped nuts, sprinkles, or a dusting of powdered sugar.
- Serve and Enjoy: Serve the chocolate cream cheese danishes immediately or store them in an airtight container at room temperature for up to 2 days. They are best enjoyed fresh!

Conclusion:
This Chocolate Cream Cheese Danish recipe is truly a must-try, and I’m not just saying that! The combination of flaky, buttery pastry, rich cream cheese filling, and decadent chocolate swirl is simply irresistible. It’s the perfect treat for a weekend brunch, a special occasion, or even just a “treat yourself” kind of day. The slight tang of the cream cheese perfectly balances the sweetness of the chocolate, creating a symphony of flavors that will have you reaching for seconds (and maybe thirds!).
But beyond the incredible taste, this recipe is also surprisingly approachable. While making danishes might seem intimidating, I’ve broken down the steps to make it as easy as possible, even for beginner bakers. You don’t need any fancy equipment or hard-to-find ingredients. Just a little patience and a love for delicious pastries! The satisfaction of pulling a warm, golden-brown danish from the oven, knowing you created it from scratch, is truly unparalleled.
Serving Suggestions and Variations:
The possibilities for enjoying this Chocolate Cream Cheese Danish are endless! Serve it warm with a scoop of vanilla ice cream for an extra indulgent dessert. A dusting of powdered sugar adds a touch of elegance, or you could drizzle it with a simple glaze made from powdered sugar and milk. For a brunch spread, pair it with fresh fruit, yogurt, and a pot of coffee or tea.
If you’re feeling adventurous, try some variations! Add a sprinkle of chopped nuts, like pecans or walnuts, to the filling for added texture and flavor. A hint of citrus zest, such as orange or lemon, can brighten up the cream cheese filling. You could even swap out the chocolate swirl for a different flavor, like raspberry jam or apple pie filling. Imagine a cream cheese danish with a caramel swirl and a sprinkle of sea salt – the possibilities are truly endless!
For a festive touch during the holidays, consider adding a sprinkle of cinnamon or nutmeg to the dough. You could also shape the danishes into different forms, like wreaths or stars, to make them even more visually appealing.
Another great variation is to make mini danishes! Simply cut the dough into smaller squares and fill them accordingly. These are perfect for parties or for portion control (although, let’s be honest, you’ll probably eat more than one!).
Don’t Be Afraid to Experiment!
The beauty of baking is that you can always adapt recipes to your own taste. So, don’t be afraid to experiment with different flavors and ingredients to create your own signature Chocolate Cream Cheese Danish.
I truly believe that this recipe will become a new favorite in your household. It’s a crowd-pleaser, a conversation starter, and a guaranteed way to brighten anyone’s day. So, what are you waiting for? Gather your ingredients, preheat your oven, and get ready to embark on a delicious baking adventure!
I’m so excited for you to try this recipe! And more importantly, I’d love to hear about your experience. Did you make any variations? What did your family and friends think? Share your photos and stories in the comments below. Let’s create a community of danish lovers! Happy baking!
Chocolate Cream Cheese Danish: The Ultimate Decadent Recipe
Flaky, buttery homemade danishes filled with creamy cream cheese and topped with a rich chocolate ganache. A decadent treat perfect for breakfast, brunch, or dessert!
Ingredients
Instructions
Recipe Notes
- Make sure your yeast is active. If it doesn’t foam in the warm milk and water, it’s likely old and needs to be replaced.
- Keeping the butter cold during the lamination process is crucial for creating flaky layers.
- Don’t overmix the butter block; you want small pieces of butter visible throughout the flour.
- Refrigerating the dough between turns allows the gluten to relax and the butter to firm up, preventing it from melting during the next rolling.
- Experiment with different shapes for the danishes, like pinwheels or braids.
- Keep a close eye on the danishes while they’re baking to prevent burning.

Leave a Comment