
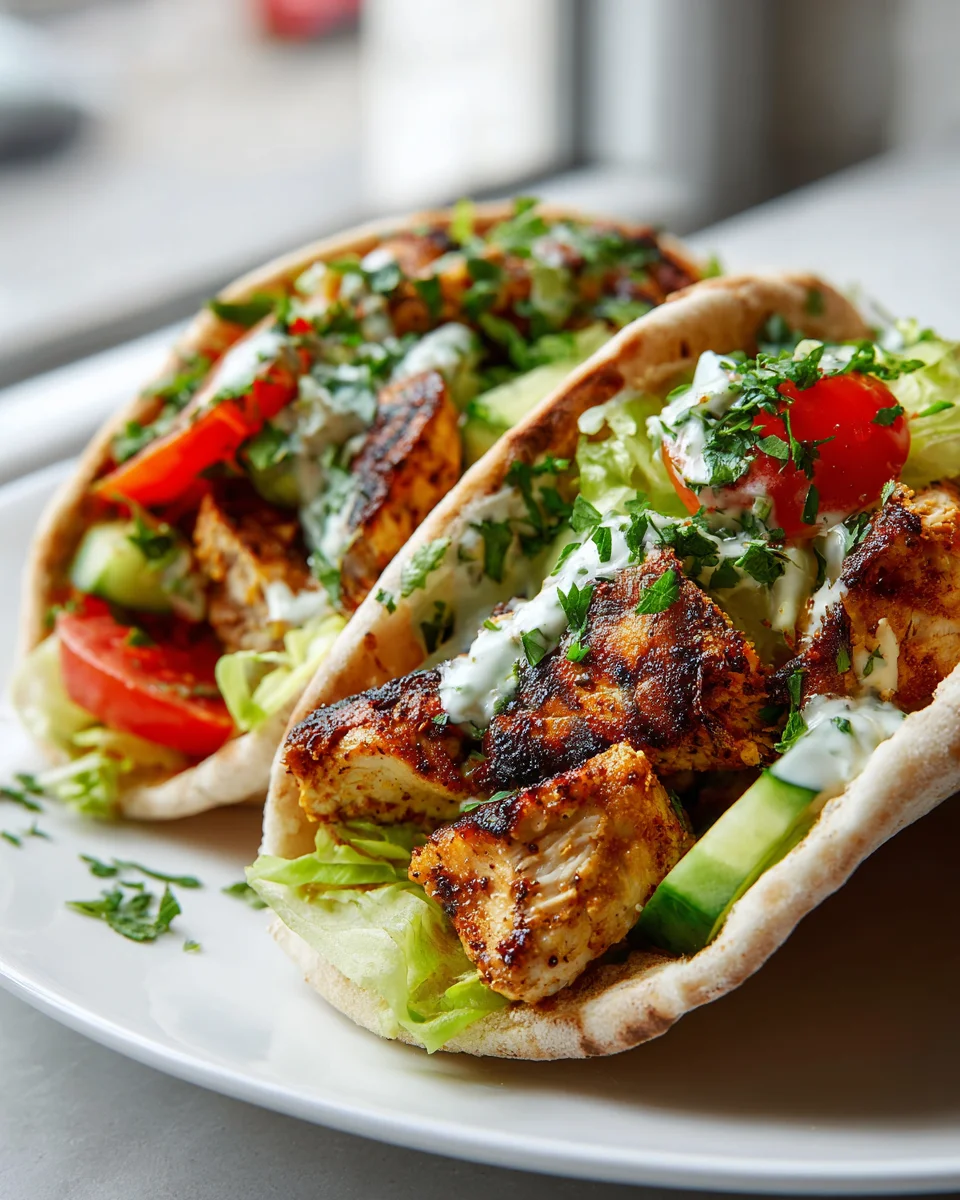
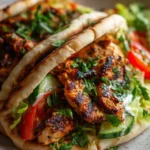
Chicken Shawarma Pitas
Oh my goodness, get ready to experience a flavor explosion that’s going to make your taste buds sing! As someone who absolutely adores the vibrant, aromatic spices of Middle Eastern cuisine, I’m beyond excited to share my go-to recipe for Chicken Shawarma Pitas. This isn’t just any weeknight meal; it’s a culinary journey packed into a warm, soft pita, bringing those amazing street food vibes right into your kitchen. What makes this particular recipe so special is the deeply flavorful, tender chicken, marinated in a homemade blend of aromatic spices like cumin, paprika, turmeric, and garlic. We’re talking about chicken that’s incredibly juicy and has that perfectly charred edge, creating an irresistible texture and taste.
You are going to absolutely love making (and devouring!) these Chicken Shawarma Pitas because they strike the perfect balance between fresh, healthy, and utterly satisfying. Imagine sinking your teeth into tender, spiced chicken, crisp lettuce, juicy tomatoes, and maybe some refreshing cucumber and red onion, all drizzled with a creamy, zesty garlic sauce (using only non-alcohol ingredients for pure deliciousness!), nestled within a warm pita bread. It’s comforting, vibrant, and surprisingly straightforward to pull together. Forget the takeout; with this recipe, you can recreate that authentic shawarma experience at home, impressing your family and friends with minimal fuss and maximum flavor. Get ready to embark on a seriously delicious adventure!

Ingredient Notes
There’s nothing quite like biting into a warm, soft pita generously stuffed with fragrant, juicy chicken shawarma and all the fresh fixings. To make these Chicken Shawarma Pitas truly spectacular, it all starts with the right ingredients. Here’s a breakdown of what you’ll need and some handy substitutions I’ve discovered along the way.
For the Chicken Shawarma
- Chicken: My absolute favorite cut for shawarma is boneless, skinless chicken thighs. They stay incredibly moist and tender, even with high-heat cooking. You can use chicken breasts if you prefer, but I find thighs yield a more authentic, succulent result. I usually cut them into thin strips or bite-sized pieces so they cook quickly and absorb the marinade beautifully.
- Yogurt: A crucial ingredient for tenderizing the chicken and creating that signature creamy texture in the marinade. Plain, unsweetened full-fat yogurt works best. If you’re dairy-free, a good quality plain dairy-free yogurt (like almond or coconut-based) can be a suitable alternative.
- Lemon Juice: Freshly squeezed lemon juice brightens the flavors and helps tenderize the chicken further. Don’t skimp on this!
- Olive Oil: Good quality extra virgin olive oil adds richness and helps the spices adhere to the chicken.
- Garlic: Lots of freshly minced garlic is non-negotiable for that classic shawarma aroma and taste.
- Spices: This is where the magic happens! My blend typically includes ground cumin, ground coriander, smoked paprika (or sweet paprika if you prefer), turmeric for color and earthy notes, a pinch of cayenne pepper for a subtle kick (optional, but I love it), and of course, salt and freshly ground black pepper. For an extra layer of authentic flavor, I sometimes add a tiny pinch of ground cinnamon or even a whisper of nutmeg. It really makes a difference!
For the Pitas and Fillings
- Pita Bread: The star of the show after the chicken! I usually buy good quality store-bought pita bread. Look for soft, pliable pitas that are easy to open and fill. You can even try making your own if you’re feeling ambitious, but for convenience, store-bought is perfectly fine.
- Garlic Sauce (Touma) or Tzatziki: A creamy, garlicky sauce is absolutely essential. Touma, a Lebanese garlic sauce, is traditional and truly amazing, but it can be a bit tricky to make at home. A simpler garlic-yogurt sauce or even a refreshing tzatziki (yogurt, cucumber, garlic, dill) works wonderfully too. You can also buy these prepared.
- Fresh Vegetables: This is where you can customize! I love a mix of shredded lettuce, diced tomatoes, diced cucumbers, and thinly sliced red onion. The freshness provides a perfect contrast to the rich chicken.
- Pickles: Don’t underestimate the power of pickles! Dill pickles, or even better, Middle Eastern pickled turnips (the pink ones!), add a fantastic tangy crunch that cuts through the richness of the chicken and sauce.
- Optional Add-ins: Sometimes I’ll add a dollop of hummus inside the pita, or even a few crispy French fries (a popular addition in many shawarma stands!). Olives, feta cheese, or even some hot sauce can also be great additions.
I always make sure to have all these components ready before assembling, because once that chicken is cooked, you’ll want to build your pita right away!
Step-by-Step Instructions
Getting those perfectly juicy, flavorful Chicken Shawarma Pitas on your plate is simpler than you might think. Here’s my step-by-step guide to bringing this incredible dish to life:
Step 1: Marinate the Chicken
- Prepare the Chicken: First, I take my boneless, skinless chicken thighs (about 1.5-2 pounds) and pat them dry with paper towels. Then, I slice them into thin, bite-sized strips or small pieces, making sure they’re roughly uniform in size for even cooking.
- Mix the Marinade: In a large bowl, I combine about 1/2 cup of plain full-fat yogurt, the juice of one large lemon (about 2-3 tablespoons), 2 tablespoons of olive oil, 4-5 cloves of minced garlic, and my spice blend: 1.5 teaspoons ground cumin, 1.5 teaspoons ground coriander, 1 teaspoon smoked paprika, 1/2 teaspoon turmeric, 1/4 teaspoon cayenne pepper (or more if you like heat!), 1 teaspoon salt, and 1/2 teaspoon black pepper. If I’m feeling adventurous, I’ll add a tiny pinch of ground cinnamon here too. I whisk everything together until it’s well combined.
- Combine & Marinate: I add the chicken pieces to the bowl with the marinade and toss them thoroughly, ensuring every piece is coated. Then, I cover the bowl and refrigerate it. For best flavor and tenderness, I recommend marinating for at least 4 hours, or even better, overnight. If you’re short on time, 30 minutes will do in a pinch, but the longer, the better!
Step 2: Cook the Chicken
- Preheat: When I’m ready to cook, I take the chicken out of the fridge about 15-20 minutes before to let it come closer to room temperature. I preheat a large, heavy-bottomed skillet (cast iron works great!) over medium-high heat. Once hot, I add a tablespoon of olive oil.
- Cook in Batches: I don’t overcrowd the pan! I cook the chicken in batches to ensure a good sear and even cooking. I spread the chicken in a single layer and let it cook undisturbed for about 3-4 minutes until it develops a nice golden-brown crust. Then, I flip the pieces and cook for another 3-4 minutes, or until fully cooked through and slightly charred. The yogurt in the marinade helps create a beautiful caramelization.
- Rest: Once all the chicken is cooked, I transfer it to a plate, cover it loosely with foil, and let it rest for 5-10 minutes. This allows the juices to redistribute, ensuring super moist chicken.
Step 3: Prepare Fillings and Sauce
- While the chicken is cooking or resting, I get all my fillings ready. I shred the lettuce, dice the tomatoes and cucumbers, and thinly slice the red onion. I also prepare or get out my garlic sauce (Touma) or tzatziki and pickles.
Step 4: Warm the Pitas
- Just before assembly, I warm my pita bread. You can do this in a dry skillet over medium heat for about 30 seconds per side until soft and pliable, in the microwave for 15-20 seconds, or wrapped in foil in a preheated oven for a few minutes. The goal is warm, soft pitas, not crispy ones!
Step 5: Assemble Your Chicken Shawarma Pitas
- This is my favorite part! I carefully open each warm pita to create a pocket.
- Inside the pita, I generously spread a layer of my garlic sauce or tzatziki.
- Then, I spoon in a generous portion of the rested, juicy chicken shawarma.
- Next, I pile on the fresh veggies: shredded lettuce, diced tomatoes, diced cucumbers, and sliced red onion.
- Finally, I add those essential pickles, a little extra drizzle of sauce if desired, and sometimes a few fries.
- I usually fold or roll the pita tightly to hold all the delicious fillings, and it’s ready to devour!
Enjoy the fruits of your labor – a truly satisfying Chicken Shawarma Pita!
Tips & Suggestions
I’ve made my fair share of Chicken Shawarma Pitas over the years, and I’ve picked up a few tricks and tips that really elevate the dish. Here’s what I recommend to make yours truly exceptional:
- Marinate for Maximum Flavor: I can’t stress this enough – the longer you marinate the chicken, the more tender and flavorful it will be. Aim for at least 4 hours, but an overnight marination in the fridge truly makes a world of difference. The yogurt and lemon juice work their magic to break down the chicken fibers beautifully.
- High Heat for the Sear: When cooking the chicken, ensure your pan is piping hot. This allows for a fantastic sear and caramelization on the outside, creating those delicious browned bits, while keeping the inside juicy. Don’t be afraid of a little char!
- Don’t Crowd the Pan: This is a common mistake I see. If you put too much chicken in the pan at once, the temperature will drop, and the chicken will steam instead of sear. Cook in batches if necessary; it’s worth the extra few minutes for perfectly cooked chicken.
- Rest Your Chicken: Just like with any cooked meat, letting the chicken rest for 5-10 minutes after cooking allows the juices to redistribute. This results in incredibly moist and tender chicken for your pitas. If you cut it immediately, the juices will run out, leaving you with drier meat.
- Warm Pitas Are a Must: Cold, stiff pita bread is no fun. Always warm your pitas until they are soft and pliable. This makes them easier to open, fill, and eat without tearing. A quick warm-up in a dry skillet, oven, or even the microwave makes a huge difference.
- Sauce is King: Don’t be shy with the garlic sauce (Touma) or tzatziki! A generous slather inside the pita and another drizzle over the chicken and veggies adds so much moisture and flavor. It’s an integral part of the shawarma experience. If you’re making your own Touma, ensure you use a good neutral oil for the emulsion.
- Pickle Power: The tang and crunch of pickles are absolutely essential to balancing the rich flavors of the chicken and sauce. I always make sure I have plenty on hand. Middle Eastern pickled turnips are fantastic if you can find them!
- Customization is Key: While the classic toppings are fantastic, feel free to experiment. I sometimes add a sprinkle of fresh parsley, a few kalamata olives, or even a crumbling of feta cheese. A dash of your favorite hot sauce can also add a nice kick.
- Serve with Sides: These pitas are a meal on their own, but if you want to make it a feast, I love serving them with a simple side of French fries, a fresh tabbouleh salad, or a bowl of hummus for dipping.
- Spice Level Adjustment: Feel free to adjust the amount of cayenne pepper to your liking. If you prefer a milder flavor, you can omit it entirely. For more heat, add an extra pinch!
Following these tips, you’ll be making Chicken Shawarma Pitas that taste like they came straight from your favorite food truck!
Storage
Once you’ve gone to the effort of making delicious Chicken Shawarma Pitas, you might wonder about storing any leftovers. While these pitas are definitely best eaten fresh, here’s my advice for storing the components to enjoy later:
- Cooked Chicken Shawarma:
- Refrigeration: The cooked chicken shawarma can be stored in an airtight container in the refrigerator for 3-4 days. I make sure it’s completely cooled before putting it away.
- Reheating: To reheat, I usually spread the chicken on a baking sheet and warm it in an oven or toaster oven at 350°F (175°C) for about 10-15 minutes, or until heated through. You can also quickly sauté it in a non-stick pan over medium heat until warm. Avoid microwaving if possible, as it can sometimes dry out the chicken.
- Freezing: Cooked chicken shawarma freezes well too! I place it in a freezer-safe, airtight container or heavy-duty freezer bag. It will keep in the freezer for up to 2-3 months. Thaw overnight in the refrigerator before reheating as described above.
- Pita Bread:
- Store-bought pita bread generally keeps well at room temperature in its original packaging for a few days. For longer storage, you can freeze pitas in an airtight bag for up to 3 months. Thaw at room temperature or warm directly from frozen.
- Sauces (Garlic Sauce/Tzatziki):
- Any homemade garlic sauce or tzatziki should be stored in a separate airtight container in the refrigerator. Garlic sauce typically lasts for about a week, while tzatziki, due to the fresh cucumber and dairy, is best consumed within 3-4 days.
- Fresh Vegetables:
- Shredded lettuce, diced tomatoes, cucumbers, and sliced onions are best stored separately in airtight containers in the refrigerator. They typically last 2-3 days, but their crispness will diminish over time.
- Assembled Pitas:
- I strongly recommend against assembling the pitas ahead of time for storage. The moisture from the sauce, chicken, and vegetables will quickly make the pita bread soggy, and the fresh vegetables won’t stay crisp. It’s truly a dish best enjoyed immediately after assembly for the best texture and flavor experience.
My advice is to prepare the chicken and sauces ahead of time, keep the fresh ingredients chopped and separate, and then assemble your pitas fresh whenever you’re ready to eat!
Final Thoughts
There’s something truly magical about bringing the vibrant flavors of the Middle East right into your kitchen, and these Chicken Shawarma Pitas do exactly that. I truly believe this recipe is a must-try for anyone looking to enjoy an incredibly flavorful, satisfying, and relatively easy meal. The tender, spiced chicken, fresh toppings, and warm pita bread come together in a symphony of tastes and textures that will transport your taste buds. Seriously, once you bite into one of these homemade Chicken Shawarma Pitas, you’ll understand why it’s become a favorite. It’s perfect for a weeknight dinner, a casual gathering, or simply when you’re craving something deliciously different. Give it a go – I promise you won’t be disappointed!
Chicken Shawarma Pitas Recipe: Easy, Authentic & Delicious!
- Total Time: 45 minutes
- Yield: 4 servings 1x
Description
Experience a flavor explosion with these Chicken Shawarma Pitas, featuring tender, spiced chicken and fresh vegetables nestled in warm pita bread. This recipe brings authentic street food vibes right into your kitchen!
Ingredients
- 1.5–2 pounds boneless, skinless chicken thighs
- 1/2 cup plain full-fat yogurt
- Juice of one large lemon (about 2–3 tablespoons)
- 2 tablespoons olive oil
- 4–5 cloves minced garlic
- 1.5 teaspoons ground cumin
- 1.5 teaspoons ground coriander
- 1 teaspoon smoked paprika
- 1/2 teaspoon turmeric
- 1/4 teaspoon cayenne pepper (optional)
- 1 teaspoon salt
- 1/2 teaspoon freshly ground black pepper
- Pita bread
- Garlic sauce (Touma) or tzatziki
- Shredded lettuce
- Diced tomatoes
- Diced cucumbers
- Thinly sliced red onion
- Pickles (dill pickles or Middle Eastern pickled turnips)
- Optional add-ins: hummus, crispy French fries, olives, feta cheese, hot sauce
Instructions
- Step 1: Marinate the Chicken
- Prepare the Chicken: Pat the chicken thighs dry and slice them into thin, bite-sized strips.
- Mix the Marinade: In a large bowl, combine yogurt, lemon juice, olive oil, minced garlic, and spices. Whisk until well combined.
- Combine & Marinate: Add the chicken pieces to the marinade, toss to coat, cover, and refrigerate for at least 4 hours or overnight.
- Step 2: Cook the Chicken
- Preheat: Take the chicken out of the fridge 15-20 minutes before cooking. Preheat a skillet over medium-high heat and add olive oil.
- Cook in Batches: Cook the chicken in batches for 3-4 minutes per side until golden brown and fully cooked.
- Rest: Transfer the cooked chicken to a plate, cover loosely with foil, and let it rest for 5-10 minutes.
- Step 3: Prepare Fillings and Sauce
- While the chicken is cooking or resting, prepare the fillings by shredding lettuce, dicing tomatoes and cucumbers, and slicing red onion. Get out the garlic sauce or tzatziki and pickles.
- Step 4: Warm the Pitas
- Warm the pita bread in a skillet, microwave, or oven until soft and pliable.
- Step 5: Assemble Your Chicken Shawarma Pitas
- Open each warm pita to create a pocket, spread a layer of garlic sauce or tzatziki, spoon in the chicken, add fresh veggies, pickles, and any optional add-ins. Fold or roll the pita tightly to hold the fillings.
- Prep Time: 15 mins
- Cook Time: 30 mins
- Category: Dinner
- Method: Cooking
- Cuisine: Middle Eastern
Nutrition
- Serving Size: 1 pita
- Calories: 450
- Sugar: 5 g
- Sodium: 600 mg
- Fat: 20 g
- Saturated Fat: 4 g
- Unsaturated Fat: 14 g
- Trans Fat: 0 g
- Carbohydrates: 40 g
- Fiber: 3 g
- Protein: 30 g
- Cholesterol: 90 mg
Keywords: Marinate the chicken for maximum flavor, cook in batches to avoid steaming, and always warm your pitas for the best texture. Customize with your favorite toppings!

Leave a Comment