
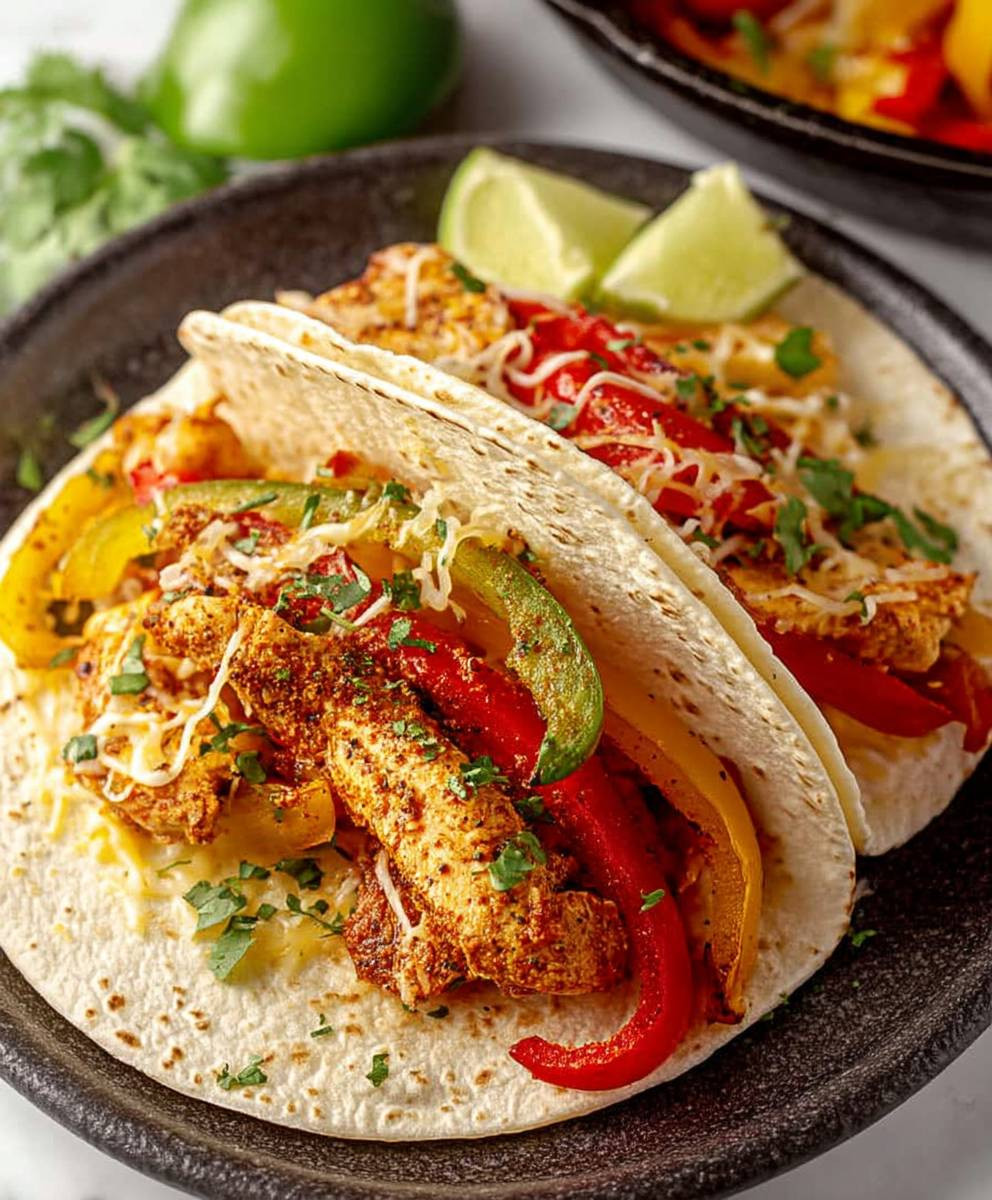
Chicken Fajitas: the sizzling symphony of flavors that transforms any weeknight into a fiesta! Have you ever wondered how a simple combination of marinated chicken, vibrant bell peppers, and onions could create such an explosion of taste and texture? This isn’t just a meal; it’s an experience, a culinary journey south of the border that you can embark on right in your own kitchen.
The history of fajitas is deeply rooted in the ranching culture of South and West Texas, dating back to the early 20th century. Ranch hands, often paid with less desirable cuts of beef, ingeniously transformed these tougher pieces into something incredibly delicious. The term “fajita” itself refers to the skirt steak, the original cut used for this dish. Over time, chicken became a popular and equally delectable alternative, offering a lighter, leaner option that still captures the essence of the original.
What makes Chicken Fajitas so universally loved? It’s the perfect blend of savory, smoky, and slightly sweet flavors, combined with the satisfying sizzle and customizable nature of the dish. The tender, juicy chicken, infused with a zesty marinade, pairs beautifully with the crisp-tender vegetables. Plus, the interactive element of building your own fajitas with warm tortillas and your favorite toppings – from creamy guacamole to tangy sour cream – makes it a fun and engaging meal for everyone. Whether you’re looking for a quick and easy weeknight dinner or a crowd-pleasing option for a weekend gathering, chicken fajitas are always a winning choice. Let’s get cooking!

Ingredients:
- 1.5 lbs boneless, skinless chicken breasts, cut into strips
- 1 large red bell pepper, sliced
- 1 large green bell pepper, sliced
- 1 large yellow bell pepper, sliced
- 1 large onion, sliced
- 2 cloves garlic, minced
- 2 tablespoons olive oil
- 1 packet (1 ounce) fajita seasoning (or homemade blend, recipe below)
- 1/4 cup lime juice, freshly squeezed
- Optional toppings: sour cream, guacamole, salsa, shredded cheese, cilantro, jalapeños
- Flour tortillas, warmed
Homemade Fajita Seasoning (Optional):
- 2 tablespoons chili powder
- 1 tablespoon cumin
- 1 tablespoon paprika
- 1 teaspoon garlic powder
- 1 teaspoon onion powder
- 1/2 teaspoon dried oregano
- 1/2 teaspoon cayenne pepper (optional, for heat)
- 1 teaspoon salt
- 1/2 teaspoon black pepper
Instructions:
Preparing the Chicken and Vegetables:
- First, let’s get the chicken ready. If you bought whole chicken breasts, slice them into strips about 1/4 inch thick. This ensures they cook quickly and evenly. Place the chicken strips in a medium bowl.
- Now, prepare the vegetables. Slice the bell peppers (red, green, and yellow) into strips similar in size to the chicken. I like to remove the seeds and membranes first. Slice the onion into similar-sized strips as well.
- Mince the garlic. You can use a garlic press or finely chop it with a knife. Set the garlic aside for now.
Marinating the Chicken:
- If you’re using store-bought fajita seasoning, open the packet and pour it over the chicken strips in the bowl. If you’re making your own fajita seasoning (which I highly recommend!), combine all the ingredients for the homemade blend in a small bowl and then pour it over the chicken.
- Add the lime juice to the chicken. This will help tenderize the chicken and add a delicious tangy flavor.
- Toss the chicken, seasoning, and lime juice together until the chicken is evenly coated. Make sure every piece gets a good dose of that flavor!
- Cover the bowl with plastic wrap or place the chicken in a resealable bag. Marinate in the refrigerator for at least 30 minutes, or up to 4 hours. The longer it marinates, the more flavorful the chicken will be. I usually aim for at least an hour if I have the time.
Cooking the Fajitas:
- Heat the olive oil in a large skillet or cast-iron skillet over medium-high heat. Make sure the skillet is nice and hot before adding the chicken. A hot skillet will help the chicken sear properly and prevent it from steaming.
- Add the marinated chicken to the hot skillet in a single layer. Don’t overcrowd the pan, or the chicken will steam instead of sear. If necessary, cook the chicken in batches.
- Cook the chicken for about 5-7 minutes, or until it’s cooked through and no longer pink inside. Stir occasionally to ensure even cooking. The internal temperature of the chicken should reach 165°F (74°C).
- Remove the cooked chicken from the skillet and set it aside in a clean bowl or plate. Cover it loosely with foil to keep it warm.
- Add the sliced bell peppers and onions to the same skillet. If the skillet seems dry, add a little more olive oil.
- Cook the vegetables for about 5-7 minutes, or until they are tender-crisp and slightly caramelized. Stir frequently to prevent them from burning. You want them to be softened but still have a little bite to them.
- Add the minced garlic to the skillet with the vegetables and cook for another minute, or until fragrant. Be careful not to burn the garlic, as it can become bitter.
- Return the cooked chicken to the skillet with the vegetables. Toss everything together to combine and heat through.
- Remove the skillet from the heat.
Warming the Tortillas:
- While the chicken and vegetables are cooking, warm the flour tortillas. There are several ways to do this:
- Microwave: Wrap a stack of tortillas in a damp paper towel and microwave for about 30-60 seconds, or until warm and pliable.
- Skillet: Heat a dry skillet over medium heat. Warm each tortilla for about 15-20 seconds per side, or until heated through and slightly puffed.
- Oven: Wrap a stack of tortillas in foil and bake in a preheated oven at 350°F (175°C) for about 10-15 minutes, or until warm.
- Keep the warmed tortillas wrapped in a clean kitchen towel or tortilla warmer to keep them warm and soft.
Assembling the Fajitas:
- Now comes the fun part – assembling your fajitas! Take a warm flour tortilla and place a generous amount of the chicken and vegetable mixture in the center.
- Add your favorite toppings. I love sour cream, guacamole, salsa, shredded cheese, cilantro, and jalapeños. Feel free to get creative and add whatever you like!
- Fold the sides of the tortilla inward and then roll it up from the bottom to create a fajita.
- Serve immediately and enjoy!
Tips and Variations:
- Spice Level: Adjust the amount of cayenne pepper in the homemade fajita seasoning to control the spice level. If you like it mild, omit the cayenne pepper altogether. If you like it extra spicy, add more!
- Vegetarian Option: Substitute the chicken with sliced portobello mushrooms or tofu for a vegetarian option.
- Bell Pepper Variations: Feel free to use different colored bell peppers or a combination of your favorites.
- Onion Variations: You can use white, yellow, or red onions, depending on your preference.
- Marinade Time: While 30 minutes is the minimum marinating time, marinating the chicken for longer (up to 4 hours) will result in a more flavorful and tender fajita.
- Serving Suggestions: Serve the fajitas with a side of rice and beans for a complete meal.
- Storage: Leftover chicken and vegetable mixture can be stored in an airtight container in the refrigerator for up to 3 days. Reheat before serving.
- Freezing: Cooked chicken and vegetable mixture can be frozen for up to 2 months. Thaw overnight in the refrigerator before reheating.
- Grilling: For a smoky flavor, grill the chicken and vegetables instead of cooking them in a skillet. Marinate the chicken as directed, then grill over medium heat until cooked through. Grill the vegetables until tender-crisp.
- Lime Wedges: Serve with extra lime wedges for squeezing over the fajitas.
Conclusion:
This isn’t just another recipe; it’s your express ticket to a fiesta of flavor! These Chicken Fajitas are a must-try because they’re incredibly easy to make, bursting with vibrant tastes, and endlessly customizable. Seriously, from prep to plate, you’re looking at a weeknight dinner champion that will have everyone asking for seconds. The combination of tender, juicy chicken, perfectly charred peppers and onions, and that signature fajita seasoning is simply irresistible.
But the real magic lies in its versatility. Feeling adventurous? Try adding a splash of lime juice and a pinch of chili powder to the marinade for an extra kick. Want to make it a vegetarian delight? Swap out the chicken for portobello mushrooms or black beans. The possibilities are truly endless!
And let’s talk serving suggestions. While the classic combination of warm tortillas, sour cream, guacamole, and salsa is always a winner, don’t be afraid to get creative. Consider adding some shredded cheese, pico de gallo, or even a dollop of Greek yogurt for a healthier twist. For a complete meal, serve your fajitas with a side of Mexican rice and refried beans. Or, if you’re looking for a lighter option, try serving them over a bed of crisp lettuce with a zesty cilantro-lime dressing.
Serving Variations to Ignite Your Taste Buds:
* Spicy Fiesta: Add jalapeños to the peppers and onions while cooking, and use a spicier salsa.
* Creamy Dreamy: Incorporate a cream cheese drizzle or a dollop of queso fresco for added richness.
* Tropical Twist: Add pineapple chunks to the fajita mixture for a sweet and tangy flavor.
* Black Bean Bonanza: Mix in black beans for added protein and fiber.
* Sheet Pan Fajitas: Roast all the ingredients on a sheet pan for an even easier cleanup.
I’ve made these Chicken Fajitas countless times, and they’re always a hit. The aroma alone is enough to get everyone’s mouths watering! The best part is that they’re so adaptable to different tastes and dietary needs. Whether you’re cooking for a crowd or just a cozy dinner for two, this recipe is guaranteed to impress.
So, what are you waiting for? Gather your ingredients, fire up your skillet, and get ready to experience the deliciousness of homemade fajitas. I promise you won’t be disappointed.
And most importantly, I want to hear about your experience! Did you try any of the variations? Did you add your own special touch? Share your photos and stories in the comments below. Let’s create a community of fajita fanatics and inspire each other with our culinary creations. I can’t wait to see what you come up with! Happy cooking, and enjoy your amazing Chicken Fajitas! I am confident that this will become a staple in your recipe rotation.
Chicken Fajitas: The Ultimate Guide to Making Perfect Fajitas
Flavorful and easy chicken fajitas with colorful bell peppers and onions, marinated in a zesty lime and fajita seasoning blend. Perfect for a quick and delicious weeknight meal!
Ingredients
Instructions
Recipe Notes
- Spice Level: Adjust the amount of cayenne pepper in the homemade fajita seasoning to control the spice level.
- Vegetarian Option: Substitute the chicken with sliced portobello mushrooms or tofu for a vegetarian option.
- Bell Pepper Variations: Feel free to use different colored bell peppers or a combination of your favorites.
- Onion Variations: You can use white, yellow, or red onions, depending on your preference.
- Marinade Time: While 30 minutes is the minimum marinating time, marinating the chicken for longer (up to 4 hours) will result in a more flavorful and tender fajita.
- Serving Suggestions: Serve the fajitas with a side of rice and beans for a complete meal.
- Storage: Leftover chicken and vegetable mixture can be stored in an airtight container in the refrigerator for up to 3 days. Reheat before serving.
- Freezing: Cooked chicken and vegetable mixture can be frozen for up to 2 months. Thaw overnight in the refrigerator before reheating.
- Grilling: For a smoky flavor, grill the chicken and vegetables instead of cooking them in a skillet. Marinate the chicken as directed, then grill over medium heat until cooked through. Grill the vegetables until tender-crisp.
- Lime Wedges: Serve with extra lime wedges for squeezing over the fajitas.


Leave a Comment