
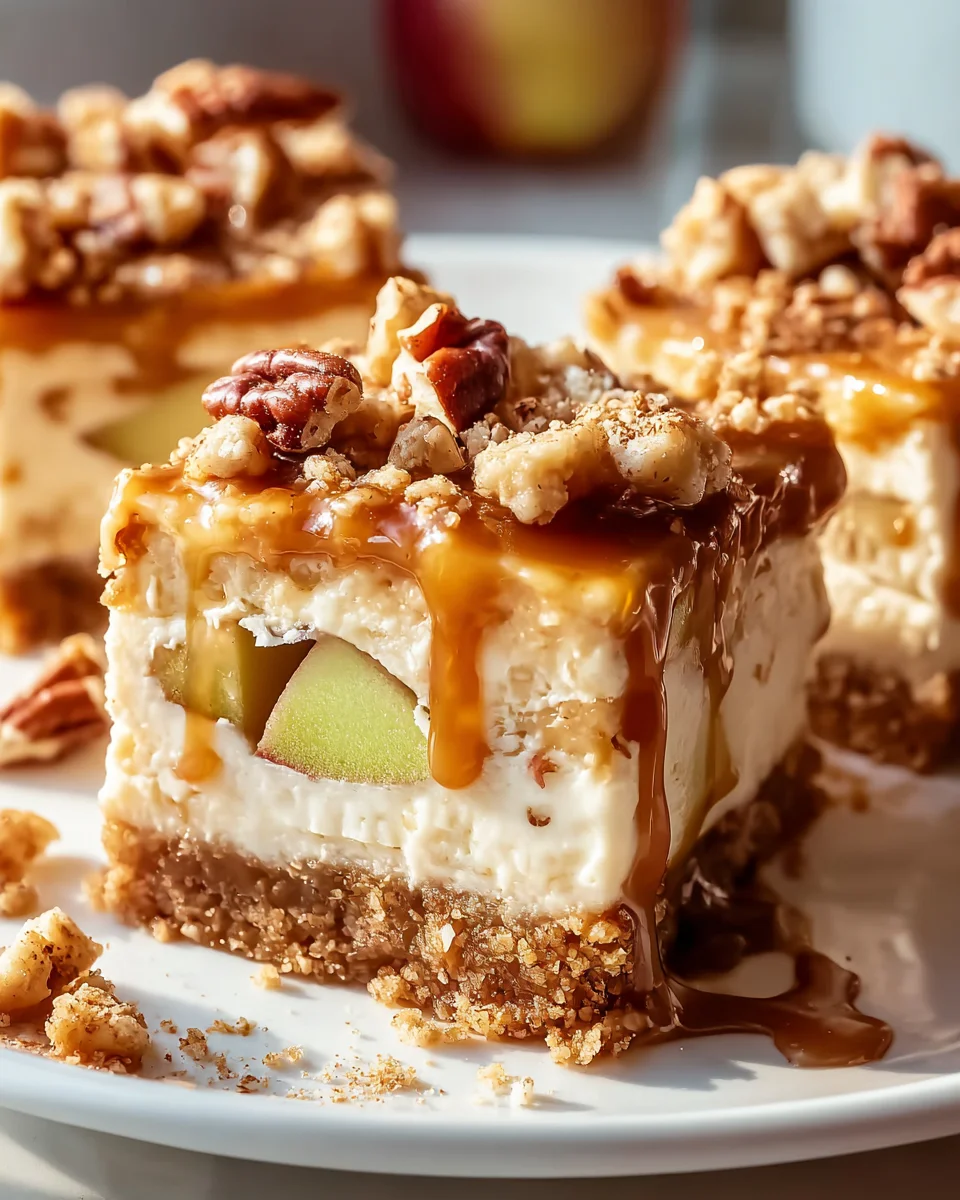
Caramel Apple Cheesecake Bars are not just a dessert; they are an experience, a harmonious symphony of autumn’s most cherished flavors. Imagine sinking your teeth into a rich, velvety cheesecake, perfectly swirled with a luscious, buttery caramel and dotted with tender, sweet-tart apple pieces, all resting atop a buttery graham cracker crust. I believe there’s truly nothing quite like the blissful combination of crisp apples and decadent caramel to signal the arrival of fall, and when you marry these elements with the universally adored creaminess of cheesecake, you create something truly extraordinary.
A Delightful Fusion of Fall Favorites
While cheesecake boasts a history stretching back to ancient Greece and caramel apples have become a beloved harvest festival and Halloween tradition, the ingenious concept of combining them into convenient, shareable bars is a testament to modern culinary creativity. People adore this dish for its exquisite balance of textures and tastes: the smooth, tangy cheesecake perfectly contrasts with the chewy, sweet caramel and the slight bite of the apples, all held together by a satisfyingly crunchy crust. These bars offer the comforting warmth of an apple pie, the indulgence of a classic cheesecake, and the delightful gooeyness of a caramel apple, making them the ultimate autumnal treat for sharing joy and flavor. They are not only incredibly delicious but also wonderfully portable, making these Caramel Apple Cheesecake Bars a guaranteed crowd-pleaser for any gathering.

Ingredients:
- For the Shortbread Crust:
- 1 ½ cups (180g) all-purpose flour
- ½ cup (100g) granulated sugar
- ¼ teaspoon salt
- ½ cup (113g) unsalted butter, very cold and cut into small cubes
- 1 large egg yolk
- 1 teaspoon pure vanilla extract
- For the Cream Cheese Filling:
- 24 ounces (680g) cream cheese, full-fat, softened completely at room temperature
- 1 cup (200g) granulated sugar
- ¼ cup (60ml) heavy cream or sour cream, at room temperature
- 1 teaspoon pure vanilla extract
- Pinch of fine sea salt
- 2 large eggs, at room temperature
- For the Spiced Apple Topping:
- 3 medium-sized apples (about 1 ½ pounds), peeled, cored, and diced into ½-inch pieces (I love using firm, tart apples like Granny Smith, Honeycrisp, or a mix of both for the best flavor and texture)
- 2 tablespoons unsalted butter
- ¼ cup (50g) granulated sugar (you might adjust this slightly based on the sweetness of your apples)
- ½ teaspoon ground cinnamon
- ¼ teaspoon ground nutmeg
- Pinch of ground cloves (optional, but it truly adds a wonderful, warm depth)
- 1 tablespoon fresh lemon juice
- 1 tablespoon cornstarch mixed with 2 tablespoons cold water (this is your slurry)
- For the Caramel Drizzle:
- ½ cup (120ml) good quality store-bought or homemade caramel sauce
Equipment You’ll Need:
Having the right tools makes all the difference when baking these delightful Caramel Apple Cheesecake Bars. Here’s what I recommend having on hand:
- A sturdy 9×13 inch baking pan
- Parchment paper and kitchen shears for easy lining
- Several large mixing bowls for separating ingredients and mixtures
- An electric mixer (either a stand mixer with a paddle attachment or a reliable hand mixer) for the best results with the cheesecake filling
- A rubber spatula for scraping down bowls and folding ingredients gently
- A whisk for dry ingredients
- Accurate measuring cups and spoons
- A sharp knife and a cutting board for preparing your apples
- A small saucepan for cooking the apple topping
- A wire cooling rack
- An oven thermometer (to ensure your oven is truly at the right temperature)
- A sturdy serving spatula or knife for neat slicing
Preparing the Crust: The Flavorful Foundation
The crust is the unsung hero of these bars, providing a delicious, buttery shortbread base that complements the creamy cheesecake and spiced apples perfectly. Let’s get started:
- First things first, let’s get your oven ready. Preheat your oven to 350°F (175°C). It’s crucial for even baking. While it’s heating, prepare your baking pan. Line a 9×13 inch baking pan with parchment paper, leaving an overhang on the longer sides. This overhang acts as “handles” later on, making it incredibly easy to lift the entire batch of bars out of the pan for neat slicing. Lightly grease any exposed parts of the pan if necessary, or just rely on the parchment.
- In a large mixing bowl, whisk together the 1 ½ cups all-purpose flour, ½ cup granulated sugar, and ¼ teaspoon salt. Make sure these dry ingredients are well combined; this ensures a consistent flavor throughout the crust.
- Now, it’s time for the butter. Add the ½ cup (113g) cold unsalted butter, cut into small cubes, to the dry ingredients. Using your fingertips, a pastry blender, or a fork, cut the butter into the flour mixture until it resembles coarse crumbs. Some pieces might be a bit larger, like small peas, and that’s perfectly fine. The cold butter is key here for creating a tender, flaky shortbread.
- In a separate small bowl, whisk together the 1 large egg yolk and 1 teaspoon pure vanilla extract. This small liquid addition brings the dough together without making it tough.
- Pour the egg yolk mixture over the butter-flour mixture. With your hands or a spatula, mix until the dough just comes together. Be careful not to overmix; you want the texture to remain tender. It should feel crumbly but hold together when you press it.
- Press this dough evenly into the bottom of your prepared 9×13 inch baking pan. I like to use the bottom of a flat glass or a measuring cup to help press it down firmly and create a nice, even layer right to the edges of the pan. An even crust ensures even baking and a beautiful presentation.
- Bake the crust in your preheated oven for 18-20 minutes, or until it’s lightly golden brown around the edges and set. The smell of baking shortbread is truly one of the best kitchen aromas!
- Once baked, remove the crust from the oven and set it aside on a wire rack. While it’s cooling slightly, you’ll want to prepare your heavenly cream cheese filling. Keep the oven on, as we’ll be using it again shortly for the next step.
Making the Cream Cheese Filling: The Silky Smooth Heart
This is where the magic really happens! Achieving a smooth, lump-free cream cheese filling is paramount for a truly delightful cheesecake bar. Pay close attention to these steps for the best results:
- In the bowl of your electric mixer (or a large mixing bowl if using a hand mixer), combine the 24 ounces (680g) softened full-fat cream cheese, 1 cup (200g) granulated sugar, ¼ cup (60ml) room temperature heavy cream or sour cream, 1 teaspoon pure vanilla extract, and a pinch of fine sea salt.
- Beat these ingredients together on medium speed until the mixture is incredibly smooth and creamy, with absolutely no lumps visible. This typically takes about 3-4 minutes. Do not rush this step! Scrape down the sides and bottom of the bowl frequently with your rubber spatula to ensure everything is thoroughly incorporated. Getting the cream cheese perfectly smooth now prevents any grainy texture later.
- Reduce the mixer speed to low. Add the 2 large eggs, one at a time, beating just until each egg is incorporated before adding the next. It’s extremely important not to overmix the batter once the eggs have been added. Overmixing introduces too much air, which can cause the cheesecake to puff up too much during baking and then crack as it cools. We want that beautiful, smooth top!
- Give the bowl one final scrape down with your spatula, ensuring all ingredients are well combined without any additional beating. The mixture should be thick, smooth, and glossy.
Assembling and Baking the Bars: The Transformation Begins
Now that your crust is par-baked and your filling is smooth, it’s time to bring them together and bake these beauties into golden perfection:
- Carefully pour the cream cheese filling evenly over the warm, par-baked shortbread crust in the pan. Gently spread it with your rubber spatula, making sure it reaches all the corners and forms a smooth, even layer.
- Place the pan back into your 350°F (175°C) preheated oven. Bake for approximately 30-35 minutes. You’ll know it’s done when the edges are set and appear slightly golden, but the center still has a slight jiggle to it when you gently shake the pan. This slight jiggle is a good sign that it won’t be overbaked and will set perfectly as it cools.
- Once baked, remove the pan from the oven. This next part is crucial for preventing cracks and achieving a perfectly creamy texture: Let the cheesecake cool on a wire rack at room temperature for at least 1 to 2 hours. During this time, the residual heat will continue to set the center, and the gradual cooling will help prevent sudden temperature changes that can lead to cracking.
- After the initial cooling period on the counter, transfer the pan to the refrigerator. It needs to chill for a minimum of 4 hours, but preferably overnight. This long chill time is non-negotiable for cheesecake! It allows the bars to set completely, ensuring they slice beautifully and have that wonderfully firm, yet creamy, texture we all love. Trying to slice them too early will result in a messy, crumbly outcome, and trust me, patience is a virtue here!
Preparing the Spiced Apple Topping: A Burst of Fall Flavor
While your cheesecake bars are chilling, or even a day ahead, you can prepare the absolutely irresistible spiced apple topping. This layer adds a fantastic contrast in texture and a burst of warm, autumnal flavor:
- In a medium saucepan, melt the 2 tablespoons of unsalted butter over medium heat.
- Add your diced apples to the melted butter. Cook the apples, stirring occasionally, for about 5-7 minutes, or until they begin to soften slightly. We’re looking for tender-crisp, not mushy, as they will continue to cook a bit more.
- Stir in the ¼ cup granulated sugar (adjust to your taste and apple tartness), ½ teaspoon ground cinnamon, ¼ teaspoon ground nutmeg, and the optional pinch of ground cloves. Continue to cook for another 2-3 minutes, allowing the spices to become fragrant and coat the apples beautifully. The aroma filling your kitchen will be amazing!
- Pour in the 1 tablespoon fresh lemon juice. The lemon juice brightens the apple flavor and helps prevent them from browning too much.
- Give your cornstarch slurry (1 tablespoon cornstarch mixed with 2 tablespoons cold water) a quick stir to ensure the cornstarch hasn’t settled. Pour it into the simmering apples, stirring constantly. Continue to cook for another 1-2 minutes, or until the mixture thickens to a glossy, syrupy consistency. It should coat the back of a spoon.
- Remove the apple topping from the heat and let it cool completely to room temperature before you even think about putting it on your chilled cheesecake. You don’t want to add warm apples to a cold cheesecake, as it could cause it to soften and become messy. You can make this topping a day in advance and store it in the refrigerator.
Finishing Touches: Assembly, Drizzle, and Pure Delight
The moment has arrived to bring all the delicious components together and prepare your Caramel Apple Cheesecake Bars for their grand debut!
- Once your cheesecake bars are fully chilled and set (at least 4 hours, remember?), and your spiced apple topping is completely cool, it’s time to assemble. Use the parchment paper overhang to carefully lift the entire cheesecake slab out of the baking pan and transfer it to a cutting board.
- Spread the cooled spiced apple topping evenly over the top of the chilled cheesecake layer. You can spread it all the way to the edges or leave a small border, depending on your aesthetic preference. I find a generous layer of apples to be most satisfying.
- For the caramel drizzle, if your caramel sauce is too thick, you can gently warm it in the microwave for 15-30 seconds, or in a small saucepan over low heat, until it’s pourable. Be careful not to overheat it.
- Drizzle the ½ cup of caramel sauce generously over the apple topping. You can create a decorative pattern or just let it flow naturally; either way, it’s going to taste incredible!
- Now for the moment of truth: slicing! For clean cuts, I always recommend using a large, sharp knife. Run the knife under hot water and wipe it clean between each cut. This creates those beautiful, crisp edges on your bars. Slice the cheesecake into 12-16 bars, depending on how large you like them.
Serving Suggestions and Storage Tips: Enjoying Every Morsel
These Caramel Apple Cheesecake Bars are truly a showstopper and deserve to be enjoyed properly. Here are my best tips for serving and keeping them fresh:
- Serving: These bars are best served chilled. The cold enhances the creamy texture of the cheesecake and the firm bite of the apples. While they are perfect on their own, a dollop of freshly whipped cream or a small scoop of vanilla bean ice cream takes them to an even higher level of indulgence. A final, extra drizzle of caramel just before serving never hurts either!
- Storage: Any leftover Caramel Apple Cheesecake Bars should be stored in an airtight container in the refrigerator. They will stay fresh and delicious for up to 4-5 days. Be sure to keep them covered to prevent them from absorbing any unwanted odors from other foods in your fridge.
- Freezing: If you’ve made a large batch or want to save some for later, these bars freeze beautifully! Once fully set and sliced, place the bars (without the caramel drizzle for best results, as caramel can get a bit hard when frozen) on a baking sheet lined with parchment paper and freeze until solid. Then, transfer the frozen bars to an airtight freezer-safe container or freezer bags, separating layers with parchment paper. They can be frozen for up to 1-2 months. When you’re ready to enjoy, simply thaw them in the refrigerator overnight, then add your fresh caramel drizzle before serving. It’s a fantastic way to enjoy a taste of fall any time of year!
Conclusion:
Well, there you have it! We’ve journeyed through the creation of what I genuinely believe will become one of your all-time favorite autumnal desserts. If you’ve been searching for that perfect treat to welcome the cooler weather, to impress guests, or simply to indulge yourself after a long day, then look no further. This recipe isn’t just about combining ingredients; it’s about crafting an experience, a delightful moment of pure, unadulterated pleasure. The magic of these bars lies in their incredible balance: the buttery, slightly salty shortbread crust providing a delightful crunch, giving way to a rich, velvety smooth cheesecake layer that is both tangy and sweet. And then, the star of the show – the tender, perfectly spiced apple topping, bathed in a decadent, luscious caramel sauce that drips and glistens, promising an explosion of flavors with every single bite.
I truly can’t emphasize enough how much these Caramel Apple Cheesecake Bars stand out. They embody everything wonderful about fall in one neat, impressive package. They’re a symphony of textures and tastes: the crispness of the crust, the creamy silkiness of the cheesecake, the chewiness of the apples, and the sticky sweetness of the caramel. It’s a dessert that looks like it took hours of painstaking effort, yet with our clear steps, you’ll find it surprisingly accessible to make. Imagine the warmth that fills your kitchen as the apples simmer with cinnamon and nutmeg, and the anticipation building as the cheesecake bakes to golden perfection. This isn’t just a dessert; it’s a memory in the making, a new tradition waiting to be born in your home.
Now, let’s talk about how to enjoy these masterpieces and how you can make them uniquely yours. While utterly divine on their own, whether served chilled straight from the fridge or slightly warmed in the microwave for a gooier, more comforting experience, there are countless ways to elevate them further. I absolutely adore them with a generous scoop of good quality vanilla bean ice cream, allowing the cold creaminess to perfectly cut through the richness of the bars. A dollop of freshly whipped cream, perhaps infused with a hint of maple syrup or a dash of bourbon, also makes for an excellent companion. For a truly indulgent experience, a drizzle of extra caramel sauce (because can you ever have too much caramel?) or a sprinkle of flaky sea salt right before serving will awaken the taste buds and add another layer of complexity.
And don’t be afraid to experiment with variations! This recipe is a fantastic canvas for your culinary creativity. Consider swapping out the Granny Smith apples for a mix of Honeycrisp and Fuji for a sweeter, crisper apple layer, or even adding a touch of pear for an interesting twist. For the crust, a handful of finely chopped toasted pecans or walnuts can be folded in, adding an extra dimension of nutty flavor and crunch. A sprinkle of coarse sugar on top of the crust before baking will give it a beautiful sparkle and even more texture. If you’re feeling adventurous, a hint of cardamom or allspice in the apple mixture can bring a subtle, exotic warmth. You could even try a graham cracker crust instead of the shortbread for a slightly different take. The possibilities are truly endless, and I encourage you to make this recipe your own, adapting it to your personal preferences and seasonal availability.
Ultimately, my greatest hope is that you feel inspired to dive into your kitchen and give these incredible bars a try. Trust me, the aroma alone will be enough to win over anyone who walks through your door. They are the quintessential autumn treat, perfect for Thanksgiving gatherings, potlucks, or simply a cozy evening with family. I’m confident that once you take that first bite, you’ll understand why I’m so passionate about them. So, gather your ingredients, put on your favorite playlist, and prepare to create something truly special. Once you’ve baked and savored your batch of Caramel Apple Cheesecake Bars, please, please come back and share your experience with me! I’d love to hear how they turned out for you, what variations you tried, and what moments of joy they brought to your home. Happy baking, my friends!
Caramel Apple Cheesecake Bars
These Caramel Apple Cheesecake Bars are a harmonious symphony of autumn’s cherished flavors. Imagine rich, velvety cheesecake swirled with luscious caramel and dotted with tender apple pieces, all resting atop a buttery graham cracker crust. This extraordinary dessert combines crisp apples and creamy cheesecake for the perfect fall treat.
Ingredients
Instructions
Important Information
Nutrition Facts (Per Serving)
It is important to consider this information as approximate and not to use it as definitive health advice.
Allergy Information
Please check ingredients for potential allergens and consult a health professional if in doubt.


Leave a Comment