
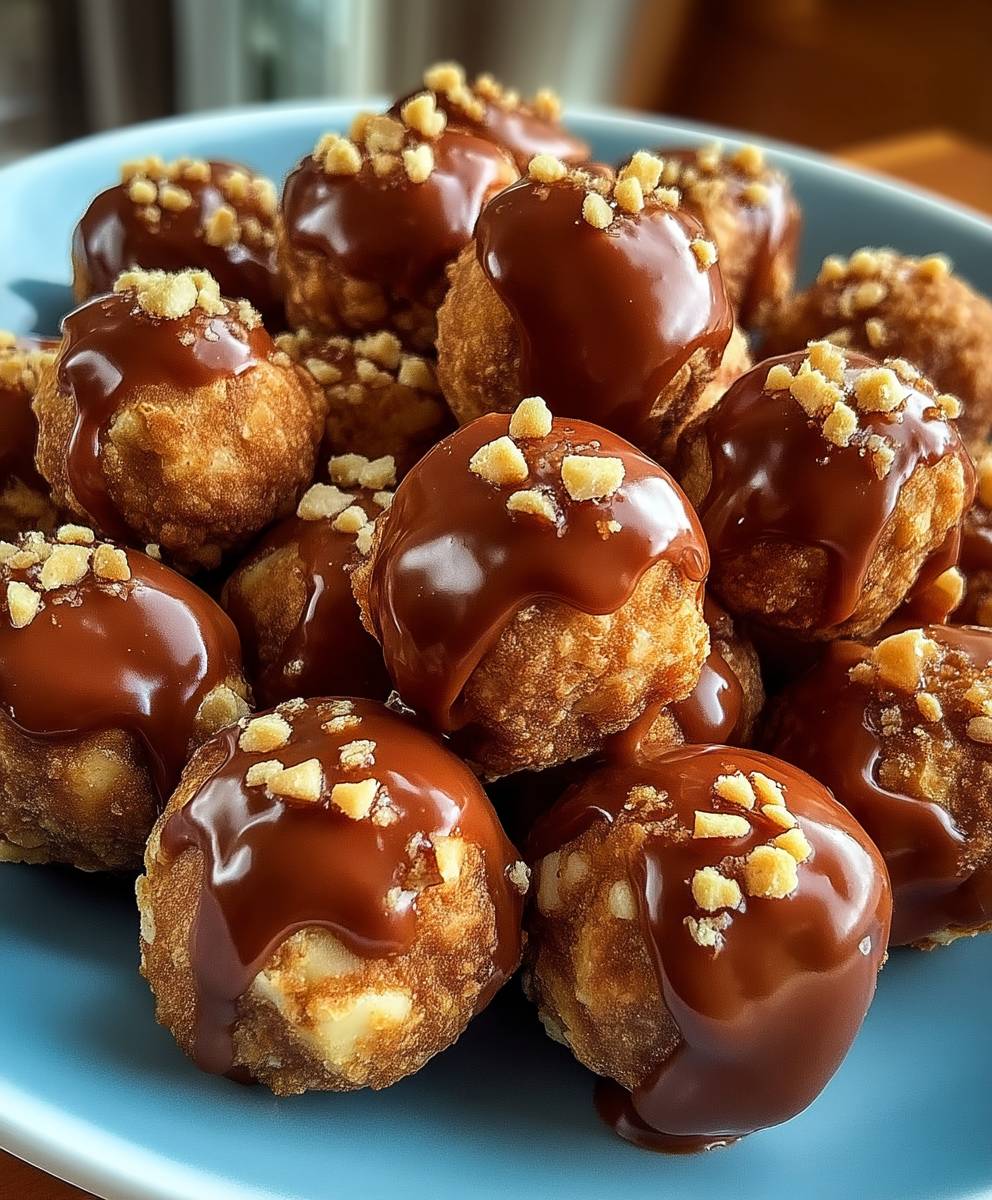
Butterfinger Balls: Prepare to be amazed by a no-bake dessert that’s ridiculously easy to make and even more ridiculously delicious! Imagine the irresistible crunch of a Butterfinger candy bar, transformed into a bite-sized ball of pure bliss. These aren’t just any treat; they’re a nostalgic trip back to childhood, reimagined for the modern dessert lover.
While the Butterfinger candy bar itself has a rich history dating back to the 1920s, these Butterfinger Balls are a more recent, ingenious invention. They capitalize on the candy’s unique flavor profile – that perfect balance of peanut butter and crispy, flaky goodness. The beauty of this recipe lies in its simplicity. No oven required! Just a few ingredients, a little mixing, and you’re on your way to a sweet escape.
People adore these little spheres of happiness for several reasons. First, the taste is undeniably addictive. The combination of peanut butter, chocolate, and that signature Butterfinger crunch is a symphony of flavors and textures. Second, they are incredibly convenient. Perfect for potlucks, holiday gatherings, or a simple weeknight treat, Butterfinger Balls are always a crowd-pleaser. And let’s be honest, who can resist a no-bake dessert that comes together in minutes? Get ready to experience a dessert that’s both fun to make and even more fun to eat!

Ingredients:
- 16 ounces Butterfinger candy bars, finely crushed (about 10 fun-size bars)
- 8 ounces cream cheese, softened
- 1 teaspoon vanilla extract
- 1/4 teaspoon salt
- 12 ounces chocolate candy coating (milk, dark, or white), melted
- Optional: Sprinkles, chopped nuts, or extra crushed Butterfinger for decoration
Preparing the Butterfinger Mixture
Alright, let’s get started! The first step is to create the base for our Butterfinger Balls. This involves combining the crushed Butterfinger candy bars with cream cheese and a few other ingredients to bind it all together. Trust me, this part is super important for achieving that perfect, melt-in-your-mouth texture.
- Crush the Butterfinger Candy Bars: This is probably the most labor-intensive part, but it’s worth it! You want the Butterfinger candy bars to be finely crushed. I find the easiest way to do this is to place the candy bars in a large zip-top bag and use a rolling pin or meat mallet to crush them. You can also use a food processor, but be careful not to over-process them into a paste. We want small, distinct pieces. Aim for a texture similar to coarse breadcrumbs. The finer the crush, the smoother the final ball will be.
- Soften the Cream Cheese: Make sure your cream cheese is properly softened. This is crucial for a smooth and even mixture. Take the cream cheese out of the refrigerator at least an hour before you plan to start. If you’re short on time, you can microwave it in 15-second intervals, checking and stirring in between, until it’s soft but not melted. Remember, melted cream cheese will change the consistency of the final product.
- Combine Ingredients: In a large mixing bowl, combine the crushed Butterfinger candy bars, softened cream cheese, vanilla extract, and salt. Use a hand mixer or stand mixer to thoroughly combine all the ingredients. Start on low speed to prevent the crushed Butterfinger from flying everywhere, then gradually increase the speed until the mixture is smooth and well combined. You should have a thick, slightly sticky dough.
- Chill the Mixture: This is a very important step! Cover the bowl with plastic wrap and refrigerate the Butterfinger mixture for at least 30 minutes, or even better, an hour. Chilling the mixture makes it much easier to roll into balls. The cold temperature will firm up the cream cheese and help the balls hold their shape. Don’t skip this step, or you’ll end up with a sticky mess!
Forming the Butterfinger Balls
Now that our Butterfinger mixture is nicely chilled, we can move on to forming the balls. This is where the fun really begins! Get ready to get your hands a little sticky, but it’s all part of the process.
- Prepare Your Workspace: Line a baking sheet with parchment paper or wax paper. This will prevent the Butterfinger Balls from sticking to the sheet and make it easier to transfer them later.
- Scoop and Roll: Using a small cookie scoop (about 1 tablespoon size) or a spoon, scoop out portions of the chilled Butterfinger mixture. Roll each portion between your palms to form a smooth, round ball. Don’t worry if they’re not perfectly round; a little imperfection adds character! Aim for consistent sizes so they look uniform.
- Place on Baking Sheet: Place each formed Butterfinger Ball onto the prepared baking sheet, leaving a little space between each one.
- Chill Again (Optional but Recommended): For even better results, place the baking sheet with the formed Butterfinger Balls back into the refrigerator for another 15-20 minutes. This will help them firm up even more before we dip them in chocolate. This step is especially helpful if your kitchen is warm.
Melting the Chocolate and Dipping
Alright, time for the chocolate! This is where our Butterfinger Balls transform from tasty treats into irresistible masterpieces. Melting the chocolate properly is key to a smooth, glossy coating. And the dipping process? Well, that’s where your creativity can shine!
- Melt the Chocolate Candy Coating: There are a couple of ways to melt the chocolate candy coating. My preferred method is using a double boiler. Fill a saucepan with about an inch of water and bring it to a simmer. Place a heat-safe bowl on top of the saucepan, making sure the bottom of the bowl doesn’t touch the water. Add the chocolate candy coating to the bowl and stir occasionally until it’s completely melted and smooth. Alternatively, you can melt the chocolate in the microwave. Place the chocolate in a microwave-safe bowl and microwave in 30-second intervals, stirring in between, until it’s melted and smooth. Be careful not to overheat the chocolate, as it can burn.
- Prepare Your Dipping Station: Once the chocolate is melted, set up your dipping station. Have the baking sheet with the Butterfinger Balls nearby, along with any decorations you plan to use (sprinkles, chopped nuts, extra crushed Butterfinger, etc.).
- Dip the Butterfinger Balls: Using a fork or dipping tools, carefully dip each Butterfinger Ball into the melted chocolate, making sure it’s completely coated. Gently tap off any excess chocolate.
- Decorate (Optional): Immediately sprinkle the dipped Butterfinger Balls with your desired decorations, such as sprinkles, chopped nuts, or extra crushed Butterfinger. The chocolate will set quickly, so you need to add the decorations right away.
- Place on Baking Sheet: Place the dipped and decorated Butterfinger Balls back onto the prepared baking sheet.
Setting and Storing
We’re almost there! Now we just need to let the chocolate set and then we can enjoy our delicious Butterfinger Balls. Proper storage is also important to keep them fresh and tasty.
- Let the Chocolate Set: Allow the chocolate to set completely. You can either let them set at room temperature, which will take about an hour, or you can place the baking sheet in the refrigerator for about 15-20 minutes to speed up the process.
- Store Properly: Once the chocolate is set, store the Butterfinger Balls in an airtight container in the refrigerator. They will keep for up to a week. You can also freeze them for longer storage. Just make sure they are well-sealed to prevent freezer burn.
Tips and Variations
Want to take your Butterfinger Balls to the next level? Here are a few tips and variations to try:
- Different Chocolate: Experiment with different types of chocolate candy coating. Milk chocolate is classic, but dark chocolate adds a richer flavor, and white chocolate is a fun and festive option. You can even swirl different chocolates together for a marbled effect.
- Peanut Butter: Add a tablespoon or two of peanut butter to the cream cheese mixture for an extra peanut butter flavor boost.
- Pretzel Pieces: Mix in some crushed pretzel pieces with the crushed Butterfinger for a salty-sweet combination.
- Espresso Powder: A pinch of espresso powder in the chocolate coating will enhance the chocolate flavor and add a subtle coffee note.
- Drizzle: After the chocolate has set, drizzle with a contrasting color of melted chocolate for a beautiful presentation.
- Lollipop Sticks: Insert lollipop sticks into the Butterfinger Balls before dipping them in chocolate to make Butterfinger Ball pops.
- Mini Butterfinger Balls: Use a smaller cookie scoop to make mini Butterfinger Balls for bite-sized treats.
Troubleshooting
Sometimes things don’t go exactly as planned. Here are a few common issues and how to fix them:
- Chocolate is too thick: If the chocolate is too thick to dip easily, add a teaspoon of vegetable oil or shortening to the melted chocolate and stir until smooth.
- Chocolate is seizing: If the chocolate seizes (becomes grainy and hard), it’s likely because it got too hot or came into contact with water. Unfortunately, there’s no real fix for seized chocolate. You’ll need to start with fresh chocolate.
- Butterfinger Balls are too sticky: If the Butterfinger mixture is too sticky to roll easily, add a little more crushed Butterfinger candy bars until it reaches a workable consistency. Make sure to chill the mixture well.
- Chocolate is cracking: If the chocolate is cracking after it sets, it’s likely because the Butterfinger Balls were too cold when you dipped them. Try letting them sit at room temperature for a few minutes before dipping.
Enjoy!
And there you have it! Delicious, homemade Butterfinger Balls that are sure to be a hit with everyone. Enjoy making and
Conclusion:
Okay, friends, let’s be honest: you’ve scrolled this far because you’re intrigued, right? And trust me, you should be! These Butterfinger Balls are not just another dessert recipe; they’re a bite-sized explosion of peanut butter and chocolate bliss. The combination of the crunchy Butterfinger candy, the creamy peanut butter, and the smooth chocolate coating is simply irresistible. It’s the perfect no-bake treat for parties, holidays, or just a sweet craving that needs immediate attention. Seriously, these little guys are dangerously addictive!
But what makes these Butterfinger Balls a must-try? First, the simplicity. We’re talking minimal ingredients and virtually no cooking involved. That’s a win in my book any day! Second, the flavor profile is a guaranteed crowd-pleaser. Who doesn’t love the iconic taste of Butterfinger? And third, they’re incredibly versatile. You can easily customize them to your liking.
Serving Suggestions and Variations:
Need some inspiration? Here are a few ideas to get you started:
- Classic Presentation: Serve them chilled on a platter for an elegant touch. A sprinkle of sea salt on top adds a delightful contrast to the sweetness.
- Party Favors: Package them in small cellophane bags tied with a ribbon for adorable party favors.
- Ice Cream Topping: Crumble them over your favorite ice cream for an extra layer of decadence.
- Coffee Companion: Enjoy them with a cup of hot coffee or tea for a cozy afternoon treat.
- Chocolate Variations: Experiment with different types of chocolate for the coating. Dark chocolate adds a sophisticated bitterness, while white chocolate creates a creamy sweetness.
- Nutty Additions: Add chopped peanuts or other nuts to the peanut butter mixture for extra crunch and flavor.
- Pretzel Crunch: Incorporate crushed pretzels into the mixture for a salty-sweet twist.
- Spice it Up: A pinch of cinnamon or cayenne pepper in the peanut butter mixture can add a subtle warmth and complexity.
The possibilities are endless! Don’t be afraid to get creative and experiment with different flavors and textures to create your own signature version of these delightful treats. Think about adding a layer of caramel, or even a hint of espresso powder to the chocolate. The key is to have fun and let your taste buds guide you.
I truly believe that this recipe for Butterfinger Balls will become a staple in your dessert repertoire. It’s quick, easy, delicious, and endlessly adaptable. What more could you ask for? So, gather your ingredients, put on some music, and get ready to create some magic in the kitchen. I promise you won’t regret it!
Now, it’s your turn! I’m so excited for you to try this recipe and experience the joy of these little peanut butter and chocolate gems. Once you’ve made them (and devoured a few, of course!), I’d love to hear about your experience. Did you try any of the variations? Did you add your own special touch? Share your photos and stories in the comments below! Let’s create a community of Butterfinger Ball enthusiasts and spread the sweetness together. Happy baking (or rather, no-baking)!
I can’t wait to see what you create! Remember to tag me in your photos on social media so I can admire your creations. Happy snacking!
Butterfinger Balls: The Ultimate No-Bake Recipe
Easy, delicious Butterfinger Balls made with crushed candy bars, cream cheese, and a chocolate coating. Perfect for parties, holidays, or a sweet treat!
Ingredients
- 16 ounces Butterfinger candy bars, finely crushed (about 10 fun-size bars)
- 8 ounces cream cheese, softened
- 1 teaspoon vanilla extract
- 1/4 teaspoon salt
- 12 ounces chocolate candy coating (milk, dark, or white), melted
- Optional: Sprinkles, chopped nuts, or extra crushed Butterfinger for decoration
Instructions
- Crush the Butterfinger Candy Bars: Place Butterfinger candy bars in a zip-top bag and crush with a rolling pin or meat mallet. Alternatively, use a food processor, being careful not to over-process.
- Soften the Cream Cheese: Ensure cream cheese is softened by leaving it at room temperature for at least an hour or microwaving in 15-second intervals until soft.
- Combine Ingredients: In a large mixing bowl, combine crushed Butterfinger candy bars, softened cream cheese, vanilla extract, and salt. Mix with a hand mixer or stand mixer until smooth and well combined.
- Chill the Mixture: Cover the bowl with plastic wrap and refrigerate for at least 30 minutes (or up to an hour).
- Prepare Your Workspace: Line a baking sheet with parchment paper or wax paper.
- Scoop and Roll: Using a small cookie scoop or spoon, scoop portions of the chilled Butterfinger mixture and roll into smooth, round balls.
- Place on Baking Sheet: Place each formed Butterfinger Ball onto the prepared baking sheet, leaving space between each one.
- Chill Again (Optional): Place the baking sheet with the formed Butterfinger Balls back into the refrigerator for another 15-20 minutes.
- Melt the Chocolate Candy Coating: Melt the chocolate candy coating using a double boiler or in the microwave in 30-second intervals, stirring in between.
- Prepare Your Dipping Station: Have the baking sheet with the Butterfinger Balls nearby, along with any decorations you plan to use.
- Dip the Butterfinger Balls: Using a fork or dipping tools, carefully dip each Butterfinger Ball into the melted chocolate, making sure it’s completely coated. Gently tap off any excess chocolate.
- Decorate (Optional): Immediately sprinkle the dipped Butterfinger Balls with your desired decorations.
- Place on Baking Sheet: Place the dipped and decorated Butterfinger Balls back onto the prepared baking sheet.
- Let the Chocolate Set: Allow the chocolate to set completely at room temperature (about an hour) or in the refrigerator (15-20 minutes).
- Store Properly: Store the Butterfinger Balls in an airtight container in the refrigerator for up to a week, or freeze for longer storage.
Notes
- Make sure the cream cheese is properly softened for a smooth mixture.
- Chilling the Butterfinger mixture is crucial for easy rolling.
- Be careful not to overheat the chocolate when melting.
- Decorate the dipped Butterfinger Balls immediately after dipping, as the chocolate sets quickly.
- Experiment with different types of chocolate and decorations for variations.

Leave a Comment