
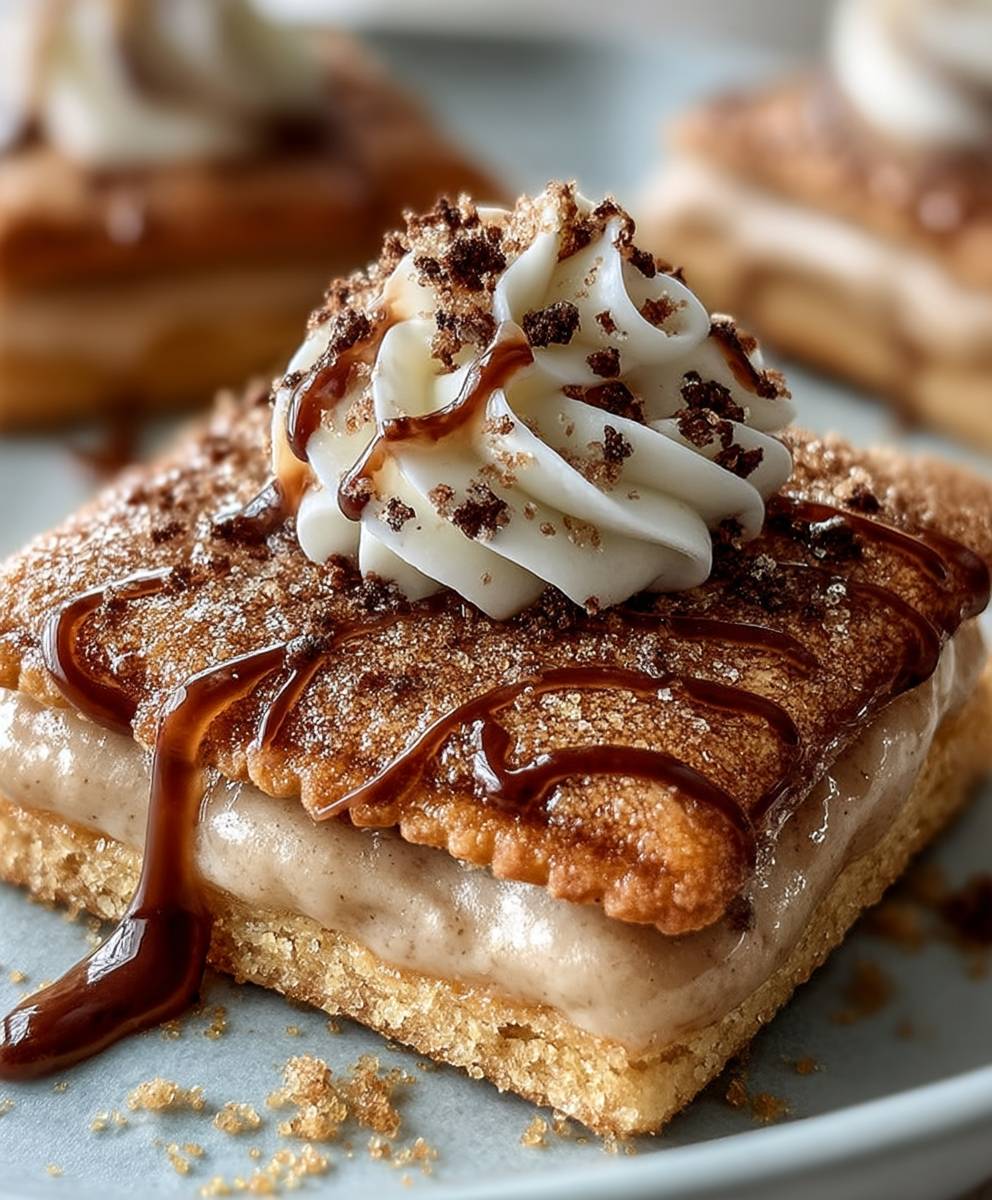
Brown Sugar Pop Tart Cookies: Prepare to be transported back to your childhood with a sophisticated twist! Remember the joy of unwrapping a warm, frosted Pop Tart? Now, imagine that same comforting flavor baked into a soft, chewy cookie. These aren’t your average cookies; they’re a nostalgic hug in every bite.
While the classic Pop Tart emerged as a convenient breakfast treat in the 1960s, offering a quick and easy way to enjoy a pastry on the go, our Brown Sugar Pop Tart Cookies elevate that concept to a whole new level. We’ve taken the essence of that beloved brown sugar filling and transformed it into a delectable cookie that’s perfect for an afternoon treat, a lunchbox surprise, or a delightful dessert.
What makes these cookies so irresistible? It’s the perfect combination of textures and flavors. The soft, slightly chewy cookie base is infused with the rich, caramel-like sweetness of brown sugar. The simple glaze adds a touch of elegance and extra sweetness, making each bite a truly satisfying experience. People adore these cookies because they offer a familiar comfort with a homemade touch. They’re easy to make, incredibly delicious, and guaranteed to bring a smile to anyone’s face. Get ready to bake up a batch of pure happiness!

Ingredients:
- For the Cookie Dough:
- 2 ½ cups all-purpose flour, plus more for dusting
- 1 teaspoon baking powder
- ½ teaspoon baking soda
- ½ teaspoon salt
- 1 cup (2 sticks) unsalted butter, softened
- ¾ cup granulated sugar
- ¾ cup packed light brown sugar
- 2 large eggs
- 1 teaspoon vanilla extract
- For the Brown Sugar Filling:
- ½ cup (1 stick) unsalted butter, softened
- 1 cup packed light brown sugar
- 2 tablespoons all-purpose flour
- 1 tablespoon milk
- ½ teaspoon vanilla extract
- ¼ teaspoon salt
- For the Glaze:
- 2 cups powdered sugar
- 4-6 tablespoons milk, or more as needed
- ½ teaspoon vanilla extract
- Optional Sprinkles:
- Your favorite sprinkles for decorating
Preparing the Cookie Dough:
- In a medium bowl, whisk together the flour, baking powder, baking soda, and salt. This ensures that the leavening agents are evenly distributed throughout the dough.
- In a large bowl, cream together the softened butter, granulated sugar, and brown sugar until light and fluffy. This usually takes about 3-5 minutes using an electric mixer. Make sure to scrape down the sides of the bowl occasionally to ensure everything is evenly mixed. The creaming process is crucial for creating a tender cookie.
- Beat in the eggs one at a time, then stir in the vanilla extract. Ensure each egg is fully incorporated before adding the next. The vanilla extract adds a lovely depth of flavor to the cookies.
- Gradually add the dry ingredients to the wet ingredients, mixing on low speed until just combined. Be careful not to overmix the dough, as this can result in tough cookies. Overmixing develops the gluten in the flour, leading to a less tender texture.
- Divide the dough in half, flatten each half into a disc, wrap in plastic wrap, and refrigerate for at least 1 hour, or preferably 2 hours. This chilling time is essential for preventing the cookies from spreading too much during baking and also allows the flavors to meld together.
Making the Brown Sugar Filling:
- In a medium bowl, cream together the softened butter and brown sugar until smooth. This will form the base of our delicious filling.
- Add the flour, milk, vanilla extract, and salt, and mix until well combined. The flour helps to thicken the filling, while the milk adds moisture and helps to create a smooth consistency. The vanilla extract enhances the brown sugar flavor.
- Set the filling aside while you prepare the cookie dough for baking.
Assembling and Baking the Cookies:
- Preheat your oven to 375°F (190°C). Line baking sheets with parchment paper. Parchment paper prevents the cookies from sticking and makes cleanup a breeze.
- On a lightly floured surface, roll out one disc of dough to about ¼ inch thickness. Use a cookie cutter or a knife to cut out desired shapes. I like to use a rectangular cookie cutter to mimic the shape of a pop tart, but you can use any shape you like!
- Place half of the cut-out cookies onto the prepared baking sheets. These will be the bottom layer of our pop tart cookies.
- Spread a generous amount of the brown sugar filling onto each cookie, leaving a small border around the edges. Don’t be shy with the filling – it’s what makes these cookies so irresistible!
- Roll out the second disc of dough and cut out the same shapes as before. These will be the top layer of our cookies.
- Carefully place the top layer of dough over the filling, pressing the edges together to seal. You can use a fork to crimp the edges for a more decorative look and to ensure a good seal. This will prevent the filling from leaking out during baking.
- Use a toothpick or skewer to poke a few holes in the top of each cookie. This allows steam to escape during baking and prevents the cookies from puffing up too much.
- Bake for 10-12 minutes, or until the edges are lightly golden brown. Keep a close eye on them, as baking times may vary depending on your oven.
- Let the cookies cool on the baking sheets for a few minutes before transferring them to a wire rack to cool completely.
Preparing the Glaze:
- In a medium bowl, whisk together the powdered sugar, milk, and vanilla extract until smooth. Start with 4 tablespoons of milk and add more as needed to reach your desired consistency. The glaze should be thick enough to coat the cookies but thin enough to spread easily.
Glazing and Decorating:
- Once the cookies are completely cool, spread the glaze evenly over the top of each cookie.
- Immediately sprinkle with your favorite sprinkles, if desired. The glaze will set quickly, so it’s important to add the sprinkles right away.
- Let the glaze set completely before serving or storing. This usually takes about 30 minutes to an hour.
Tips for Success:
- Don’t overmix the dough: Overmixing develops the gluten in the flour, resulting in tough cookies. Mix until just combined.
- Chill the dough: Chilling the dough prevents the cookies from spreading too much during baking and allows the flavors to meld together.
- Use parchment paper: Parchment paper prevents the cookies from sticking and makes cleanup a breeze.
- Seal the edges well: Press the edges of the top and bottom layers of dough together firmly to prevent the filling from leaking out during baking.
- Poke holes in the top: Poking holes in the top of each cookie allows steam to escape during baking and prevents the cookies from puffing up too much.
- Let the cookies cool completely before glazing: Glazing warm cookies can cause the glaze to melt and run off.
Storage Instructions:
Store the baked and glazed cookies in an airtight container at room temperature for up to 3-4 days. They can also be frozen for longer storage. To freeze, wrap the cookies individually in plastic wrap and then place them in a freezer-safe container. Thaw at room temperature before serving.
Variations:
- Different Flavors: Experiment with different extracts in the dough and filling, such as almond, lemon, or maple.
- Different Fillings: Try using different fillings, such as jam, Nutella, or peanut butter.
- Different Glazes: Use a chocolate glaze or a flavored glaze, such as lemon or maple.
- Add Nuts: Add chopped nuts to the filling or sprinkle them on top of the glaze.
Troubleshooting:
- Cookies are spreading too much: Make sure the dough is properly chilled. You can also add a tablespoon or two of flour to the dough if it seems too soft.
- Filling is leaking out: Make sure you are sealing the edges of the cookies well. You can also try using a slightly thicker filling.
- Cookies are burning: Lower the oven temperature and bake for a longer time.
- Glaze is too thick: Add a little more milk to thin it out.
- Glaze is too thin: Add a little more powdered sugar to thicken it up.
Conclusion:
Okay, friends, let’s be honest – you’ve scrolled this far because something about these Brown Sugar Pop Tart Cookies has whispered sweet nothings in your ear. And I’m here to tell you, that whisper is absolutely right! These aren’t just cookies; they’re a nostalgic hug in every bite, a delightful twist on a childhood favorite that’s surprisingly easy to whip up. The combination of the buttery, melt-in-your-mouth cookie base with that rich, caramelly brown sugar filling is simply irresistible. Trust me, once you try them, you’ll understand why I’m so enthusiastic.
But why are these Brown Sugar Pop Tart Cookies a must-try? It’s more than just the flavor. It’s the simplicity. We’re talking about a recipe that uses ingredients you probably already have in your pantry. No fancy techniques, no complicated steps, just pure baking joy. Plus, they’re incredibly versatile!
Serving Suggestions and Variations:
Think of these cookies as a blank canvas for your culinary creativity. Want to elevate them even further? Here are a few ideas:
* Ice Cream Sandwich Extravaganza: Let the cookies cool completely, then sandwich a scoop of vanilla bean or brown sugar cinnamon ice cream between two for an unforgettable dessert.
* Drizzle Delight: A simple glaze of powdered sugar and milk, or even a drizzle of melted white chocolate, adds a touch of elegance and extra sweetness.
* Nutty Nuance: Add chopped pecans or walnuts to the cookie dough for a delightful crunch and nutty flavor.
* Spice It Up: A pinch of cinnamon or nutmeg in the dough or filling will enhance the warm, comforting flavors.
* Fruity Fun: A thin layer of raspberry or strawberry jam under the brown sugar filling adds a burst of fruity tanginess.
* Mini Masterpieces: Make them smaller for bite-sized treats that are perfect for parties or lunchboxes.
* Holiday Cheer: Use festive sprinkles or cookie cutters to adapt them for any holiday occasion.
These Brown Sugar Pop Tart Cookies are also fantastic with a cold glass of milk, a warm cup of coffee, or even a scoop of ice cream. They’re perfect for an afternoon treat, a dessert after dinner, or a special occasion. They’re also a great homemade gift for friends and family.
I truly believe that baking should be fun and accessible, and this recipe embodies that philosophy perfectly. It’s a chance to create something delicious and share it with the people you love.
So, what are you waiting for? Preheat that oven, gather your ingredients, and get ready to experience the magic of these Brown Sugar Pop Tart Cookies. I promise you won’t be disappointed.
And now, for the most important part: I want to hear about your baking adventures! Did you try the recipe? Did you make any variations? What did your family and friends think? Share your photos, your stories, and your tips in the comments below. Let’s create a community of cookie lovers and inspire each other to bake the world a better place, one delicious cookie at a time. Happy baking!
Brown Sugar Pop Tart Cookies: The Ultimate Recipe & Baking Guide
Buttery cookies filled with a rich brown sugar filling, topped with a sweet glaze and sprinkles.
Ingredients
- All-purpose flour: 2 ½ cups, plus more for dusting
- Baking powder: 1 teaspoon
- Baking soda: ½ teaspoon
- Salt: ½ teaspoon
- Unsalted butter: 1 cup (2 sticks), softened
- Granulated sugar: ¾ cup
- Light brown sugar: ¾ cup, packed
- Large eggs: 2
- Vanilla extract: 1 teaspoon
- Unsalted butter: ½ cup (1 stick), softened
- Light brown sugar: 1 cup, packed
- All-purpose flour: 2 tablespoons
- Milk: 1 tablespoon
- Vanilla extract: ½ teaspoon
- Salt: ¼ teaspoon
- Powdered sugar: 2 cups
- Milk: 4-6 tablespoons, or more as needed
- Vanilla extract: ½ teaspoon
- Sprinkles: Your favorite sprinkles for decorating
Instructions
- Prepare the Cookie Dough: In a medium bowl, whisk together the flour, baking powder, baking soda, and salt.
- In a large bowl, cream together the softened butter, granulated sugar, and brown sugar until light and fluffy (3-5 minutes with an electric mixer). Scrape down the sides of the bowl.
- Beat in the eggs one at a time, then stir in the vanilla extract.
- Gradually add the dry ingredients to the wet ingredients, mixing on low speed until just combined. Do not overmix.
- Divide the dough in half, flatten each half into a disc, wrap in plastic wrap, and refrigerate for at least 1 hour, or preferably 2 hours.
- Make the Brown Sugar Filling: In a medium bowl, cream together the softened butter and brown sugar until smooth.
- Add the flour, milk, vanilla extract, and salt, and mix until well combined.
- Set the filling aside.
- Assemble and Bake the Cookies: Preheat oven to 375°F (190°C). Line baking sheets with parchment paper.
- On a lightly floured surface, roll out one disc of dough to about ¼ inch thickness. Cut out desired shapes with a cookie cutter or knife.
- Place half of the cut-out cookies onto the prepared baking sheets (bottom layer).
- Spread a generous amount of the brown sugar filling onto each cookie, leaving a small border around the edges.
- Roll out the second disc of dough and cut out the same shapes as before (top layer).
- Carefully place the top layer of dough over the filling, pressing the edges together to seal. Crimp the edges with a fork for a decorative look.
- Use a toothpick or skewer to poke a few holes in the top of each cookie.
- Bake for 10-12 minutes, or until the edges are lightly golden brown.
- Let the cookies cool on the baking sheets for a few minutes before transferring them to a wire rack to cool completely.
- Prepare the Glaze: In a medium bowl, whisk together the powdered sugar, milk, and vanilla extract until smooth. Start with 4 tablespoons of milk and add more as needed to reach your desired consistency.
- Glaze and Decorate: Once the cookies are completely cool, spread the glaze evenly over the top of each cookie.
- Immediately sprinkle with your favorite sprinkles, if desired.
- Let the glaze set completely before serving or storing (30 minutes to an hour).
Notes
- Don’t overmix the dough: Overmixing develops the gluten in the flour, resulting in tough cookies. Mix until just combined.
- Chill the dough: Chilling the dough prevents the cookies from spreading too much during baking and allows the flavors to meld together.
- Use parchment paper: Parchment paper prevents the cookies from sticking and makes cleanup a breeze.
- Seal the edges well: Press the edges of the top and bottom layers of dough together firmly to prevent the filling from leaking out during baking.
- Poke holes in the top: Poking holes in the top of each cookie allows steam to escape during baking and prevents the cookies from puffing up too much.
- Let the cookies cool completely before glazing: Glazing warm cookies can cause the glaze to melt and run off.
- Storage Instructions: Store the baked and glazed cookies in an airtight container at room temperature for up to 3-4 days. They can also be frozen for longer storage. To freeze, wrap the cookies individually in plastic wrap and then place them in a freezer-safe container. Thaw at room temperature before serving.
- Variations:
- Different Flavors: Experiment with different extracts in the dough and filling, such as almond, lemon, or maple.
- Different Fillings: Try using different fillings, such as jam, Nutella, or peanut butter.
- Different Glazes: Use a chocolate glaze or a flavored glaze, such as lemon or maple.
- Add Nuts: Add chopped nuts to the filling or sprinkle them on top of the glaze.
- Troubleshooting:
- Cookies are spreading too much: Make sure the dough is properly chilled. You can also add a tablespoon or two of flour to the dough if it seems too soft.
- Filling is leaking out: Make sure you are sealing the edges of the cookies well. You can also try using a slightly thicker filling.
- Cookies are burning: Lower the oven temperature and bake for a longer time.
- Glaze is too thick: Add a little more milk to thin it out.
- Glaze is too thin: Add a little more powdered sugar to thicken it up.


Leave a Comment