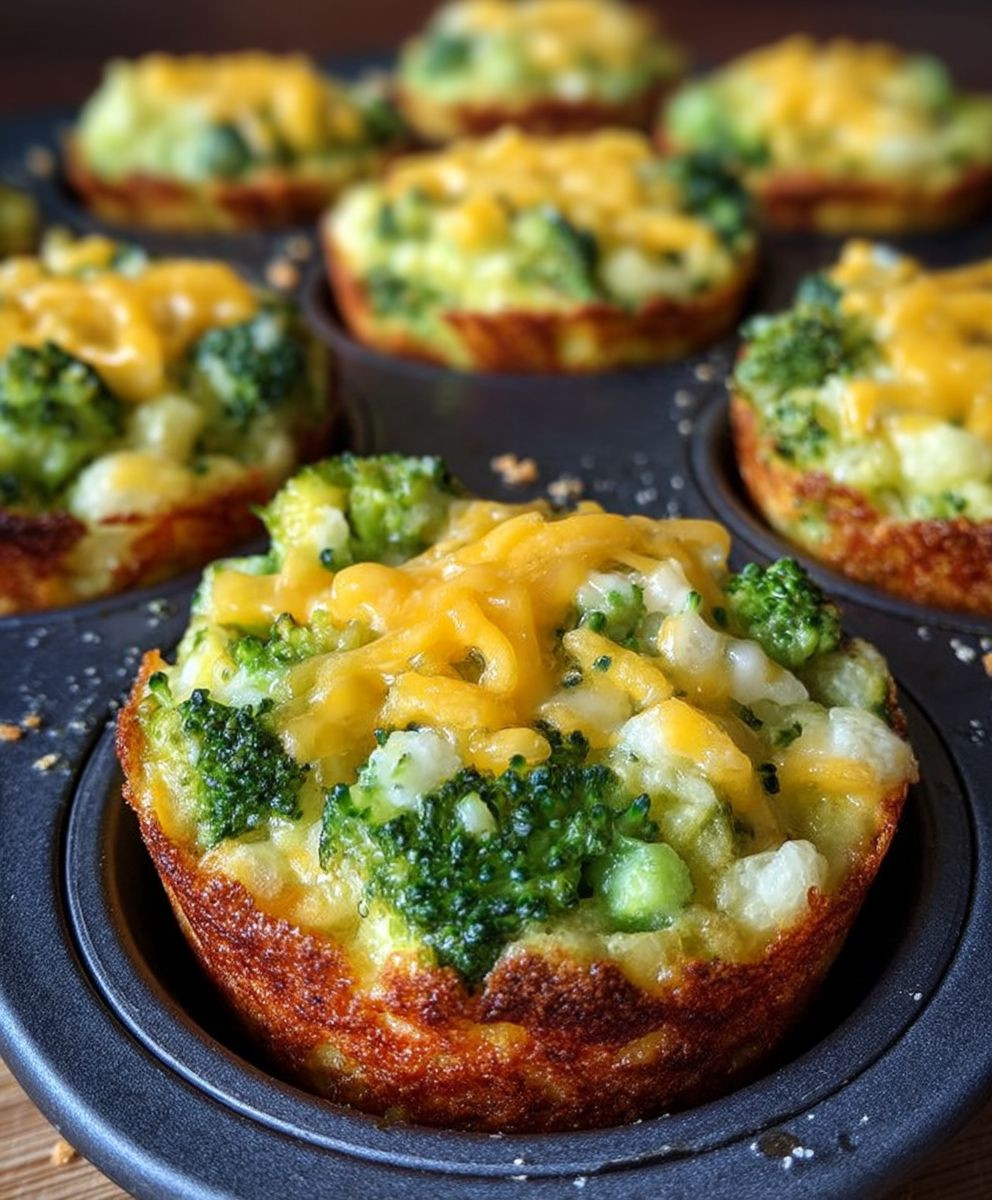
Broccoli Cheese Cups: Prepare to be amazed by these delightful, bite-sized morsels of cheesy goodness! Forget everything you thought you knew about broccoli – this recipe will convert even the staunchest vegetable skeptics. Imagine tender broccoli florets nestled in a creamy, cheddar-infused embrace, baked to golden perfection in convenient, individual cups.
While the exact origins of Broccoli Cheese Cups are shrouded in mystery, the combination of broccoli and cheese has been a beloved pairing for generations. It’s a marriage of textures and flavors that simply works. Think of classic broccoli cheese soup, or broccoli cheddar baked potatoes – the possibilities are endless! This particular iteration, the individual cup, elevates the experience, making it perfect for parties, potlucks, or even a quick and easy weeknight dinner.
What makes these Broccoli Cheese Cups so irresistible? It’s the perfect balance of healthy and indulgent. The broccoli provides a subtle earthiness and a satisfying crunch, while the cheese adds richness, creaminess, and that undeniable comfort food factor. They are incredibly easy to make, requiring minimal prep time and readily available ingredients. Plus, their individual portion size makes them ideal for controlling portions and preventing food waste. Get ready to experience a new family favorite!
Ingredients:
- For the Broccoli:
- 1 large head of broccoli, cut into florets (about 4 cups)
- 2 tablespoons olive oil
- 1/2 teaspoon garlic powder
- 1/4 teaspoon salt
- 1/4 teaspoon black pepper
- For the Cheese Sauce:
- 4 tablespoons unsalted butter
- 4 tablespoons all-purpose flour
- 2 cups milk (whole or 2%)
- 1/2 teaspoon salt
- 1/4 teaspoon black pepper
- 1/4 teaspoon nutmeg (optional, but highly recommended!)
- 2 cups shredded cheddar cheese (sharp or medium, your preference!)
- 1/2 cup shredded Gruyere cheese (optional, but adds a lovely depth of flavor)
- For the Egg Mixture:
- 4 large eggs
- 1/4 cup milk
- 1/4 teaspoon salt
- 1/8 teaspoon black pepper
- Other:
- Cooking spray
Preparing the Broccoli:
Okay, let’s start by getting our broccoli ready. This is a super simple step, but it’s crucial for adding that healthy and delicious element to our cups. I like to roast my broccoli because it brings out its natural sweetness and gives it a nice, slightly crispy texture. Trust me, it makes a difference!
- Preheat your oven to 400°F (200°C). This is important to ensure the broccoli roasts evenly.
- Prepare the broccoli florets. Make sure your broccoli is washed thoroughly and cut into bite-sized florets. You don’t want them too big, or they won’t cook properly.
- Toss with olive oil and seasonings. In a large bowl, toss the broccoli florets with the olive oil, garlic powder, salt, and pepper. Make sure the florets are evenly coated. This will help them roast beautifully and develop a delicious flavor.
- Roast the broccoli. Spread the broccoli florets in a single layer on a baking sheet. Roast for 15-20 minutes, or until the broccoli is tender-crisp and slightly browned. Keep an eye on them, as ovens can vary. You want them to be cooked through but not mushy.
- Set aside to cool slightly. Once the broccoli is roasted, remove it from the oven and let it cool slightly while you prepare the cheese sauce.
Making the Cheese Sauce:
Now for the star of the show – the cheese sauce! This is where the magic happens, and it’s surprisingly easy to make. Don’t be intimidated by the roux; I’ll walk you through it step by step. A good cheese sauce is creamy, cheesy, and oh-so-satisfying.
- Melt the butter. In a medium saucepan over medium heat, melt the butter. Make sure the butter doesn’t burn.
- Whisk in the flour. Once the butter is melted, whisk in the flour until it forms a smooth paste. This is called a roux, and it’s the base of our cheese sauce. Cook the roux for about 1-2 minutes, stirring constantly, to cook out the raw flour taste.
- Gradually add the milk. Slowly pour in the milk, whisking constantly to prevent lumps from forming. Continue whisking until the sauce is smooth and thickened. This may take a few minutes, so be patient.
- Season the sauce. Add the salt, pepper, and nutmeg (if using) to the sauce. Stir to combine.
- Melt the cheese. Reduce the heat to low and gradually add the cheddar cheese and Gruyere cheese (if using), stirring constantly until the cheese is melted and the sauce is smooth and creamy. Make sure the cheese is fully melted and incorporated into the sauce.
- Remove from heat. Once the cheese sauce is smooth and creamy, remove it from the heat and set aside.
Preparing the Egg Mixture:
The egg mixture is what will bind everything together and give our cups that lovely, slightly custardy texture. It’s a simple step, but it’s essential for creating a cohesive and delicious final product.
- Whisk the eggs. In a medium bowl, whisk together the eggs, milk, salt, and pepper until well combined.
Assembling the Broccoli Cheese Cups:
Alright, we’re in the home stretch! This is where we bring all the components together to create our beautiful broccoli cheese cups. It’s a simple process, but it’s important to layer everything correctly to ensure even distribution of flavors and textures.
- Preheat your oven to 350°F (175°C). We’re lowering the temperature slightly for this bake to ensure the eggs cook through without over-browning the cheese.
- Grease a muffin tin. Generously spray a 12-cup muffin tin with cooking spray. This will prevent the cups from sticking and make them easy to remove after baking.
- Divide the broccoli among the muffin cups. Distribute the roasted broccoli florets evenly among the muffin cups. You want each cup to be about half full of broccoli.
- Pour the cheese sauce over the broccoli. Pour the cheese sauce over the broccoli in each muffin cup, filling them about three-quarters full. Make sure the cheese sauce is evenly distributed.
- Pour the egg mixture over the cheese sauce. Carefully pour the egg mixture over the cheese sauce in each muffin cup, filling them almost to the top. Be careful not to overfill the cups, as they may overflow during baking.
- Bake the cups. Bake for 25-30 minutes, or until the cups are set and lightly golden brown on top. A toothpick inserted into the center of a cup should come out clean.
- Let cool slightly. Remove the muffin tin from the oven and let the cups cool in the tin for a few minutes before transferring them to a wire rack to cool completely. This will help them set up properly and prevent them from falling apart.
Serving and Storage:
Now for the best part – enjoying your delicious broccoli cheese cups! These are perfect as a side dish, a light lunch, or even a snack. They’re also great for meal prepping, as they reheat beautifully.
- Serving: Serve the broccoli cheese cups warm or at room temperature. They’re delicious on their own, but you can also pair them with a salad or a piece of grilled chicken or fish for a complete meal.
- Storage: Store any leftover broccoli cheese cups in an airtight container in the refrigerator for up to 3 days.
- Reheating: To reheat, you can microwave them for a minute or two, or bake them in a preheated oven at 350°F (175°C) for about 10-15 minutes, or until heated through.
Tips and Variations:
Want to customize your broccoli cheese cups? Here are a few ideas:
- Add some protein: Stir in some cooked and crumbled bacon, ham, or sausage to the cheese sauce for a heartier cup.
- Spice it up: Add a pinch of red pepper flakes to the cheese sauce for a little kick.
- Use different cheeses: Experiment with different types of cheese, such as Monterey Jack, Pepper Jack, or Gouda.
- Add vegetables: Add other vegetables, such as chopped onions, bell peppers, or mushrooms, to the broccoli.
- Make it gluten-free: Use a gluten-free all-purpose flour blend in the cheese sauce.
Enjoy your Broccoli Cheese Cups!

Conclusion:
These Broccoli Cheese Cups are truly a must-try recipe, and I’m not just saying that! They’re the perfect blend of healthy and comforting, offering a delightful way to sneak in some extra veggies while satisfying those cheesy cravings. The ease of preparation makes them ideal for busy weeknights, and their adorable individual portions are perfect for everything from kids’ lunches to elegant appetizers. Seriously, what’s not to love?
Why are these Broccoli Cheese Cups a game-changer? They’re versatile, delicious, and incredibly simple. The combination of tender broccoli florets, creamy cheese, and a hint of savory seasoning creates a flavor explosion that will have everyone reaching for seconds. Plus, they’re naturally gluten-free (if you use gluten-free breadcrumbs or omit them altogether!), making them a great option for those with dietary restrictions.
But the best part? You can totally customize them to your liking!
Serving Suggestions and Variations:
* Spice it up! Add a pinch of red pepper flakes or a dash of hot sauce to the cheese mixture for a little kick.
* Protein Power: Stir in some cooked and crumbled bacon, diced ham, or shredded chicken for a heartier meal.
* Veggie Variety: Swap out some of the broccoli for other vegetables like cauliflower, carrots, or bell peppers. Just make sure they’re finely chopped or steamed beforehand.
* Crustless Option: For a truly low-carb version, skip the breadcrumbs altogether. The cheese will still create a lovely, slightly crispy exterior.
* Dipping Delights: Serve these Broccoli Cheese Cups with a side of ranch dressing, honey mustard, or even a dollop of sour cream for dipping.
* Make it a Meal: Pair them with a simple salad or a bowl of soup for a complete and satisfying lunch or dinner.
* Freezer Friendly: These cups freeze beautifully! Simply let them cool completely, then wrap them individually in plastic wrap and store them in a freezer bag. Reheat them in the oven or microwave when you’re ready to enjoy.
I truly believe that once you try this recipe for Broccoli Cheese Cups, it will become a staple in your household. It’s a fantastic way to get your kids to eat their vegetables, a crowd-pleasing appetizer for parties, and a comforting snack for any time of day.
So, what are you waiting for? Gather your ingredients, preheat your oven, and get ready to experience the cheesy, broccoli-filled goodness! I’m confident that you’ll love them as much as I do.
And most importantly, I want to hear about your experience! Did you try any of the variations I suggested? Did you add your own special twist? Share your photos and comments below! Let me know what you think of these Broccoli Cheese Cups and how you made them your own. Happy cooking! I can’t wait to see your creations!
Broccoli Cheese Cups: Easy Recipe & Healthy Snack Idea
Delicious and easy Broccoli Cheese Cups! Roasted broccoli, creamy cheese sauce, and a light egg mixture baked in muffin tins. Perfect side, lunch, or snack!
Ingredients
Instructions
Recipe Notes
- Serving: Serve warm or at room temperature.
- Storage: Store leftovers in an airtight container in the refrigerator for up to 3 days.
- Reheating: Microwave for 1-2 minutes or bake at 350°F (175°C) for 10-15 minutes, or until heated through.
- Variations:
- Add cooked bacon, ham, or sausage to the cheese sauce.
- Add a pinch of red pepper flakes to the cheese sauce.
- Experiment with different cheeses like Monterey Jack, Pepper Jack, or Gouda.
- Add other vegetables like chopped onions, bell peppers, or mushrooms to the broccoli.
- Use gluten-free all-purpose flour for a gluten-free version.


Leave a Comment