
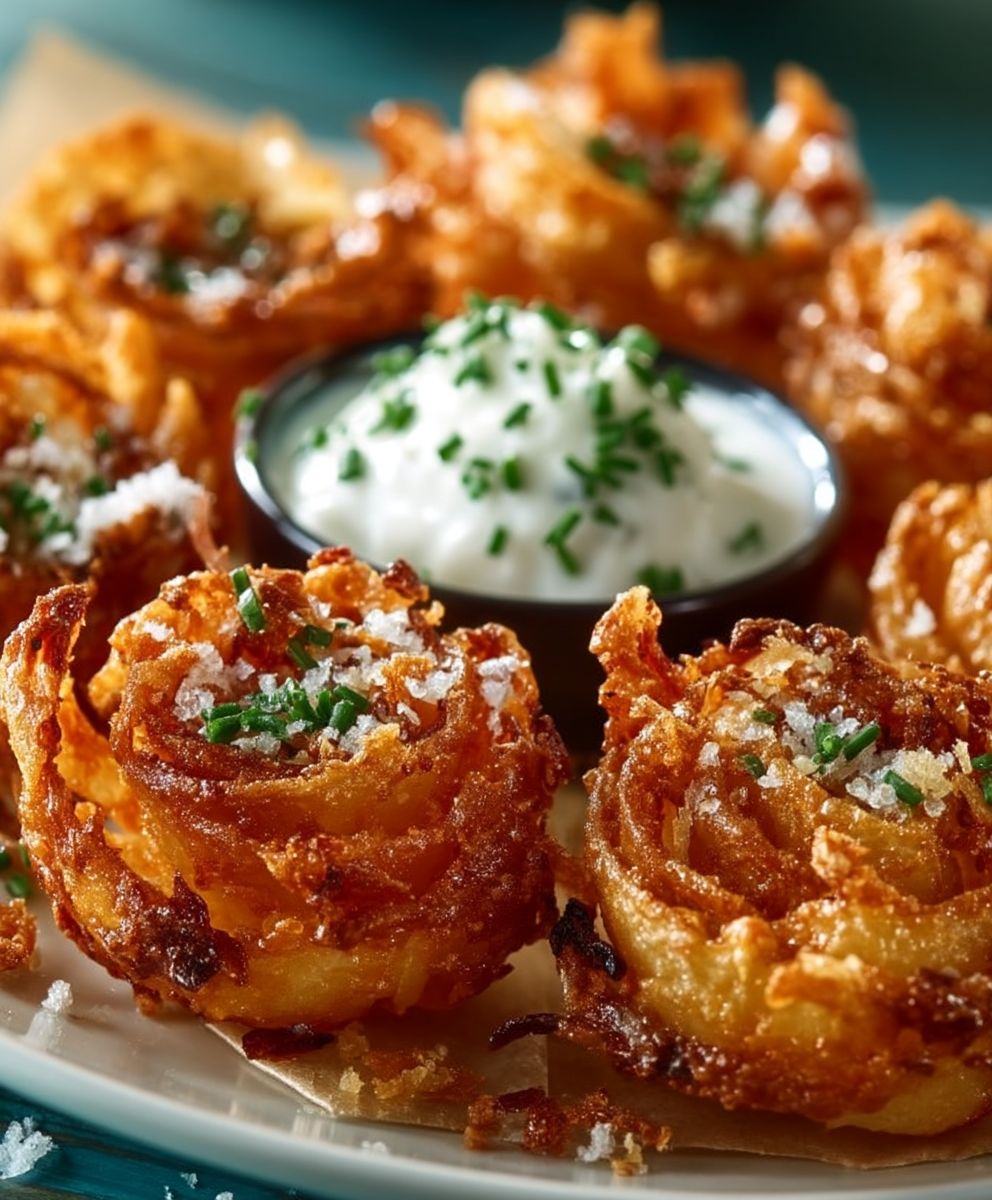
Blooming onion appetizer: Prepare to be amazed! Imagine a single, colossal onion transformed into a stunning, edible flower, its crispy petals radiating outwards, begging to be dipped into a creamy, zesty sauce. This isn’t just an appetizer; it’s a showstopper, a conversation starter, and a guaranteed crowd-pleaser. I’m thrilled to share my foolproof recipe for this iconic dish that’s sure to impress your family and friends.
While the exact origins of the blooming onion are debated, its popularity exploded thanks to the Outback Steakhouse in the 1980s. They trademarked their version as the “Bloomin’ Onion,” and it quickly became a signature item, synonymous with fun, casual dining. But the concept of deep-frying an onion in a creative way likely has roots in earlier culinary traditions, perhaps inspired by similar techniques used with other vegetables.
So, why is the blooming onion appetizer so beloved? It’s a symphony of textures and flavors! The crispy, golden-brown petals offer a satisfying crunch, while the tender onion inside provides a subtle sweetness. The dipping sauce, typically a horseradish-mayo blend, adds a tangy, creamy counterpoint that perfectly complements the richness of the fried onion. Plus, let’s be honest, there’s something undeniably fun and theatrical about pulling apart those petals and savoring each bite. It’s an interactive eating experience that makes any gathering feel a little more special. Get ready to create your own blooming masterpiece!

Ingredients:
- 1 large Vidalia onion (about 3-4 inches in diameter)
- 1 ½ cups all-purpose flour
- 2 tablespoons cornstarch
- 2 teaspoons paprika
- 1 teaspoon garlic powder
- 1 teaspoon onion powder
- 1 teaspoon dried oregano
- 1 teaspoon dried thyme
- ½ teaspoon cayenne pepper (optional, for heat)
- 1 teaspoon salt
- ½ teaspoon black pepper
- 1 cup buttermilk
- 1 large egg
- Vegetable oil, for frying (about 6-8 cups)
Dipping Sauce Ingredients:
- 1 cup mayonnaise
- ¼ cup ketchup
- 2 tablespoons horseradish sauce
- 1 teaspoon paprika
- ½ teaspoon garlic powder
- ¼ teaspoon cayenne pepper (optional, for heat)
- Salt and pepper to taste
Preparing the Blooming Onion:
- Chill the Onion: Place the onion in the freezer for about 30 minutes before you start. This helps it hold its shape better when you cut it. Don’t freeze it solid, just chill it!
- Prepare the Cutting Board: Remove the onion from the freezer and place it on a large cutting board. Peel the onion, leaving the root end intact. The root end is crucial – it holds the whole thing together!
- Make the First Cuts: Using a sharp knife (a chef’s knife works best), start about ½ inch from the root end and make your first cut down towards the cutting board. Be careful not to cut all the way through the root. You want to leave it connected.
- Continue Cutting: Rotate the onion about ¼ inch and make another cut, parallel to the first. Repeat this process all the way around the onion, creating a series of evenly spaced cuts. The more cuts you make, the more “petals” your blooming onion will have. Aim for about 16-20 cuts.
- Make the Second Layer of Cuts: Now, carefully flip the onion over. Repeat the cutting process, making cuts between the cuts you made in the first layer. This will create a staggered effect and give your blooming onion a fuller look. Again, be sure not to cut through the root end.
- Gently Separate the Petals: Gently use your fingers to separate the petals of the onion. Start from the center and work your way outwards. Be careful not to tear the petals. You want them to fan out nicely. If some petals are sticking together, you can carefully use a knife to separate them.
- Submerge in Ice Water: Place the cut onion in a large bowl filled with ice water. This will help the petals open up further and also help to remove some of the onion’s sharpness. Let it soak for about 30 minutes.
Preparing the Breading:
- Combine Dry Ingredients: In a large bowl, whisk together the flour, cornstarch, paprika, garlic powder, onion powder, oregano, thyme, cayenne pepper (if using), salt, and pepper. Make sure everything is well combined.
- Prepare the Wet Ingredients: In a separate bowl, whisk together the buttermilk and egg until well combined.
- Set Up Your Breading Station: Set up a breading station with the bowl of dry ingredients, the bowl of wet ingredients, and a clean plate or baking sheet.
Breading the Blooming Onion:
- Drain the Onion: Remove the onion from the ice water and gently pat it dry with paper towels. It’s important to get it as dry as possible so the breading adheres well.
- First Dip: Dredge the onion in the dry flour mixture, making sure to coat all the petals thoroughly, inside and out. Use your fingers to get the flour mixture into all the crevices.
- Second Dip: Dip the floured onion into the buttermilk-egg mixture, again making sure to coat all the petals completely. Let any excess drip off.
- Final Dip: Dredge the onion again in the dry flour mixture, ensuring a thick and even coating. This double breading is what gives the blooming onion its crispy texture.
- Rest the Breading: Place the breaded onion on a baking sheet and let it rest for about 15-20 minutes. This helps the breading adhere better and prevents it from falling off during frying.
Frying the Blooming Onion:
- Heat the Oil: Pour the vegetable oil into a large, deep pot or Dutch oven. Heat the oil over medium-high heat to 350°F (175°C). Use a deep-fry thermometer to monitor the temperature. It’s crucial to maintain the correct temperature for even cooking and crispy results.
- Carefully Lower the Onion: Carefully lower the breaded onion into the hot oil, using a large slotted spoon or spider. Make sure the onion is fully submerged in the oil.
- Fry Until Golden Brown: Fry the onion for about 6-8 minutes, or until it is golden brown and crispy. Use the slotted spoon to gently turn the onion occasionally to ensure even cooking.
- Remove and Drain: Carefully remove the fried onion from the oil and place it on a wire rack lined with paper towels to drain excess oil.
Making the Dipping Sauce:
- Combine Ingredients: In a medium bowl, combine the mayonnaise, ketchup, horseradish sauce, paprika, garlic powder, cayenne pepper (if using), salt, and pepper.
- Mix Well: Stir all the ingredients together until well combined.
- Adjust Seasoning: Taste the dipping sauce and adjust the seasoning as needed. Add more horseradish for a spicier kick, or more paprika for a smoky flavor.
- Chill (Optional): For best flavor, cover the dipping sauce and chill it in the refrigerator for at least 30 minutes before serving. This allows the flavors to meld together.
Serving the Blooming Onion:
- Place on a Platter: Transfer the fried blooming onion to a serving platter.
- Serve Immediately: Serve the blooming onion immediately while it’s hot and crispy.
- Add the Dipping Sauce: Place the dipping sauce in a small bowl in the center of the blooming onion, or serve it on the side.
- Garnish (Optional): Garnish with chopped parsley or a sprinkle of paprika for added visual appeal.
Tips for Success:
- Don’t Overcrowd the Pot: Fry the onion in a large enough pot to prevent overcrowding, which can lower the oil temperature and result in a soggy onion.
- Maintain Oil Temperature: Monitor the oil temperature closely and adjust the heat as needed to maintain a consistent 350°F (175°C).
- Use Fresh Oil: Use fresh, clean vegetable oil for the best flavor and results.
- Adjust Spices: Feel free to adjust the spices in the breading and dipping sauce to your liking.
- Make it Ahead: You can prepare the onion and bread it ahead of time, then fry it just before serving.
Variations:
- Spicy Blooming Onion: Add more cayenne pepper to the breading and dipping sauce for a spicier kick.
- Cajun Blooming Onion: Use Cajun seasoning in place of the paprika, garlic powder, onion powder, oregano, and thyme.
- Blooming Onion with Cheese: Sprinkle shredded cheddar cheese or Monterey Jack cheese over the blooming onion after frying.
Conclusion:
This isn’t just another appetizer; it’s a showstopper! The blooming onion is a guaranteed crowd-pleaser, transforming a humble onion into a crispy, flavorful masterpiece. From the satisfying crunch of the perfectly fried petals to the tangy dipping sauce, every bite is an explosion of textures and tastes. Trust me, once you’ve experienced the joy of pulling apart those golden-brown layers, you’ll understand why this recipe is a must-try for any occasion.
But the best part? It’s surprisingly easy to make at home! Forget waiting in line at your favorite restaurant; now you can create this iconic appetizer in your own kitchen, impressing your friends and family with your culinary skills. And the satisfaction of knowing you crafted this deliciousness from scratch? Priceless!
Beyond the basic recipe, there’s plenty of room for customization. Feeling adventurous? Try experimenting with different spice blends in the flour mixture. A dash of cayenne pepper for a kick, smoked paprika for a smoky depth, or even a touch of garlic powder for extra savory flavor – the possibilities are endless!
Serving Suggestions and Variations:
* Dipping Sauces: While the classic creamy horseradish sauce is a winner, don’t be afraid to get creative! Ranch dressing, blue cheese dressing, or even a spicy sriracha mayo would be fantastic accompaniments. For a lighter option, consider a yogurt-based dip with fresh herbs.
* Spice Levels: Adjust the amount of cayenne pepper or hot sauce in the batter and dipping sauce to suit your personal preference.
* Onion Variety: While yellow onions are traditionally used, you can also experiment with white or Vidalia onions for a slightly different flavor profile. Vidalia onions, being sweeter, will caramelize beautifully during frying.
* Air Fryer Option: For a healthier alternative, you can try air frying the blooming onion. While it won’t be quite as crispy as the deep-fried version, it’s still a delicious and satisfying option. Just be sure to spray it generously with cooking oil before air frying.
* Mini Blooming Onions: Use smaller onions to create individual blooming onion appetizers, perfect for parties or gatherings.
I truly believe that this blooming onion recipe will become a staple in your appetizer repertoire. It’s fun to make, incredibly delicious, and always a hit with everyone who tries it. So, gather your ingredients, put on your apron, and get ready to create some culinary magic!
I’m so excited for you to try this recipe! Once you’ve made your own blooming onion, I’d love to hear about your experience. Did you try any variations? What dipping sauce did you choose? Share your photos and stories in the comments below! Let’s create a community of blooming onion enthusiasts and inspire each other with our culinary creations. Happy cooking! I can’t wait to see your blooming onion masterpieces!
Blooming Onion Appetizer: The Ultimate Guide to Making It at Home
This recipe provides detailed instructions for making a classic Blooming Onion with a delicious dipping sauce. A large Vidalia onion is cut to resemble a blooming flower, coated in a flavorful breading, and deep-fried until golden brown and crispy. Served with a homemade dipping sauce, this appetizer is sure to impress.
Ingredients
**Strengths:**
* **Comprehensive and Detailed:** The recipe is very thorough, covering every step from chilling the onion to serving. It leaves little room for ambiguity, which is great for novice cooks.
* **Clear Instructions:** The instructions are written in a clear, easy-to-understand manner. The use of numbered steps is excellent.
* **Helpful Tips:** The “Tips for Success” section is valuable, addressing common pitfalls and offering solutions.
* **Ingredient Specificity:** Specifying “Vidalia onion” is helpful, as it’s known for its sweetness. Providing the diameter range (3-4 inches) is also useful.
* **Good Visual Cues:** The recipe uses descriptive language like “golden brown,” “fan out nicely,” and “staggered effect,” which helps the cook visualize the desired outcome.
* **Safety Considerations:** The recipe implicitly addresses safety by mentioning “carefully lower the onion” and using a deep-fry thermometer.
* **Variations:** Including variations provides options for customization and caters to different tastes.
* **Equipment List:** The equipment list is helpful for ensuring the cook has everything needed before starting.
**Potential Improvements & Suggestions:**
* **Root End Clarification:** While the recipe mentions leaving the root end intact, it could benefit from a visual aid (a simple illustration) or a more detailed explanation of *why* it’s crucial. Explain that it acts as an anchor, preventing the onion from falling apart during cutting and frying.
* **Cutting Technique Refinement:**
* **Sharpening:** Explicitly recommend sharpening the knife before starting. A dull knife is dangerous and makes clean cuts difficult.
* **Cutting Board Stability:** Suggest using a damp towel under the cutting board to prevent it from slipping.
* **Cut Depth Consistency:** Emphasize the importance of consistent cut depth. Inconsistent depth can lead to uneven “petals.”
* **Breading Consistency:**
* **Flour Dredge Technique:** Suggest using a sifter or fine-mesh strainer to evenly distribute the flour during the dredging process. This prevents clumps.
* **Patting Dry:** Reiterate the importance of patting the onion *very* dry after the ice water soak. Excess moisture will prevent the breading from adhering properly.
* **Frying Refinements:**
* **Oil Safety:** Add a warning about the dangers of hot oil and the importance of never leaving it unattended.
* **Smoke Point:** Briefly mention the importance of using an oil with a high smoke point (vegetable, canola, peanut) to avoid off-flavors and potential fire hazards.
* **Batch Frying:** If the pot isn’t large enough to fully submerge the onion, recommend batch frying (frying half at a time) to maintain oil temperature.
* **Oil Disposal:** Include a brief note about proper oil disposal (e.g., letting it cool completely and then disposing of it in a sealed container).
* **Dipping Sauce Enhancement:**
* **Ingredient Quality:** Suggest using high-quality mayonnaise and ketchup for the best flavor.
* **Flavor Development:** Mention that the dipping sauce can be made a day in advance to allow the flavors to meld even further.
* **Serving Suggestions:**
* **Presentation:** Suggest serving the blooming onion on a bed of shredded lettuce or kale for a more visually appealing presentation.
* **Alternative Dips:** Briefly mention other dipping sauce options, such as ranch dressing, blue cheese dressing, or a spicy aioli.
* **Nutritional Information (Optional):** While not essential, adding approximate nutritional information (calories, fat, etc.) would be a bonus for health-conscious cooks.
* **Troubleshooting:** Add a small troubleshooting section. For example:
* **Onion Falling Apart:** “If your onion is falling apart during frying, it may not have been chilled enough, or the root end may have been cut too deeply. Next time, chill the onion longer and be more careful when cutting.”
* **Breading Not Sticking:** “If the breading isn’t sticking, make sure the onion is thoroughly dry before breading, and that you’re pressing the flour mixture firmly onto the onion.”
* **Metric Conversions:** Consider adding metric conversions for all measurements to make the recipe more accessible to international cooks.
**Example Incorporations of Suggestions:**
* **Cutting Technique:**
“3. **Make the First Cuts:** Using a *sharpened* chef’s knife (a dull knife is dangerous!), start about ½ inch from the root end and make your first cut down towards the cutting board. *Place a damp towel under your cutting board to prevent it from slipping.* Be careful not to cut all the way through the root. You want to leave it connected. *The root end is crucial because it acts as an anchor, holding the onion together during cutting and frying.* Aim for consistent cut depth.”
* **Breading:**
“1. **First Dip:** Dredge the onion in the dry flour mixture, making sure to coat all the petals thoroughly, inside and out. *Use a sifter or fine-mesh strainer to evenly distribute the flour and prevent clumps.* Use your fingers to get the flour mixture into all the crevices.”
* **Frying:**
“1. **Heat the Oil:** Pour the vegetable oil (or canola or peanut oil – these have high smoke points) into a large, deep pot or Dutch oven. *Never leave hot oil unattended!* Heat the oil over medium-high heat to 350°F (175°C). Use a deep-fry thermometer to monitor the temperature. It’s crucial to maintain the correct temperature for even cooking and crispy results. *If your pot isn’t large enough to fully submerge the onion, fry it in batches to maintain the oil temperature.*”
By incorporating these suggestions, you can make an already excellent recipe even better, ensuring a higher success rate and a more enjoyable cooking experience for everyone.
Instructions
- Place the onion in the freezer for about 30 minutes before you start. This helps it hold its shape better when you cut it. Don’t freeze it solid, just chill it!
- Remove the onion from the freezer and place it on a large cutting board. Peel the onion, leaving the root end intact. The root end is crucial – it holds the whole thing together!
- Using a sharp knife (a chef’s knife works best), start about ½ inch from the root end and make your first cut down towards the cutting board. Be careful not to cut all the way through the root. You want to leave it connected.
- Rotate the onion about ¼ inch and make another cut, parallel to the first. Repeat this process all the way around the onion, creating a series of evenly spaced cuts. The more cuts you make, the more “petals” your blooming onion will have. Aim for about 16-20 cuts.
- Now, carefully flip the onion over. Repeat the cutting process, making cuts between the cuts you made in the first layer. This will create a staggered effect and give your blooming onion a fuller look. Again, be sure not to cut through the root end.
- Gently use your fingers to separate the petals of the onion. Start from the center and work your way outwards. Be careful not to tear the petals. You want them to fan out nicely. If some petals are sticking together, you can carefully use a knife to separate them.
- Place the cut onion in a large bowl filled with ice water. This will help the petals open up further and also help to remove some of the onion’s sharpness. Let it soak for about 30 minutes.
- In a large bowl, whisk together the flour, cornstarch, paprika, garlic powder, onion powder, oregano, thyme, cayenne pepper (if using), salt, and pepper. Make sure everything is well combined.
- In a separate bowl, whisk together the buttermilk and egg until well combined.
- Set up a breading station with the bowl of dry ingredients, the bowl of wet ingredients, and a clean plate or baking sheet.
- Remove the onion from the ice water and gently pat it dry with paper towels. It’s important to get it as dry as possible so the breading adheres well.
- Dredge the onion in the dry flour mixture, making sure to coat all the petals thoroughly, inside and out. Use your fingers to get the flour mixture into all the crevices.
- Dip the floured onion into the buttermilk-egg mixture, again making sure to coat all the petals completely. Let any excess drip off.
- Dredge the onion again in the dry flour mixture, ensuring a thick and even coating. This double breading is what gives the blooming onion its crispy texture.
- Place the breaded onion on a baking sheet and let it rest for about 15-20 minutes. This helps the breading adhere better and prevents it from falling off during frying.
- Pour the vegetable oil into a large, deep pot or Dutch oven. Heat the oil over medium-high heat to 350°F (175°C). Use a deep-fry thermometer to monitor the temperature. It’s crucial to maintain the correct temperature for even cooking and crispy results.
- Carefully lower the breaded onion into the hot oil, using a large slotted spoon or spider. Make sure the onion is fully submerged in the oil.
- Fry the onion for about 6-8 minutes, or until it is golden brown and crispy. Use the slotted spoon to gently turn the onion occasionally to ensure even cooking.
- Carefully remove the fried onion from the oil and place it on a wire rack lined with paper towels to drain excess oil.
- In a medium bowl, combine the mayonnaise, ketchup, horseradish sauce, paprika, garlic powder, cayenne pepper (if using), salt, and pepper.
- Stir all the ingredients together until well combined.
- Taste the dipping sauce and adjust the seasoning as needed. Add more horseradish for a spicier kick, or more paprika for a smoky flavor.
- For best flavor, cover the dipping sauce and chill it in the refrigerator for at least 30 minutes before serving. This allows the flavors to meld together.
- Transfer the fried blooming onion to a serving platter.
- Serve the blooming onion immediately while it’s hot and crispy.
- Place the dipping sauce in a small bowl in the center of the blooming onion, or serve it on the side.
- Garnish with chopped parsley or a sprinkle of paprika for added visual appeal.
Notes
**Strengths:**
* **Detailed Instructions:** The instructions are very clear, step-by-step, and easy to follow, even for someone who hasn’t made a blooming onion before.
* **Helpful Tips:** The “Tips for Success” section is excellent. It addresses common pitfalls and provides practical advice.
* **Ingredient Specificity:** Specifying the type of onion (Vidalia) and the size range is helpful.
* **Clear Equipment List:** The equipment list is thorough and includes helpful recommendations (e.g., chef’s knife).
* **Good Explanations:** The recipe explains *why* certain steps are important (e.g., chilling the onion, leaving the root intact, double breading). This helps the cook understand the process and make better decisions.
* **Temperature Guidance:** Providing the oil temperature and emphasizing its importance is crucial for successful frying.
* **Variations:** Offering variations is a nice touch and encourages experimentation.
* **Dipping Sauce Included:** Providing a complementary dipping sauce recipe is essential.
* **Visual Appeal:** The optional garnish suggestion adds a nice touch.
* **Prep and Cook Time:** Providing prep and cook time helps the user plan.
**Minor Suggestions for Improvement:**
* **Root End Clarification:** While you mention leaving the root end intact, you could add a sentence clarifying *why* it’s so important. Something like: “The root end acts as an anchor, holding all the petals together during cutting and frying.”
* **Cutting Depth Visual:** Consider adding a visual cue for the cutting depth. For example: “Cut down towards the cutting board, stopping about ½ inch from the bottom (imagine leaving a small ‘platform’ of onion at the base).”
* **Breading Technique Detail:** When describing the breading process, you could add a tip about pressing the flour mixture into the onion to ensure good adhesion. Something like: “Press the flour mixture firmly into the onion petals to ensure a good coating.”
* **Oil Safety:** Add a brief safety note about frying with hot oil. For example: “Be extremely careful when working with hot oil. Never leave the pot unattended, and keep a fire extinguisher nearby.”
* **Dipping Sauce Consistency:** Mention that the dipping sauce can be adjusted for consistency. “If you prefer a thinner sauce, add a teaspoon or two of milk or water.”
* **Serving Suggestion:** Consider adding a serving suggestion for how to *eat* the blooming onion. For example: “To eat, pull off individual petals and dip them in the sauce.”
* **Storage:** Add a note about storage. “Blooming onions are best served immediately. Leftovers can be stored in the refrigerator, but will lose their crispness.”
**Revised Snippets Incorporating Suggestions:**
* **Root End Clarification:** “Peel the onion, leaving the root end intact. The root end is crucial – it acts as an anchor, holding all the petals together during cutting and frying!”
* **Cutting Depth Visual:** “Using a sharp knife (a chef’s knife works best), start about ½ inch from the root end and make your first cut down towards the cutting board, stopping about ½ inch from the bottom (imagine leaving a small ‘platform’ of onion at the base). Be careful not to cut all the way through the root.”
* **Breading Technique Detail:** “Dredge the onion in the dry flour mixture, making sure to coat all the petals thoroughly, inside and out. Use your fingers to get the flour mixture into all the crevices, pressing firmly to ensure a good coating.”
* **Oil Safety:** “Pour the vegetable oil into a large, deep pot or Dutch oven. Heat the oil over medium-high heat to 350°F (175°C). Use a deep-fry thermometer to monitor the temperature. Be extremely careful when working with hot oil. Never leave the pot unattended, and keep a fire extinguisher nearby.”
* **Dipping Sauce Consistency:** “Mix Well: Stir all the ingredients together until well combined. If you prefer a thinner sauce, add a teaspoon or two of milk or water.”
* **Serving Suggestion:** “To eat, pull off individual petals and dip them in the sauce.”
* **Storage:** “Blooming onions are best served immediately. Leftovers can be stored in the refrigerator, but will lose their crispness.”
**Overall:**
This is a fantastic recipe! The suggestions above are just minor tweaks to make it even more user-friendly and foolproof. Great job!


Leave a Comment