
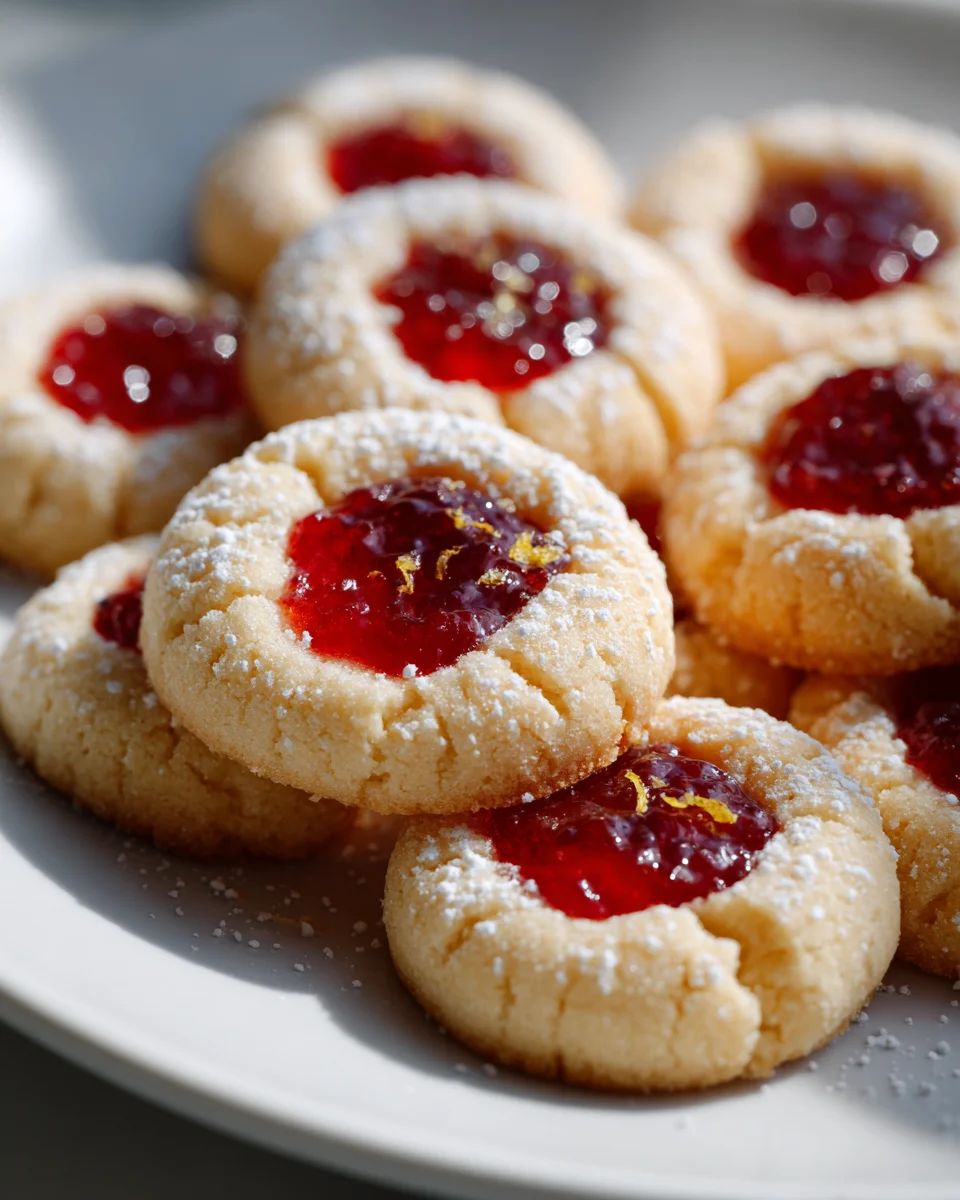
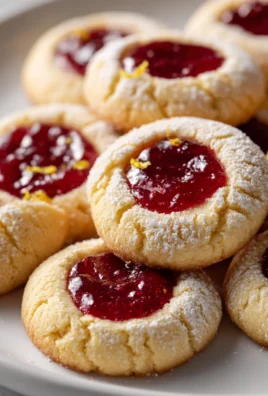
Lemon Raspberry Thumbprint Cookies
Oh, Lemon Raspberry Thumbprint Cookies! These aren’t just any cookies; they’re a little burst of sunshine and joy in every bite. I absolutely adore how they perfectly blend that zesty, bright lemon flavor right into a tender, buttery shortbread-style cookie base. Then, just when you think it couldn’t get any better, we nestle a jewel-toned dollop of sweet-tart raspberry jam right in the center. It’s truly a match made in heaven!
What makes these so special, you ask? Well, beyond the incredible flavor combination, it’s the simple elegance and the sheer delight of creating them. There’s something so satisfying about pressing that little thumbprint (or the back of a spoon!) into the soft dough. Readers, you are going to fall head over heels for how effortlessly these cookies come together, yet look incredibly impressive. They’re perfect for brightening up a dessert platter, gifting to a loved one, or simply enjoying with a cup of tea. Get ready for a delightful sensory experience – the tender crumb, the vibrant jam, and that irresistible lemon kick. I just know you’ll love them!

Ingredient Notes
Creating these delightful Lemon Raspberry Thumbprint Cookies starts with a few key ingredients, and I always believe that the quality of what you use truly shines through in the final bake. Here’s a quick run-down of what you’ll need and some thoughts on alternatives:
- Unsalted Butter: This is the backbone of our cookie dough, providing that rich, tender texture. I always opt for unsalted so I can control the amount of salt in the recipe. Make sure it’s at room temperature for easy creaming with the sugar. If you need a dairy-free option, a good quality plant-based butter alternative (the stick kind, not the spread) works wonderfully here. Just ensure it has a similar fat content for best results.
- Granulated Sugar: Beyond sweetness, sugar helps with the cookie’s structure and gives it a lovely crisp edge. There isn’t a direct substitution I’d recommend for granulated sugar in this base, as its crystalline structure is important.
- All-Purpose Flour: My go-to for its versatility and consistent results. For a gluten-free version, a 1:1 gluten-free baking blend that includes xanthan gum is your best bet. Remember that gluten-free flours can absorb liquids differently, so you might need minor adjustments to the chilling time or dough consistency.
- Lemon Zest & Fresh Lemon Juice: These are absolutely crucial for that bright, zesty lemon flavor that defines these cookies. Don’t skip fresh zest; dried lemon peel won’t give you the same vibrant punch. For the juice, fresh is always superior to bottled. I recommend zesting the lemon before you juice it – it’s much easier!
- Large Egg Yolk: The yolk adds richness and helps bind the dough, contributing to a wonderfully tender crumb. While not a perfect substitute, for those avoiding eggs, a ‘flax egg’ (1 tablespoon ground flaxseed mixed with 3 tablespoons water, allowed to sit for 5-10 minutes until thick) can sometimes work in recipes requiring a single egg yolk, though it might slightly alter the texture.
- Pure Vanilla Extract: A touch of vanilla rounds out all the flavors beautifully. Make sure it’s pure vanilla extract for the best taste.
- Raspberry Jam or Preserves: This is where the ‘raspberry’ in our name comes alive! I recommend using a good quality raspberry jam or preserves with a decent fruit content. Seedless is often preferred for a smoother bite, but I don’t mind the seeds myself. You could also make a quick homemade raspberry compote if you have fresh or frozen raspberries on hand. While other jams like strawberry or apricot would work, they wouldn’t be “Lemon Raspberry”!
- Powdered Sugar: Essential for our tangy lemon glaze. It dissolves easily and creates a smooth, pourable consistency. There isn’t a good substitute for powdered sugar in a glaze.
Step-by-Step Instructions
Let’s get baking! Here’s how I bring these sunshine-filled Lemon Raspberry Thumbprint Cookies to life in my kitchen:
- Cream Butter and Sugar: In a large mixing bowl, using an electric mixer, beat the softened unsalted butter and granulated sugar together on medium speed until light and fluffy. This usually takes about 2-3 minutes. Scrape down the sides of the bowl as needed to ensure everything is well combined.
- Add Wet Ingredients: Beat in the egg yolk, lemon zest, and vanilla extract until fully incorporated. The mixture should be fragrant and creamy.
- Combine Dry Ingredients: In a separate medium bowl, whisk together the all-purpose flour and salt. This ensures the salt is evenly distributed throughout the dough.
- Gradually Add Dry to Wet: With the mixer on low speed, gradually add the dry flour mixture to the wet ingredients, mixing just until combined. Be careful not to overmix, as this can lead to tough cookies. The dough will be soft.
- Chill the Dough: Shape the dough into a disk, wrap it tightly in plastic wrap, and refrigerate for at least 30 minutes, or up to 2 hours. Chilling is super important here; it helps the cookies hold their shape and prevents spreading.
- Preheat Oven and Prep Baking Sheets: While the dough chills, preheat your oven to 350°F (175°C). Line two baking sheets with parchment paper or silicone mats.
- Form the Cookies: Once chilled, unwrap the dough. Roll small portions of dough into 1-inch balls (about 1 tablespoon each). Place them about 2 inches apart on your prepared baking sheets.
- Make the Thumbprints: Using your thumb or the back of a small measuring spoon (I find a 1/2 teaspoon works perfectly), gently press an indentation into the center of each cookie dough ball. If the edges crack slightly, just gently smooth them back together.
- Fill with Raspberry Jam: Spoon about 1/2 teaspoon of your raspberry jam into each indentation. Don’t overfill, or it might bubble over during baking.
- Bake: Bake the cookies for 12-15 minutes, or until the edges are lightly golden and the jam is bubbly. The centers might still look a bit soft, but they will firm up as they cool.
- Cool Completely: Let the cookies cool on the baking sheets for 5 minutes before carefully transferring them to a wire rack to cool completely. Cooling completely is important before glazing.
- Prepare the Lemon Glaze: While the cookies cool, whisk together the powdered sugar and fresh lemon juice in a small bowl until smooth and of a pourable consistency. If it’s too thick, add a tiny bit more lemon juice; if too thin, add a tiny bit more powdered sugar.
- Glaze the Cookies: Once the cookies are completely cool, drizzle the lemon glaze over them using a spoon or a whisk. Let the glaze set for about 15-20 minutes before serving or storing.
Tips & Suggestions
Making these Lemon Raspberry Thumbprint Cookies is a true joy, and over time, I’ve picked up a few tricks that I love to share to help you achieve perfect results every time:
- Don’t Skimp on Chilling Time: I know it’s tempting to rush, but chilling the dough is absolutely essential for thumbprint cookies. It helps the butter firm up, preventing the cookies from spreading too much in the oven and ensuring they maintain their round shape and distinct thumbprint. If your kitchen is warm, you might even need to chill the dough for a little longer.
- Preventing Cracks: When you press your thumb or spoon into the dough ball, it’s common for tiny cracks to form around the edges. Don’t worry! Simply use your fingers to gently smooth out any cracks before filling. A slightly warm dough (after chilling, but not too warm from your hands) can be more pliable.
- Evenly Sized Cookies: For uniform baking and a professional look, I highly recommend using a small cookie scoop or weighing your dough balls. This ensures all your cookies are the same size and bake at the same rate.
- Jam Choice Matters: While any raspberry jam will work, a good quality jam with a vibrant color and strong raspberry flavor will truly elevate your cookies. If you prefer a less sweet cookie, look for lower-sugar preserves. If using homemade compote, ensure it’s thick enough not to be too watery.
- Intensify Lemon Flavor: For an even more pronounced lemon punch in your cookies, you can add a tiny pinch of citric acid to the cookie dough or the glaze. Just be very sparing, as a little goes a long way! You can also grate a little extra lemon zest directly over the wet glaze before it sets for a beautiful visual and aromatic boost.
- Baking Batch by Batch: If your oven has hot spots, rotate your baking sheets halfway through baking for even browning. If you’re baking multiple batches, make sure your baking sheets have cooled down between uses. Placing dough on a hot sheet can cause premature spreading.
- Glaze Consistency: The perfect glaze should be thick enough to cling to the cookie but thin enough to drizzle smoothly. Adjust with tiny amounts of powdered sugar or lemon juice until you reach your desired consistency. For a bolder glaze, you can double dip after the first layer sets slightly.
- Cooling is Key: Make sure the cookies are completely cooled before applying the lemon glaze. If they’re warm, the glaze will melt and run off, resulting in a mess rather than a neat drizzle.
Storage
Once you’ve made a batch of these irresistible Lemon Raspberry Thumbprint Cookies, here’s how I like to store them to keep them fresh and delicious:
- At Room Temperature: These cookies keep wonderfully at room temperature. Once the lemon glaze has fully set, arrange the cookies in a single layer or stacked with parchment paper in between in an airtight container. They will stay fresh and soft for up to 3-5 days. Keep them away from direct sunlight or heat sources.
- In the Refrigerator: If you prefer to extend their shelf life slightly, or if your kitchen is particularly warm, you can store them in an airtight container in the refrigerator for up to a week. The texture might become a little firmer when cold, but they’ll soften up quickly once brought back to room temperature.
- Freezing Baked Cookies: These cookies freeze beautifully! Once completely cooled and the glaze has set, arrange them in a single layer on a baking sheet and freeze until solid (about 1-2 hours). Once frozen, transfer them to a freezer-safe airtight container or a heavy-duty freezer bag, separating layers with parchment paper to prevent sticking. They will keep well in the freezer for up to 2-3 months. Thaw at room temperature for a few hours before serving.
- Freezing Unbaked Dough: You can also freeze the unbaked cookie dough. After preparing the dough, form it into a disk, wrap it tightly in plastic wrap, and then an additional layer of aluminum foil. This will keep for up to 3 months in the freezer. When you’re ready to bake, thaw the dough overnight in the refrigerator, then proceed with rolling, thumb-printing, and baking as usual. You can also roll the dough into balls, make the thumbprint, and freeze them on a tray before transferring to a bag. When baking from frozen, you might need to add a couple of extra minutes to the baking time.
- Best Practices for Storing: Always ensure cookies are completely cool before storing to prevent condensation, which can make them soggy. If storing with other baked goods, keep them separate if flavors are strong, as cookies can absorb odors.
Final Thoughts
I truly hope you’re inspired to bake a batch of these incredible Lemon Raspberry Thumbprint Cookies! What makes this recipe an absolute must-try is the perfect harmony of flavors and textures. Imagine a tender, buttery cookie infused with bright lemon, cradling a jewel-toned dollop of sweet-tart raspberry jam. It’s a combination that truly sings, offering a delightful balance that is both refreshing and comforting. I promise you, these Lemon Raspberry Thumbprint Cookies are not just cookies; they’re little bites of sunshine that are sure to bring joy to any occasion and impress everyone who tastes them. Go on, treat yourself to something truly special!

Best Lemon Raspberry Thumbprint Cookies Recipe Ever!
- Total Time: 45 minutes
- Yield: 24 cookies 1x
Description
These Lemon Raspberry Thumbprint Cookies are a delightful blend of zesty lemon flavor and sweet-tart raspberry jam nestled in a tender, buttery shortbread-style cookie. Perfect for any occasion, they are sure to impress with their vibrant taste and beautiful appearance.
Ingredients
- 1 cup Unsalted Butter, at room temperature
- 3/4 cup Granulated Sugar
- 1 3/4 cups All-Purpose Flour
- 1/4 teaspoon Salt
- 1 tablespoon Lemon Zest
- 1 tablespoon Fresh Lemon Juice
- 1 Large Egg Yolk
- 1 teaspoon Pure Vanilla Extract
- 1/2 cup Raspberry Jam or Preserves
- 1 cup Powdered Sugar
Instructions
- In a large mixing bowl, using an electric mixer, beat the softened unsalted butter and granulated sugar together on medium speed until light and fluffy, about 2-3 minutes. Scrape down the sides of the bowl as needed.
- Beat in the egg yolk, lemon zest, and vanilla extract until fully incorporated.
- In a separate medium bowl, whisk together the all-purpose flour and salt.
- With the mixer on low speed, gradually add the dry flour mixture to the wet ingredients, mixing just until combined.
- Shape the dough into a disk, wrap it tightly in plastic wrap, and refrigerate for at least 30 minutes, or up to 2 hours.
- Preheat your oven to 350°F (175°C) and line two baking sheets with parchment paper or silicone mats.
- Once chilled, unwrap the dough and roll small portions into 1-inch balls, placing them about 2 inches apart on the prepared baking sheets.
- Using your thumb or the back of a small measuring spoon, gently press an indentation into the center of each cookie dough ball.
- Spoon about 1/2 teaspoon of raspberry jam into each indentation.
- Bake the cookies for 12-15 minutes, or until the edges are lightly golden and the jam is bubbly.
- Let the cookies cool on the baking sheets for 5 minutes before transferring them to a wire rack to cool completely.
- While the cookies cool, whisk together the powdered sugar and fresh lemon juice in a small bowl until smooth.
- Once the cookies are completely cool, drizzle the lemon glaze over them and let it set for about 15-20 minutes before serving.
- Prep Time: 30 mins
- Cook Time: 15 mins
- Category: Dessert
- Method: Baking
- Cuisine: American
Nutrition
- Serving Size: 1 cookie
- Calories: 120
- Sugar: 8 g
- Sodium: 50 mg
- Fat: 6 g
- Saturated Fat: 4 g
- Unsaturated Fat: 2 g
- Trans Fat: 0 g
- Carbohydrates: 15 g
- Fiber: 0 g
- Protein: 1 g
- Cholesterol: 25 mg
Keywords: Chilling the dough is essential for maintaining the cookies' shape. Use a good quality raspberry jam for the best flavor, and ensure the cookies are completely cool before glazing.

Leave a Comment