
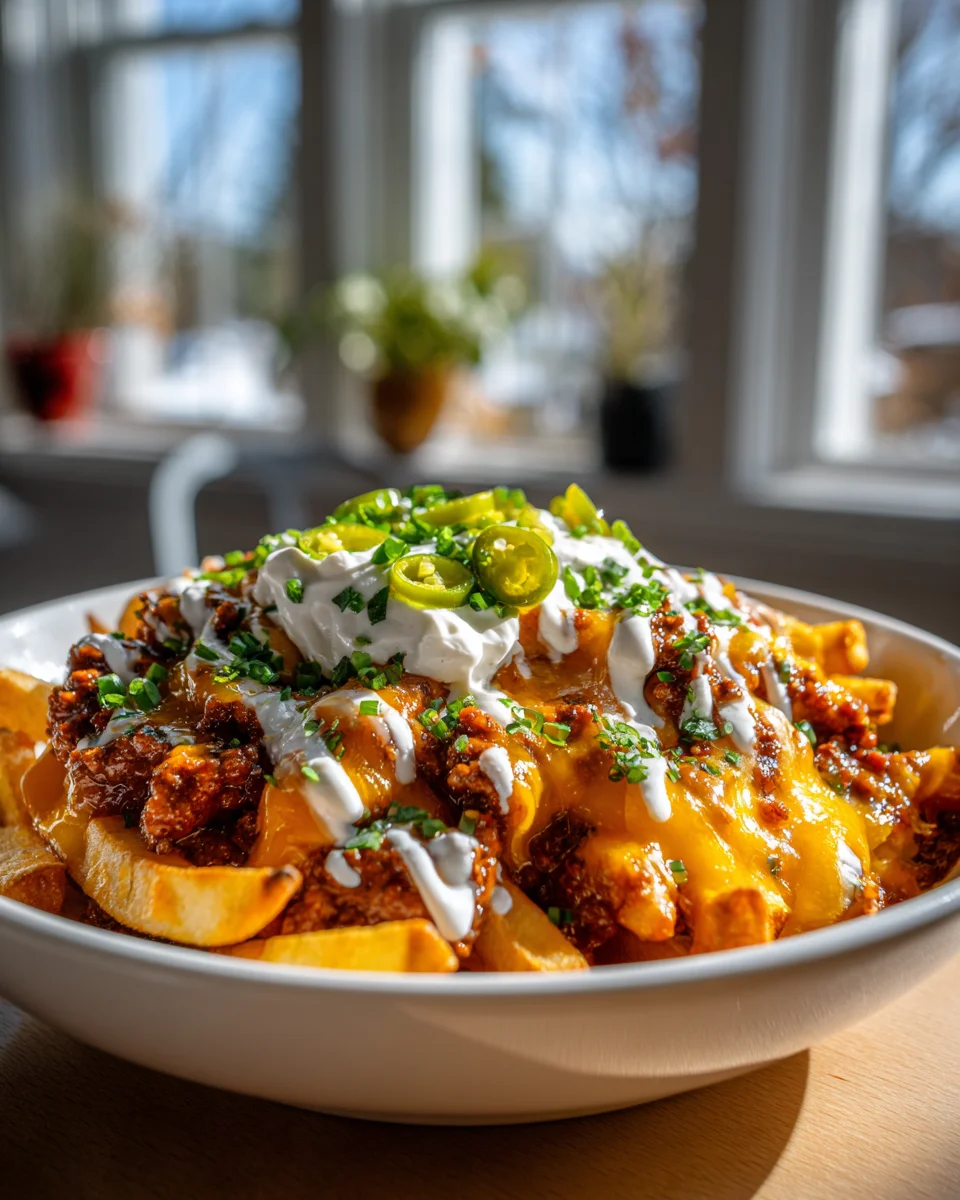
Chili Cheese Fries Recipe
Oh, prepare yourselves, because you’re about to dive into the ultimate comfort food experience: Chili Cheese Fries! I mean, who can resist that perfect trifecta? This isn’t just a snack; it’s a glorious, decadent meal in itself that promises to be the star of any game day, movie night, or just a Tuesday when you need a little extra joy.
What makes my Chili Cheese Fries recipe so special, you ask? It’s all about balance and flavor. We’re talking about perfectly crispy, golden fries that serve as the ideal base for a rich, deeply savory beef chili – yes, we’re making it with tender, flavorful beef, brimming with aromatic spices. And then, the grand finale: a generous blanket of molten, gooey cheese that pulls and stretches with every single bite. Trust me, your taste buds are in for a treat!
You are absolutely going to love how incredibly satisfying and surprisingly straightforward this dish is to put together. It transforms humble ingredients into something truly extraordinary and utterly irresistible. Get ready to indulge in a warm, hearty, and unbelievably cheesy masterpiece that will have everyone coming back for more!

Ingredient Notes
Creating the ultimate chili cheese fries starts with understanding your core ingredients. While the concept seems simple, a few thoughtful choices can elevate your dish from good to absolutely amazing. Here, I’ll walk you through the key components and some clever substitutions.
The Fries
The foundation of our dish! You have two main routes here: frozen or homemade. I often opt for good quality frozen fries for convenience, particularly shoestring or crinkle-cut, as their larger surface area holds onto chili and cheese beautifully. If you’re feeling ambitious, homemade fries are fantastic. For homemade, I recommend russet potatoes, cut into about 1/4 to 1/2-inch thick sticks, soaked in cold water for 30 minutes to remove excess starch, then thoroughly dried before frying or baking. The goal is crispy fries, no matter the method. For a fun twist, consider using sweet potato fries or even waffle fries; they offer a different flavor profile and texture.
The Chili
This is where the magic truly happens! A rich, flavorful chili is non-negotiable. While a good quality canned chili can work in a pinch for speed, I genuinely believe homemade chili makes all the difference. For my go-to, I use lean ground beef, browned and crumbled, combined with diced onions, garlic, a mix of kidney and pinto beans, crushed tomatoes, a hint of beef broth, and a robust blend of chili powder, cumin, paprika, and a pinch of cayenne for heat. Remember, we’re focusing on beef here, so no pork. If you want to deepen the flavor, a splash of non-alcoholic beer or a dash of Worcestershire sauce (check for non-alcoholic versions) can add complexity. For a vegetarian option, a hearty lentil or mixed-bean chili works wonderfully, or you could opt for ground turkey chili for a lighter alternative.
The Cheese
Meltability is key! You want cheese that will become wonderfully gooey and stretchy. My top picks are sharp cheddar and Monterey Jack, often in a 50/50 blend for both flavor and an excellent melt. Colby Jack or a Mexican blend also work well. While pre-shredded cheese is convenient, shredding your own from a block will always give you a smoother, creamier melt as it lacks the anti-caking agents found in pre-packaged varieties. For those with dietary restrictions, there are many excellent dairy-free shredded cheeses available now that melt surprisingly well.
Optional Toppings
These are the delightful final touches that personalize your chili cheese fries. My favorites include thinly sliced green onions for freshness, a dollop of sour cream or Greek yogurt for a cool contrast, and sliced jalapeños (fresh or pickled) if you love an extra kick. Other great options include chopped red onion, a sprinkle of cilantro, or even a dash of your favorite hot sauce.
Step-by-Step Instructions
Alright, let’s get down to business! Making chili cheese fries is a relatively straightforward process, especially if your chili is already prepared. Here’s how I bring it all together for that perfect, indulgent experience.
Step 1: Prepare Your Fries
First things first, get those fries ready. If you’re using frozen fries, preheat your oven to the temperature specified on the package, usually around 400-425°F (200-220°C). Arrange the fries in a single layer on a baking sheet. I always line my baking sheet with parchment paper for easy cleanup and to help prevent sticking. Bake according to package directions, typically 20-25 minutes, flipping them halfway through, until they are golden brown and deliciously crispy. This crispness is crucial, as it provides a sturdy base for our chili and cheese. If you’re air-frying, follow your air fryer’s instructions for similar results. If you’re making homemade fries, either bake them following similar guidance or deep-fry them until golden and crisp, draining excess oil on paper towels.
Step 2: Heat Your Chili
While your fries are baking, it’s time to heat up that fantastic chili. If you’re using pre-made or leftover chili, gently warm it in a saucepan over medium-low heat, stirring occasionally, until it’s hot and simmering. You want it warm enough to melt the cheese efficiently but not boiling vigorously. If your chili is a bit too thick, you can add a tablespoon or two of beef broth or water to achieve a spoonable, but not watery, consistency.
Step 3: Assemble the Chili Cheese Fries
Once your fries are perfectly crispy and your chili is hot, it’s assembly time! This is where you bring all the delicious components together. You can either assemble them on the same baking sheet you used for the fries (if it’s oven-safe) or transfer the fries to an oven-safe serving dish or cast-iron skillet.
First, spread the hot, crispy fries evenly across the bottom of your chosen dish. Next, generously spoon the warm chili over the fries, making sure to distribute it well so every fry gets a taste. Don’t be shy here! Finally, sprinkle your shredded cheese (or cheese blend) over the top of the chili. I like to be fairly generous with the cheese because, well, it’s chili cheese fries!
Step 4: Melt the Cheese
Now, for the glorious melted cheese! Place your assembled chili cheese fries back into the preheated oven, or under the broiler, just until the cheese is beautifully melted, bubbly, and slightly golden in spots. This usually takes about 5-10 minutes in the oven at 375°F (190°C), or 2-4 minutes under a broiler (keep a very close eye on it if using the broiler, as cheese can burn quickly!). The goal is gooey, luscious cheese that stretches when you pull a fry.
Step 5: Garnish and Serve Immediately
As soon as the cheese is perfectly melted, carefully remove the dish from the oven. This dish waits for no one! Garnish with your favorite toppings – a scattering of fresh green onions, a dollop of sour cream, or some sliced jalapeños. Serve them hot and fresh, straight from the oven, with plenty of napkins. Enjoy the indulgent deliciousness!
Tips & Suggestions
After making countless batches of chili cheese fries, I’ve picked up a few tricks that consistently yield the best results. Here are my top tips and suggestions to help you perfect this classic comfort food.
Crispy Fries are Non-Negotiable
This is arguably the most important tip. Soggy fries under a pile of chili and cheese are a culinary tragedy. Whether you’re baking, air-frying, or deep-frying, ensure your fries are extra crispy before adding any toppings. If baking, avoid overcrowding the baking sheet; use two if necessary. A little extra time in the oven or air fryer can make all the difference in achieving that essential crunch.
Choose Your Cheese Wisely
As mentioned in the ingredient notes, the type of cheese truly matters. Opt for cheeses known for their good melting qualities like sharp cheddar, Monterey Jack, or a blend. Shredding your own cheese will always provide a superior, creamier melt compared to pre-shredded options due to the lack of anti-caking agents. Don’t be afraid to experiment with different cheese combinations to find your favorite flavor profile.
The Right Chili Consistency
Your chili should be hearty but not overly thick, and definitely not watery. If it’s too thin, it will make your fries soggy too quickly. If it’s too thick, it won’t spread well over the fries. Aim for a consistency that spoons easily but clings to the back of a spoon. If your chili is a bit thin, let it simmer uncovered for a while to reduce. If it’s too thick, stir in a little beef broth or water.
Serve Immediately
Chili cheese fries are a dish that must be enjoyed fresh out of the oven. The longer they sit, the more the fries will absorb moisture from the chili, leading to inevitable sogginess. Have all your toppings ready and your hungry crowd gathered around, because once these come out, it’s go-time!
Spice It Up (or Down)
Tailor the heat level of your chili to your preference. If you love a kick, add extra cayenne pepper or a pinch of crushed red pepper flakes to your chili. For an even bigger punch, serve with a side of your favorite hot sauce or extra sliced jalapeños. If you prefer milder flavors, reduce the amount of spicy ingredients or use a milder chili powder blend.
Make it a Meal
While often considered an appetizer, chili cheese fries are hearty enough to be a full meal, especially with the addition of extra protein in your chili. Serve them with a simple side salad to balance the richness, or enjoy them as a standalone, indulgent treat.
Storage
Unfortunately, chili cheese fries are one of those dishes that are truly best enjoyed fresh. The components, particularly the fries, don’t hold up well once assembled.
Assembled Chili Cheese Fries
I generally do not recommend storing leftover assembled chili cheese fries. The fries will become very soggy and lose their texture when refrigerated and reheated. The cheese can also become rubbery. While technically safe to eat if refrigerated within two hours, the quality will be significantly diminished.
Storing Components Separately
If you’re planning ahead or have leftovers of individual components, store them separately:
- Chili: Your homemade chili can be stored in an airtight container in the refrigerator for 3-4 days, or frozen for up to 3 months. Thaw frozen chili in the refrigerator overnight before reheating.
- Fries: Cooked fries are best eaten immediately. If you have leftover plain fries, you can try reheating them in an air fryer or oven to regain some crispness, but they won’t be as good as freshly made ones.
- Cheese: Store shredded cheese in an airtight container in the refrigerator for several days.
Reheating Advice (for components)
When you’re ready to enjoy chili cheese fries again, reheat your chili gently on the stovetop or in the microwave. Prepare a fresh batch of crispy fries. Then, assemble and melt the cheese as described in the steps above. This way, you get to enjoy almost the same fresh quality without the disappointment of soggy leftovers.
Final Thoughts
There you have it – my go-to Chili Cheese Fries Recipe! I truly believe this dish is the epitome of comfort food done right. The combination of crispy, golden fries, smothered in a hearty, flavorful beef chili, and then topped with generous amounts of gooey, melted cheese is simply irresistible. This isn’t just a snack; it’s a full-on experience that delivers on every front: texture, flavor, and pure satisfaction.
I promise you, once you try making this Chili Cheese Fries Recipe at home, you’ll see just how easy it is to achieve restaurant-quality results in your own kitchen. It’s the perfect treat for game night, a casual gathering, or simply when you need a little pick-me-up. So, go ahead, gather your ingredients, and get ready to indulge in a truly spectacular dish that will quickly become a beloved favorite. Enjoy every single cheesy, chili-laden bite!

Best Beef Chili Cheese Fries Recipe: Easy Comfort Food!
- Total Time: 1 hour
- Yield: 4 servings
Description
Dive into the ultimate comfort food experience with these Chili Cheese Fries! Crispy fries topped with rich beef chili and gooey cheese create a decadent meal perfect for any occasion.
Ingredients
- Frozen fries (shoestring or crinkle-cut) or russet potatoes (cut into 1/4 to 1/2-inch thick sticks)
- Lean ground beef
- Diced onions
- Garlic
- Kidney beans
- Pinto beans
- Crushed tomatoes
- Beef broth
- Chili powder
- Cumin
- Paprika
- Cayenne pepper
- Non-alcoholic beer (optional)
- Worcestershire sauce (non-alcoholic, optional)
- Sharp cheddar cheese
- Monterey Jack cheese
- Colby Jack cheese or Mexican blend cheese (optional)
- Green onions (for garnish)
- Sour cream or Greek yogurt (for garnish)
- Sliced jalapeños (fresh or pickled, for garnish)
- Chopped red onion (optional, for garnish)
- Cilantro (optional, for garnish)
- Hot sauce (optional, for garnish)
Instructions
- Prepare your fries: If using frozen fries, preheat your oven to the temperature specified on the package, usually around 400-425°F (200-220°C). Arrange the fries in a single layer on a baking sheet lined with parchment paper. Bake according to package directions, typically 20-25 minutes, flipping halfway through, until golden brown and crispy. For homemade fries, soak russet potatoes in cold water for 30 minutes, dry thoroughly, and then bake or deep-fry until crispy.
- Heat your chili: While your fries are baking, gently warm your prepared chili in a saucepan over medium-low heat, stirring occasionally until hot and simmering. If the chili is too thick, add a tablespoon or two of beef broth or water to achieve a spoonable consistency.
- Assemble the chili cheese fries: Once the fries are crispy and the chili is hot, spread the fries evenly across the bottom of an oven-safe dish. Spoon the warm chili generously over the fries, then sprinkle shredded cheese over the top.
- Melt the cheese: Place the assembled chili cheese fries back into the preheated oven or under the broiler until the cheese is melted, bubbly, and slightly golden, about 5-10 minutes in the oven at 375°F (190°C) or 2-4 minutes under the broiler.
- Garnish and serve immediately: Carefully remove the dish from the oven and garnish with your favorite toppings like green onions, sour cream, or jalapeños. Serve hot and enjoy!
- Prep Time: 30 mins
- Cook Time: 30 mins
- Category: Dinner
- Method: Baking
- Cuisine: American
Nutrition
- Serving Size: 1 plate
- Calories: 800
- Sugar: 5 g
- Sodium: 1200 mg
- Fat: 45 g
- Saturated Fat: 20 g
- Unsaturated Fat: 15 g
- Trans Fat: 0 g
- Carbohydrates: 70 g
- Fiber: 10 g
- Protein: 30 g
- Cholesterol: 90 mg
Keywords: Ensure fries are crispy before adding toppings to avoid sogginess. Shredding your own cheese will provide a creamier melt. Adjust the heat level of your chili to your preference by adding cayenne or crushed red pepper flakes.

Leave a Comment