
Easy Moist Banana Bread Recipe For Beginners – there’s nothing quite like the comforting aroma of freshly baked banana bread wafting through your home. It’s a scent that instantly transports you to cozy mornings and happy memories. Did you know this beloved treat gained its widespread popularity during the Great Depression? Resourceful home bakers discovered that overripe bananas, often overlooked, could be transformed into something truly delightful and economical. This ingenious creation quickly became a staple, appreciated for its delightful sweetness, incredibly tender crumb, and ability to turn forgotten fruit into a family favorite. It’s the ultimate comfort food, perfect for breakfast with your morning coffee, a midday snack, or even a light dessert.
And today, I’m absolutely thrilled to share with you an Easy Moist Banana Bread Recipe For Beginners that will make you feel like a seasoned baker, even if you’re just starting your culinary journey. No fancy equipment or obscure ingredients are needed here! I promise, you’ll be amazed by how simple it is to achieve a perfectly golden loaf with that unmistakable moist texture and rich banana flavor. Get ready to impress yourself and your loved ones with this foolproof, deliciously moist creation!

Ingredients:
- 3 large ripe to overripe bananas: This is absolutely crucial for a super moist and flavorful banana bread. You want bananas that are heavily speckled with brown or even completely brown. The riper they are, the sweeter and more aromatic your bread will be. If your bananas aren’t quite ripe enough, you can speed up the process by baking them in their peels on a baking sheet at 300°F (150°C) for 15-20 minutes, or until the peels are black and shiny. Just let them cool before mashing! These extra-ripe bananas are key for achieving that naturally sweet, intense banana flavor and contributing to the bread’s incredible moisture. Don’t be afraid if they look a little unappetizing; they’re perfect for this recipe.
- 1/2 cup (113g) unsalted butter: I always prefer unsalted butter so I can control the amount of salt in the recipe. Make sure it’s melted and slightly cooled before you add it to the other wet ingredients. This helps prevent scrambling the eggs when they mix and ensures a smooth, emulsified batter. Using butter instead of oil also adds a richer, more complex flavor profile to the finished loaf.
- 2 large eggs: These act as a binder, providing structure and richness to our banana bread. For the best results, bring your eggs to room temperature before using them. This helps them incorporate more evenly into the batter, leading to a smoother consistency and a more uniform bake. You can quickly achieve room temperature by placing the eggs in a bowl of warm (not hot!) water for 5-10 minutes while you prepare your other ingredients.
- 1/2 cup (100g) granulated sugar: This provides a beautiful sweetness and helps with the lovely golden-brown crust of your bread. It’s the classic sweetener that brightens the banana flavor without overpowering it.
- 1/4 cup (50g) packed light brown sugar: The brown sugar adds a lovely caramel-like depth of flavor and contributes significantly to the bread’s moist texture. Its molasses content helps keep the banana bread tender and prevents it from drying out. Don’t skip it if you can help it; it truly makes a difference in the overall flavor and texture.
- 1 teaspoon pure vanilla extract: A good quality pure vanilla extract really elevates the flavor of your banana bread, adding a warm, aromatic note that complements the banana beautifully. I often add a little extra because I just love that inviting aroma it brings to any baked good.
- 1 1/2 cups (180g) all-purpose flour: I find that all-purpose flour works perfectly for a tender crumb in banana bread. While sifting isn’t strictly necessary for banana bread, if you want an extra light texture, you can sift it along with your other dry ingredients. However, simply whisking it thoroughly with the other dry components is usually sufficient for a wonderfully textured loaf.
- 1 teaspoon baking soda: This is our primary leavening agent, reacting with the acidity of the bananas and brown sugar to help the bread rise beautifully and create an airy, tender texture. Make sure your baking soda is fresh! If it’s been sitting in your pantry for ages, it might not be as potent, and your bread won’t rise as much or achieve that desired lightness. You can test its freshness by adding a teaspoon to a small bowl with a little vinegar; it should fizz vigorously immediately.
- 1/2 teaspoon salt: A little salt is essential in baking; it balances out the sweetness, enhances all the other flavors, and prevents the bread from tasting flat. It’s a secret ingredient in many sweet baked goods that truly brings out their best characteristics.
- Optional add-ins (1/2 to 1 cup): These are fantastic for customizing your banana bread and adding extra flavor and texture.
- Chopped nuts: Walnuts or pecans are classic choices and add a lovely crunch and earthy flavor that pairs wonderfully with banana.
- Chocolate chips: Semi-sweet or dark chocolate chips are always a hit, especially if you have a sweet tooth! They melt into delicious pockets of chocolatey goodness.
- Dried fruit: Raisins, cranberries, or chopped dates can add another layer of chewy texture and concentrated sweetness.
- Shredded coconut: For a tropical twist, toasted or untoasted shredded coconut is a delightful addition.
Preparing Your Workspace and Wet Ingredients
- Preheat your oven and prepare your baking pan: First things first, let’s get that oven ready! Preheat your oven to a steady 350°F (175°C). This ensures a consistent baking temperature from the moment your bread goes in, which is crucial for even rising and browning. While the oven is heating, take a standard 9×5 inch (23×13 cm) loaf pan and prepare it thoroughly. I like to lightly grease it with butter or cooking spray, making sure to get into all the corners and up the sides. Then, dust it lightly with a tablespoon or so of all-purpose flour, tapping out any excess. For an extra easy removal and virtually no cleanup, you can also line the bottom and two long sides with a strip of parchment paper, leaving an overhang on the long sides to use as “handles” later. This really makes life simple when it comes to gently lifting the finished loaf out of the pan. Making sure your pan is ready before you start mixing means you won’t be scrambling later and can focus on the fun part: mixing the batter!
- Mash the ripe bananas: In a large mixing bowl, take your beautiful, ripe bananas and mash them thoroughly with a fork or a potato masher. You’re aiming for a consistency that’s mostly smooth but still has some small lumps. I personally love a few small banana chunks in my bread, as they add wonderful texture and pockets of intense banana flavor throughout the loaf, so don’t feel like you need to get every single lump out. This step is where all that wonderful banana essence is released, contributing significantly to the bread’s flavor and moisture, so take your time and enjoy the sweet aroma that will start to fill your kitchen!
- Melt the butter and let it cool slightly: In a microwave-safe bowl or a small saucepan over low heat, melt your 1/2 cup of unsalted butter until it’s completely liquid. Once it’s fully melted, set it aside for a few minutes to cool down. It’s incredibly important that the butter is not hot when you add it to your eggs, as direct heat could cook them prematurely, resulting in an undesirable texture (or even scrambled egg bits!) in your batter. It just needs to be warm or lukewarm, not scorching hot, to ensure it incorporates smoothly with the other wet ingredients without causing any issues.
- Combine the wet ingredients: Now, let’s bring it all together and create the flavorful base for our banana bread! To the mashed bananas in your large mixing bowl, add the slightly cooled melted butter. Then, crack in your two large room-temperature eggs. Sprinkle in both the granulated sugar and the packed light brown sugar. Finally, pour in your delightful vanilla extract. Give everything a good stir with a sturdy whisk or a rubber spatula until all these wet ingredients are thoroughly combined, well integrated, and uniform in color. The mixture will look a bit thick, syrupy, and very fragrant at this point, with a lovely golden-brown hue from the brown sugar and bananas. This is where the magic truly begins to happen, laying the foundation for a truly moist loaf!
Combining the Dry Ingredients
- Whisk together the dry ingredients: In a separate medium-sized bowl, measure out your 1 1/2 cups of all-purpose flour. Add the 1 teaspoon of fresh baking soda and the 1/2 teaspoon of salt. Take a whisk and gently, yet thoroughly, whisk these dry ingredients together for about 30 seconds to a minute. This step is much more important than it might seem because it ensures that the leavening agent (baking soda) and salt are evenly distributed throughout the flour. If you don’t do this, you might end up with pockets of unrisen batter, leading to an uneven texture, or overly salty bits in some areas of your bread and blandness in others, and nobody wants that! Even distribution means your banana bread will rise uniformly, have a consistent, tender texture, and a balanced flavor in every single bite.
Mixing and Baking the Banana Bread
- Gently combine wet and dry ingredients: Now for the absolutely crucial step of bringing the two bowls together. Pour the dry ingredient mixture directly into the bowl with your wet banana mixture. Using a rubber spatula or a sturdy wooden spoon, gently fold the ingredients together. Here’s an important tip for beginners that cannot be stressed enough: do not overmix! Mix just until the flour streaks have almost disappeared and everything is just combined. A few small lumps in the batter from the bananas are perfectly fine, and even desirable, as they contribute to the rustic charm and moistness of the bread. Overmixing develops the gluten in the flour too much, which can lead to a tough, dense, and chewy banana bread, rather than the wonderfully moist, tender loaf we’re aiming for. So, be gentle, mix with a light hand, and stop as soon as you see no more dry flour patches. The less you mix, the more tender your bread will be!
- Fold in any optional add-ins: If you’re incorporating delicious extras like chopped nuts, chocolate chips, dried fruit, or shredded coconut, now is the perfect time to add them! Gently fold them into the batter until they are evenly distributed. Again, be mindful not to overmix here; usually just a few more stirs are enough to spread the goodies throughout the batter, and then you stop. These additions not only enhance the flavor but also provide delightful bursts of texture in every slice, making your banana bread even more exciting and personalized.
- Pour the batter into the prepared pan: Carefully scrape all of the wonderful banana bread batter from the mixing bowl into your thoroughly greased and floured (or parchment-lined) 9×5 inch loaf pan. Use your rubber spatula to gently spread the batter evenly in the pan, making sure it reaches into all the corners and the top is relatively level. You can gently tap the pan on your counter a few times to release any large air bubbles and help settle the batter. If you like, for an extra touch of visual appeal, you can sprinkle a few extra chocolate chips, nuts, or a slice of banana on top before baking – it also gives a lovely hint of the delightful surprises awaiting inside!
-
Bake your banana bread to golden perfection: Place the loaf pan carefully into your preheated 350°F (175°C) oven. The baking time will typically be between 55 to 65 minutes. However, every oven is a little different, and exact baking times can vary, so it’s always best to keep a close eye on your bread, especially towards the end of the baking cycle. Around the 45-minute mark, your kitchen will undoubtedly start to fill with the most incredible, warm, sweet, and comforting aroma – that’s your cue that something delicious is happening! The bread should be beautifully golden brown on top, and the edges will start to pull away slightly from the sides of the pan.
How to Check for Doneness:
The most reliable way to tell if your banana bread is perfectly baked through is by inserting a long wooden skewer or a clean toothpick directly into the very center of the loaf. When you pull it out, it should come out clean or with just a few moist crumbs attached. If you see any wet batter, pop it back in the oven for another 5-10 minutes and test again. If you notice the top is browning too quickly before the center is cooked, you can loosely tent the loaf with a piece of aluminum foil for the remaining baking time to prevent it from getting too dark.
Cooling and Serving Your Delicious Banana Bread
- Cool the banana bread in the pan: Once your banana bread is perfectly baked, passes the toothpick test, and looks glorious, carefully remove the loaf pan from the hot oven. Resist the incredible urge to slice into it right away! Let the banana bread cool in the loaf pan on a wire rack for about 10 to 15 minutes. This initial cooling period in the pan is incredibly important because it allows the bread to set and firm up a bit. If you try to remove it too soon, it might crumble, stick to the pan, or simply collapse. Plus, the residual heat retained by the pan helps the bread finish cooking slightly (this is called carryover cooking) and enhances its moist, tender texture even further.
- Transfer to a wire rack for complete cooling: After the initial cooling period in the pan, gently run a thin knife or offset spatula around the edges of the loaf to loosen it from the pan, if you didn’t use parchment paper. If you were smart and used parchment paper handles, simply lift the loaf straight out of the pan using those convenient handles. Transfer the banana bread to a wire cooling rack and let it cool completely. I know, I know, waiting for this irresistible aroma to completely cool down is absolute torture! But trust me on this one; patience truly pays off. Cooling completely on a wire rack allows air to circulate evenly around all sides of the loaf, preventing the bottom from becoming soggy from trapped steam. It also makes for much cleaner, neater slices when you finally cut into it, and a fully cooled loaf is much easier to handle, slice, and store.
-
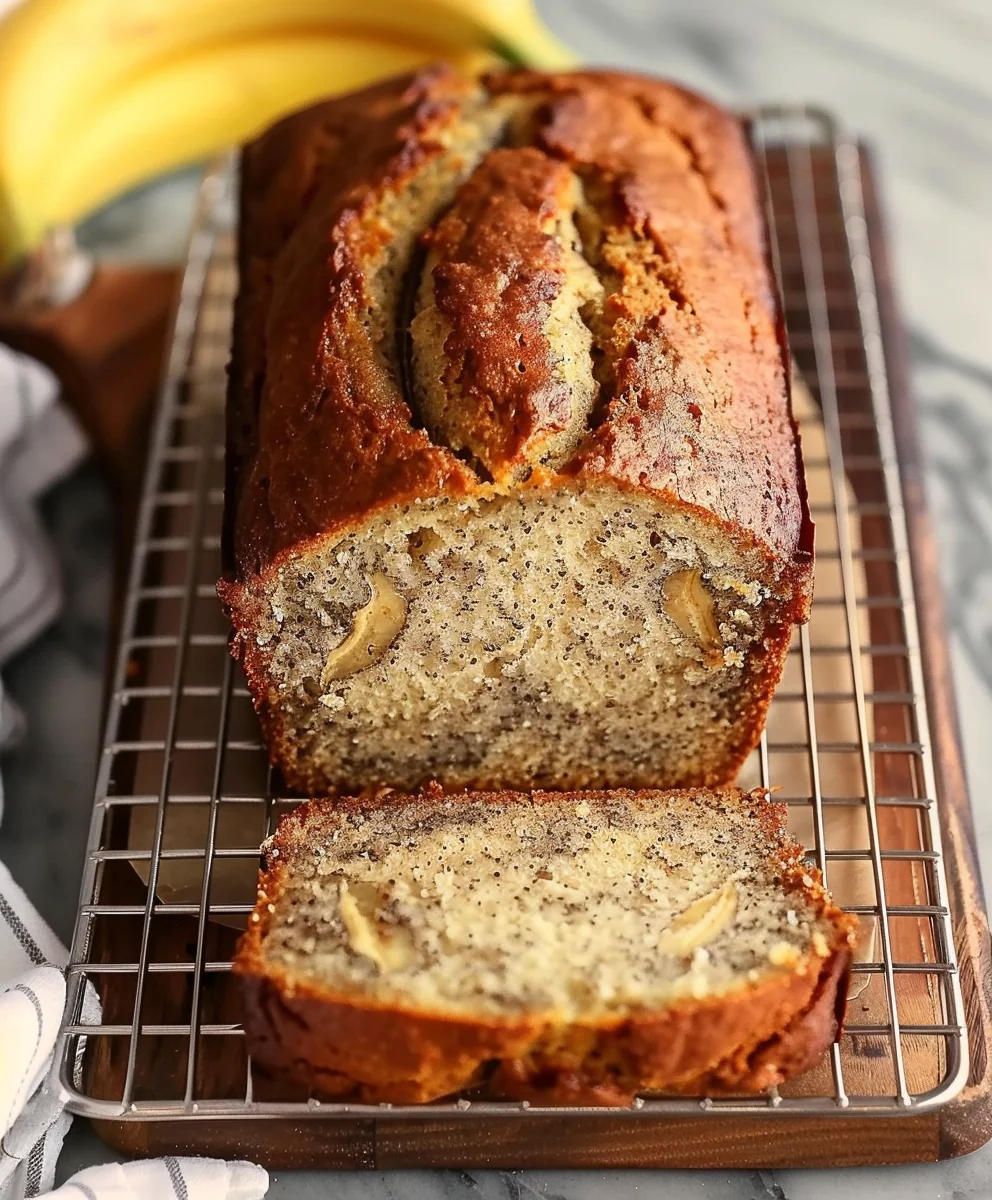
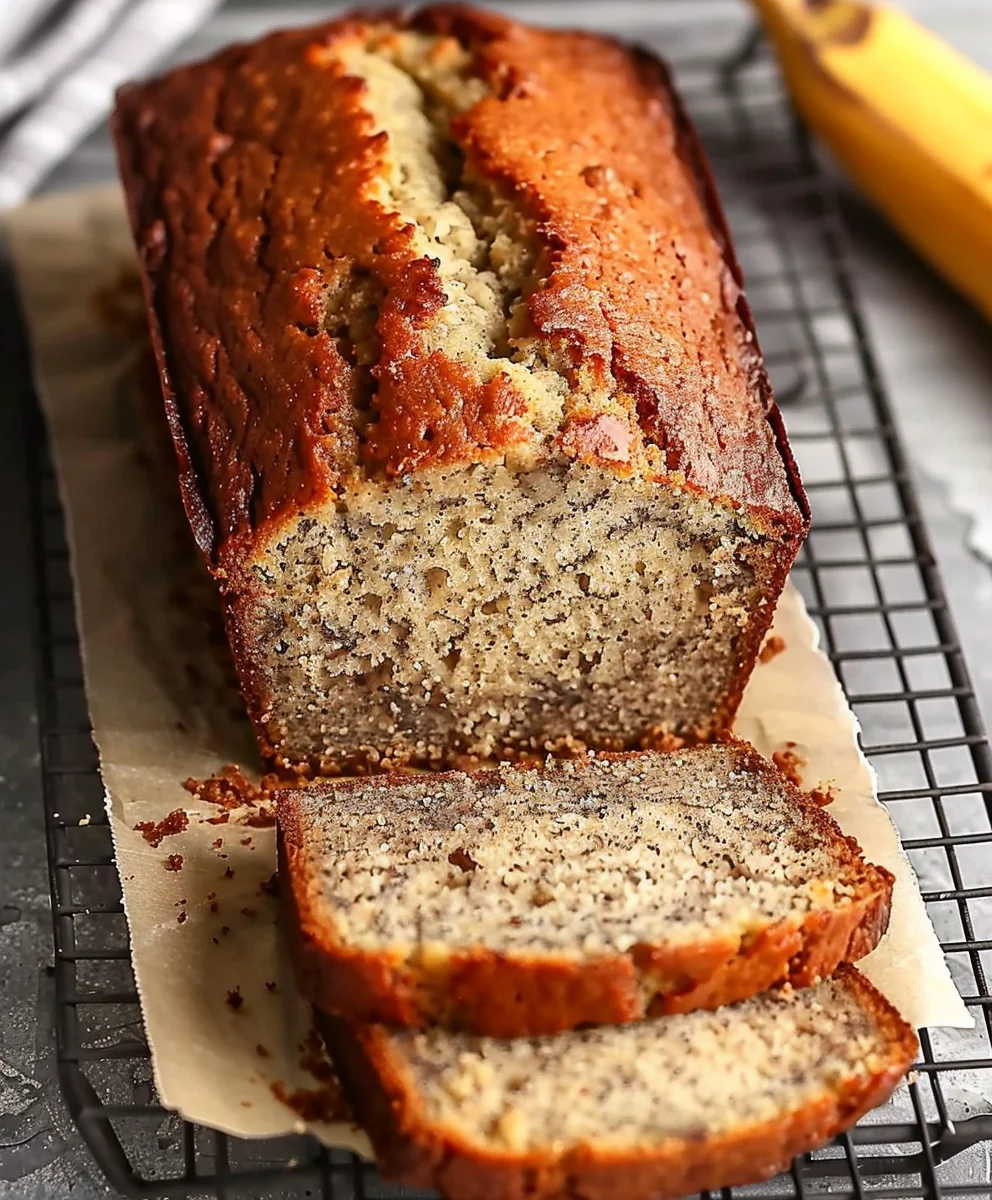
Slice and enjoy: Once the banana bread has cooled completely (or at least to lukewarm, if you absolutely, positively can’t wait any longer and are ready to risk slightly less pristine slices!), grab a sharp, serrated knife and slice it into thick, generous pieces. The aroma alone will be enough to make your mouth water and make you proud of your baking accomplishment! This banana bread is incredibly versatile and utterly delicious all on its own, celebrating the pure banana flavor.
Serving Suggestions:
- Enjoy it plain for a simple, comforting, and wholesome treat any time of day.
- Spread a dollop of soft butter, cream cheese, or even a nut butter for an extra rich and satisfying experience.
- Serve it alongside your morning coffee or tea, making for a perfect breakfast or afternoon pick-me-up.
- A light drizzle of honey, a sprinkle of cinnamon, or a dusting of powdered sugar can also be lovely for an added touch of elegance.
- For an extra indulgent treat, warm a slice slightly and serve it with a scoop of vanilla ice cream – simply divine!
It’s truly perfect for breakfast, a comforting snack, or even a light dessert.
- Storing your homemade banana bread: To keep your incredibly moist banana bread fresh and delicious for as long as possible, store it at room temperature in an airtight container or tightly wrapped in plastic wrap. It will stay wonderfully fresh and moist on your counter for up to 3-4 days. If you live in a particularly warm or humid climate, or if you want to extend its life, you can store it in the refrigerator for up to a week, though I find the texture is best at room temperature. For longer storage, homemade banana bread freezes beautifully! Once completely cooled, wrap the entire loaf or individual slices tightly in plastic wrap, then again in a layer of aluminum foil to prevent freezer burn. It can be frozen for up to 3 months. When you’re ready to enjoy, simply thaw at room temperature for a few hours, or gently warm individual slices in the microwave or toaster oven for a quick treat. You’ll be amazed at how well it holds up and how fresh it tastes even after being frozen! Enjoy every single delicious slice of your homemade, easy, and incredibly moist banana bread – you’ve earned it!
Conclusion:
And there you have it, my dear fellow baking enthusiasts! We’ve reached the end of our journey through what I truly believe is not just another recipe, but a gateway to a delightful, comforting, and undeniably satisfying experience. If you’ve been on the fence about baking, or perhaps you’re a seasoned pro looking for a consistently perfect outcome, this particular method for creating the ultimate banana bread is, without a doubt, a game-changer. I’ve shared every trick and tip I know to ensure your success, because nothing gives me more joy than seeing others create something wonderful in their own kitchens.
Why is this recipe a must-try, you ask? Well, for starters, it absolutely lives up to its name. You’ll find that it consistently delivers an incredibly moist crumb, a rich banana flavor that sings with natural sweetness, and a texture that is simply heavenly – tender, never dry, and utterly satisfying with every single bite. It’s the kind of bake that makes your entire home smell inviting, drawing everyone towards the kitchen with its irresistible aroma. What truly sets it apart is its remarkable simplicity. I’ve specifically designed and refined this to be an Easy Moist Banana Bread Recipe For Beginners, meaning you don’t need fancy equipment or advanced techniques to achieve bakery-quality results. We’re talking minimal fuss, maximum flavor. The steps are straightforward, the ingredients are pantry staples, and the payoff is immense. It’s the perfect project for a lazy weekend afternoon, a thoughtful gift for a friend, or simply a treat to brighten your own day. Trust me when I say, once you try this version, it will quickly become your go-to.
Now, let’s talk about enjoying your masterpiece! While this banana bread is absolutely phenomenal on its own, still warm from the oven with its fragrant crust, there are so many ways to elevate the experience. For a simple breakfast or snack, I adore a thick slice lightly toasted and spread with a generous dollop of butter – the way it melts into the warm bread is pure bliss. Alternatively, a smear of cream cheese frosting turns it into an indulgent dessert, especially if you add a sprinkle of cinnamon on top. Feeling fancy? Try serving it with a scoop of vanilla bean ice cream and a drizzle of caramel sauce for an after-dinner treat that will impress any guest. For those who like a little extra texture and flavor, consider folding in a handful of chopped walnuts or pecans into the batter next time, or perhaps some dark chocolate chips for a decadent twist. Dried cranberries or even a dash of pumpkin pie spice can also add wonderful new dimensions. The beauty of this recipe is its versatility; it serves as a fantastic base for all your creative whims. Don’t be afraid to experiment with your favorite add-ins – just remember not to overload the batter to maintain that perfect moistness!
My hope is that after reading this, you feel inspired and confident enough to roll up your sleeves and dive into baking this delightful banana bread. I truly believe that baking should be a joyful and accessible experience for everyone, and this recipe embodies that philosophy perfectly. So, please, give it a try! Gather your ripe bananas, preheat your oven, and let the magic happen. When you do, I would absolutely love to hear about your experience. Did you add anything special? What did your family think? How did it make your kitchen smell? Your feedback and shared moments truly make my day and fuel my passion for sharing more delicious recipes with you all. Snap a photo of your beautiful creation and share it with us – let’s celebrate the simple joy of baking together. Happy baking, my friends!
Beginner’s Easy Moist Banana Bread: Perfect Every Time!
An incredibly easy and moist banana bread recipe perfect for beginners. Transform ripe bananas into a comforting, tender, and flavorful loaf. No fancy equipment or obscure ingredients needed for this ultimate comfort food, ideal for breakfast, a snack, or light dessert.
Ingredients
-
3 large ripe to overripe bananas
-
1/2 cup (1 stick) unsalted butter, melted and slightly cooled
-
2 large eggs, room temperature
-
1 cup granulated sugar
-
1/4 cup (50g) packed light brown sugar
-
1 teaspoon non-alcoholic vanilla extract
-
1 1/2 cups all-purpose flour
-
1 teaspoon baking soda
-
1/2 teaspoon salt
-
1/2 to 1 cup optional add-ins (e.g., chopped nuts, chocolate chips, dried fruit, shredded coconut)
Instructions
-
Step 1
Preheat oven to 350°F (175°C). Lightly grease and flour a 9×5 inch (23×13 cm) loaf pan, or line it with parchment paper for easy removal. -
Step 2
In a large mixing bowl, mash the ripe bananas, leaving a few small lumps for texture. Add the slightly cooled melted butter, room temperature eggs, granulated sugar, packed light brown sugar, and non-alcoholic vanilla extract. Stir with a whisk or spatula until all wet ingredients are thoroughly combined and uniform. -
Step 3
In a separate medium-sized bowl, whisk together the all-purpose flour, baking soda, and salt for about 30 seconds to ensure even distribution. -
Step 4
Pour the dry ingredient mixture into the wet banana mixture. Using a rubber spatula, gently fold the ingredients together until flour streaks have almost disappeared and the batter is just combined. Do not overmix, as this can lead to a tough loaf. If using, gently fold in optional add-ins like nuts or chocolate chips until evenly distributed. -
Step 5
Carefully scrape the batter into the prepared loaf pan and spread evenly. Place the pan in the preheated oven and bake for 55 to 65 minutes. The bread is done when a long wooden skewer or clean toothpick inserted into the very center comes out clean or with just a few moist crumbs. If the top browns too quickly, loosely tent the loaf with aluminum foil. -
Step 6
Once baked, remove the loaf pan from the oven and let the banana bread cool in the pan on a wire rack for 10-15 minutes. This allows it to set. Then, gently remove the loaf from the pan and transfer it directly to the wire rack to cool completely. Cooling thoroughly prevents a soggy bottom and makes for cleaner slices. Once cooled, slice with a sharp, serrated knife and enjoy! Serve plain, with butter, cream cheese, or as a dessert with ice cream. -
Step 7
Store leftover banana bread at room temperature in an airtight container or tightly wrapped in plastic wrap for 3-4 days. For longer storage, wrap individual slices or the whole loaf tightly in plastic wrap, then aluminum foil, and freeze for up to 3 months. Thaw at room temperature or gently warm before serving.
Important Information
Nutrition Facts (Per Serving)
It is important to consider this information as approximate and not to use it as definitive health advice.
Allergy Information
Please check ingredients for potential allergens and consult a health professional if in doubt.


Leave a Comment