
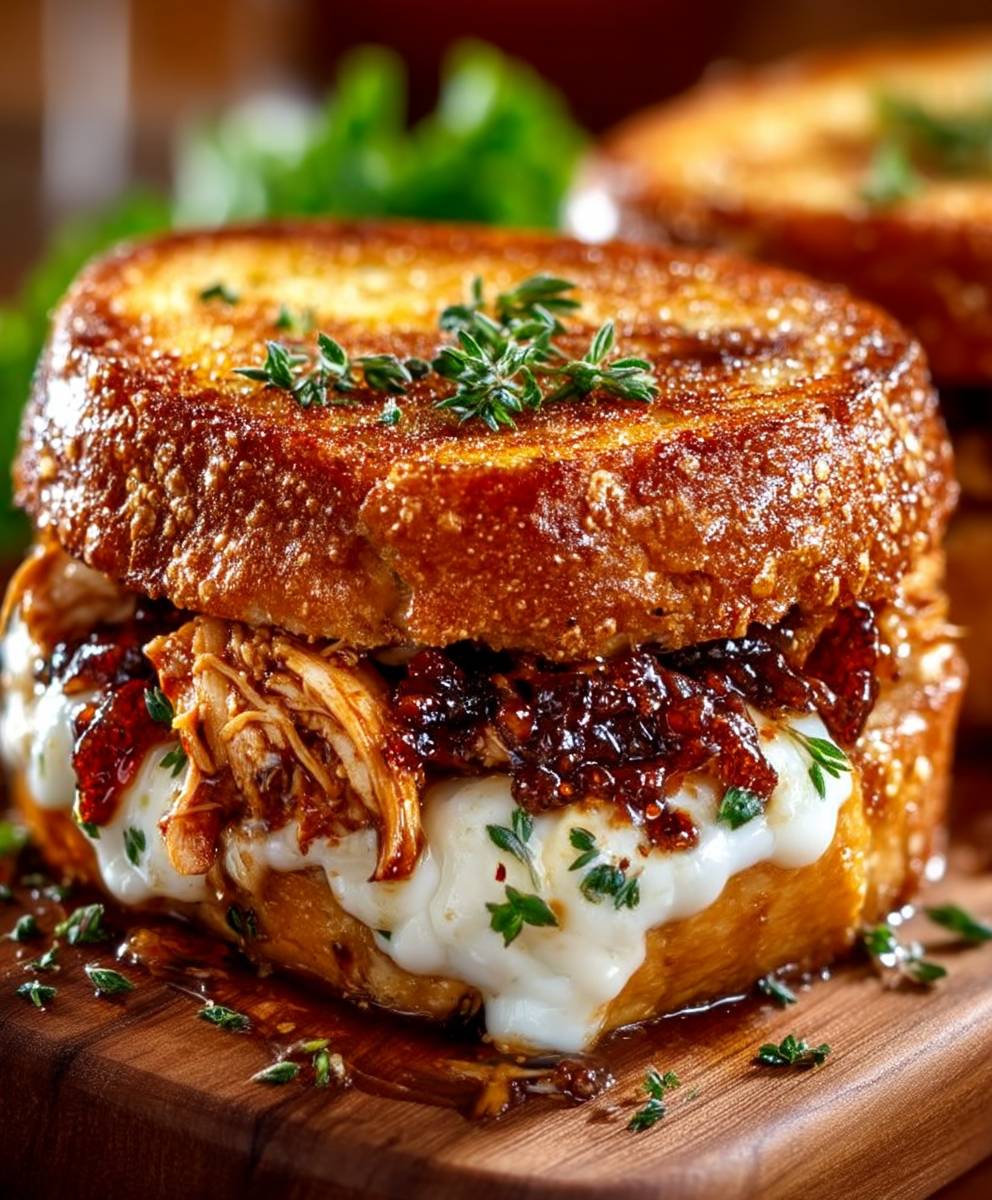
BBQ Chicken Grilled Cheese: Prepare to experience a flavor explosion that will redefine your definition of comfort food! Imagine the smoky sweetness of barbecue chicken melding perfectly with the gooey, melted cheese nestled between slices of golden-brown, perfectly grilled bread. This isn’t just a sandwich; it’s a culinary adventure.
While the grilled cheese sandwich itself boasts a long and beloved history, tracing back to the simple pleasure of toasted bread and cheese, the addition of barbecue chicken elevates it to a whole new level. Barbecue, with its roots in the Caribbean and its evolution across the American South, brings a rich, smoky heritage to this modern twist. It’s a fusion of classic comfort and bold, contemporary flavors.
People adore this BBQ Chicken Grilled Cheese because it’s the ultimate indulgence. The combination of savory barbecue chicken, creamy melted cheese, and the satisfying crunch of grilled bread is simply irresistible. It’s quick, easy to make, and perfect for a weeknight dinner or a weekend lunch. Plus, it’s a fantastic way to use up leftover barbecue chicken! The tangy barbecue sauce complements the richness of the cheese, creating a symphony of flavors that will leave you craving more. Get ready to discover your new favorite sandwich!

Ingredients:
- For the BBQ Chicken:
- 2 boneless, skinless chicken breasts (about 6-8 ounces each)
- 1 tablespoon olive oil
- 1/2 teaspoon smoked paprika
- 1/4 teaspoon garlic powder
- 1/4 teaspoon onion powder
- 1/4 teaspoon chili powder
- Salt and pepper to taste
- 1 cup BBQ sauce (your favorite brand!)
- For the Grilled Cheese:
- 8 slices of your favorite bread (I love using sourdough or Texas toast)
- 4 tablespoons butter, softened
- 8 slices cheddar cheese (or your preferred cheese blend – Monterey Jack and pepper jack are also great!)
- 1/2 cup red onion, thinly sliced
- 1/4 cup cilantro, chopped (optional)
Preparing the BBQ Chicken:
- Season the Chicken: In a small bowl, combine the smoked paprika, garlic powder, onion powder, chili powder, salt, and pepper. Rub this spice mixture all over the chicken breasts, ensuring they are evenly coated.
- Sear the Chicken: Heat the olive oil in a large skillet over medium-high heat. Once the oil is shimmering, add the seasoned chicken breasts to the skillet. Sear for about 3-4 minutes per side, until they are nicely browned. This step is crucial for developing flavor and locking in the juices. Don’t overcrowd the pan; if your skillet isn’t large enough, cook the chicken in batches.
- Simmer in BBQ Sauce: Reduce the heat to medium-low. Pour the BBQ sauce over the chicken breasts, ensuring they are completely covered. Cover the skillet with a lid and let the chicken simmer in the BBQ sauce for about 15-20 minutes, or until the chicken is cooked through and reaches an internal temperature of 165°F (74°C). Use a meat thermometer to check for doneness.
- Shred the Chicken: Remove the chicken breasts from the skillet and place them on a cutting board. Use two forks to shred the chicken into bite-sized pieces. Return the shredded chicken to the skillet with the BBQ sauce and toss to coat. This ensures every piece of chicken is flavorful and saucy.
Assembling the Grilled Cheese:
- Butter the Bread: Spread a thin layer of softened butter on one side of each slice of bread. This buttered side will be the outside of your grilled cheese, creating that golden-brown, crispy crust we all love.
- Layer the Cheese: Place four slices of bread, butter-side down, on a clean work surface. On each slice, layer two slices of cheddar cheese (or your cheese of choice). Make sure the cheese covers the entire surface of the bread to prevent any dry spots.
- Add the BBQ Chicken and Red Onion: Evenly distribute the shredded BBQ chicken over the cheese on each of the four bread slices. Top the chicken with thinly sliced red onion. The red onion adds a nice bite and complements the sweetness of the BBQ sauce. If you’re using cilantro, sprinkle it over the chicken and onion at this stage.
- Top with More Cheese: Add another layer of cheese (one or two slices, depending on your preference) on top of the chicken and red onion. This will help to hold everything together and create an extra gooey grilled cheese.
- Close the Sandwiches: Place the remaining four slices of bread, butter-side up, on top of the cheese, chicken, and onion. Gently press down on each sandwich to ensure the filling is evenly distributed and the bread adheres to the cheese.
Cooking the Grilled Cheese:
- Heat the Skillet: Heat a large skillet or griddle over medium heat. You want the skillet to be hot enough to melt the cheese and toast the bread, but not so hot that the bread burns before the cheese melts.
- Grill the Sandwiches: Carefully place the assembled grilled cheese sandwiches in the hot skillet. Don’t overcrowd the pan; if necessary, cook the sandwiches in batches.
- Cook Until Golden Brown: Cook the sandwiches for about 3-4 minutes per side, or until the bread is golden brown and the cheese is melted and gooey. Use a spatula to gently flip the sandwiches, being careful not to lose any of the filling. You can also gently press down on the sandwiches with the spatula while they are cooking to ensure even browning and melting.
- Check for Doneness: To ensure the cheese is fully melted, you can cover the skillet with a lid for the last minute or two of cooking. This will trap the heat and help the cheese melt faster.
- Remove and Serve: Once the grilled cheese sandwiches are golden brown and the cheese is melted, remove them from the skillet and place them on a cutting board. Let them cool for a minute or two before slicing in half and serving. This will prevent the cheese from oozing out too much when you cut into them.
Tips for the Perfect BBQ Chicken Grilled Cheese:
- Use High-Quality Ingredients: The better the ingredients, the better the final product. Choose a good quality BBQ sauce, flavorful cheese, and fresh bread.
- Don’t Overcrowd the Pan: Cooking the grilled cheese sandwiches in batches ensures that they cook evenly and the bread gets nice and crispy.
- Use Medium Heat: Cooking over medium heat allows the cheese to melt completely without burning the bread.
- Press Gently: Gently pressing down on the sandwiches with a spatula while they are cooking helps to ensure even browning and melting.
- Experiment with Cheese: Feel free to experiment with different types of cheese. Monterey Jack, pepper jack, and provolone are all great options.
- Add Some Heat: If you like a little spice, add a pinch of red pepper flakes to the BBQ chicken or use pepper jack cheese.
- Serve Immediately: Grilled cheese sandwiches are best served immediately, while the bread is still crispy and the cheese is melted and gooey.
Variations:
- BBQ Chicken Grilled Cheese with Bacon: Add cooked bacon to the grilled cheese for an extra layer of flavor and texture.
- BBQ Chicken Grilled Cheese with Avocado: Add sliced avocado to the grilled cheese after it’s cooked for a creamy and refreshing twist.
- BBQ Chicken Grilled Cheese with Jalapeños: Add sliced jalapeños to the grilled cheese for a spicy kick.
- BBQ Chicken Grilled Cheese with Coleslaw: Serve the grilled cheese with a side of coleslaw for a classic BBQ combination.
Conclusion:
So there you have it! This BBQ Chicken Grilled Cheese isn’t just another sandwich; it’s a flavor explosion waiting to happen. The smoky sweetness of the barbecue sauce, the tender chicken, and the gooey, melted cheese all come together in perfect harmony between two slices of perfectly toasted bread. It’s quick, it’s easy, and it’s guaranteed to satisfy even the biggest cravings. Honestly, what’s not to love?
I truly believe this recipe is a must-try for anyone who enjoys a good grilled cheese or is looking for a fun and creative way to use leftover barbecue chicken. It’s a fantastic weeknight meal, a crowd-pleasing lunch option, or even a surprisingly delicious late-night snack. Forget boring sandwiches – this is where it’s at!
But the fun doesn’t stop there! Feel free to get creative and customize this recipe to your own tastes. Want to add a little kick? Try incorporating some sliced jalapeños or a dash of hot sauce into the mix. Craving something a bit more savory? A sprinkle of crumbled bacon or some caramelized onions would be absolutely divine. You could even experiment with different types of cheese! While cheddar is a classic choice, provolone, Monterey Jack, or even a smoky Gouda would all work beautifully.
Serving Suggestions and Variations:
* Serve your BBQ Chicken Grilled Cheese with a side of coleslaw or potato salad for a complete and satisfying meal.
* Cut the grilled cheese into smaller squares and serve as appetizers at your next party. They’re always a hit!
* For a vegetarian option, substitute the chicken with grilled portobello mushrooms marinated in barbecue sauce.
* Try using different types of bread, such as sourdough, brioche, or even Texas toast, for a unique twist.
* Add a thin layer of ranch dressing or blue cheese dressing inside the sandwich for extra flavor.
* Don’t be afraid to experiment with different barbecue sauce flavors! Honey barbecue, spicy barbecue, or even a fruit-based barbecue sauce can all add a unique dimension to the sandwich.
* Consider adding some fresh cilantro or chopped green onions for a pop of freshness.
Ultimately, the best part about this recipe is that it’s incredibly versatile. You can easily adapt it to suit your own preferences and dietary needs. So, go ahead and unleash your inner chef!
I’m so confident that you’ll love this BBQ Chicken Grilled Cheese as much as I do. It’s a simple yet satisfying recipe that’s perfect for any occasion. I encourage you to give it a try and see for yourself! And when you do, please don’t hesitate to share your experience with me. I’d love to hear what you think, what variations you tried, and how you made it your own. You can leave a comment below, tag me on social media, or even send me an email. I’m always eager to hear from fellow food lovers! Happy cooking, and I hope you enjoy every delicious bite! I can’t wait to hear about your BBQ Chicken Grilled Cheese adventures!
BBQ Chicken Grilled Cheese: The Ultimate Comfort Food Recipe
This BBQ Chicken Grilled Cheese recipe combines the comforting flavors of grilled cheese with savory BBQ chicken. Shredded chicken is simmered in your favorite BBQ sauce, then layered with cheddar cheese, red onion, and cilantro between slices of buttered bread, grilled to golden perfection. Perfect for a quick and satisfying meal.
Ingredients
**I. Recipe Overview**
* **Name:** BBQ Chicken Grilled Cheese
* **Yields:** 4 servings
* **Prep Time:** 20 minutes
* **Cook Time:** 30 minutes
**II. Ingredients**
* **A. BBQ Chicken Ingredients:**
* 2 boneless, skinless chicken breasts (6-8 ounces each)
* 1 tablespoon olive oil
* 1/2 teaspoon smoked paprika
* 1/4 teaspoon garlic powder
* 1/4 teaspoon onion powder
* 1/4 teaspoon chili powder
* Salt and pepper to taste
* 1 cup BBQ sauce (your favorite brand)
* **B. Grilled Cheese Ingredients:**
* 8 slices bread (sourdough or Texas toast recommended)
* 4 tablespoons butter, softened
* 8 slices cheddar cheese (or preferred cheese blend)
* 1/2 cup red onion, thinly sliced
* 1/4 cup cilantro, chopped (optional)
**III. Instructions**
* **A. Preparing the BBQ Chicken:**
1. **Season Chicken:** Combine smoked paprika, garlic powder, onion powder, chili powder, salt, and pepper in a bowl. Rub the mixture evenly over the chicken breasts.
2. **Sear Chicken:** Heat olive oil in a large skillet over medium-high heat. Sear chicken breasts for 3-4 minutes per side until browned. Cook in batches if necessary to avoid overcrowding.
3. **Simmer in BBQ Sauce:** Reduce heat to medium-low. Pour BBQ sauce over chicken, ensuring it’s completely covered. Cover the skillet and simmer for 15-20 minutes, or until the chicken reaches an internal temperature of 165°F (74°C). Use a meat thermometer.
4. **Shred Chicken:** Remove chicken from skillet and shred with two forks. Return shredded chicken to the skillet with the BBQ sauce and toss to coat.
* **B. Assembling the Grilled Cheese:**
1. **Butter Bread:** Spread a thin layer of softened butter on one side of each slice of bread.
2. **Layer Cheese:** Place four slices of bread, butter-side down, on a clean surface. Layer two slices of cheese on each slice.
3. **Add Chicken and Onion:** Distribute shredded BBQ chicken evenly over the cheese. Top with thinly sliced red onion. Sprinkle with cilantro, if using.
4. **Add More Cheese:** Add another layer of cheese on top of the chicken and red onion.
5. **Close Sandwiches:** Place the remaining four slices of bread, butter-side up, on top of the cheese, chicken, and onion. Gently press down on each sandwich.
* **C. Cooking the Grilled Cheese:**
1. **Heat Skillet:** Heat a large skillet or griddle over medium heat.
2. **Grill Sandwiches:** Carefully place assembled grilled cheese sandwiches in the hot skillet. Cook in batches if necessary.
3. **Cook Until Golden Brown:** Cook for 3-4 minutes per side, or until bread is golden brown and cheese is melted and gooey. Flip carefully with a spatula. Gently press down on the sandwiches while cooking.
4. **Check for Doneness:** Cover the skillet with a lid for the last minute or two of cooking to ensure the cheese is fully melted.
5. **Remove and Serve:** Remove from skillet and let cool for a minute or two before slicing in half and serving.
**IV. Tips for the Perfect Grilled Cheese**
* Use high-quality ingredients.
* Don’t overcrowd the pan.
* Use medium heat.
* Press gently while cooking.
* Experiment with different cheeses.
* Add some heat with red pepper flakes or pepper jack cheese.
* Serve immediately.
**V. Variations**
* BBQ Chicken Grilled Cheese with Bacon
* BBQ Chicken Grilled Cheese with Avocado
* BBQ Chicken Grilled Cheese with Jalapeños
* BBQ Chicken Grilled Cheese with Coleslaw
This structured format makes the recipe easier to follow and understand. It clearly separates the ingredients and steps, and highlights important tips and variations.
Instructions
- Season the Chicken: In a small bowl, combine the smoked paprika, garlic powder, onion powder, chili powder, salt, and pepper. Rub this spice mixture all over the chicken breasts, ensuring they are evenly coated.
- Sear the Chicken: Heat the olive oil in a large skillet over medium-high heat. Once the oil is shimmering, add the seasoned chicken breasts to the skillet. Sear for about 3-4 minutes per side, until they are nicely browned. This step is crucial for developing flavor and locking in the juices. Don’t overcrowd the pan; if your skillet isn’t large enough, cook the chicken in batches.
- Simmer in BBQ Sauce: Reduce the heat to medium-low. Pour the BBQ sauce over the chicken breasts, ensuring they are completely covered. Cover the skillet with a lid and let the chicken simmer in the BBQ sauce for about 15-20 minutes, or until the chicken is cooked through and reaches an internal temperature of 165°F (74°C). Use a meat thermometer to check for doneness.
- Shred the Chicken: Remove the chicken breasts from the skillet and place them on a cutting board. Use two forks to shred the chicken into bite-sized pieces. Return the shredded chicken to the skillet with the BBQ sauce and toss to coat. This ensures every piece of chicken is flavorful and saucy.
- Butter the Bread: Spread a thin layer of softened butter on one side of each slice of bread. This buttered side will be the outside of your grilled cheese, creating that golden-brown, crispy crust we all love.
- Layer the Cheese: Place four slices of bread, butter-side down, on a clean work surface. On each slice, layer two slices of cheddar cheese (or your cheese of choice). Make sure the cheese covers the entire surface of the bread to prevent any dry spots.
- Add the BBQ Chicken and Red Onion: Evenly distribute the shredded BBQ chicken over the cheese on each of the four bread slices. Top the chicken with thinly sliced red onion. The red onion adds a nice bite and complements the sweetness of the BBQ sauce. If you’re using cilantro, sprinkle it over the chicken and onion at this stage.
- Top with More Cheese: Add another layer of cheese (one or two slices, depending on your preference) on top of the chicken and red onion. This will help to hold everything together and create an extra gooey grilled cheese.
- Close the Sandwiches: Place the remaining four slices of bread, butter-side up, on top of the cheese, chicken, and onion. Gently press down on each sandwich to ensure the filling is evenly distributed and the bread adheres to the cheese.
- Heat the Skillet: Heat a large skillet or griddle over medium heat. You want the skillet to be hot enough to melt the cheese and toast the bread, but not so hot that the bread burns before the cheese melts.
- Grill the Sandwiches: Carefully place the assembled grilled cheese sandwiches in the hot skillet. Don’t overcrowd the pan; if necessary, cook the sandwiches in batches.
- Cook Until Golden Brown: Cook the sandwiches for about 3-4 minutes per side, or until the bread is golden brown and the cheese is melted and gooey. Use a spatula to gently flip the sandwiches, being careful not to lose any of the filling. You can also gently press down on the sandwiches with the spatula while they are cooking to ensure even browning and melting.
- Check for Doneness: To ensure the cheese is fully melted, you can cover the skillet with a lid for the last minute or two of cooking. This will trap the heat and help the cheese melt faster.
- Remove and Serve: Once the grilled cheese sandwiches are golden brown and the cheese is melted, remove them from the skillet and place them on a cutting board. Let them cool for a minute or two before slicing in half and serving. This will prevent the cheese from oozing out too much when you cut into them.
Notes
**Yields:** 4 servings
**Prep time:** 20 minutes
**Cook time:** 30 minutes
**Keywords:** BBQ Chicken Grilled Cheese, Grilled Cheese Recipe, Chicken Recipe, BBQ Recipe, Comfort Food, Easy Dinner, Quick Lunch
## Ingredients:
**For the BBQ Chicken:**
* 2 boneless, skinless chicken breasts (6-8 ounces each) – *Consider adding “fresh or frozen, thawed”*
* 1 tablespoon olive oil – *Consider adding “extra virgin”*
* 1/2 teaspoon smoked paprika – *Consider adding “for smoky flavor”*
* 1/4 teaspoon garlic powder
* 1/4 teaspoon onion powder
* 1/4 teaspoon chili powder
* Salt and pepper to taste
* 1 cup BBQ sauce (your favorite brand!) – *Consider adding “store-bought or homemade”*
**For the Grilled Cheese:**
* 8 slices of your favorite bread (sourdough or Texas toast recommended) – *Consider adding “thick-cut” or “artisan bread”*
* 4 tablespoons butter, softened – *Consider adding “unsalted”*
* 8 slices cheddar cheese (or your preferred cheese blend – Monterey Jack and pepper jack are also great!) – *Consider adding “sharp cheddar” or “mild cheddar”*
* 1/2 cup red onion, thinly sliced – *Consider adding “for a sharp bite”*
* 1/4 cup cilantro, chopped (optional) – *Consider adding “fresh cilantro”*
### Instructions:
#### Preparing the BBQ Chicken:
1. **Season the Chicken:** In a small bowl, combine the smoked paprika, garlic powder, onion powder, chili powder, salt, and pepper. Rub this spice mixture all over the chicken breasts, ensuring they are evenly coated. *Consider adding “This creates a flavorful crust.”*
2. **Sear the Chicken:** Heat the olive oil in a large skillet over medium-high heat. Once the oil is shimmering, add the seasoned chicken breasts to the skillet. Sear for about 3-4 minutes per side, until they are nicely browned. This step is crucial for developing flavor and locking in the juices. Don’t overcrowd the pan; if your skillet isn’t large enough, cook the chicken in batches. *Consider adding “Searing seals in the moisture.”*
3. **Simmer in BBQ Sauce:** Reduce the heat to medium-low. Pour the BBQ sauce over the chicken breasts, ensuring they are completely covered. Cover the skillet with a lid and let the chicken simmer in the BBQ sauce for about 15-20 minutes, or until the chicken is cooked through and reaches an internal temperature of 165°F (74°C). Use a meat thermometer to check for doneness. *Consider adding “This ensures the chicken is safe to eat.”*
4. **Shred the Chicken:** Remove the chicken breasts from the skillet and place them on a cutting board. Use two forks to shred the chicken into bite-sized pieces. Return the shredded chicken to the skillet with the BBQ sauce and toss to coat. This ensures every piece of chicken is flavorful and saucy. *Consider adding “This makes it easier to eat in the grilled cheese.”*
#### Assembling the Grilled Cheese:
1. **Butter the Bread:** Spread a thin layer of softened butter on one side of each slice of bread. This buttered side will be the outside of your grilled cheese, creating that golden-brown, crispy crust we all love. *Consider adding “Butter helps the bread brown evenly.”*
2. **Layer the Cheese:** Place four slices of bread, butter-side down, on a clean work surface. On each slice, layer two slices of cheddar cheese (or your cheese of choice). Make sure the cheese covers the entire surface of the bread to prevent any dry spots. *Consider adding “Use enough cheese to cover the bread completely.”*
3. **Add the BBQ Chicken and Red Onion:** Evenly distribute the shredded BBQ chicken over the cheese on each of the four bread slices. Top the chicken with thinly sliced red onion. The red onion adds a nice bite and complements the sweetness of the BBQ sauce. If you’re using cilantro, sprinkle it over the chicken and onion at this stage. *Consider adding “Don’t overload the sandwich with chicken.”*
4. **Top with More Cheese:** Add another layer of cheese (one or two slices, depending on your preference) on top of the chicken and red onion. This will help to hold everything together and create an extra gooey grilled cheese. *Consider adding “This helps the sandwich stay together.”*
5. **Close the Sandwiches:** Place the remaining four slices of bread, butter-side up, on top of the cheese, chicken, and onion. Gently press down on each sandwich to ensure the filling is evenly distributed and the bread adheres to the cheese. *Consider adding “Pressing helps the ingredients meld together.”*
#### Cooking the Grilled Cheese:
1. **Heat the Skillet:** Heat a large skillet or griddle over medium heat. You want the skillet to be hot enough to melt the cheese and toast the bread, but not so hot that the bread burns before the cheese melts. *Consider adding “A non-stick skillet works best.”*
2. **Grill the Sandwiches:** Carefully place the assembled grilled cheese sandwiches in the hot skillet. Don’t overcrowd the pan; if necessary, cook the sandwiches in batches. *Consider adding “Overcrowding lowers the skillet temperature.”*
3. **Cook Until Golden Brown:** Cook the sandwiches for about 3-4 minutes per side, or until the bread is golden brown and the cheese is melted and gooey. Use a spatula to gently flip the sandwiches, being careful not to lose any of the filling. You can also gently press down on the sandwiches with the spatula while they are cooking to ensure even browning and melting. *Consider adding “Watch carefully to prevent burning.”*
4. **Check for Doneness:** To ensure the cheese is fully melted, you can cover the skillet with a lid for the last minute or two of cooking. This will trap the heat and help the cheese melt faster. *Consider adding “This is especially helpful for thick sandwiches.”*
5. **Remove and Serve:** Once the grilled cheese sandwiches are golden brown and the cheese is melted, remove them from the skillet and place them on a cutting board. Let them cool for a minute or two before slicing in half and serving. This will prevent the cheese from oozing out too much when you cut into them. *Consider adding “Serve immediately for the best flavor and texture.”*
### Tips for the Perfect BBQ Chicken Grilled Cheese:
* **Use High-Quality Ingredients:** The better the ingredients, the better the final product. Choose a good quality BBQ sauce, flavorful cheese, and fresh bread. *Consider adding “This makes a noticeable difference.”*
* **Don’t Overcrowd the Pan:** Cooking the grilled cheese sandwiches in batches ensures that they cook evenly and the bread gets nice and crispy. *Consider adding “This allows for proper browning.”*
* **Use Medium Heat:** Cooking over medium heat allows the cheese to melt completely without burning the bread. *Consider adding “Adjust heat as needed.”*
* **Press Gently:** Gently pressing down on the sandwiches with a spatula while they are cooking helps to ensure even browning and melting. *Consider adding “Be careful not to press too hard.”*
* **Experiment with Cheese:** Feel free to experiment with different types of cheese. Monterey Jack, pepper jack, and provolone are all great options. *Consider adding “Try a combination of cheeses.”*
* **Add Some Heat:** If you like a little spice, add a pinch of red pepper flakes to the BBQ chicken or use pepper jack cheese. *Consider adding “Jalapenos are another great option.”*
* **Serve Immediately:** Grilled cheese sandwiches are best served immediately, while the bread is still crispy and the cheese is melted and gooey. *Consider adding “They don’t reheat well.”*
### Variations:
* **BBQ Chicken Grilled Cheese with Bacon:** Add cooked bacon to the grilled cheese for an extra layer of flavor and texture. *Consider adding “Crispy bacon is best.”*
* **BBQ Chicken Grilled Cheese with Avocado:** Add sliced avocado to the grilled cheese after it’s cooked for a creamy and refreshing twist. *Consider adding “Use ripe avocado.”*
* **BBQ Chicken Grilled Cheese with Jalapeños:** Add sliced jalapeños to the grilled cheese for a spicy kick. *Consider adding “Remove seeds for less heat.”*
* **BBQ Chicken Grilled Cheese with Coleslaw:** Serve the grilled cheese with a side of coleslaw for a classic BBQ combination. *Consider adding “Creamy or vinegar-based coleslaw.”*
**Enjoy your delicious BBQ Chicken Grilled Cheese!**
**Notes on Enhancements:**
* **Keywords:** Added keywords at the beginning to improve search engine optimization (SEO).
* **Ingredient Clarification:** Added details to ingredients (e.g., “extra virgin” olive oil, “sharp cheddar” cheese) for clarity and to target specific searches.
* **Explanatory Notes:** Added short explanations after certain steps to clarify the reasoning behind the instructions.
* **Actionable Advice:** Added more actionable advice in the “

Leave a Comment