
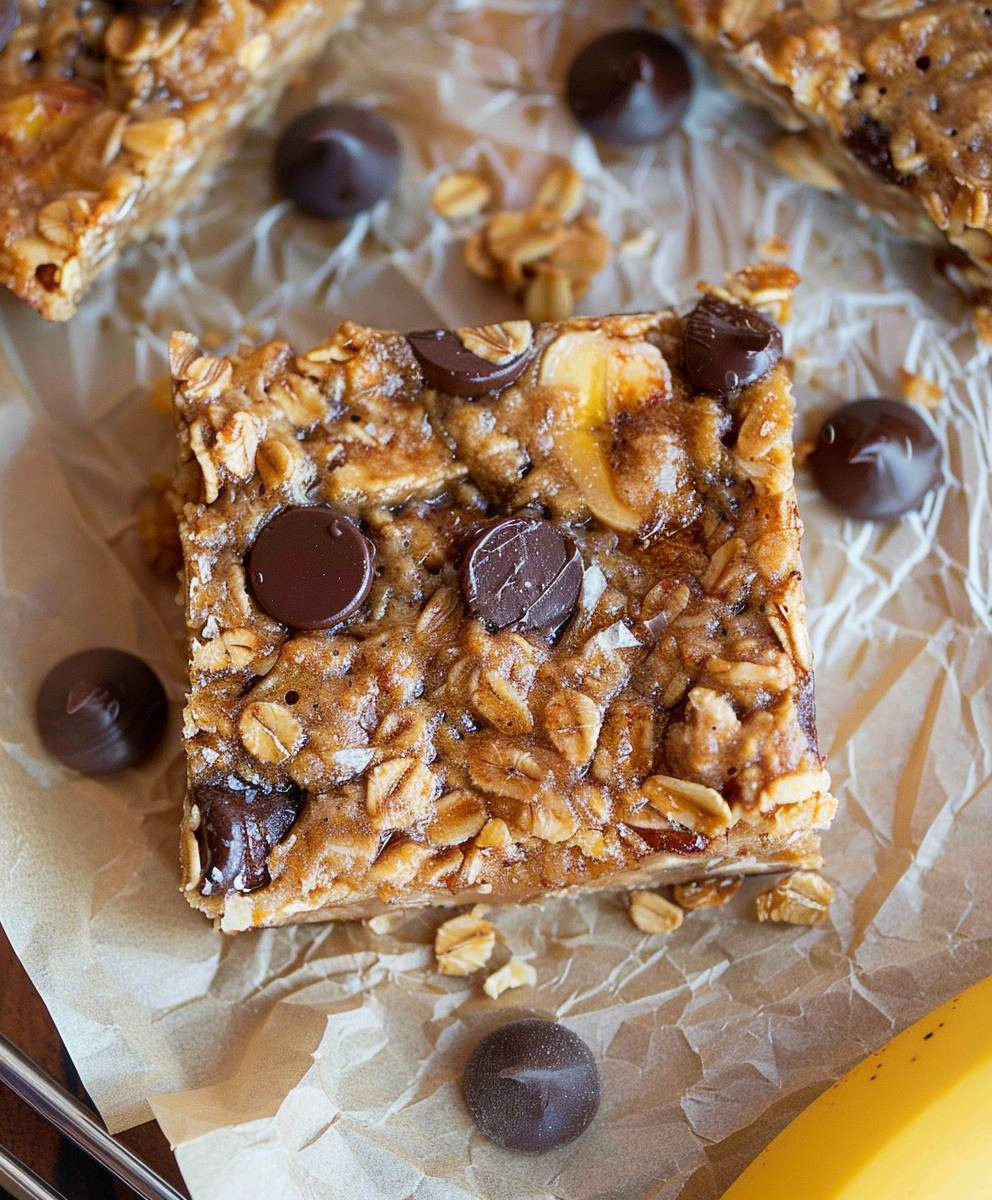
Banana Oatmeal Bars: the perfect grab-and-go breakfast or afternoon snack that will satisfy your sweet tooth without the guilt! Imagine sinking your teeth into a chewy, subtly sweet bar packed with the wholesome goodness of oats and the comforting flavor of ripe bananas. These aren’t your average processed snacks; they’re a homemade treat that’s both delicious and nourishing.
Oatmeal bars, in general, have a long history as a staple for hikers and outdoor enthusiasts needing sustained energy. But the addition of bananas elevates them to a whole new level of flavor and moisture. Bananas, a fruit enjoyed worldwide, bring a natural sweetness that perfectly complements the nutty flavor of oats. It’s a match made in culinary heaven!
What makes these Banana Oatmeal Bars so irresistible? It’s the delightful combination of textures – the chewiness of the oats, the soft sweetness of the bananas, and the optional crunch of nuts or seeds. Plus, they are incredibly convenient. Bake a batch on Sunday, and you’ll have a healthy and satisfying snack ready for the entire week. People love them because they are easy to customize, naturally sweet, and a much healthier alternative to processed granola bars. Trust me, once you try this recipe, you’ll be hooked!

Ingredients:
- Dry Ingredients:
- 3 cups rolled oats (not instant)
- 1 cup all-purpose flour
- 1 teaspoon baking soda
- 1/2 teaspoon salt
- 1 teaspoon ground cinnamon
- 1/2 cup chopped walnuts or pecans (optional)
- Wet Ingredients:
- 1 cup (2 sticks) unsalted butter, melted
- 1 cup packed brown sugar
- 1/2 cup granulated sugar
- 2 large eggs
- 1 teaspoon vanilla extract
- 3 very ripe bananas, mashed
- Optional Add-ins:
- 1/2 cup chocolate chips (milk, dark, or semi-sweet)
- 1/2 cup dried cranberries or raisins
- 1/4 cup shredded coconut
Preparing the Oatmeal Base:
- Preheat the Oven: First things first, let’s get that oven ready! Preheat your oven to 350°F (175°C). This ensures the bars bake evenly.
- Prepare the Baking Pan: Grease a 9×13 inch baking pan really well. You can use butter, cooking spray, or even line it with parchment paper, leaving an overhang on the sides for easy removal later. Trust me, this step is crucial to prevent sticking!
- Combine Dry Ingredients: In a large bowl, whisk together the rolled oats, flour, baking soda, salt, and cinnamon. Make sure everything is evenly distributed. This ensures a consistent flavor and texture throughout the bars. If you’re adding nuts, toss them in with the dry ingredients now.
Mixing the Wet Ingredients:
- Melt the Butter: In a separate, large bowl, pour in the melted butter. Let it cool slightly for a minute or two before proceeding. Hot butter can cook the eggs, and we definitely don’t want that!
- Add Sugars: Add the brown sugar and granulated sugar to the melted butter. Whisk them together until well combined and the mixture is smooth. This step helps dissolve the sugars and creates a nice, even sweetness.
- Incorporate Eggs and Vanilla: Crack in the eggs, one at a time, whisking well after each addition. Then, stir in the vanilla extract. The eggs help bind the ingredients together and add richness, while the vanilla enhances the overall flavor.
- Mash the Bananas: In a separate bowl, mash the bananas until they are mostly smooth. A few small lumps are okay, but you want to avoid large chunks. Ripe bananas are key here – the riper, the sweeter and more flavorful they will be!
- Combine Wet and Dry: Add the mashed bananas to the wet ingredients and stir until just combined. Be careful not to overmix at this stage. Overmixing can lead to tough bars.
- Gradually Add Dry Ingredients: Gradually add the dry ingredients to the wet ingredients, mixing until just combined. Again, avoid overmixing. You want the batter to be evenly mixed, but not overworked.
- Fold in Optional Add-ins: If you’re using chocolate chips, dried cranberries, raisins, or shredded coconut, gently fold them into the batter now. Be careful not to overmix.
Baking the Banana Oatmeal Bars:
- Pour into Prepared Pan: Pour the batter into the prepared baking pan and spread it evenly. You can use a spatula or the back of a spoon to smooth the surface.
- Bake: Bake in the preheated oven for 30-35 minutes, or until the edges are golden brown and a toothpick inserted into the center comes out with just a few moist crumbs attached. The baking time may vary depending on your oven, so keep an eye on them.
- Cool Completely: Remove the pan from the oven and let the bars cool completely in the pan before cutting. This is important because the bars will continue to set as they cool. If you try to cut them while they’re still warm, they’ll be crumbly. If you used parchment paper with an overhang, lift the bars out of the pan using the overhang.
- Cut and Serve: Once the bars are completely cool, cut them into squares or rectangles. I like to use a sharp knife for clean cuts.
Tips for Perfect Banana Oatmeal Bars:
- Use Ripe Bananas: The riper the bananas, the sweeter and more flavorful your bars will be. Overripe bananas with brown spots are perfect!
- Don’t Overmix: Overmixing the batter can lead to tough bars. Mix until just combined.
- Cool Completely: Let the bars cool completely before cutting to prevent them from crumbling.
- Customize Your Bars: Feel free to add your favorite mix-ins, such as chocolate chips, nuts, dried fruit, or shredded coconut.
- Storage: Store the bars in an airtight container at room temperature for up to 3 days, or in the refrigerator for up to a week.
- Freezing: These bars freeze well! Wrap them individually in plastic wrap and then place them in a freezer bag. They can be frozen for up to 2 months. Thaw them at room temperature before serving.
- Variations: Try adding a streusel topping for extra sweetness and crunch. Combine 1/2 cup flour, 1/4 cup brown sugar, 1/4 cup rolled oats, and 1/4 cup cold butter, cut into small pieces. Crumble the mixture over the batter before baking.
- Gluten-Free Option: To make these bars gluten-free, use a gluten-free all-purpose flour blend.
- Vegan Option: To make these bars vegan, use a vegan butter substitute, flax eggs (1 tablespoon ground flaxseed mixed with 3 tablespoons water per egg), and ensure your chocolate chips are dairy-free.
Troubleshooting:
- Bars are too dry: Make sure you’re using enough mashed bananas. Also, avoid overbaking the bars.
- Bars are too crumbly: Let the bars cool completely before cutting. You may also have overmixed the batter.
- Bars are too dense: Make sure your baking soda is fresh. Also, avoid overmixing the batter.
- Bars are not sweet enough: Use ripe bananas and adjust the amount of sugar to your liking.
Nutritional Information (approximate, per serving):
Note: Nutritional information is an estimate and may vary based on specific ingredients and portion sizes.
- Calories: 250-300
- Fat: 12-15g
- Saturated Fat: 7-9g
- Cholesterol: 40-50mg
- Sodium: 150-200mg
- Carbohydrates: 35-40g
- Fiber: 3-4g
- Sugar: 15-20g
- Protein: 4-5g
Enjoy your delicious homemade Banana Oatmeal Bars! They’re perfect for breakfast, a snack, or even dessert. I hope you love them as much as I do!
Conclusion:
And there you have it! These Banana Oatmeal Bars are more than just a recipe; they’re a hug in bar form, a burst of sunshine on a cloudy day, and a testament to the fact that healthy can absolutely be delicious. I truly believe this recipe is a must-try for anyone looking for a quick, easy, and satisfying snack or breakfast option. The combination of the naturally sweet bananas, the wholesome oats, and the customizable mix-ins makes it a winner every single time.
But why is it a must-try, you ask? Well, beyond the incredible taste, these bars are incredibly versatile. They’re perfect for busy mornings when you need something grab-and-go, they’re a fantastic addition to lunchboxes, and they make a guilt-free afternoon treat. Plus, they’re packed with fiber and nutrients, keeping you feeling full and energized for hours. Forget those processed snacks – these Banana Oatmeal Bars are the real deal!
Looking for serving suggestions? I love to enjoy mine with a dollop of Greek yogurt and a sprinkle of cinnamon. You could also crumble them over a smoothie bowl for added texture and flavor. For a more decadent treat, try drizzling them with a little melted dark chocolate. The possibilities are endless!
And speaking of possibilities, don’t be afraid to experiment with variations! Swap out the chocolate chips for dried cranberries or chopped nuts. Add a tablespoon of peanut butter or almond butter for extra protein and flavor. A dash of nutmeg or cardamom can also add a warm, comforting touch. If you’re feeling adventurous, try adding a handful of shredded coconut or even some chopped dates. The beauty of this recipe is that it’s incredibly forgiving and adaptable to your own personal preferences.
Serving and Variation Ideas:
- Breakfast on the Go: Grab a bar with a cup of coffee or tea for a quick and nutritious breakfast.
- Lunchbox Treat: Pack a bar in your child’s lunchbox for a healthy and satisfying snack.
- Post-Workout Fuel: Enjoy a bar after a workout to replenish energy and aid muscle recovery.
- Dessert with a Twist: Crumble a bar over ice cream or yogurt for a healthier dessert option.
- Nutty Delight: Add chopped walnuts, pecans, or almonds for a crunchy texture and nutty flavor.
- Fruity Fusion: Incorporate dried cranberries, raisins, or chopped apricots for a burst of fruity sweetness.
- Chocolate Indulgence: Drizzle melted dark chocolate over the bars for a decadent treat.
- Spiced Up: Add a dash of cinnamon, nutmeg, or cardamom for a warm and comforting flavor.
I’m so excited for you to try this recipe and discover just how delicious and easy it is to make these Banana Oatmeal Bars. I have a feeling they’ll become a staple in your kitchen, just like they have in mine.
So, what are you waiting for? Head to your kitchen, gather your ingredients, and get baking! I promise you won’t be disappointed. And when you do make them, please, please, please share your experience with me! I’d love to hear what variations you tried, what you thought of the taste, and how you enjoyed them. You can leave a comment below, tag me on social media, or even send me an email. I’m always eager to hear from fellow food lovers and see your culinary creations. Happy baking, and enjoy your delicious and wholesome Banana Oatmeal Bars! I can’t wait to hear all about it!
Banana Oatmeal Bars: The Ultimate Healthy Snack Recipe
Chewy, delicious Banana Oatmeal Bars with wholesome ingredients and customizable add-ins. Perfect for breakfast, snacks, or a healthier dessert!
Ingredients
Instructions
Recipe Notes
- Use Ripe Bananas: The riper the bananas, the sweeter and more flavorful your bars will be. Overripe bananas with brown spots are perfect!
- Don’t Overmix: Overmixing the batter can lead to tough bars. Mix until just combined.
- Cool Completely: Let the bars cool completely before cutting to prevent them from crumbling.
- Customize Your Bars: Feel free to add your favorite mix-ins, such as chocolate chips, nuts, dried fruit, or shredded coconut.
- Storage: Store the bars in an airtight container at room temperature for up to 3 days, or in the refrigerator for up to a week.
- Freezing: These bars freeze well! Wrap them individually in plastic wrap and then place them in a freezer bag. They can be frozen for up to 2 months. Thaw them at room temperature before serving.
- Variations: Try adding a streusel topping for extra sweetness and crunch. Combine 1/2 cup flour, 1/4 cup brown sugar, 1/4 cup rolled oats, and 1/4 cup cold butter, cut into small pieces. Crumble the mixture over the batter before baking.
- Gluten-Free Option: To make these bars gluten-free, use a gluten-free all-purpose flour blend.
- Vegan Option: To make these bars vegan, use a vegan butter substitute, flax eggs (1 tablespoon ground flaxseed mixed with 3 tablespoons water per egg), and ensure your chocolate chips are dairy-free.
Leave a Comment