
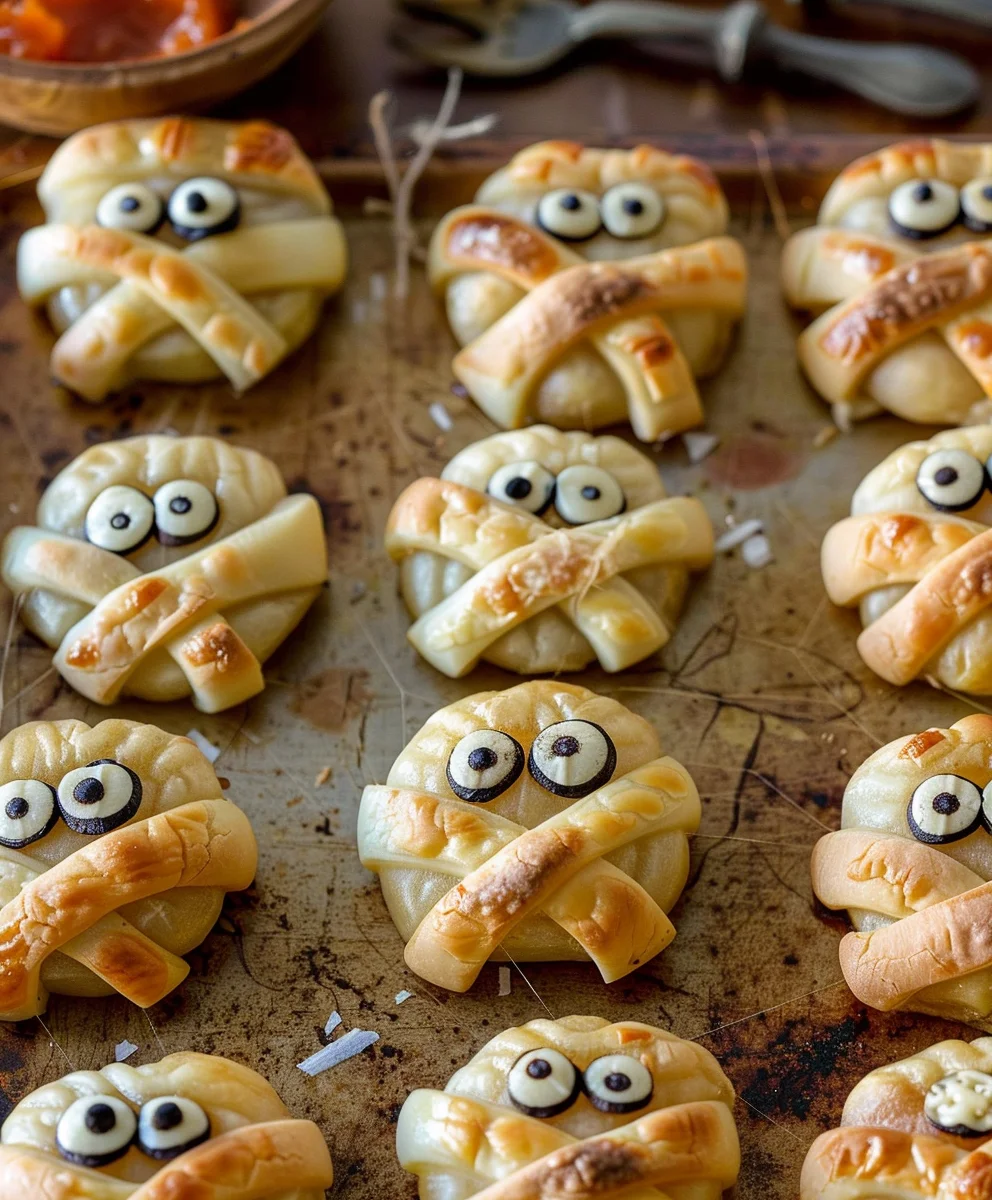
Baked Cheese Mummies are not merely a snack; they are an enchanting, playful delight that consistently steals the show at any gathering, especially during festive seasons or spooky celebrations. Imagine the joyous gasps as these adorable, savory parcels emerge from your oven, their golden-brown pastry bandages revealing peeks of perfectly melted, gooey cheese. It’s a culinary spectacle that combines whimsical presentation with irresistible flavor, guaranteed to bring smiles to faces young and old.
While their origins aren’t steeped in ancient Egyptian lore, these delightful treats have swiftly carved out a special place in modern culinary tradition, becoming a beloved staple for themed parties and casual get-togethers alike. I find their charm undeniable and their simplicity profoundly appealing.
People absolutely adore this dish for a multitude of reasons. Firstly, the harmonious blend of warm, stretchy cheese enveloped in a flaky, golden-baked pastry is simply divine. The textural contrast is incredibly satisfying, offering a comforting chewiness against a delicate crisp. Secondly, their sheer convenience is a huge draw – requiring minimal ingredients and preparation time, they are a fantastic option for busy hosts. Finally, the playful visual appeal of these Baked Cheese Mummies makes them an instant conversation starter and a truly memorable addition to any menu. They are, without a doubt, a crowd-pleaser that effortlessly merges fun with fantastic flavor.

Ingredients:
- 2 cans (8 oz each) refrigerated crescent roll dough (such as Pillsbury Crescent Rolls)
- 12 slices of cheese, approximately 1-inch thick (I prefer a blend of sharp cheddar, Monterey Jack, or even some mozzarella for extra meltiness. You can also use pre-sliced cheese or cut from a block.)
- 1 large egg, whisked (for egg wash)
- 1 tablespoon water (to thin the egg wash)
- Optional: 24 small black olive pieces or edible candy eyes (for decorating your mummies after baking)
- Optional: A pinch of garlic powder or onion powder, mixed into the egg wash, for extra flavor
- Optional: A light dusting of dried herbs like oregano or parsley, also mixed into the egg wash or sprinkled over the finished mummies for added aroma and visual appeal.
Gathering Your Supplies and Prepping
- Preheat Your Oven: First things first, we want to get our oven nice and hot. I always set mine to 375°F (190°C) well in advance, usually about 15-20 minutes before I start assembling, to ensure it reaches and maintains the correct temperature. A properly preheated oven is key to achieving that perfect golden-brown crust on our Baked Cheese Mummies.
- Prepare Your Baking Sheets: Line two large baking sheets with parchment paper. This step is a real game-changer; it prevents sticking, makes cleanup a breeze, and helps with even baking. If you don’t have parchment paper, you can lightly grease the baking sheets with cooking spray, but I highly recommend parchment for the best results, especially for these fun little creations.
- Prepare the Cheese: If you’re using a block of cheese, now is the time to slice it. I aim for slices that are about 1-inch thick and roughly 1×3 inches in size. The exact dimensions aren’t critical, but you want them substantial enough to hold their shape and deliver a good cheesy bite within our mummy wraps. I find that using a variety of cheeses, like sharp cheddar for tang and Monterey Jack for its fantastic melt, really elevates the flavor profile of these Baked Cheese Mummies.
- Whisk the Egg Wash: In a small bowl, whisk together the large egg and the tablespoon of water until well combined. This is our egg wash, and it’s what will give our Baked Cheese Mummies that beautiful, glossy, golden finish. If you’re feeling adventurous, you can also whisk in a tiny pinch of garlic powder or onion powder for a subtle savory kick.
Crafting Your Cheese Mummies
- Unroll the Crescent Dough: Carefully unroll one can of refrigerated crescent roll dough onto a clean, dry work surface. You’ll notice it’s usually in a large rectangle with perforations that divide it into eight triangles. We need to gently press those perforations together to form a solid rectangle. If your dough is designed as one large sheet, even better! My goal here is to have a relatively seamless sheet of dough to work with.
- Cut the Dough into Strips: Using a pizza cutter or a sharp knife, cut the dough rectangle lengthwise into long, thin strips, about ½-inch wide. I usually get about 8-10 strips from each sheet, depending on how thin I make them. Don’t worry if they’re not perfectly even; the rustic look adds to the charm of our Baked Cheese Mummies. These strips will be the “bandages” for our cheesy friends.
- Repeat with Second Can of Dough: Follow steps 5 and 6 for the second can of crescent roll dough. By the end of this step, you should have a good pile of dough strips ready for wrapping. Remember, the more strips you have, the more creatively you can wrap your mummies!
- Assemble Your First Mummy: Take one of your cheese slices. Now, pick up one of your dough strips. Starting at one end of the cheese slice, begin to wrap the dough strip around the cheese, much like you would wrap a bandage around a finger. Don’t wrap it too tightly, as the dough needs room to expand as it bakes. Overlap the dough slightly as you go, leaving a small gap at the top where the “face” of your mummy will be, and another gap at the bottom. I usually leave about ¼-inch of cheese showing at the top.
- Continue Wrapping: Continue wrapping with additional dough strips as needed until the entire cheese slice, except for the “face” area, is covered. You might need 2-3 strips per cheese slice, depending on the length of your strips and the size of your cheese. Gently pinch the ends of the dough strips onto the mummy to secure them. Make sure the ends are tucked underneath or firmly pressed onto the dough so they don’t unravel during baking. This is where the fun creative part comes in when making your Baked Cheese Mummies!
- Arrange on Baking Sheets: Carefully transfer each assembled cheese mummy to your prepared baking sheets, making sure to leave about 1-2 inches of space between them. This spacing is important because the crescent dough will puff up quite a bit in the oven, and we want to ensure even baking and browning on all sides. Overcrowding the pan can lead to unevenly baked mummies and a less crispy texture.
The Baking Process
- Apply Egg Wash: Once all your Baked Cheese Mummies are neatly arranged on the baking sheets, take your whisked egg wash and, using a pastry brush, lightly brush the tops and visible sides of each mummy. This step is crucial for achieving that beautiful golden sheen and a slightly crispy exterior. Don’t drench them, just a light, even coat will do. If you added any optional seasonings to your egg wash, this is when they’ll make their appearance!
- Bake to Golden Perfection: Place the baking sheets into your preheated oven. I usually bake one sheet at a time, or if my oven is large enough, I rotate them halfway through the baking time to ensure even browning. Bake for 12-15 minutes, or until the dough is puffed, beautifully golden brown, and the cheese inside is visibly melted and bubbly. Every oven is different, so keep a close eye on your Baked Cheese Mummies, especially towards the end of the baking time, to prevent over-browning.
- Cool Slightly: Once they are perfectly golden, carefully remove the baking sheets from the oven. Let the Baked Cheese Mummies cool on the baking sheets for about 2-3 minutes before transferring them to a wire rack. This brief cooling period helps the cheese set a little and makes them easier to handle without falling apart.
Adding the Finishing Touches
- Add the Eyes (Optional but Recommended!): Once the mummies have cooled slightly on the wire rack (but are still warm), it’s time to give them their spooky little eyes! Carefully place two small pieces of black olive onto the “face” area you left exposed earlier. If you’re using edible candy eyes, a tiny dab of cream cheese or even melted chocolate (though less savory) can help them stick. This step truly brings your Baked Cheese Mummies to life and is often the most fun part, especially if you have little helpers in the kitchen.
- Serve Warm: These Baked Cheese Mummies are best enjoyed warm, straight from the oven. The dough is flaky, and the cheese is wonderfully gooey and melted. They make a fantastic appetizer or a fun snack for any gathering, particularly around Halloween!
Tips for Perfect Baked Cheese Mummies
Optimal Cheese Choices for the Best Melt
While cheddar is a classic, don’t limit yourself! I’ve found that a blend of cheeses works wonderfully for these Baked Cheese Mummies. Mozzarella offers an incredible melt and stretch, while Monterey Jack provides a mild, creamy texture. For a bolder flavor, a sharp white cheddar or even a little provolone can be fantastic. The key is to use cheese that melts well. Avoid very crumbly or overly firm cheeses as they might not create that satisfying gooey center we’re aiming for.
Enhancing Flavor with Seasonings
Beyond just cheese and dough, a little seasoning can go a long way. Before wrapping, you could sprinkle a tiny pinch of garlic powder, onion powder, or even a mix of Italian herbs directly onto your cheese slices. For a spicier kick, a very light dusting of cayenne pepper or red pepper flakes would be delicious. Just be mindful not to overdo it, as we still want the cheesy goodness to be the star of these Baked Cheese Mummies.
Making Ahead and Storage
If you’re planning a party, you can prepare the Baked Cheese Mummies up to the point of baking. Assemble them on the parchment-lined baking sheets, then cover them loosely with plastic wrap and refrigerate for up to 24 hours. When you’re ready to bake, remove them from the fridge about 15-20 minutes beforehand to let them come closer to room temperature, then apply the egg wash and bake as directed. Leftovers (if there are any!) can be stored in an airtight container in the refrigerator for 2-3 days. Reheat them gently in a toaster oven or a regular oven at 300°F (150°C) until warmed through and slightly crispy again. Microwaving is an option, but it won’t restore the crispiness of the dough.
Serving Suggestions and Dips
These Baked Cheese Mummies are delicious on their own, but they are also fantastic with a dipping sauce. My go-to choices include a simple marinara sauce, a tangy ranch dip, or even a creamy honey mustard. For a slightly more sophisticated touch, a warm spinach and artichoke dip could also be a delightful pairing. The savory, flaky pastry and melted cheese really shine when complemented by a flavorful dip.
Getting Kids Involved
This recipe is incredibly kid-friendly and a fantastic way to get little ones involved in the kitchen. They can help with unwrapping the dough, gently pressing the perforations, and, most excitingly, wrapping the “bandages” around the cheese. Of course, the best part for them is often placing the olive or candy eyes after baking. Just ensure adult supervision, especially with knives and hot ovens. Making Baked Cheese Mummies becomes a fun family activity!
Troubleshooting Common Issues
Why are my mummies not golden brown?
This usually indicates that the oven wasn’t hot enough, or they didn’t bake long enough. Ensure your oven is fully preheated and don’t skip the egg wash. The egg wash is essential for that beautiful, shiny, golden finish. Sometimes, simply moving the baking sheet to a higher rack in the oven for the last few minutes can help with browning.
Why did my cheese leak out?
If your cheese is escaping, it might be due to a few reasons. First, ensure your dough strips are overlapping enough to create a good seal. Second, avoid overfilling your mummies with too much cheese. While generous, you want the dough to completely encase the cheese on the sides and bottom. Also, very thin dough strips might be more prone to tearing during baking, so try to keep them at least ½-inch wide.
Can I use puff pastry instead of crescent rolls?
Absolutely! Puff pastry is a fantastic alternative and will yield an even flakier, richer texture for your Baked Cheese Mummies. Thaw the puff pastry according to package directions, then cut it into strips and proceed with the wrapping steps as you would with crescent dough. The baking time might be slightly different, so keep an eye on them. The results are equally delicious, just with a different textural experience.
Creative Variations for Your Baked Cheese Mummies
Spicy Cheese Mummies
Add a thin slice of jalapeño or a pinch of red pepper flakes to the cheese before wrapping for a delightful kick. You could also mix a bit of chili powder into your egg wash.
Herbaceous Mummies
Sprinkle dried oregano, thyme, or an Italian herb blend onto the dough strips or the cheese before wrapping. The herbs will infuse into the dough as it bakes, adding another layer of flavor.
Mini Pizza Mummies
Before wrapping, place a tiny dollop of pizza sauce on the cheese, and perhaps a mini pepperoni slice. These tiny additions will transform your Baked Cheese Mummies into savory pizza bites!
Sweet Mummies (A Twist!)
While not “cheese mummies,” you could adapt this concept for a sweet treat. Use cream cheese (perhaps mixed with a little sugar and vanilla) as the filling, and sprinkle with cinnamon sugar before baking. A drizzle of chocolate or caramel after baking would be divine!
I genuinely believe that these Baked Cheese Mummies are not just a recipe; they’re an experience. They’re a fantastic way to bring a smile to faces, especially during festive times. The simple act of wrapping the dough, watching them puff up in the oven, and then adding those cute little eyes makes the whole process so enjoyable. And the taste? Oh, the taste is just pure comfort – warm, cheesy, and encased in flaky, golden pastry. I hope you enjoy making and devouring these delightful treats as much as I do!
Conclusion:
Well, my friends, we’ve reached the delicious finale of our journey, and I genuinely hope you’re feeling as excited as I am about this incredible recipe. If there’s one dish I could urge you to try from my kitchen, it would undoubtedly be our fantastic creation. Why is this recipe a must-try, you ask? Because it perfectly embodies everything wonderful about home cooking: it’s effortlessly simple, incredibly fun to make, and delivers on flavor in the most delightful way imaginable. We’re talking about a dish that consistently brings smiles to faces, sparks conversations, and quite frankly, disappears from the plate faster than you can say “more, please!” It’s that rare combination of ease and absolute crowd-pleasing power. Whether you’re a seasoned chef or someone just starting their culinary adventure, the joy of crafting something so appealing, so delicious, and so universally loved is truly unbeatable. This isn’t just a recipe; it’s an experience, a little bit of magic you can whip up in your own kitchen.
What makes our creation particularly special is its inherent versatility and charm. Imagine the delighted gasps at your next gathering when you present these golden-brown, cheesy parcels. They’re not just food; they’re an edible centerpiece, a conversation starter, and a testament to the fact that sometimes, the simplest ideas yield the most extraordinary results. I’ve seen these vanish at kids’ parties, adult game nights, and even as a comforting, quick snack on a lazy Sunday afternoon. Their warm, gooey cheese interior, encased in that perfectly crisp, flaky exterior, is a texture and flavor combination that truly sings. It’s comforting, it’s exciting, and it’s something everyone, from the pickiest eater to the most adventurous palate, will genuinely appreciate. Trust me when I say, once you try making these, they’ll quickly become a staple in your repertoire, a go-to for those moments when you need something impressive yet utterly stress-free.
Elevating Your Experience: Serving Suggestions and Creative Variations
Now, let’s talk about how to truly make these your own and elevate the experience. While they are undeniably perfect on their own, a good dipping sauce can take them to stratospheric levels of deliciousness. My personal favorites include a classic marinara sauce, warmed gently, or a tangy ranch dressing for a creamy contrast. Don’t shy away from experimenting though! A zesty honey mustard, a spicy sriracha mayo, or even a sweet chili sauce could offer an exciting twist. For a truly indulgent experience, consider serving them alongside a vibrant garden salad to balance the richness, or as an appetizer before a hearty pasta dish. They also pair wonderfully with a light tomato soup for a comforting lunch.
But why stop there? The beauty of this recipe lies in its adaptability. You can absolutely play around with the cheese! Instead of classic mozzarella sticks, try using strips of cheddar for a sharper flavor, provolone for a milder melt, or even pepper jack for a subtle kick. Imagine adding a tiny sliver of cooked ham or pepperoni inside before wrapping, transforming each one into a miniature, savory surprise. For an herb-infused delight, sprinkle a pinch of dried oregano or basil, or a tiny dash of garlic powder, into the dough before wrapping the cheese. If you’re feeling adventurous, you could even try a sweet variation: fill them with cream cheese mixed with a touch of sugar and a few berries, then dust with cinnamon sugar after baking. The possibilities are genuinely endless, and each variation promises its own unique charm and flavor profile. These subtle changes can completely transform the dish, allowing you to tailor it to your personal preferences or the specific occasion.
Your Culinary Adventure Awaits!
This is where you come in! I truly, wholeheartedly encourage you to roll up your sleeves, gather your ingredients, and give this recipe a try. You won’t regret the effort, which, I promise, is minimal for the maximum reward. There’s something profoundly satisfying about seeing your creation emerge from the oven, golden and fragrant, ready to be devoured. These Baked Cheese Mummies are not just a snack; they are a gateway to joyful cooking, a testament to the power of simple ingredients, and a guaranteed hit for any occasion.
Once you’ve experienced the magic for yourself, I would absolutely love to hear about it! Did you try a new dipping sauce? Did you experiment with different cheeses or fillings? Did they disappear as quickly at your table as they do at mine? Please, don’t keep your culinary triumphs to yourself. Share your stories, your photos, and your invaluable feedback. Your experiences not only inspire me but also help our growing community of fellow food lovers discover new ways to enjoy and customize this delightful dish. Your journey with this recipe starts now, and I can’t wait to see what delicious adventures you embark on. Happy cooking, my friends!
Baked Cheese Mummies
These enchanting Baked Cheese Mummies are a playful delight for any gathering, especially during festive or spooky celebrations. Combining whimsical presentation with irresistible flavor, warm, stretchy cheese is enveloped in flaky, golden-baked pastry, creating a comforting texture. They are an effortless crowd-pleaser that merges fun with fantastic flavor.
Ingredients
-
2 sheets thawed puff pastry
-
14 Mini Babybel® cheeses (wax removed)
-
1/3 cup honey or your favorite jam (optional, for serving)
-
1 large egg, beaten with 1 teaspoon water (for egg wash)
-
28 candy eyes or mini chocolate chips (for decorating)
Instructions
-
Step 1
Preheat your oven to 375°F (190°C). Line a large baking sheet with parchment paper. -
Step 2
Thaw puff pastry sheets according to package directions. Gently unroll each sheet onto a clean work surface. -
Step 3
Using a pizza cutter or sharp knife, cut each puff pastry sheet lengthwise into 7-8 long strips, approximately ½-inch wide. -
Step 4
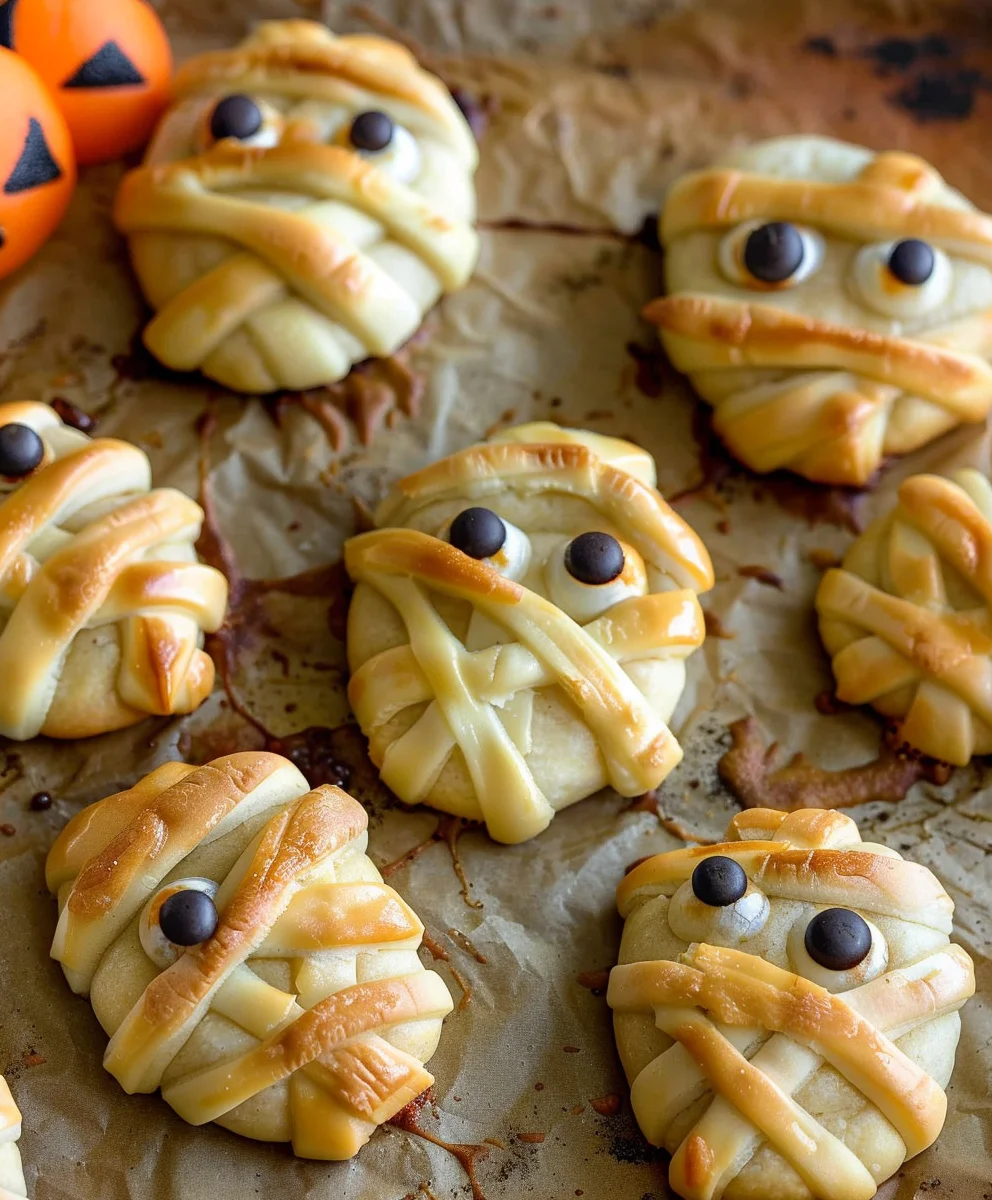
Remove the red wax coating from each Mini Babybel® cheese. -
Step 5
Take one Babybel cheese. Starting at one end, carefully wrap a pastry strip around it, overlapping slightly and leaving a small gap near the top for the ‘face’. Do not wrap too tightly. Pinch the ends of the pastry strip onto the mummy to secure them. -
Step 6
Place each assembled cheese mummy onto the prepared baking sheet, ensuring at least 1-2 inches of space between them for even baking. -
Step 7
In a small bowl, whisk together the large egg and 1 teaspoon of water to create the egg wash. Lightly brush the tops and visible sides of each mummy with the egg wash for a golden sheen. -
Step 8
Bake for 12-15 minutes, or until the puff pastry is puffed, beautifully golden brown, and the cheese inside is visibly melted and bubbly. Monitor closely as oven temperatures vary. -
Step 9
Carefully remove the baking sheet from the oven. Let the mummies cool slightly on the sheet for 2-3 minutes before transferring them to a wire rack. -
Step 10
While still warm, carefully place two candy eyes or mini chocolate chips onto the exposed ‘face’ area of each mummy. -
Step 11
Serve warm, optionally drizzled with honey or your favorite jam. Enjoy these delightful treats!
Important Information
Nutrition Facts (Per Serving)
It is important to consider this information as approximate and not to use it as definitive health advice.
Allergy Information
Please check ingredients for potential allergens and consult a health professional if in doubt.


Leave a Comment