
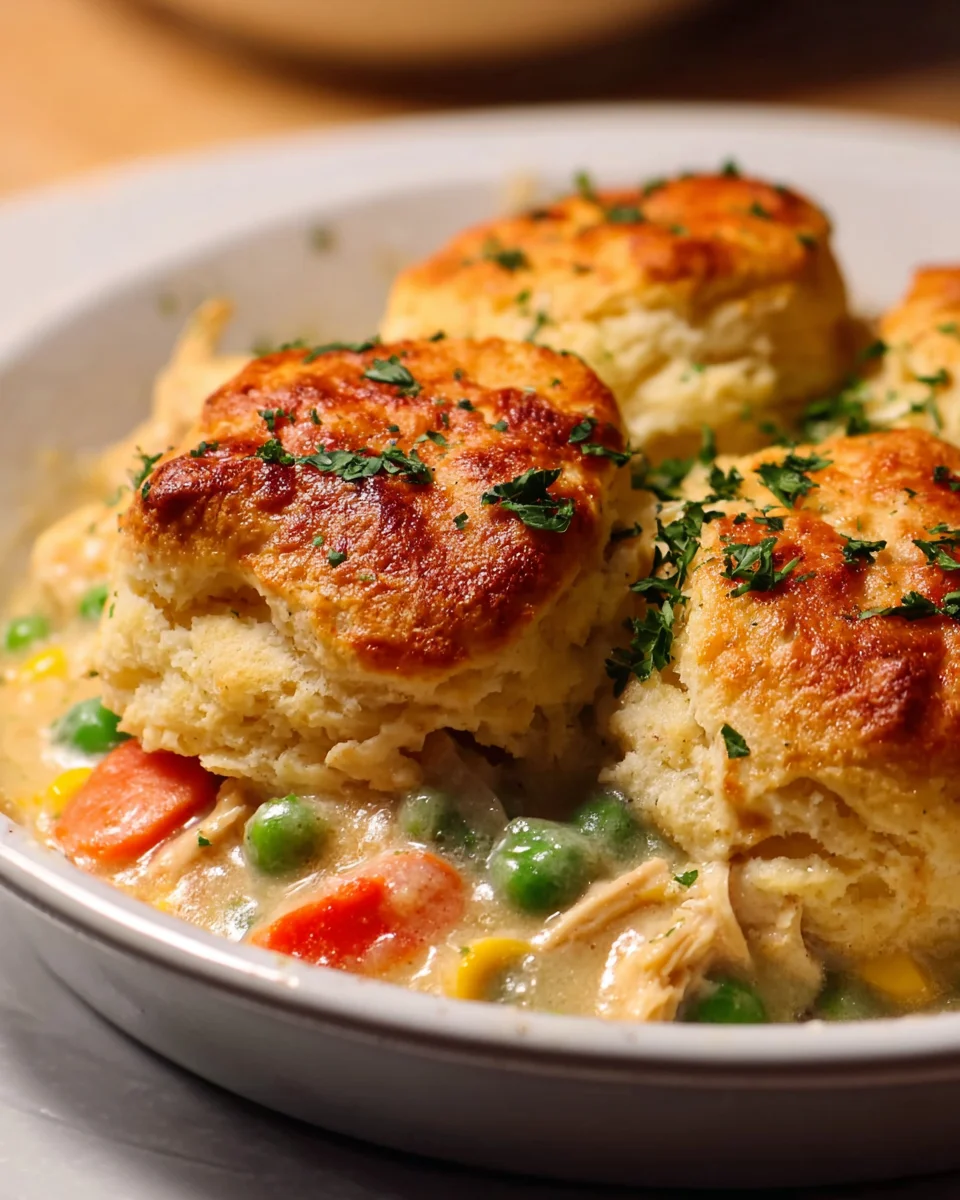
Red Lobster Biscuit Chicken Pot Pie is not just a meal; it’s an experience, a symphony of savory flavors and comforting textures that will transport you straight to culinary bliss. Imagine sinking your fork into a rich, creamy chicken and vegetable filling, perfectly seasoned and enveloped by a golden, flaky crust that tastes remarkably like those iconic cheesy garlic biscuits we all adore from Red Lobster. It’s the ultimate comfort food elevated to gourmet status, offering a nostalgic nod to classic American cuisine with an innovative, irresistible twist.
For generations, chicken pot pie has been a staple in homes, revered for its ability to warm the soul and satisfy the heartiest appetites. But what happens when you take that beloved classic and crown it with the very essence of pure indulgence? You get this incredible creation! People adore this dish not only for its incredibly rich, savory filling, packed with tender chicken and vibrant vegetables, but also for the distinctively buttery, garlicky, and slightly cheesy biscuit topping. This innovative approach combines the rustic charm of a homemade pie with the crave-worthy allure of those famous biscuits, creating a truly unforgettable dish. The convenience of having a complete meal baked in one dish, offering both heartiness and an explosion of flavor, makes it an absolute winner for any weeknight or special gathering.
I promise you, mastering this homemade Red Lobster Biscuit Chicken Pot Pie is simpler than you might think, and the reward is absolutely worth every moment. Prepare to delight your family and friends with a dish that promises pure satisfaction and leaves everyone asking for seconds.

Ingredients:
-
For the Rich and Creamy Chicken Pot Pie Filling:
- 2 tablespoons unsalted butter: A foundational fat for sautéing and building our roux, adding a lovely richness right from the start.
- 1 ½ pounds boneless, skinless chicken: I love using a mix of chicken breasts and thighs for the best texture and flavor – the breasts stay tender, while the thighs offer a juicy depth. Cut them into ¾ to 1-inch cubes for even cooking.
- 1 medium yellow onion: Finely diced, it will sweat down beautifully, providing a sweet aromatic base for our pot pie.
- 2 stalks celery: Diced to a similar size as the onion, adding a subtle peppery note and essential texture.
- 2 medium carrots: Peeled and diced, bringing natural sweetness and vibrant color to our filling.
- 2 cloves garlic: Minced, for that indispensable aromatic punch that elevates any savory dish.
- ½ cup all-purpose flour: Our thickening agent, crucial for creating a luscious, smooth roux that will bind the filling together.
- 4 cups chicken broth: Opt for a good quality low-sodium broth so you can control the seasoning yourself. This forms the liquid base of our sauce.
- 1 cup whole milk or half-and-half: Adds creaminess and richness, making the filling wonderfully indulgent. Whole milk works great, but half-and-half takes it up a notch.
- 1 cup frozen peas: No need to thaw! They’ll cook perfectly in the hot filling, adding a pop of sweetness and bright color.
- 1 cup frozen corn: Just like the peas, these little kernels of sweetness are a must-have for classic pot pie flavor and texture.
- ½ teaspoon dried thyme: Earthy and aromatic, a classic herb for chicken pot pie.
- ¼ teaspoon dried rosemary: A pungent, piney herb that complements chicken beautifully; just a touch goes a long way.
- 1 bay leaf: For an underlying layer of subtle, aromatic complexity that you’ll notice in the finished dish. Don’t forget to remove it before serving!
- Salt and freshly ground black pepper: To taste, crucial for bringing all the flavors into harmony. Be generous, especially with the pepper!
- ¼ cup fresh parsley: Chopped, for a final burst of freshness and color stirred in at the end.
-
For the Cheesy Garlic Biscuit Topping (Red Lobster Style!):
- 2 cups all-purpose flour: The backbone of our fluffy, tender biscuits.
- 1 tablespoon baking powder: Our primary leavening agent, ensuring those biscuits rise high and proud.
- ½ teaspoon baking soda: Works with the buttermilk to create extra lift and tender crumb.
- 1 teaspoon granulated sugar: Just a touch, to balance the savory flavors and aid in browning.
- ½ teaspoon salt: Essential for seasoning the biscuits themselves and enhancing all the other flavors.
- ½ cup (1 stick) unsalted butter: Crucially, it must be very cold and cut into small cubes. This is the secret to flaky biscuits!
- 1 cup grated sharp cheddar cheese: The star of our “Red Lobster” style biscuits, providing incredible flavor and gooey pockets.
- 1 teaspoon garlic powder: Infuses our biscuits with that signature savory garlic flavor.
- ½ teaspoon onion powder: A subtle background note that enhances the garlic and cheese.
- ¾ cup cold buttermilk: The acidic component that reacts with the baking soda, creating tenderness and flavor. If you don’t have buttermilk, you can make a quick substitute by adding 1 tablespoon of lemon juice or white vinegar to regular milk and letting it sit for 5 minutes.
-
For the Irresistible Garlic Butter Glaze:
- ¼ cup unsalted butter: Melted, this will be brushed generously over the hot biscuits.
- ½ teaspoon garlic powder: For an extra hit of savory garlic goodness on the finished biscuits.
- 1 tablespoon fresh parsley: Finely chopped, for a pop of green and fresh herby aroma.
Instructions:
Preparing Your Chicken and Vegetables
- Prep the Chicken: First things first, let’s get our chicken ready. Grab your boneless, skinless chicken breasts and/or thighs. Using a sharp knife, carefully cut them into uniform ¾ to 1-inch cubes. Uniformity is key here because it ensures every piece cooks evenly, preventing some from being overdone while others are still catching up. Once cut, give your chicken a good season with a generous pinch of salt and a healthy grind of fresh black pepper. Don’t be shy; this is your first layer of flavor! Set the seasoned chicken aside for a moment while we get our veggies prepped.
- Chop the Aromatics and Vegetables: Now for the supporting cast of vegetables. Peel and finely dice your yellow onion. Aim for pieces that are roughly ¼-inch in size so they can meld seamlessly into the sauce. Next, trim and dice your celery stalks and peel and dice your carrots to a similar small size. Precision here ensures they soften evenly and contribute their flavor without being overly chunky. Finally, mince your two cloves of garlic. Having all your ingredients prepped and ready to go before you even turn on the stove is what we call “mise en place” – it makes the cooking process so much smoother and more enjoyable!
Crafting the Irresistible Pot Pie Filling
- Sear the Chicken: Place a large Dutch oven or a heavy-bottomed pot over medium-high heat. Add 1 tablespoon of unsalted butter and let it melt until it shimmers. Once hot, carefully add your seasoned chicken cubes in a single layer, making sure not to overcrowd the pot. You might need to do this in two batches to ensure proper searing. We’re not cooking the chicken through at this stage; rather, we’re aiming for a beautiful golden-brown crust on the outside. This searing step adds a wonderful depth of flavor through the Maillard reaction. Cook for about 3-4 minutes per side until nicely browned. Once seared, remove the chicken from the pot and set it aside on a plate. It will finish cooking in the sauce later.
- Sauté the Mirepoix: Reduce the heat to medium. Add the remaining 1 tablespoon of butter to the pot. If there’s any fond (browned bits) at the bottom, that’s fantastic – it’s pure flavor! Add your diced onion, celery, and carrots to the pot. Give them a good stir, scraping up any browned bits from the bottom of the pot with your spoon. We want to “sweat” these vegetables, meaning we’ll cook them gently until they soften and become translucent, releasing their natural sweetness. This usually takes about 8-10 minutes. Stir occasionally to prevent sticking.
- Infuse with Garlic: Once the vegetables are tender, add your minced garlic to the pot. Stir it in and cook for just about 1 minute more, or until you can smell its intoxicating aroma. Be careful not to burn the garlic, as burnt garlic can turn bitter very quickly. We just want to awaken its fragrant oils.
- Build the Roux: This is a crucial step for our creamy sauce! Sprinkle the ½ cup of all-purpose flour over the sautéed vegetables and garlic. With a whisk or wooden spoon, stir constantly for 2-3 minutes. You’re cooking out the raw flour taste, which is essential for a smooth, delicious sauce. The mixture will look thick and pasty, and it might even start to smell a little nutty. This flour and fat mixture is what we call a roux, and it’s going to be the backbone of our luscious pot pie gravy.
- Whisk in the Liquids: Gradually, slowly, and steadily, pour in the 4 cups of chicken broth, whisking continuously as you add it. This is important to prevent lumps and ensure a silky-smooth sauce. Keep whisking until the mixture is fully incorporated and starts to thicken. Then, pour in the 1 cup of whole milk or half-and-half, again, whisking until everything is wonderfully combined and smooth. Bring the mixture to a gentle simmer, allowing it to bubble lightly for 5-7 minutes, until it has thickened to your desired consistency – it should be thick enough to coat the back of a spoon.
- Season and Simmer: Now it’s time to add our herbs and seasonings. Stir in the ½ teaspoon of dried thyme, ¼ teaspoon of dried rosemary, and drop in the bay leaf. Season generously with salt and freshly ground black pepper. Remember, you can always add more salt later, but you can’t take it out, so start with a good amount and then taste! Bring the sauce back to a gentle simmer and let it cook for another 5 minutes, allowing all those beautiful flavors to meld and deepen.
- Combine and Finish the Filling: Return your seared chicken to the pot. Add the 1 cup of frozen peas and 1 cup of frozen corn directly into the simmering sauce – no need to thaw them beforehand, as the heat of the filling will cook them perfectly. Give everything a good stir to ensure all the ingredients are evenly distributed and coated in the creamy sauce. Let it simmer gently for another 5 minutes, allowing the chicken to finish cooking through and the vegetables to become tender-crisp.
- Taste and Adjust: This is perhaps the most important step in all cooking! Carefully taste the pot pie filling. Does it need more salt? A little more pepper? Perhaps a dash more thyme? Adjust the seasonings to your preference until it tastes absolutely perfect to you. Before serving, remember to fish out and discard the bay leaf. Finally, stir in the ¼ cup of fresh chopped parsley for a bright, fresh finish and a lovely pop of green.
- Transfer to Baking Dish: Pour the hot, delicious chicken pot pie filling into a 9×13-inch baking dish or a similarly sized oven-safe dish (about 3-quart capacity). Spread it evenly across the bottom. The warmth of the filling will be perfect for the biscuit topping.
Whipping Up the Signature Red Lobster Style Biscuits
- Combine Dry Ingredients: In a large mixing bowl, whisk together the 2 cups of all-purpose flour, 1 tablespoon of baking powder, ½ teaspoon of baking soda, 1 teaspoon of granulated sugar, and ½ teaspoon of salt. Make sure these are thoroughly combined – this ensures an even rise throughout your biscuits.
- Cut in the Cold Butter: This is where the magic happens for flaky biscuits! Add your ½ cup (1 stick) of very cold butter, cut into small cubes, to the dry ingredients. Using a pastry blender, two knives, or even your fingertips, work the butter into the flour mixture until it resembles coarse crumbs, with some pea-sized pieces of butter remaining. The colder the butter, the flakier your biscuits will be, as the steam from the melting butter creates pockets of air during baking.
- Add Cheese and Seasonings: Stir in the 1 cup of grated sharp cheddar cheese, 1 teaspoon of garlic powder, and ½ teaspoon of onion powder. Give it a good mix to distribute the cheese and seasonings evenly throughout the flour mixture. This is what gives our biscuits that signature savory, cheesy Red Lobster-inspired flavor!
- Add Buttermilk and Mix Gently: Pour in the ¾ cup of cold buttermilk. Using a fork or a rubber spatula, mix until the dough just comes together. The key here is not to overmix! Overmixing develops the gluten in the flour, which will result in tough, dense biscuits. We’re looking for a shaggy, slightly sticky dough. A few streaks of flour are perfectly fine.
Assembling and Baking Your Masterpiece
- Preheat Oven and Top the Pie: Preheat your oven to 400°F (200°C). Once your biscuit dough is ready, take spoonfuls (about 2-3 tablespoons each) and gently drop them evenly over the hot chicken pot pie filling in the baking dish. Don’t worry about them being perfectly shaped; rustic is part of the charm! Leave a little space between each biscuit for them to expand during baking. The hot filling will give the bottom of the biscuits a head start on cooking, ensuring they’re cooked through and not soggy.
- Bake to Golden Perfection: Place the baking dish in your preheated oven. Bake for 25-30 minutes, or until the biscuit topping is beautifully golden brown, puffed up, and cooked through, and the pot pie filling is bubbling enthusiastically around the edges. You can insert a toothpick into the center of a biscuit to check for doneness; it should come out clean.
- Prepare the Garlic Butter Glaze: While the pot pie is baking during its last 5-10 minutes, melt ¼ cup of unsalted butter in a small microwave-safe bowl or saucepan. Stir in ½ teaspoon of garlic powder and 1 tablespoon of fresh chopped parsley. Give it a good whisk to combine. This simple glaze is the final touch that truly elevates our biscuits to “Red Lobster” status.
- Glaze and Rest: Once the pot pie is out of the oven, immediately brush the prepared garlic butter glaze generously over the tops of the hot, golden-brown biscuits. The hot biscuits will absorb all that wonderful garlicky butter, making them incredibly flavorful and moist.
- Serve with Joy: Let the Red Lobster Biscuit Chicken Pot Pie rest for 5-10 minutes before serving. This brief resting period allows the filling to set up slightly, preventing it from being too runny, and ensures everything is at the perfect temperature for enjoying. Serve warm, scooping out generous portions that include both the rich, creamy filling and a fluffy, cheesy biscuit. It’s truly a comforting meal that will bring smiles all around!
Conclusion:
Well, my friends, we’ve reached the delicious culmination of our culinary journey, and I genuinely hope you’re feeling inspired to roll up your sleeves and bring this incredible dish to life in your own kitchen. After all we’ve discussed, it’s clear why this particular creation is far more than just another dinner recipe; it’s an experience. The unparalleled joy of combining the ultimate comfort food — a rich, savory chicken pot pie — with the iconic, cheesy, garlicky perfection of those beloved biscuits is, simply put, a stroke of genius. This isn’t just any meal; it’s a celebration of flavors and textures that dance harmoniously on your palate. The creamy, herby chicken and vegetable filling, simmered to tender perfection, nestled under that golden, flaky, and incredibly flavorful biscuit topping, creates a symphony of taste that few dishes can rival.
I genuinely believe this recipe deserves a prime spot in your cooking repertoire. Why is it a must-try? Because it masterfully blends nostalgia with innovation. It takes familiar, comforting elements and elevates them into something truly extraordinary. The Red Lobster Biscuit Chicken Pot Pie is a dish that speaks to the soul, promising warmth, satisfaction, and a little bit of indulgence with every single bite. Imagine the aroma filling your home as it bakes – that irresistible scent of garlic, cheese, and simmering herbs is enough to make anyone’s mouth water. It’s perfect for a cozy weeknight dinner, impressive enough for entertaining guests, and utterly delightful for a lazy Sunday meal. The satisfaction you’ll feel from creating such a show-stopping dish from scratch is incredibly rewarding, and I promise you, the smiles around your table will be all the proof you need that this recipe is a true winner.
Elevate Your Experience: Serving Suggestions & Creative Variations
Now that you’re convinced of its deliciousness, let’s talk about how to make it truly your own. For serving, I love pairing this hearty pot pie with something light and fresh to balance the richness. A simple, crisp green salad with a bright vinaigrette is always a fantastic choice. You could also offer a side of steamed green beans or roasted asparagus for a touch of vibrant color and extra vegetables. Don’t forget a sprinkle of fresh parsley or chives over the top just before serving for a lovely pop of color and freshness!
But the fun doesn’t stop there! One of the beautiful things about a good pot pie is its versatility. Feel free to get creative and adapt this recipe to your preferences or what you have on hand. If you’re not a fan of peas, swap them out for corn, diced potatoes, or even some sautéed mushrooms. For a heartier vegetable profile, consider adding diced carrots, celery, or even bell peppers. Have leftover roasted turkey from a holiday? Absolutely use that in place of the cooked chicken for an equally delicious and resourceful meal – it works wonderfully! For those who love a bit of a kick, a pinch of cayenne pepper or a dash of hot sauce in the filling can add a delightful warmth. And if you’re feeling extra adventurous, why not experiment with different cheeses in your biscuit topping? A sharp cheddar or a smoky gouda could introduce an exciting new dimension to that already incredible topping. You could also try making individual Red Lobster Biscuit Chicken Pot Pies in smaller ramekins for charming, personalized servings – perfect for portion control or a more elegant presentation!
Your Culinary Adventure Awaits!
So, what are you waiting for? Gather your ingredients, put on your favorite apron, and prepare to embark on a truly satisfying culinary adventure. This isn’t just about following a recipe; it’s about the joy of cooking, the warmth of sharing a homemade meal, and the pure delight of eating something truly exceptional. I can’t emphasize enough how much I encourage you to try this particular recipe. It’s more than just food; it’s an experience that brings comfort, joy, and incredible flavor to your table. Once you’ve made it, I would absolutely love to hear about your experience! Did you stick to the recipe, or did you put your own creative spin on it? What were your favorite parts? Please, share your stories, your photos, and any brilliant variations you came up with. Your culinary triumphs inspire me and our entire cooking community. Happy cooking, and bon appétit!
Amazing Red Lobster Biscuit Chicken Pot Pie
Red Lobster Biscuit Chicken Pot Pie is not just a meal; it’s an experience, a symphony of savory flavors and comforting textures that will transport you straight to culinary bliss. Imagine sinking your fork into a rich, creamy chicken and vegetable filling, perfectly seasoned and enveloped by a golden, flaky crust that tastes remarkably like those iconic cheesy garlic biscuits we all adore from Red Lobster. It’s the ultimate comfort food elevated to gourmet status, offering a nostalgic nod to classic American cuisine with an innovative, irresistible twist.
Ingredients
Instructions
Important Information
Nutrition Facts (Per Serving)
It is important to consider this information as approximate and not to use it as definitive health advice.
Allergy Information
Please check ingredients for potential allergens and consult a health professional if in doubt.


Leave a Comment