
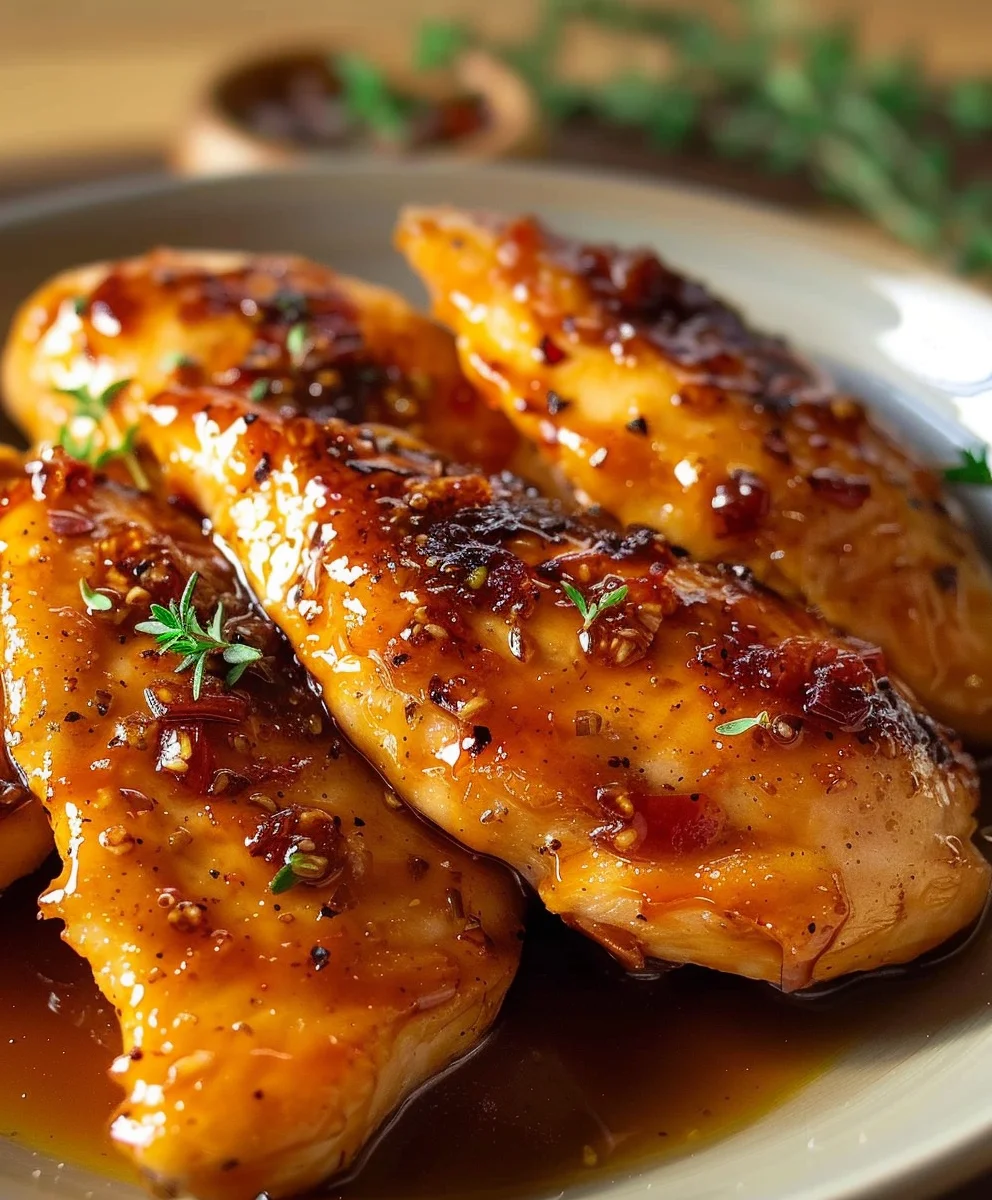
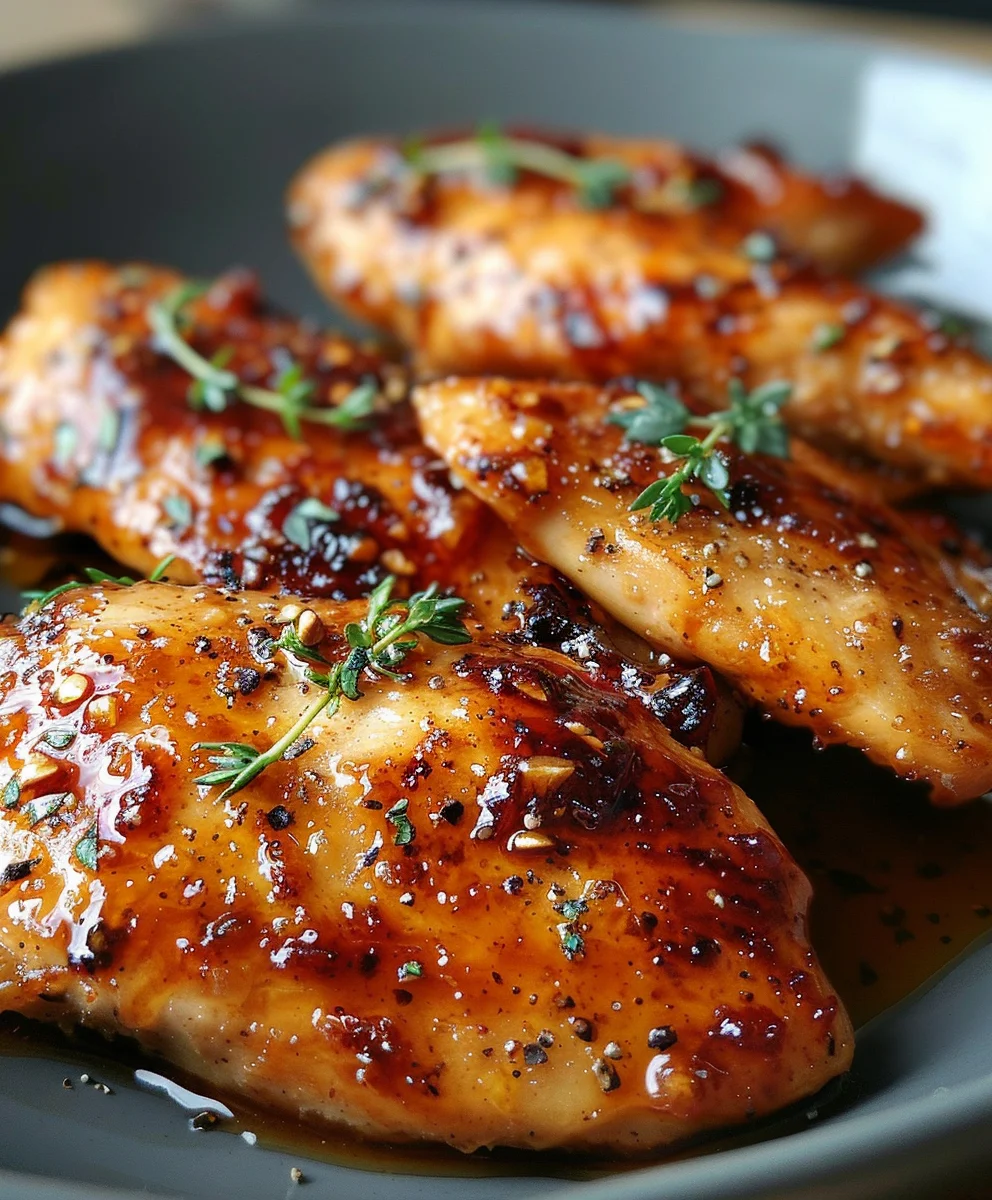
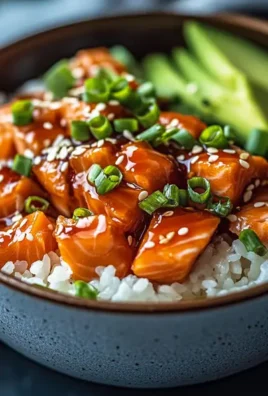
Air Fryer Maple Glazed Chicken Breast – have you ever dreamt of a weeknight meal that’s both incredibly delicious and astonishingly quick to prepare? As someone who cherishes both flavor and efficiency in the kitchen, I can confidently say this recipe is a game-changer. Imagine perfectly cooked chicken breast, boasting a beautiful golden-brown crisp on the outside and unbelievably juicy on the inside, all coated in a luscious, sticky-sweet maple glaze with just the right hint of savory balance. This isn’t just another chicken dish; it’s a testament to how modern cooking methods can elevate everyday ingredients into something truly special, transforming your dinner table with minimal effort.
A Modern Culinary Delight: Why This Dish Shines
While chicken itself has graced dinner tables for centuries across countless cultures, the specific marriage of air frying technology with the rich, autumnal notes of maple syrup speaks to a more contemporary culinary evolution. Maple, a cherished flavor, particularly prominent in North American cuisine, brings a comforting warmth, transforming a simple protein into an exciting sensory experience. People absolutely adore this dish not only for its irresistible combination of sweet and savory flavors and its delightful texture – that crispy exterior contrasting with tender meat – but also for its unparalleled convenience. The air fryer works its magic, ensuring a quick and even cook with minimal oil, making the Air Fryer Maple Glazed Chicken Breast a healthy and stress-free option for busy families and individuals alike. It’s truly a five-minute magic concept from prep to plate, making gourmet-level weeknight dinners an effortless reality.

Ingredients:
- For the Chicken:
- 4 boneless, skinless chicken breasts (about 6-8 ounces each), preferably organic or free-range for the best flavor and texture. I find that using quality chicken really makes a difference here.
- 1 tablespoon olive oil (extra virgin or regular, whichever you prefer. I usually opt for extra virgin for a slightly richer base flavor).
- ½ teaspoon sea salt, or to taste.
- ¼ teaspoon freshly ground black pepper, or to taste.
- ½ teaspoon garlic powder – this gives a lovely foundational savory note.
- ½ teaspoon onion powder – another essential for depth of flavor.
- ¼ teaspoon smoked paprika – for a subtle smokiness that complements the maple beautifully. If you don’t have smoked paprika, regular sweet paprika works too, but the smoked really elevates it.
- For the Maple Glaze:
- ¼ cup pure maple syrup (make sure it’s pure, not pancake syrup. The quality of your maple syrup directly impacts the final glaze. I always go for dark amber or very dark for a robust maple flavor).
- 1 tablespoon low-sodium soy sauce – this adds an incredible umami depth and balances the sweetness. If you’re gluten-free, tamari works perfectly.
- 1 tablespoon apple cider vinegar – essential for cutting through the richness and sweetness of the maple, adding a lovely tang.
- 1 teaspoon Dijon mustard – acts as an emulsifier and provides a slight piquant kick that is just delightful.
- 1 clove fresh garlic, minced very finely – fresh garlic is crucial for a bright, aromatic punch in the glaze.
- Optional: A tiny pinch of red pepper flakes for a subtle warmth if you like a little heat.
- For Garnish (Optional):
- Fresh chopped parsley or chives – for a pop of color and a fresh, herbaceous finish.
Preparing the Chicken:
- Patting the Chicken Dry: First things first, we want to ensure our chicken breasts are as dry as possible. This is a critical step because excess moisture can steam the chicken rather than allowing it to get that beautiful golden crust in the air fryer. So, grab some paper towels and thoroughly pat each chicken breast on all sides. Don’t rush this part; a dry surface is key for seasoning to adhere well and for achieving that perfect sear.
- Pounding for Even Thickness: Now, for a secret to perfectly cooked, juicy chicken every single time: even thickness. Place each chicken breast between two pieces of plastic wrap or in a large resealable plastic bag. Using a meat mallet, the flat side of a rolling pin, or even a heavy-bottomed pan, gently pound the chicken until it’s about ¾ to 1 inch thick across its entire surface. The goal here isn’t to make it paper-thin, but to ensure that the thicker parts are thinned out to match the leaner ends. This ensures uniform cooking, preventing one part from drying out while another is still cooking. It also helps tenderize the meat, making for a more pleasant eating experience. Trust me, this step is worth the extra minute!
- Seasoning the Chicken: In a small bowl, combine your salt, black pepper, garlic powder, onion powder, and smoked paprika. Give them a quick whisk to ensure they’re thoroughly mixed. This creates a balanced, savory blend that will lay the groundwork for our maple glaze. Next, drizzle the olive oil evenly over both sides of your pounded chicken breasts. Use your hands to rub the oil all over, making sure every inch is lightly coated. The oil not only helps the seasonings stick but also aids in getting a lovely crispy exterior in the air fryer.
- Applying the Seasoning Blend: Now, generously sprinkle your prepared seasoning blend over all sides of each chicken breast. Don’t be shy here! Use your fingers to gently rub the spices into the meat, ensuring an even coating. This aromatic rub will infuse the chicken with flavor from the inside out. Once seasoned, you can either proceed directly to air frying, or if you have a little extra time, I highly recommend letting the chicken sit at room temperature for about 15-20 minutes, or even refrigerating it for up to an hour. This short resting period allows the flavors to meld and penetrate deeper into the meat, resulting in a more flavorful final dish. If refrigerating, remember to bring it out about 10-15 minutes before cooking to take off the chill.
Crafting the Maple Glaze:
- Combining Glaze Ingredients: In a small saucepan, combine your pure maple syrup, low-sodium soy sauce, apple cider vinegar, Dijon mustard, and the finely minced fresh garlic. If you’re opting for a bit of heat, now is the time to add that tiny pinch of red pepper flakes. Give everything a good whisk to ensure all the ingredients are well incorporated.
- Simmering the Glaze: Place the saucepan over medium-low heat. Bring the mixture to a gentle simmer, stirring occasionally. You’ll notice it start to bubble lightly around the edges. We want to reduce this mixture slightly, allowing it to thicken into a lovely, syrupy glaze. Continue to simmer for about 5-7 minutes, or until the glaze coats the back of a spoon. The consistency should be thick enough to cling to the chicken but still pourable. Be careful not to let it boil too vigorously, as maple syrup can burn easily if left unattended. Keep a watchful eye and stir frequently. The aroma filling your kitchen right now will be absolutely intoxicating!
- Achieving the Right Consistency and Flavor Balance: As the glaze simmers, it will gradually reduce and thicken. A good test is to dip a spoon into the glaze, then run your finger across the back of the spoon – if it leaves a clear line, it’s ready. Once it reaches your desired consistency, remove the saucepan from the heat. This is a great time to give it a quick taste. Does it need a touch more tang? Add a tiny bit more apple cider vinegar. Prefer it a bit sweeter? A dab more maple syrup. Want more umami? Another drop of soy sauce. Adjust according to your personal preference. Remember, this glaze is going to be the star flavor of our chicken, so make it perfect for you! Set the glaze aside; it will continue to thicken slightly as it cools.
Air Frying the Chicken:
- Preheating the Air Fryer: Just like with a traditional oven, preheating your air fryer is crucial for even cooking and achieving that coveted crispy exterior. Preheat your air fryer to 375°F (190°C). Depending on your model, this usually takes about 3-5 minutes. Don’t skip this step! Placing cold chicken into a cold air fryer basket can lead to uneven cooking and a less desirable texture. A properly preheated air fryer will immediately start to sear the outside of the chicken, locking in juices and flavor.
- Arranging Chicken in the Air Fryer: While the air fryer is preheating, lightly spray the air fryer basket with a non-stick cooking spray or brush it with a little olive oil. This prevents the chicken from sticking and makes for easier cleanup. Carefully place the seasoned chicken breasts in the air fryer basket in a single layer. It’s incredibly important not to overcrowd the basket. If your air fryer is packed too tightly, the air won’t circulate properly, and your chicken will steam instead of air fry, resulting in a soggy rather than crispy finish. If you have more than two chicken breasts, you’ll likely need to cook them in batches. Patience here will be rewarded!
- Initial Air Frying Phase: Cook the chicken breasts for 8-10 minutes on the first side. The exact timing can vary slightly depending on the thickness of your chicken breasts and the specific wattage/model of your air fryer. Around the 8-minute mark, carefully flip the chicken breasts over using tongs. You should see a lovely golden-brown crust forming. Continue to cook for another 5-7 minutes on the second side.
- Checking for Doneness: After the initial cooking time, it’s absolutely essential to check the internal temperature of your chicken. The safest and most accurate way to do this is with an instant-read meat thermometer. Insert the thermometer into the thickest part of the largest chicken breast. We are looking for a minimum internal temperature of 165°F (74°C). If it hasn’t reached this temperature, continue to cook in 2-minute increments, checking the temperature each time, until it is safely cooked through. Avoid overcooking, as this will lead to dry, tough chicken. We want that perfect juicy interior!
- Resting the Chicken (Before Glazing): Once your chicken reaches 165°F (74°C), carefully remove it from the air fryer and transfer it to a clean plate or cutting board. It’s crucial to let the chicken rest for about 3-5 minutes before you even think about glazing it. This resting period allows the juices within the chicken to redistribute throughout the meat, ensuring every bite is incredibly tender and succulent. If you cut into it too soon, all those delicious juices will simply run out, leaving you with drier chicken. This is a small but mighty step that makes a huge difference in the final texture.
Applying the Glaze & Final Touches:
- Applying the Maple Glaze: Now for the moment we’ve been waiting for! While the chicken is resting, gently reheat your maple glaze for just about 30 seconds on low heat if it has cooled down too much and thickened excessively. We want it warm enough to brush easily. Using a pastry brush, generously brush the warm maple glaze over the top and sides of each chicken breast. Don’t be shy; aim for a good, even coating that truly envelops the chicken. The chicken has already cooked through, so this step is all about caramelizing the glaze and infusing it with that incredible sweet-savory flavor.
- Quick Return to the Air Fryer for Caramelization: Carefully return the glazed chicken breasts to the air fryer basket in a single layer. We’re not cooking the chicken anymore; we’re just setting the glaze. Cook for an additional 2-3 minutes at 375°F (190°C). Keep a very close eye on it during this stage, as the maple syrup can caramelize quickly and go from beautifully glazed to burnt in a blink. You’re looking for the glaze to become slightly sticky, shiny, and beautifully golden-brown, with perhaps some slightly darkened, caramelized edges. This quick blast of heat will deepen the flavor of the glaze and make it adhere perfectly to the chicken.
- Final Rest and Garnish: Once the glaze is perfectly caramelized, remove the chicken from the air fryer and transfer it back to your serving plate or cutting board. Allow it to rest for another 1-2 minutes. This final rest allows the glaze to set slightly and become beautifully glossy. If desired, sprinkle with fresh chopped parsley or chives for a vibrant pop of color and a touch of fresh, herbaceous aroma. The fresh herbs not only look fantastic but also add a wonderful counterpoint to the rich maple flavor.
Serving Suggestions & Tips:
- Perfect Pairings: This Air Fryer Maple Glazed Chicken Breast is incredibly versatile and pairs wonderfully with a variety of side dishes. I love serving it with simple roasted asparagus or green beans, a light garden salad with a vinaigrette dressing to cut through the richness, or fluffy quinoa or brown rice to soak up every last drop of that amazing glaze. For something heartier, a side of creamy mashed potatoes or a sweet potato puree would be absolutely divine.
- Storage and Reheating: Leftovers, if you have any, can be stored in an airtight container in the refrigerator for up to 3-4 days. To reheat, you can gently warm them in the microwave, but I find they taste best when reheated in the air fryer at 300°F (150°C) for about 5-7 minutes, or until just warmed through. This helps to re-crisp the exterior without drying out the chicken. You can also slice the cold chicken and add it to salads or sandwiches for a delicious next-day meal.
- Air Fryer Model Variations: Please remember that air fryer models can vary significantly in their wattage and how quickly they cook. The times I’ve provided are a general guideline. It’s always a good idea to consult your air fryer’s manual and to keep a close eye on your food, especially the first time you make this recipe. You might need to adjust the cooking times by a minute or two, either up or down, to achieve perfect results with your specific appliance. Always rely on an instant-read thermometer to confirm internal doneness.
-
Flavor Twists and Variations:
- Spicier Kick: If you love heat, increase the red pepper flakes in the glaze, or add a pinch of cayenne pepper to the chicken seasoning.
- Ginger Infusion: For an Asian-inspired twist, add ½ teaspoon of freshly grated ginger to the maple glaze along with the garlic. It adds a beautiful fragrant warmth.
- Herbaceous Notes: Experiment with different herbs. A sprinkle of fresh thyme or rosemary could also be a lovely addition to the chicken seasoning or as a garnish.
- Citrus Brightness: A squeeze of fresh orange juice or a bit of orange zest added to the glaze could offer an extra layer of brightness that pairs well with maple.
This Air Fryer Maple Glazed Chicken Breast is a testament to how quick, easy, and incredibly flavorful healthy cooking can be. I truly hope you enjoy making and savoring this dish as much as I do!
Conclusion:
And there you have it, my friends – a recipe that I genuinely believe will become a staple in your kitchen rotation, just as it has in mine. What truly makes this recipe a standout isn’t just its incredible flavor profile, but the sheer effortlessness with which you can bring it to life. We’re talking about achieving restaurant-quality results with minimal fuss, transforming an everyday ingredient like chicken breast into something truly extraordinary. Forget about long marinading times or complicated cooking methods; this approach embraces efficiency without compromising on taste. It’s the kind of dish that whispers promises of weeknight dinners that feel indulgent yet are incredibly practical.
I can’t emphasize enough how game-changing this Air Fryer Maple Glazed Chicken Breast: 5 minute magic is. It’s a revelation for anyone looking to eat healthily without sacrificing flavor or spending hours in the kitchen. The air fryer works its magic, ensuring the chicken breast remains juicy and tender on the inside, with that beautiful, caramelized maple glaze on the outside that will have your taste buds singing. That perfect balance of sweet and savory, with a hint of tang, is simply irresistible. It’s a dish that genuinely delights, offering comfort and sophistication in every bite. This isn’t just another chicken recipe; it’s an experience, a delightful surprise that proves quick meals can be utterly delicious and satisfying.
Serving Suggestions & Creative Variations to Elevate Your Meal:
Now that you’ve mastered the art of this delicious chicken, let’s talk about how to make it a complete meal or how to switch things up to keep things exciting. For a classic, wholesome dinner, I absolutely love pairing this chicken with some simple steamed green beans or asparagus, perhaps a sprinkle of toasted almonds for extra crunch. A fluffy bed of quinoa or wild rice also complements the sweet-savory notes of the maple glaze beautifully, soaking up all those delicious juices. If you’re in the mood for something a bit more substantial, a side of roasted sweet potato wedges or a light, refreshing garden salad with a vinaigrette dressing would be perfect. The vibrant colors and textures will make your plate sing!
But don’t stop there! The beauty of this recipe lies in its adaptability. Thinking about variations? Try adding a pinch of smoked paprika or a dash of cayenne pepper to the glaze for an extra layer of warmth and a subtle kick. Or, for an herbaceous twist, finely chop some fresh rosemary or thyme and mix it into the glaze before air frying. Imagine the aromatic burst! If you’re feeling adventurous, consider swapping out the maple syrup for honey or even a balsamic reduction for a completely different, yet equally delicious, flavor profile. This chicken isn’t just for dinner either; thinly slice any leftovers and add them to a fresh salad for a gourmet lunch, or tuck them into a warm pita with some crisp lettuce and a drizzle of aioli for a fantastic sandwich. It also works wonderfully shredded into tacos or mixed into a hearty grain bowl. The possibilities are truly endless, limited only by your imagination!
Your Turn to Create and Share!
I truly hope this recipe inspires you to step into your kitchen and give this incredible Air Fryer Maple Glazed Chicken Breast: 5 minute magic a try. It’s so simple, so quick, and so undeniably delicious, I’m confident it will earn a coveted spot in your personal recipe collection. Don’t be shy; embrace the ease and savor the incredible flavors! I promise you, your taste buds will thank you. When you do make it, I would absolutely love to hear about your experience. Did you stick to the original recipe, or did you put your own unique spin on it? What did you serve it with? Every comment, every photo, every shared tip enriches our culinary community. So please, come back and leave a comment below, or better yet, share a photo of your masterpiece on social media and tag me! Let’s celebrate delicious, easy cooking together. Happy cooking, and I can’t wait to see your creations!
Air Fryer Maple Glazed Chicken Breast
Indulge in a truly delicious and astonishingly quick weeknight meal with this Air Fryer Maple Glazed Chicken Breast. Experience perfectly cooked chicken breast with a beautiful golden-brown crisp and juicy interior, all coated in a luscious, sticky-sweet maple glaze with a savory balance. This contemporary dish combines the efficiency of air frying with the comforting notes of maple syrup, offering an irresistible sweet and savory flavor profile and delightful texture in minimal time.
Ingredients
-
2 chicken breasts
-
1/4 cup maple syrup
-
2 tablespoons soy sauce
-
1 tablespoon Dijon mustard
-
1 teaspoon garlic powder
-
Salt to taste
-
Pepper to taste
Instructions
-
Step 1
Pat chicken breasts dry. Pound each to an even ¾ to 1 inch thickness. Season both sides with salt, pepper, and garlic powder. -
Step 2
In a small saucepan, combine maple syrup, soy sauce, and Dijon mustard. Bring to a gentle simmer over medium-low heat, stirring occasionally. Cook for 5-7 minutes until the glaze thickens slightly and coats the back of a spoon. Remove from heat and set aside. -
Step 3
Preheat your air fryer to 375°F (190°C). Lightly spray the air fryer basket with non-stick spray. Place the seasoned chicken breasts in a single layer, ensuring not to overcrowd. Cook for 8-10 minutes, then flip the chicken. Continue cooking for another 5-7 minutes, or until an instant-read thermometer inserted into the thickest part reads 165°F (74°C). Remove chicken and let it rest on a clean plate for 3-5 minutes. -
Step 4
Gently reheat the maple glaze for about 30 seconds on low heat if it has cooled too much. Brush the warm glaze generously over the top and sides of each rested chicken breast. Carefully return the glazed chicken to the air fryer basket. Cook for an additional 2-3 minutes at 375°F (190°C), watching closely, until the glaze is sticky, shiny, and beautifully caramelized with slightly darkened edges. -
Step 5
Remove the glazed chicken from the air fryer and allow it to rest for another 1-2 minutes before serving. Garnish with fresh chopped parsley or chives if desired, and enjoy immediately.
Important Information
Nutrition Facts (Per Serving)
It is important to consider this information as approximate and not to use it as definitive health advice.
Allergy Information
Please check ingredients for potential allergens and consult a health professional if in doubt.
Leave a Comment