
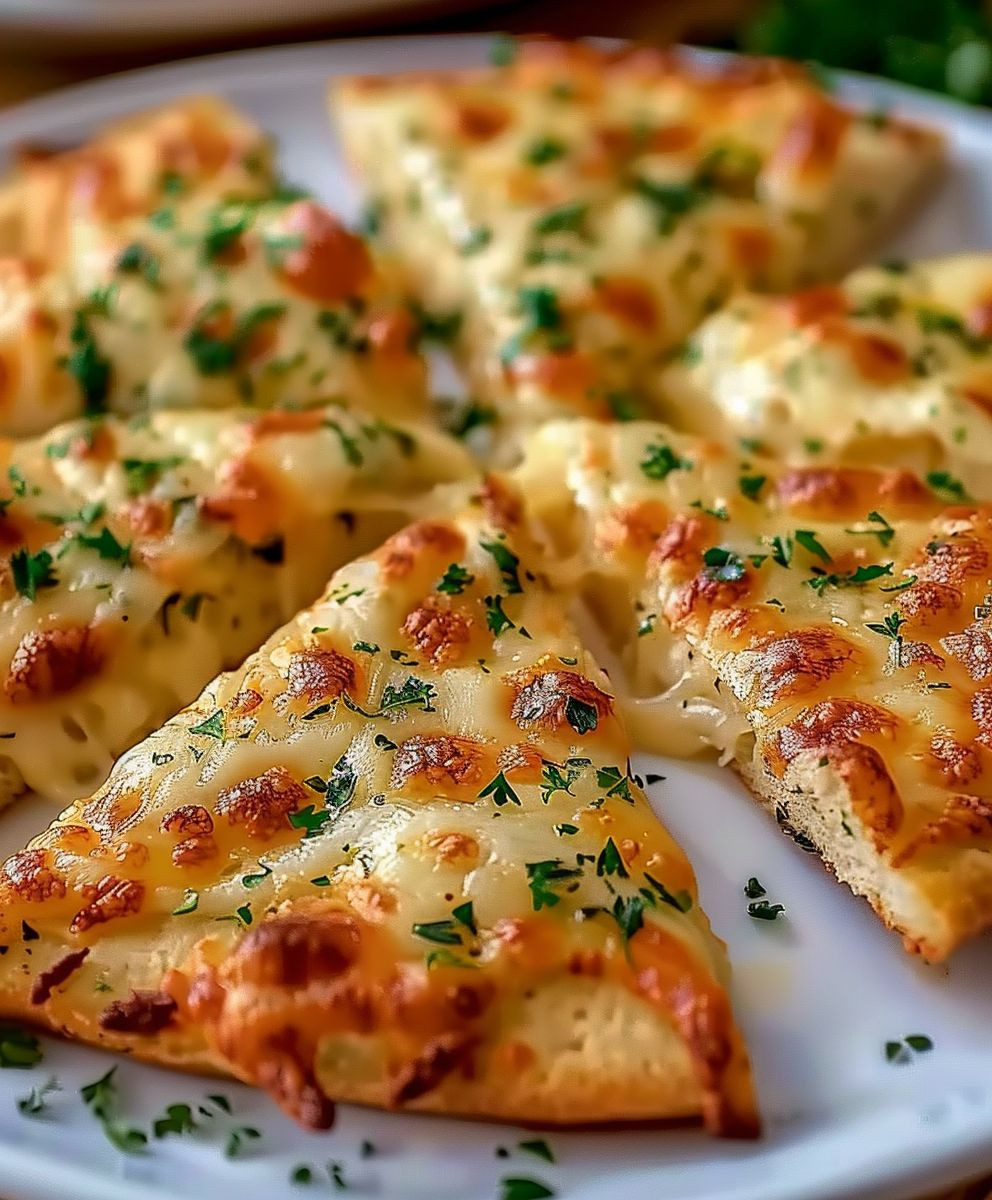
Air Fryer Cheesy Garlic Bread: Prepare to be amazed! Imagine biting into warm, crusty bread, oozing with melted cheese and infused with the irresistible aroma of garlic. This isn’t just any garlic bread; it’s a game-changer, and it’s ready in minutes thanks to the magic of the air fryer. Forget slaving over a hot oven – this recipe delivers perfect results with minimal effort.
Garlic bread, in its essence, is a celebration of simple pleasures. While its exact origins are debated, the concept of flavoring bread with garlic and oil has likely existed for centuries across various cultures. The addition of cheese elevates it to a truly decadent treat, a comforting staple at Italian-American restaurants and family gatherings alike. It’s a dish that transcends generations, evoking feelings of warmth and nostalgia.
What makes air fryer cheesy garlic bread so universally loved? It’s the perfect combination of textures: the crisp exterior of the bread, the soft, chewy interior, and the gooey, melted cheese. The garlic adds a pungent, savory note that complements the richness of the cheese beautifully. Plus, the air fryer method ensures even cooking and a delightfully crispy crust without the need for excessive butter or oil. It’s quick, easy, and utterly delicious – the trifecta of a perfect recipe. I know you’ll love this easy take on a classic!

Ingredients:
- 1 loaf of Italian bread, about 24 inches long
- ½ cup (1 stick) unsalted butter, softened
- 6 cloves garlic, minced
- 1 teaspoon dried Italian seasoning
- ¼ teaspoon garlic powder
- ¼ teaspoon black pepper
- ½ cup grated Parmesan cheese
- 1 ½ cups shredded mozzarella cheese
- 2 tablespoons chopped fresh parsley, for garnish (optional)
Preparing the Garlic Butter:
Okay, let’s get started by making the heart of our cheesy garlic bread – the garlic butter! This is where all the flavor magic happens, so pay close attention.
- Soften the Butter: First things first, make sure your butter is nice and soft. You can leave it out at room temperature for about an hour, or if you’re in a hurry, microwave it in 10-second intervals until it’s softened but not melted. We want it spreadable, not liquid!
- Mince the Garlic: Now, grab those garlic cloves and mince them finely. The finer the mince, the more evenly the garlic flavor will distribute throughout the butter. I like to use a garlic press for this, but you can also chop it by hand. Just be careful not to burn it when cooking.
- Combine Ingredients: In a medium bowl, combine the softened butter, minced garlic, Italian seasoning, garlic powder, and black pepper.
- Mix Well: Use a fork or a small whisk to thoroughly mix all the ingredients together until they are evenly combined. You should have a smooth, fragrant garlic butter. Give it a taste and adjust the seasonings if needed. Maybe you want a little more garlic powder? Go for it!
Preparing the Bread:
Now that our garlic butter is ready, let’s get the bread prepped for its cheesy transformation.
- Slice the Bread: Using a serrated bread knife, carefully slice the loaf of Italian bread lengthwise. You should have two long halves.
- Spread the Garlic Butter: Generously spread the garlic butter evenly over the cut sides of both bread halves. Make sure to get every nook and cranny! Don’t be shy – this is where the flavor comes from.
- Add Parmesan Cheese: Sprinkle the grated Parmesan cheese evenly over the garlic butter on both halves. This adds a nice salty, nutty flavor that complements the garlic perfectly.
- Top with Mozzarella Cheese: Now for the star of the show – the mozzarella! Pile the shredded mozzarella cheese evenly over the Parmesan cheese on both halves. Don’t skimp on the cheese – we want it nice and gooey!
Air Frying the Cheesy Garlic Bread:
Alright, the moment we’ve been waiting for! Let’s get this cheesy garlic bread into the air fryer and watch the magic happen.
- Preheat the Air Fryer (Optional): Some air fryers recommend preheating, while others don’t. Check your air fryer’s manual. If yours recommends preheating, preheat it to 350°F (175°C).
- Cut the Bread (If Necessary): Depending on the size of your air fryer basket, you may need to cut each bread half into smaller pieces to fit. Make sure the pieces aren’t overlapping.
- Place Bread in Air Fryer: Carefully place the bread pieces in the air fryer basket in a single layer. Avoid overcrowding the basket, as this will prevent the bread from cooking evenly. You may need to cook the bread in batches.
- Air Fry: Air fry at 350°F (175°C) for 5-7 minutes, or until the cheese is melted, bubbly, and lightly golden brown, and the bread is toasted to your liking. Keep a close eye on it, as air fryers can vary in cooking time.
- Check for Doneness: After 5 minutes, check the bread. If the cheese isn’t melted enough, or the bread isn’t toasted to your liking, continue air frying for another 1-2 minutes.
- Remove from Air Fryer: Once the cheesy garlic bread is cooked to perfection, carefully remove it from the air fryer basket using tongs or a spatula. Be careful, it will be hot!
Serving and Enjoying:
The hard work is done! Now it’s time to enjoy the fruits (or rather, the bread) of your labor.
- Garnish (Optional): If desired, sprinkle the chopped fresh parsley over the cheesy garlic bread for a pop of color and freshness.
- Slice and Serve: Use a pizza cutter or a sharp knife to slice the cheesy garlic bread into smaller pieces.
- Serve Immediately: Serve the cheesy garlic bread immediately while it’s hot and the cheese is melted and gooey. It’s best enjoyed fresh!
- Pairing Suggestions: This cheesy garlic bread is delicious on its own, but it also pairs perfectly with pasta dishes, soups, salads, or as a side dish to your favorite Italian meal. It’s also great for dipping in marinara sauce!
Tips and Variations:
Want to customize your cheesy garlic bread? Here are a few ideas:
- Add More Cheese: Experiment with different types of cheese, such as provolone, fontina, or asiago.
- Spice it Up: Add a pinch of red pepper flakes to the garlic butter for a little heat.
- Add Herbs: Use fresh herbs like basil, oregano, or thyme in addition to the Italian seasoning.
- Use Different Bread: Try using a baguette, ciabatta, or sourdough bread instead of Italian bread.
- Make it a Meal: Top the cheesy garlic bread with cooked sausage, pepperoni, or vegetables for a heartier meal.
- Garlic Infused Oil: For a more intense garlic flavor, use garlic-infused olive oil in place of some of the butter.
- Sun-Dried Tomatoes: Add chopped sun-dried tomatoes to the garlic butter for a tangy and savory twist.
- Caramelized Onions: Spread a thin layer of caramelized onions under the cheese for a sweet and savory flavor.
Storage Instructions:
If you happen to have any leftovers (which is unlikely!), here’s how to store them:
- Refrigerate: Store leftover cheesy garlic bread in an airtight container in the refrigerator for up to 2 days.
- Reheat: To reheat, you can air fry it again for a few minutes until heated through, or bake it in a preheated oven at 350°F (175°C) for about 5-10 minutes. You can also microwave it, but the bread may become a bit soggy.
Important Notes:
- Air Fryer Temperatures: Air fryer temperatures can vary, so it’s always a good idea to keep a close eye on your food while it’s cooking.
- Don’t Overcrowd: Avoid overcrowding the air fryer basket, as this will prevent the bread from cooking evenly.
- Adjust Cooking Time: Adjust the cooking time as needed, depending on your air fryer and your personal preferences.
- Use Good Quality Ingredients: Using good quality ingredients will make a big difference in the flavor of your cheesy garlic bread.
Conclusion:
Okay, friends, let’s be honest: you’ve scrolled this far because you’re intrigued by the sheer deliciousness of Air Fryer Cheesy Garlic Bread. And trust me, you should be! This isn’t just another garlic bread recipe; it’s a game-changer. The air fryer delivers a level of crispy, golden perfection that a traditional oven simply can’t match, all while keeping the inside soft and pillowy. The garlic butter infuses every nook and cranny with savory goodness, and the melted cheese? Well, that’s just pure, unadulterated comfort food bliss.
I know what you’re thinking: “Is it really that good?” The answer is a resounding YES! It’s quick, it’s easy, and it’s guaranteed to be a crowd-pleaser. Whether you’re whipping it up as a side dish for pasta night, serving it alongside a hearty soup, or just craving a cheesy, garlicky snack, this recipe has you covered. The beauty of this recipe lies in its simplicity and the incredible flavor payoff. It’s the kind of recipe that will become a staple in your kitchen, one you’ll turn to again and again when you need a quick and satisfying meal or appetizer.
Serving Suggestions and Variations:
Now, let’s talk about how you can make this Air Fryer Cheesy Garlic Bread even more amazing! Feel free to get creative and customize it to your liking. Here are a few ideas to get you started:
- Spice it up: Add a pinch of red pepper flakes to the garlic butter for a little kick.
- Herb it up: Mix in some fresh herbs like parsley, oregano, or basil for a burst of freshness.
- Cheese it up (even more!): Experiment with different cheeses like mozzarella, provolone, or even a sprinkle of parmesan. A blend of cheeses creates a complex and delicious flavor profile.
- Dip it good: Serve it with a side of marinara sauce, ranch dressing, or even a creamy pesto for dipping.
- Make it a meal: Top it with cooked ground beef or sausage and marinara sauce for a quick and easy pizza bread.
- Garlic Lovers’ Dream: Roast the garlic before adding it to the butter for a deeper, sweeter garlic flavor.
Don’t be afraid to experiment and find your perfect combination! The possibilities are endless. I personally love adding a sprinkle of Italian seasoning and a generous helping of mozzarella cheese. It’s simple, classic, and always a hit.
So, what are you waiting for? Grab your ingredients, preheat your air fryer, and get ready to experience the magic of Air Fryer Cheesy Garlic Bread. I promise you won’t be disappointed. It’s the perfect combination of crispy, cheesy, and garlicky goodness, all made in a fraction of the time compared to traditional methods. It’s a guaranteed win for any occasion.
I’m so excited for you to try this recipe! Once you do, please come back and share your experience in the comments below. Let me know what variations you tried, what you served it with, and most importantly, how much you loved it! I can’t wait to hear all about your cheesy, garlicky adventures. Happy cooking!
Air Fryer Cheesy Garlic Bread: The Ultimate Recipe
Quick and easy air fryer cheesy garlic bread with Italian bread, garlic butter, Parmesan, and mozzarella. Perfect appetizer or side!
Ingredients
Instructions
Recipe Notes
- Air fryer temperatures can vary, so keep a close eye on the bread while cooking.
- Avoid overcrowding the air fryer basket for even cooking.
- Adjust cooking time as needed based on your air fryer and preferences.
- For a spicier version, add a pinch of red pepper flakes to the garlic butter.
- Experiment with different cheeses like provolone or asiago.
- Leftovers can be stored in the refrigerator for up to 2 days and reheated in the air fryer or oven.


Leave a Comment