
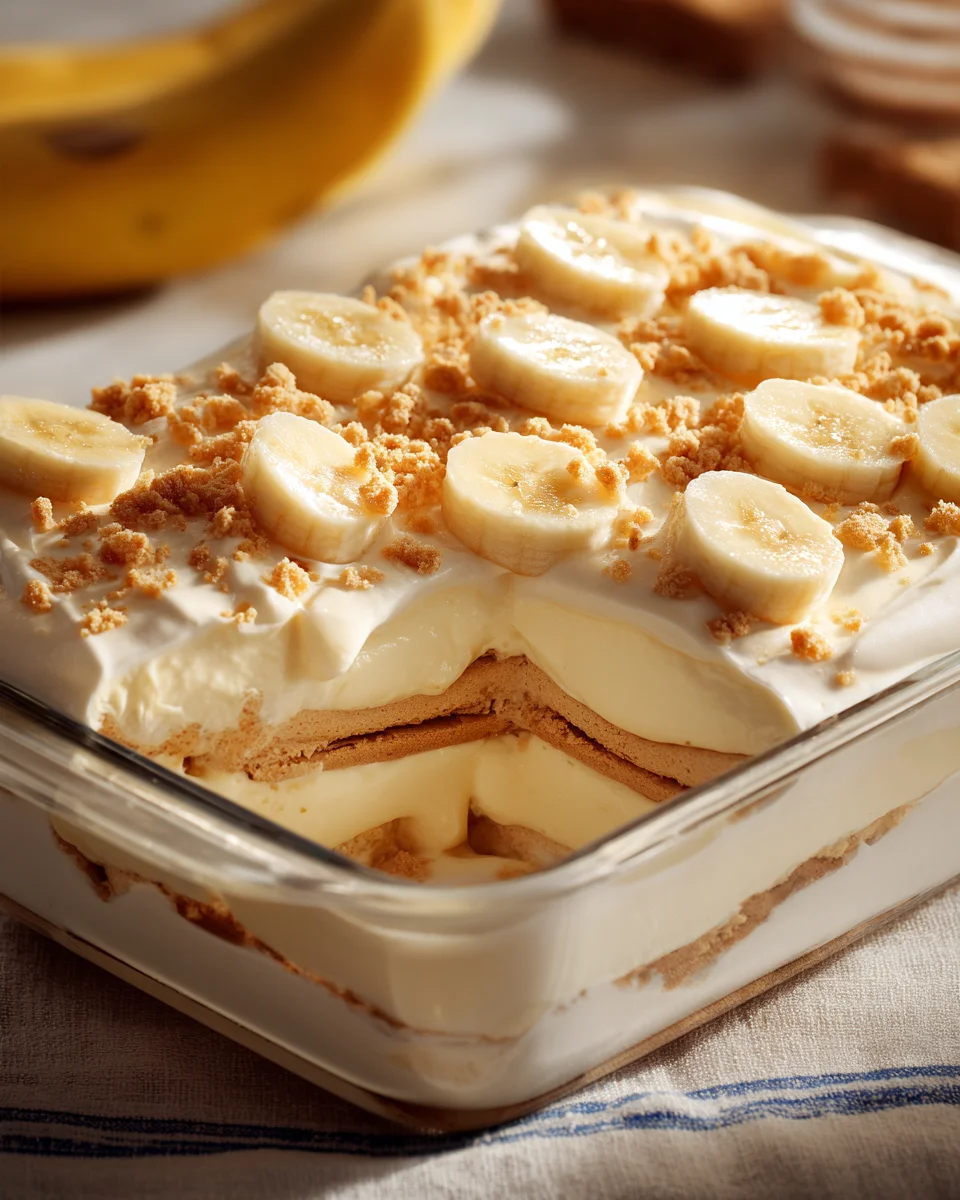
Growing up, Sunday dinners at my grandma’s house were always a treat, but nothing compared to the anticipation of her famous Easy Banana Pudding. I remember the way the kitchen would fill with the sweet, comforting aroma of ripe bananas mingling with creamy vanilla pudding. The moment I walked through the door, I could practically taste it. My grandma would set a big, glass dish on the table, layers of golden bananas, fluffy whipped cream, and buttery vanilla wafers peeking through. It was a sight to behold!
This dish is special to me not just for its nostalgic flavors but for the way it brings people together. Each creamy bite is a perfect harmony of textures—the softness of the pudding, the slight crunch of the wafers, and the tender banana slices. It’s like a warm hug in dessert form. What makes my version stand out is the addition of a hint of cinnamon, which elevates the classic flavors and adds a cozy depth. I also use a touch of homemade whipped cream instead of store-bought, ensuring every layer is rich and luscious.
So, if you’re ready to whip up a batch of this delightful treat that will transport you to those cherished Sunday dinners, let me show you exactly how to make it. You’re going to love it!

Why You’ll Love This Recipe
- Only takes 20 minutes to prepare, with no baking required, making it perfect for busy days.
- Layers of creamy vanilla pudding and ripe bananas create a delightful contrast in texture.
- Budget-friendly ingredients mean you can treat yourself without breaking the bank.
- Can be made ahead of time, allowing the flavors to meld beautifully for an even tastier dessert.
- Perfect for any occasion — from summer picnics to holiday gatherings, everyone will love it!
Ingredients
- 1 package 5 ounces instant vanilla pudding mix
- 2 cups cold whole milk
- 1 can 14 ounces sweetened condensed milk
- 1 1/2 cups whipped topping
- 4 to 5 ripe bananas, sliced
- 1 box 11 ounces vanilla wafers
The key ingredients in this Easy Banana Pudding Creamy Classic Layers recipe work together to create that classic dessert experience. The instant vanilla pudding mix is crucial for a quick setup, thickening with cold milk to create a luscious base. Opt for a high-quality brand to ensure the best flavor. You can substitute vanilla pudding with banana pudding if you’re craving an extra banana flavor.
Sweetened condensed milk adds a rich sweetness and creamy texture that elevates the pudding. Make sure to use full-fat condensed milk for optimal creaminess, but if you’re looking to lighten the dish, you can replace it with half the amount of regular milk combined with a tablespoon of sugar. Lastly, whipped topping gives the dish its airy feel. If you prefer a homemade touch, you can whip your own heavy cream to fold in, just remember to sweeten it slightly to match the store-bought version.
Step-by-Step Instructions
- In a large mixing bowl, whisk together 1 package of instant vanilla pudding mix and 2 cups of cold whole milk for about 2 minutes, or until the mixture thickens and is smooth. Make sure there are no lumps; a whisk or electric mixer works best here.
- Once thickened, gently stir in the entire can of sweetened condensed milk. This should create a rich and creamy mixture. Be careful not to over-mix; you want to keep that light texture.
- Next, fold in 1 1/2 cups of whipped topping until fully incorporated. The goal is a smooth and airy pudding, so use a spatula and a careful folding technique to maintain the fluffiness.
- In a 9×13 inch dish, start layering by placing a single layer of vanilla wafers at the bottom. Make sure they are evenly spaced and cover the base completely.
- Top the wafers with a layer of sliced bananas, about 4 to 5 ripe bananas depending on size. Aim for an even layer to ensure every bite has that delightful banana flavor.
- Pour one-third of the pudding mixture over the bananas, spreading it evenly to cover. This should be a generous coat that seeps down into the layers.
- Repeat the layering process: another layer of vanilla wafers, followed by bananas, and another third of the pudding mixture. Aim for three total layers, finishing with pudding on top.
- Cover the dish with plastic wrap or a lid and refrigerate for at least 4 hours, or overnight if you can wait! This step allows the flavors to meld and the wafers to soften.
Pro Tips for the Best Easy Banana Pudding Creamy Classic Layers
- Make sure your bananas are perfectly ripe, but not overripe, to maintain a balanced flavor and texture. Overripe bananas can become mushy and may not hold up well in the dish.
- Use a glass dish for serving. Not only does it allow you to showcase the beautiful layers, but it also helps to keep the pudding cool while serving at warm gatherings.
- To avoid soggy wafers, layer them just before serving if you’re making this for a special occasion. This maintains their crunch and adds a delightful contrast to the creamy pudding.
- A common mistake is to rush the refrigeration time. Allowing it to chill for a full 4 hours is essential for achieving the right texture and flavor.
- If you want a richer flavor, consider adding a teaspoon of vanilla extract to the pudding mixture for an extra layer of taste.
Variations & Serving Ideas
Consider these fun variations to customize your Easy Banana Pudding Creamy Classic Layers: try using chocolate pudding instead of vanilla for a chocolate-banana twist, or add crushed pineapple for a tropical flair. For a healthier version, swap out the whipped topping for Greek yogurt and use whole grain wafers.
When it comes to serving, this dessert pairs beautifully with a light fruit salad, as the freshness complements the creamy richness. A scoop of vanilla ice cream alongside adds an indulgent touch, while a cup of coffee or tea balances out the sweetness perfectly after a meal.
Storage, Make-Ahead & Reheating
Your Easy Banana Pudding Creamy Classic Layers can be stored in the refrigerator for up to 3 days. However, it’s best enjoyed within the first two days for optimal freshness. Unfortunately, this dessert does not freeze well due to the bananas and whipped topping, which can change texture when thawed. If you have leftovers, simply cover tightly in the fridge and enjoy cold straight from the dish!
Frequently Asked Questions
Can I make Easy Banana Pudding Creamy Classic Layers ahead of time?
Yes — in fact, making it a day ahead allows the flavors to meld beautifully, enhancing the overall taste. Just be sure to cover it well to prevent any absorption of odors from the fridge.
Can I use a different type of milk?
Absolutely! You can substitute whole milk with almond milk or oat milk for a dairy-free version. Just be mindful that this may slightly change the flavor and texture of the pudding.
How can I prevent the bananas from browning?
To keep bananas from browning, you can toss the banana slices in a little lemon juice before layering them in the pudding. This will help maintain their color and freshness.
Can I use homemade whipped cream instead of whipped topping?
Yes! Homemade whipped cream is a great alternative and adds a fresh flavor. Just make sure to sweeten it slightly to match the sweetness of store-bought whipped topping for the best results.
What can I do with leftovers?
Leftover banana pudding can be turned into a delicious parfait by layering it with granola and additional fruit for a quick breakfast or snack. It’s a great way to repurpose any remaining pudding!
Final Thoughts
Easy Banana Pudding Creamy Classic Layers is a delightful treat that captures the essence of comfort food with its rich, velvety textures and layers of sweet banana and creamy pudding. This recipe is worth making not just for its simplicity, but for the joy it brings with every spoonful, creating a nostalgic experience that resonates with so many.
This is the kind of recipe I come back to again and again, especially when I want to evoke fond memories of family gatherings or simply indulge in something sweet. The combination of soft bananas, luscious pudding, and crunchy wafers is a timeless classic that never disappoints.
I encourage you to try this delightful dessert for your next occasion, and don’t hesitate to share your results or add your own twist—maybe some chocolate shavings or a sprinkle of cinnamon! Enjoy creating your own banana pudding masterpiece!
Creamy Banana Pudding Recipe: Easy Classic Layered Delight
- Total Time: 20 minutes
- Yield: 8 servings 1x
Description
This Easy Banana Pudding is a nostalgic dessert that combines creamy vanilla pudding, ripe bananas, and crunchy vanilla wafers. It’s a delightful treat that brings people together with every creamy bite.
Ingredients
- 1 package 5 ounces instant vanilla pudding mix
- 2 cups cold whole milk
- 1 can 14 ounces sweetened condensed milk
- 1 1/2 cups whipped topping
- 4 to 5 ripe bananas, sliced
- 1 box 11 ounces vanilla wafers
Instructions
- In a large mixing bowl, whisk together 1 package of instant vanilla pudding mix and 2 cups of cold whole milk for about 2 minutes, or until the mixture thickens and is smooth. Make sure there are no lumps; a whisk or electric mixer works best here.
- Once thickened, gently stir in the entire can of sweetened condensed milk. This should create a rich and creamy mixture. Be careful not to over-mix; you want to keep that light texture.
- Next, fold in 1 1/2 cups of whipped topping until fully incorporated. The goal is a smooth and airy pudding, so use a spatula and a careful folding technique to maintain the fluffiness.
- In a 9×13 inch dish, start layering by placing a single layer of vanilla wafers at the bottom. Make sure they are evenly spaced and cover the base completely.
- Top the wafers with a layer of sliced bananas, about 4 to 5 ripe bananas depending on size. Aim for an even layer to ensure every bite has that delightful banana flavor.
- Pour one-third of the pudding mixture over the bananas, spreading it evenly to cover. This should be a generous coat that seeps down into the layers.
- Repeat the layering process: another layer of vanilla wafers, followed by bananas, and another third of the pudding mixture. Aim for three total layers, finishing with pudding on top.
- Cover the dish with plastic wrap or a lid and refrigerate for at least 4 hours, or overnight if you can wait! This step allows the flavors to meld and the wafers to soften.
- Prep Time: 20 mins
- Cook Time: 0 mins
- Category: Dessert
- Method: No baking required
- Cuisine: American
Nutrition
- Serving Size: 1 bowl
- Calories: 300
- Sugar: 25 g
- Sodium: 150 mg
- Fat: 10 g
- Saturated Fat: 5 g
- Unsaturated Fat: 3 g
- Trans Fat: 0 g
- Carbohydrates: 45 g
- Fiber: 1 g
- Protein: 4 g
- Cholesterol: 15 mg
Keywords: Make sure your bananas are perfectly ripe, but not overripe, to maintain a balanced flavor and texture. Use a glass dish for serving to showcase the beautiful layers and keep the pudding cool. To avoid soggy wafers, layer them just before serving if you're making this for a special occasion.


Leave a Comment