
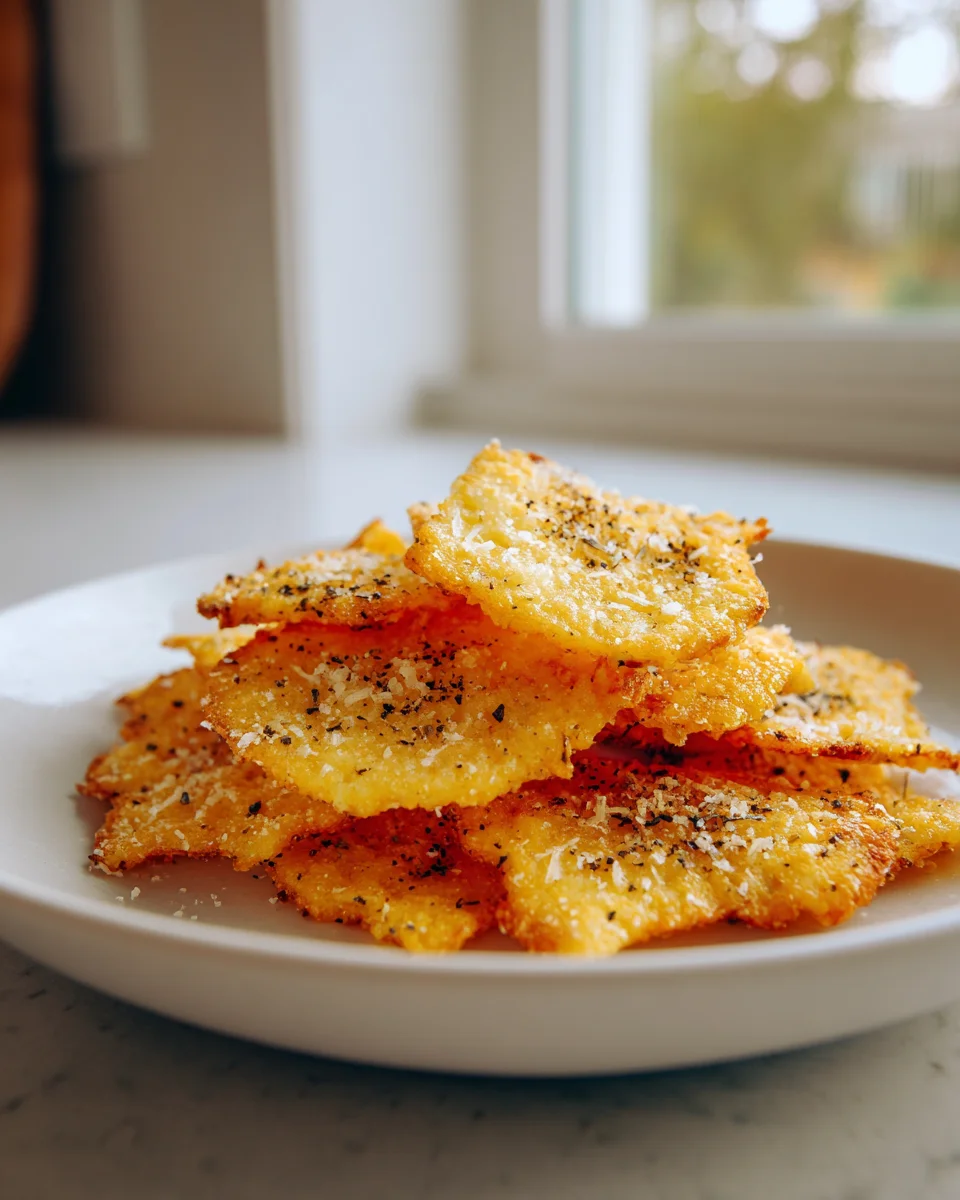
Cottage Cheese Chips Recipe
Oh, prepare yourself for a snack revelation! When I first heard about making “chips” from cottage cheese, I was skeptical, just like you might be right now. But let me tell you, this Cottage Cheese Chips Recipe isn’t just a quirky idea – it’s a game-changer! What makes this recipe so incredibly special is its ingenious ability to transform a humble, creamy dairy product into an unbelievably crispy, savory, and satisfying chip. It’s not just a snack; it’s a high-protein, low-carb alternative that actually delivers on the crunch factor we all crave.
You are absolutely going to love these because they brilliantly satisfy that desire for something crunchy and flavorful, all without the guilt often associated with traditional potato chips. Imagine biting into a perfectly seasoned, golden crisp that’s surprisingly light yet robust enough for dipping. This dish is essentially baked dollops of cottage cheese, seasoned to perfection, that emerge from the oven as firm, savory crisps, ready to elevate your snack game. I promise, once you try them, you’ll be hooked on these delightful little nuggets!

Ingredient Notes
Making crispy, satisfying cottage cheese chips might sound a little unconventional, but trust me, it’s a game-changer! The beauty of this recipe lies in its simplicity and the ability to customize it to your heart’s content. Here are the key ingredients you’ll need and a few ideas for substitutions to get you started on your cottage cheese chip journey.
- Cottage Cheese: This is, of course, our star ingredient! I highly recommend using small-curd cottage cheese. While large-curd can work, small-curd tends to dry out and crisp up more evenly, giving you that perfect chip texture. Whether you go for full-fat, low-fat, or fat-free is entirely up to your preference; the most critical factor here is draining it properly, which we’ll cover in the instructions. Don’t even think about skipping the draining step – it’s crucial for crispiness!
- Cornstarch (or Arrowroot Powder): A little bit of cornstarch goes a long way in helping these chips achieve that desirable crunch. It acts as a binder and helps absorb any residual moisture, contributing to a truly crispy outcome. If you prefer, arrowroot powder is an excellent gluten-free alternative that performs similarly. I usually start with just one tablespoon, but you can adjust slightly depending on how wet your cottage cheese is after draining.
- Salt: Essential for flavor! I use fine sea salt, but kosher salt works beautifully too. Remember that you can always add more salt after baking if needed, so start with a conservative amount.
- Black Pepper: Freshly ground black pepper adds a lovely subtle warmth and depth of flavor. It’s a simple addition that makes a big difference.
- Optional Seasonings: This is where the fun really begins, and you can truly make these chips your own!
- Garlic Powder & Onion Powder: These are my go-to’s for an all-around savory, classic chip flavor. They infuse a wonderful aroma and taste without adding moisture.
- Smoked Paprika: For a touch of smoky depth and a beautiful reddish hue. It pairs wonderfully with the savory base.
- Chili Powder or Cayenne Pepper: If you like a little heat, a pinch of either of these will kick things up a notch.
- Dried Herbs: Dried dill, parsley, chives, or even a mixed Italian herb blend can add a fantastic fresh dimension.
- Nutritional Yeast: For an extra cheesy, umami boost without actual cheese. It’s a great option for those looking for a dairy-free cheese flavor.
- Everything Bagel Seasoning: This blend is fantastic for a robust, savory flavor profile – just be mindful of its salt content!
- Olive Oil or Cooking Spray: You’ll need a little bit of fat to prevent sticking and aid in browning and crisping. A light brushing of olive oil on your parchment paper or a quick spray with cooking oil is perfect.
Step-by-Step Instructions
Alright, let’s get down to business and transform that humble tub of cottage cheese into irresistibly crunchy chips! The process is straightforward, but a few key steps are crucial for success.
- Drain the Cottage Cheese (CRITICAL STEP!): This is arguably the most important step for truly crispy chips. Place your cottage cheese into a fine-mesh sieve lined with cheesecloth (if you have it, otherwise just the sieve works well). Place the sieve over a bowl and let it drain in the refrigerator for at least 30 minutes, or even a few hours. For best results, I like to gently press down on the cottage cheese with the back of a spoon or even gather the cheesecloth and squeeze out as much liquid as possible. The drier the cottage cheese, the crispier your chips will be. You want it to be as firm as possible.
- Preheat Oven & Prepare Baking Sheet: While your cottage cheese is draining (or just before if it’s already drained), preheat your oven to 375°F (190°C). Line a large baking sheet with parchment paper. This step is essential to prevent sticking and ensures easy removal of your delicate chips. Lightly grease the parchment paper with a tiny bit of olive oil or cooking spray.
- Mix Ingredients: Transfer the well-drained cottage cheese to a medium-sized mixing bowl. Add the cornstarch, salt, black pepper, and any optional seasonings you’ve chosen (garlic powder, onion powder, paprika, etc.). Mix everything together thoroughly until the seasonings are evenly distributed and the mixture is well combined. The mixture should feel relatively firm, not watery.
- Form the Chips: Now for the fun part! Take small spoonfuls (about half a tablespoon) of the cottage cheese mixture and drop them onto the prepared parchment paper. Using the back of the spoon, gently spread each dollop into a thin, even circle or oval shape, mimicking the size and thickness of a typical potato chip. The thinner you can get them without tearing, the crispier they will be! Aim for about 1.5-2 inches in diameter. Leave a little space between each chip to allow for even airflow and baking. Don’t overcrowd the baking sheet; if necessary, use a second one.
- Bake Until Golden & Crispy: Place the baking sheet in your preheated oven. Bake for 25-35 minutes, or until the chips are deeply golden brown around the edges and feel firm and crispy to the touch. Baking times can vary depending on your oven and how thin your chips are, so keep an eye on them, especially towards the end. Some people like to flip them halfway through baking for extra even crispiness, but I find if they’re thin enough, they crisp up beautifully without flipping.
- Cool Completely: This step is just as important as draining! Once baked, remove the baking sheet from the oven and carefully transfer the chips to a wire cooling rack. Allow them to cool completely. As they cool, they will continue to crisp up and firm. Resist the urge to snack on them immediately (I know, it’s hard!).
Tips & Suggestions
Making cottage cheese chips is more of an art than a science, and these tips will help you perfect your technique and enjoy the most delicious results!
- Embrace the Drain: I cannot stress this enough – draining your cottage cheese is the single most important factor for crispy chips. If your chips turn out soft or chewy, it’s almost certainly because there was too much moisture left in the cottage cheese. Take your time with this step!
- Go Thin: The thinner you spread your cottage cheese mixture, the crispier your chips will be. Aim for almost cracker-like thinness. If they’re too thick, they’ll be chewy rather than crunchy. Don’t worry if they’re not perfectly round; rustic shapes are part of their charm!
- Don’t Rush the Bake: Patience is a virtue, especially when it comes to baking these chips. They need sufficient time in the oven to dehydrate and crisp up. If they come out soft, pop them back in for a few more minutes until they’re golden and firm.
- Seasoning Adventures: Don’t be afraid to experiment with your favorite flavors! Think beyond the basic salt and pepper.
- For a cheesy kick, try adding a tablespoon of finely grated Parmesan cheese to the mixture.
- Spicy lovers can add a pinch of smoked chipotle powder or a dash of hot sauce to the mixture before spreading.
- For a slightly different savory profile, a tiny bit of dried mustard powder can add a pleasant tang.
- Air Fryer Option: If you have an air fryer, these chips can be made even faster! Preheat your air fryer to 350°F (175°C). Place the formed chips in a single layer in the air fryer basket (you’ll likely need to work in batches). Air fry for 8-12 minutes, flipping halfway, until golden and crispy. Keep a close eye on them as air fryer times can vary wildly.
- Serving Suggestions: These chips are fantastic on their own, but they’re also incredible with dips!
- Serve them with your favorite salsa or guacamole for a healthy snack.
- They pair beautifully with a simple Greek yogurt dip seasoned with fresh dill and garlic.
- Try them with hummus or a creamy spinach dip.
- They even make a great crunchy topping for salads or soups!
- Even Spacing: Ensure there’s enough space between each chip on the baking sheet. This allows for proper air circulation, which is key for even baking and crisping. Overcrowding can lead to soggy spots.
Storage
Once you’ve gone to the effort of making these delicious cottage cheese chips, you’ll want to make sure they stay perfectly crisp for as long as possible. Here’s how I recommend storing them:
- Airtight Container: The absolute best way to store your cottage cheese chips is in an airtight container at room temperature. This will protect them from moisture in the air, which is their biggest enemy when it comes to maintaining crispiness. A glass container with a tight-fitting lid or a sealed plastic container works wonderfully.
- Avoid the Refrigerator: Do not store these chips in the refrigerator. The humidity inside the fridge will quickly turn them soft and rubbery, completely undoing all your hard work to get them crispy.
- Shelf Life: When stored properly in an airtight container at room temperature, these chips will typically stay crisp for 3-5 days. Beyond that, they may start to lose some of their crunch, though they’ll still be perfectly safe to eat.
- Re-crisping: If your chips do start to lose some of their crispness over time, don’t despair! You can easily revive them.
- Oven Method: Spread them out in a single layer on a baking sheet and bake in a preheated oven at 300°F (150°C) for 5-10 minutes, or until they’re crisp again.
- Air Fryer Method: Place them in a single layer in your air fryer basket and air fry at 300°F (150°C) for 3-5 minutes, keeping a close eye on them to prevent burning.
Allow them to cool completely on a wire rack after re-crisping to ensure they firm up again.
- Freezing is Not Recommended: Due to their delicate texture and the goal of achieving a crisp chip, freezing is not recommended for cottage cheese chips. The thawing process would introduce too much moisture, making them soggy.
Final Thoughts
And there you have it! I truly believe this Cottage Cheese Chips Recipe is a game-changer for anyone seeking a healthier, protein-packed snack that absolutely delivers on flavor and crunch. It’s remarkably simple to prepare, transforming a humble dairy product into something surprisingly addictive and utterly satisfying. Forget about those traditional, often greasy alternatives – these chips are your new go-to for guilt-free munching that truly hits the spot. I wholeheartedly encourage you to give this particular Cottage Cheese Chips Recipe a try; I’m confident you’ll be just as delighted as I am with these crispy, golden bites. Experiment with your favorite seasonings, and prepare to be amazed by how delicious and simple homemade can be!
Easy & Crispy Cottage Cheese Chips: Healthy, Guilt-Free Snack!
- Total Time: 1 hour
- Yield: 4 servings 1x
Description
Transform cottage cheese into irresistibly crispy chips with this easy recipe. Enjoy a high-protein, low-carb snack that satisfies your crunch cravings without the guilt!
Ingredients
- 1 cup small-curd cottage cheese
- 1 tablespoon cornstarch (or arrowroot powder)
- 1/2 teaspoon fine sea salt
- 1/4 teaspoon freshly ground black pepper
- Optional Seasonings: garlic powder, onion powder, smoked paprika, chili powder, cayenne pepper, dried herbs (dill, parsley, chives, Italian herb blend), nutritional yeast, everything bagel seasoning
- Olive oil or cooking spray
Instructions
- Drain the Cottage Cheese (CRITICAL STEP!): Place your cottage cheese into a fine-mesh sieve lined with cheesecloth. Place the sieve over a bowl and let it drain in the refrigerator for at least 30 minutes, or even a few hours. Press down on the cottage cheese to squeeze out as much liquid as possible.
- Preheat Oven & Prepare Baking Sheet: Preheat your oven to 375°F (190°C). Line a large baking sheet with parchment paper and lightly grease it with olive oil or cooking spray.
- Mix Ingredients: Transfer the well-drained cottage cheese to a medium-sized mixing bowl. Add the cornstarch, salt, black pepper, and any optional seasonings. Mix everything together thoroughly until well combined.
- Form the Chips: Take small spoonfuls of the cottage cheese mixture and drop them onto the prepared parchment paper. Spread each dollop into a thin, even circle or oval shape, aiming for about 1.5-2 inches in diameter.
- Bake Until Golden & Crispy: Place the baking sheet in the preheated oven and bake for 25-35 minutes, or until the chips are deeply golden brown and feel firm and crispy. Keep an eye on them, especially towards the end.
- Cool Completely: Once baked, transfer the chips to a wire cooling rack and allow them to cool completely to ensure they firm up.
- Prep Time: 30 mins
- Cook Time: 30 mins
- Category: Snack
- Method: Baking
- Cuisine: American
Nutrition
- Serving Size: 1 serving
- Calories: 100
- Sugar: 2 g
- Sodium: 200 mg
- Fat: 3 g
- Saturated Fat: 1 g
- Unsaturated Fat: 2 g
- Trans Fat: 0 g
- Carbohydrates: 8 g
- Fiber: 0 g
- Protein: 10 g
- Cholesterol: 20 mg
Keywords: Drain your cottage cheese thoroughly for the crispiest chips. Experiment with different seasonings to customize your flavor. Ensure even spacing on the baking sheet for proper air circulation.


Leave a Comment