
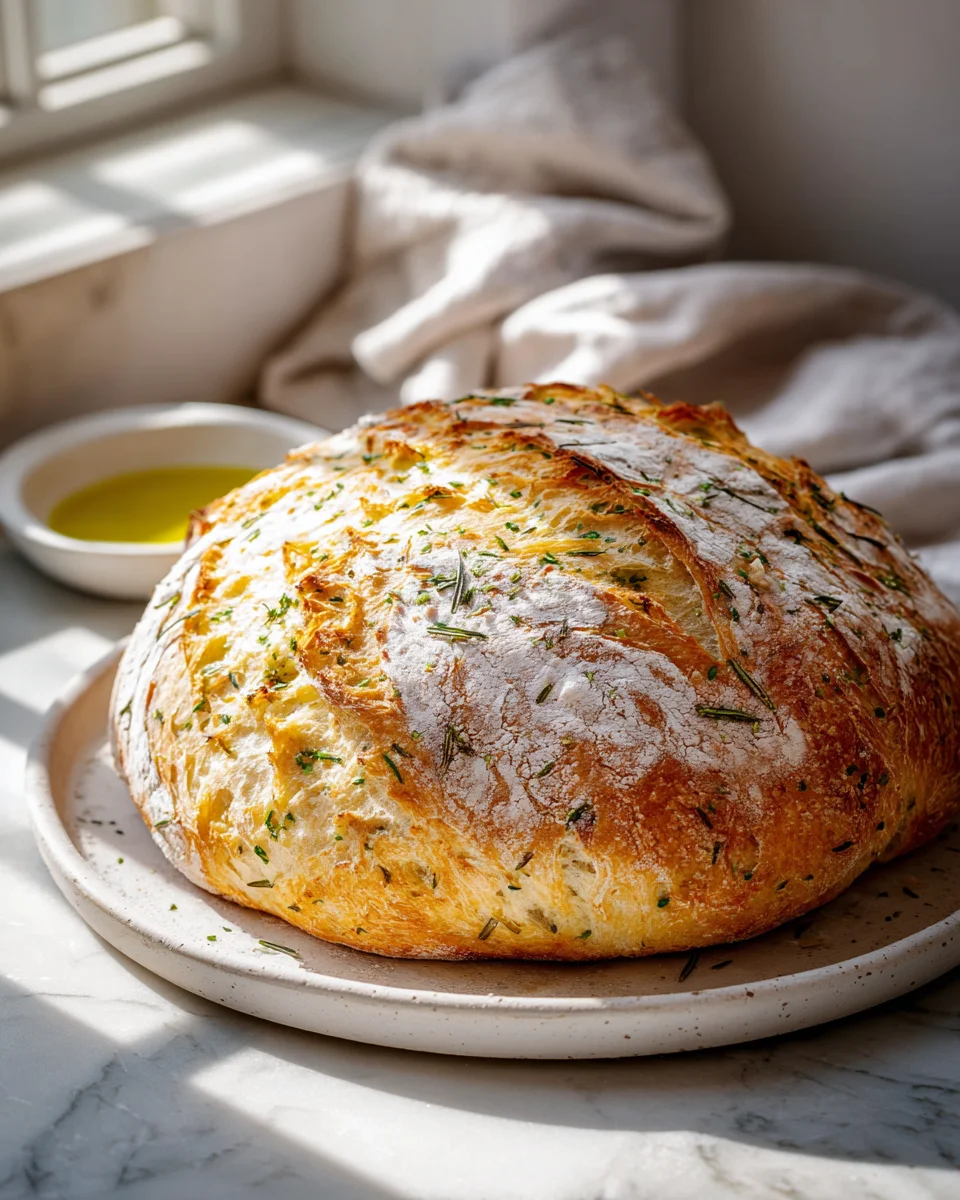
Garlic Herb Dutch Oven Bread Recipe
Oh, the pure joy of fresh, warm bread! There’s something incredibly comforting and deeply satisfying about pulling a beautiful loaf from the oven, especially when it’s made right in your own kitchen. And let me tell you, this Garlic Herb Dutch Oven Bread Recipe is about to become your new obsession. What makes it so special? Well, for starters, baking in a Dutch oven creates an absolutely magical environment, giving you that coveted, crackling, golden-brown crust that’s usually only found at the best bakeries, all while keeping the inside wonderfully soft and airy.
But it doesn’t stop there. We’re infusing every bite with the irresistible aroma and flavor of fragrant garlic and a medley of your favorite herbs – think rosemary, thyme, and maybe a hint of oregano. It’s a symphony for your senses! You’ll love how incredibly easy it is to achieve such a professional-looking and tasting loaf, often with minimal kneading. The smell alone, as it bakes and fills your home, is enough to make anyone swoon. Get ready to impress your family and friends, or simply treat yourself to a slice (or three!) because this rustic, flavorful bread is perfect for tearing and sharing, dunking into olive oil, or accompanying any meal. Trust me, once you try this homemade garlic herb bread, you’ll never look back!

Ingredient Notes
Crafting the perfect loaf of Garlic Herb Dutch Oven Bread starts with understanding our core ingredients. I’ve found that using quality components truly elevates the final product, but don’t worry, there are always a few clever swaps if you’re in a pinch!
- All-Purpose Flour: This is my go-to for its balanced protein content, which gives us a lovely chew without being overly dense. You can certainly use bread flour for an even chewier, more structured crumb, or experiment with swapping up to 1 cup of whole wheat flour for a nuttier flavor and added fiber. Just know that whole wheat flour absorbs more liquid, so your dough might be a little stiffer.
- Warm Water: The magic temperature for activating yeast is crucial. I aim for water between 105°F and 115°F (40°C-46°C). It should feel pleasantly warm to the touch, like a warm bath, not hot. Too hot and you’ll kill the yeast; too cold and it won’t activate properly.
- Active Dry Yeast: This is our leavening agent, responsible for all those lovely bubbles that make our bread light and airy. If you only have instant yeast, you can skip the proofing step with the warm water and simply mix it directly with the dry ingredients. You’ll generally use the same amount, though some recipes suggest a tiny bit less instant yeast.
- Salt: Don’t underestimate salt! It’s not just for flavor; it also controls yeast activity and strengthens the gluten structure. I typically use fine sea salt. Without enough salt, your bread will taste bland and could rise too quickly.
- Fresh Minced Garlic: This is where the “garlic” in our Garlic Herb Dutch Oven Bread truly shines! Freshly minced garlic provides the most potent and aromatic flavor. I usually use about 4-6 cloves, finely minced, but feel free to adjust to your garlic-loving heart’s content. Substitution: If fresh isn’t available, you can use 1 to 1 ½ teaspoons of garlic powder, but the fresh flavor is unparalleled.
- Fresh Herbs: For the “herb” component, my favorites are a combination of fresh rosemary, thyme, and finely chopped parsley. They offer a beautiful earthy and fragrant profile. Aim for about 2-3 tablespoons of finely chopped fresh herbs in total. Substitution: You can absolutely use dried herbs – just remember that dried herbs are more concentrated. Use about 1 tablespoon of dried mixed Italian herbs, or a combination of dried rosemary and thyme.
- Olive Oil: A touch of good quality extra virgin olive oil adds richness, flavor, and helps tenderize the crumb. It also helps prevent sticking and contributes to a beautiful golden crust.
Step-by-Step Instructions
Making this Garlic Herb Dutch Oven Bread is surprisingly straightforward, even for beginner bakers. The Dutch oven does most of the heavy lifting, creating that perfect crispy crust and tender interior.
- Prepare Your Yeast: In a large mixing bowl, combine the warm water and active dry yeast. If you like, add a pinch of sugar (about ¼ teaspoon) to “feed” the yeast – it’s not strictly necessary but can help ensure vigorous bubbling. Stir gently and let it sit for 5-10 minutes. You should see a foamy layer form on top, indicating your yeast is alive and well. If nothing happens, your water might have been too hot or too cold, or your yeast may be expired.
- Mix the Dough: To the foamy yeast mixture, add the all-purpose flour, salt, olive oil, minced fresh garlic, and your chosen fresh herbs. Using a sturdy spoon or a Danish dough whisk, mix everything together until a shaggy, somewhat sticky dough forms. Don’t worry about kneading at this stage; we’re just aiming for all the flour to be hydrated.
- First Rise (Bulk Fermentation): Cover the bowl tightly with plastic wrap or a damp kitchen towel. Place it in a warm, draft-free spot in your kitchen. Let the dough rise for 8-18 hours. Yes, that’s a wide range! I often prepare it in the evening and let it rise overnight on the counter. The longer, slower rise develops more complex flavors. The dough should roughly double in size and be very bubbly.
- Preheat Oven and Dutch Oven: About 30-45 minutes before you’re ready to bake, place your Dutch oven (with its lid) into your cold oven. Preheat the oven to 450°F (232°C). This step is CRITICAL for achieving that signature crispy Dutch oven crust.
- Shape the Dough: Lightly flour a clean work surface. Gently scrape the risen dough out of the bowl onto the floured surface. The dough will be very soft and somewhat sticky – resist the urge to add too much extra flour. Gently fold the edges of the dough towards the center a few times, forming a rough ball. Flip it over so the seam is on the bottom, and gently cup your hands around it to tighten the ball shape.
- Second Proof (Optional, but Recommended): You can place the shaped dough onto a piece of parchment paper. This makes transferring it to the hot Dutch oven much safer and easier. Let the dough rest for another 15-20 minutes while the oven finishes preheating. This brief rest helps the dough relax and get ready for baking.
- Bake the Bread: Carefully, using oven mitts, remove the screaming hot Dutch oven from the preheated oven. Lift the lid. Using the parchment paper as a sling, carefully lower the dough into the hot Dutch oven. Score the top of the dough with a sharp knife or razor blade (a few shallow cuts are fine) – this helps control where the bread expands.
- Covered Bake: Place the lid back on the Dutch oven and return it to the oven. Bake for 30 minutes. The lid traps steam, creating an incredibly moist environment that helps the bread achieve an amazing rise and a super crispy crust.
- Uncovered Bake: After 30 minutes, carefully remove the lid from the Dutch oven (watch out for steam!). Reduce the oven temperature to 425°F (220°C). Continue to bake for another 15-20 minutes, or until the crust is a deep golden brown and sounds hollow when tapped on the bottom.
- Cool Completely: Carefully remove the Dutch oven from the oven. Using oven mitts, lift the bread out by the parchment paper and transfer it to a wire rack to cool completely. This is the hardest part, I know, but cooling allows the internal structure of the bread to set and prevents a gummy texture. Resist cutting into it for at least 1-2 hours!
Tips & Suggestions
I’ve learned a few tricks over the years that can really make your Garlic Herb Dutch Oven Bread truly spectacular. These little adjustments can make a big difference!
- Don’t Rush the Rise: The longer, slower fermentation of this no-knead dough is key to its fantastic flavor and texture. Don’t try to speed it up too much, as you’ll lose out on the complexity. If your kitchen is very cold, you can place the covered bowl in an oven that’s been warmed briefly to about 100°F (38°C) and then turned off, creating a proofing box.
- Hydration is Key: This dough is meant to be quite wet and sticky. Resist the urge to add too much extra flour during the initial mixing or even when shaping. A wet dough is what contributes to the beautiful open crumb and crispy crust. A light dusting of flour on your hands and work surface is usually sufficient for shaping.
- Handle Gently: Once the dough has risen, handle it very gently when transferring and shaping. We want to preserve as many of those precious air bubbles as possible.
- Preheat Your Dutch Oven Properly: This is a non-negotiable step for me. A screaming hot Dutch oven mimics a professional bread oven, shocking the dough and creating an incredible oven spring and a thick, blistered crust. Be extremely careful when handling it!
- Scoring for Success: A quick score (a single slash or a cross shape) on top of your dough before baking helps guide the bread’s expansion, preventing uncontrolled cracks and giving it a professional look. Use a very sharp knife or a bread lame.
- Personalize Your Flavors: While garlic and herbs are classic, feel free to experiment! You could add a handful of shredded Parmesan cheese, sun-dried tomatoes (well drained and chopped), or even some finely chopped jalapeños for a kick. Just be mindful not to overload the dough, as it can affect its rise.
- Serving Suggestions: This bread is incredibly versatile. It’s fantastic on its own with just a drizzle of olive oil, perfect for sopping up sauces from pasta or stews, or alongside a hearty soup. It also makes a wonderful accompaniment to a cheese board.
Storage
Once you’ve baked this delicious Garlic Herb Dutch Oven Bread, you’ll want to enjoy every last crumb! Here’s how I recommend storing it to keep it fresh.
- Room Temperature: Once the bread has completely cooled, store it in an airtight container, a bread box, or a clean paper bag placed inside a plastic bag at room temperature for up to 3-4 days. I avoid keeping it in just a plastic bag on the counter, as it can soften the crust too much.
- Freezing: For longer storage, this bread freezes beautifully. Once fully cooled, you can wrap the entire loaf tightly in plastic wrap, then again in aluminum foil, and freeze for up to 2-3 months. For individual servings, slice the bread first, then wrap slices individually before freezing.
- Reheating: To revive a day-old loaf, sprinkle it lightly with water, then reheat in a 350°F (175°C) oven for 10-15 minutes until warmed through and the crust has crisped up again. For frozen bread, thaw at room temperature first, then reheat as described for day-old bread.
Final Thoughts
There’s truly nothing quite like the aroma of freshly baked bread filling your home, and with the Garlic Herb Dutch Oven Bread Recipe, that experience reaches a whole new level of deliciousness. From the satisfying process of mixing the simple ingredients to the moment you lift the lid off the Dutch oven to reveal a perfectly golden-brown loaf, every step is a joy.
I genuinely believe this recipe is a must-try for anyone who appreciates the comforting warmth of homemade bread. The unique combination of savory garlic and aromatic herbs baked in a Dutch oven creates an unparalleled, crispy crust and an incredibly soft, flavorful interior. It’s the kind of bread that elevates any meal, whether it’s served alongside a hearty beef stew or simply enjoyed on its own with a smear of butter. So go ahead, give the Garlic Herb Dutch Oven Bread Recipe a try – I promise you won’t be disappointed. Your taste buds, and your kitchen, will thank you!
Garlic Herb Dutch Oven Bread: Easy No-Knead Recipe
- Total Time: 1 hour
- Yield: 1 loaf 1x
Description
Experience the joy of homemade Garlic Herb Dutch Oven Bread with a crispy crust and soft interior. This easy no-knead recipe is perfect for impressing family and friends.
Ingredients
- 3 cups all-purpose flour
- 1 1/2 cups warm water (between 105°F and 115°F)
- 1/4 teaspoon active dry yeast
- 1 teaspoon salt
- 4–6 cloves fresh minced garlic
- 2–3 tablespoons finely chopped fresh herbs (rosemary, thyme, parsley)
- 1 tablespoon olive oil
Instructions
- In a large mixing bowl, combine the warm water and active dry yeast. Optionally, add a pinch of sugar and let it sit for 5-10 minutes until foamy.
- To the foamy yeast mixture, add the all-purpose flour, salt, olive oil, minced fresh garlic, and your chosen fresh herbs. Mix until a shaggy, somewhat sticky dough forms.
- Cover the bowl tightly with plastic wrap or a damp kitchen towel and let it rise in a warm, draft-free spot for 8-18 hours until doubled in size and bubbly.
- About 30-45 minutes before baking, place your Dutch oven (with its lid) into your cold oven and preheat to 450°F (232°C).
- Lightly flour a clean work surface and gently scrape the risen dough onto it. Fold the edges of the dough towards the center a few times to form a rough ball.
- Optionally, place the shaped dough onto parchment paper and let it rest for another 15-20 minutes while the oven finishes preheating.
- Carefully remove the hot Dutch oven from the oven. Using the parchment paper, lower the dough into the Dutch oven and score the top with a sharp knife.
- Place the lid back on the Dutch oven and bake for 30 minutes.
- After 30 minutes, remove the lid and reduce the oven temperature to 425°F (220°C). Continue to bake for another 15-20 minutes until the crust is golden brown.
- Remove the Dutch oven from the oven and transfer the bread to a wire rack to cool completely for at least 1-2 hours.
- Prep Time: 15 mins
- Cook Time: 45 mins
- Category: Bread
- Method: Baking
- Cuisine: American
Nutrition
- Serving Size: 1 slice
- Calories: 150
- Sugar: 0 g
- Sodium: 200 mg
- Fat: 3 g
- Saturated Fat: 0.5 g
- Unsaturated Fat: 2.5 g
- Trans Fat: 0 g
- Carbohydrates: 28 g
- Fiber: 1 g
- Protein: 4 g
- Cholesterol: 0 mg
Keywords: Don't rush the rise for the best flavor and texture. A wet dough is essential for a beautiful crumb and crust. Handle the dough gently to preserve air bubbles.


Leave a Comment