
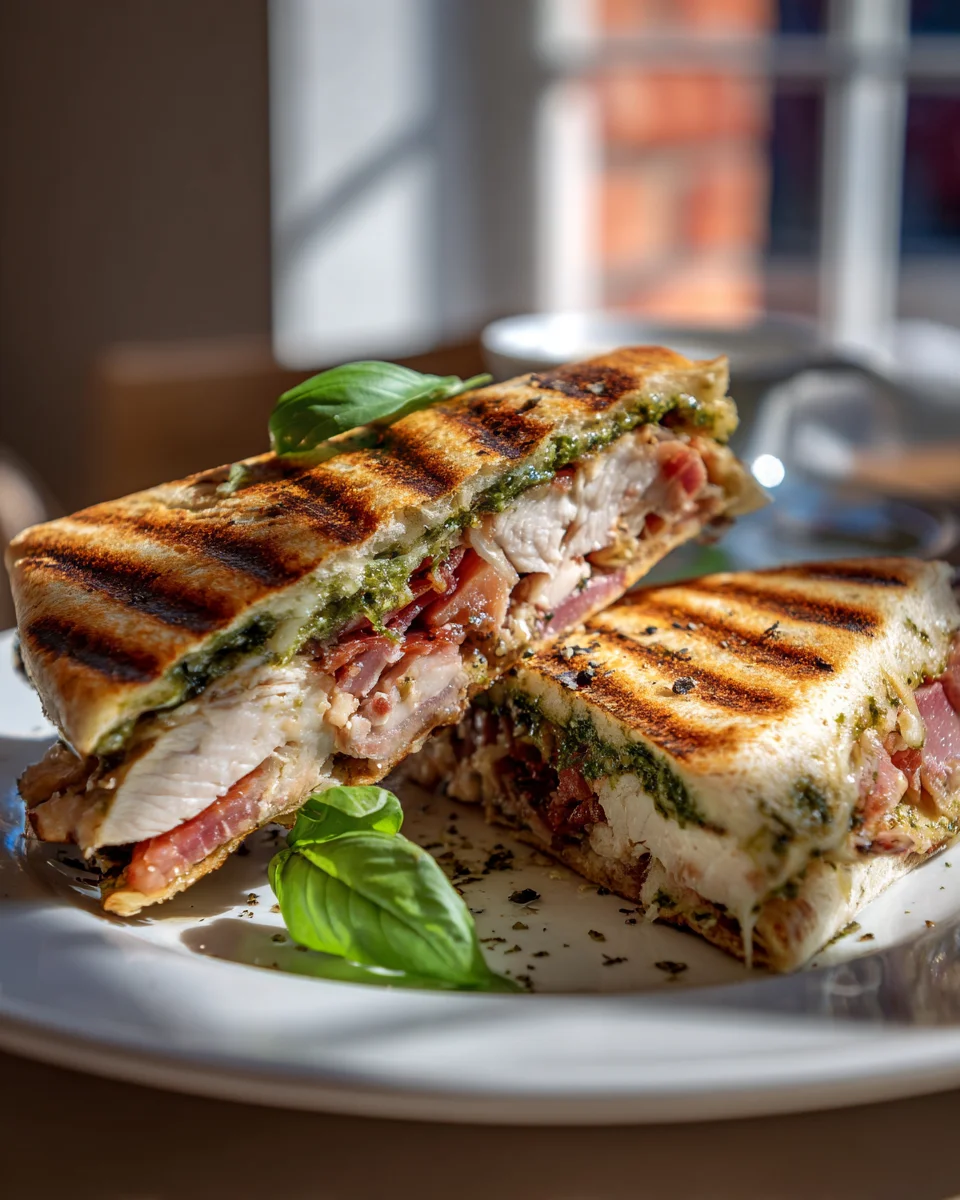
Chicken Beef Bacon Pesto Mozzarella Wrap (pressed Panini Style)
Oh boy, have I got a treat for you today! Forget everything you thought you knew about simple wraps, because the Chicken Beef Bacon Pesto Mozzarella Wrap (pressed Panini Style) is here to blow your taste buds away. Imagine sinking your teeth into a perfectly pressed, golden-brown wrap, crackling just slightly as you bite, revealing a symphony of flavors inside. This isn’t just a sandwich; it’s an experience!
What makes this specific wrap so unbelievably special? It’s the harmonious blend of robust, savory chicken and smoky, crispy beef bacon, dancing together with the bright, herbaceous kick of pesto. Then, just when you think it couldn’t get any better, the creamy, melt-in-your-mouth mozzarella cheese ties it all together, oozing out in glorious streaks with every bite. The “pressed Panini style” is truly the magic touch, creating that irresistible crispy exterior and a wonderfully warm, gooey interior that makes every mouthful pure comfort.
I know you’re going to absolutely adore this recipe because it takes familiar, beloved ingredients and elevates them into something truly extraordinary yet incredibly easy to make. It’s hearty enough for a satisfying dinner, quick enough for a gourmet lunch, and utterly irresistible for anyone craving a flavor-packed meal. Prepare yourself for a new favorite – this wrap is pure bliss!

Ingredient Notes
Creating the perfect Chicken Beef Bacon Pesto Mozzarella Wrap, pressed Panini style, starts with selecting quality ingredients. Each component plays a vital role in delivering that delicious, satisfying crunch and gooey center. Here’s a breakdown of what you’ll need and some handy substitutions I often use.
Essential Ingredients:
- Large Flour Tortillas: I typically opt for a 10-12 inch flour tortilla. This size is perfect for holding all the delicious fillings without tearing and allows for a nice, tight roll. You could also use large whole wheat or spinach wraps if you prefer, but flour tortillas tend to get the best crisp in a panini press.
- Cooked Chicken: For ultimate convenience, I love using pre-cooked rotisserie chicken. Simply shred the breast and thigh meat. Alternatively, you can bake, grill, or pan-fry chicken breasts ahead of time and then shred or thinly slice them. About 1/2 to 3/4 cup per wrap is a good amount.
- Cooked Beef Bacon: Crispy beef bacon adds an incredible smoky, salty dimension. Cook it until it’s perfectly crisp, then crumble it or break it into smaller pieces. Remember to blot any excess fat to keep your wrap from becoming greasy.
- Basil Pesto: This is where a lot of the vibrant flavor comes from! I usually use a good quality store-bought basil pesto for ease, but homemade pesto is fantastic if you have the time. If you have nut allergies, many brands now offer nut-free pesto. About 1-2 tablespoons per wrap should do it, depending on your love for pesto.
- Low-Moisture Mozzarella Cheese: Shredded low-moisture mozzarella melts beautifully and gives that desirable cheesy pull. Fresh mozzarella slices can also work, but sometimes they release more water, which can make the wrap a bit soggy if you’re not careful. I find about 1/4 to 1/2 cup per wrap is ideal.
- Olive Oil (for pressing): A little brush of olive oil on the outside of the wrap before pressing helps achieve that golden-brown, crispy exterior.
My Favorite Substitutions & Additions:
- For the Chicken: Cooked turkey breast or even plant-based chicken strips would work wonderfully if you’re looking to change things up.
- For the Beef Bacon: If you’re out of beef bacon, turkey bacon is a solid alternative for that smoky crunch.
- For the Pesto: Red pepper pesto or even a sun-dried tomato spread could be interesting variations if you want a different flavor profile.
- For the Mozzarella: Provolone, Monterey Jack, or a blend of Italian cheeses can also be used for a slightly different melt and taste.
- Extra Veggies: I sometimes like to add a thin layer of baby spinach, a few slices of roasted red peppers, or some sun-dried tomatoes (oil-packed and drained) to boost the flavor and nutrition. Just be careful not to overfill!
Step-by-Step Instructions
Making this Chicken Beef Bacon Pesto Mozzarella Wrap is incredibly straightforward, especially if you have your chicken and beef bacon pre-cooked. The key is in the assembly and, of course, the glorious press! Here’s how I put mine together to achieve that perfect panini-style finish.
Preparation (10 minutes)
- Prep Your Chicken: If your chicken isn’t already cooked, go ahead and cook it now. I usually bake chicken breasts at 375°F (190°C) for 20-25 minutes until cooked through, then let them cool slightly before shredding or thinly slicing. Aim for about 1/2 to 3/4 cup per wrap.
- Cook the Beef Bacon: Fry your beef bacon in a skillet over medium heat until it’s deliciously crispy. Once cooked, remove it from the pan and place it on a paper towel-lined plate to drain any excess fat. Once cooled slightly, crumble it into small pieces.
- Gather Your Remaining Ingredients: Have your pesto, shredded mozzarella, and tortillas ready to go. If you’re adding any extra veggies like spinach or sun-dried tomatoes, prepare those too.
- Preheat Your Press: Turn on your panini press and let it preheat while you assemble the wraps. If you don’t have a panini press, you can use a large skillet over medium heat with a heavy pan or brick wrapped in foil to press down on the wraps.
Assembly (5 minutes per wrap)
- Lay Out the Tortilla: Place one large flour tortilla on a clean, flat work surface.
- Spread the Pesto: Take about 1-2 tablespoons of basil pesto and spread it evenly over one half of the tortilla, or across the entire surface, leaving a small border around the edges. This ensures every bite gets a burst of flavor.
- Layer the Mozzarella: Sprinkle about half of your desired mozzarella (around 1/4 cup) evenly over the pesto. This layer helps protect the tortilla from getting soggy and creates a lovely gooey base.
- Add the Chicken: Distribute your shredded or sliced cooked chicken evenly over the mozzarella.
- Add the Beef Bacon: Sprinkle the crumbled beef bacon over the chicken layer.
- Top with More Cheese: Add the remaining mozzarella cheese over the chicken and bacon. This top layer will melt and bind all the fillings together beautifully.
- Optional Veggies: If you’re adding spinach or other thin veggies, place them over the top cheese layer.
- Fold or Roll Tightly: There are a couple of ways to do this. You can fold one side of the tortilla over the filling to create a half-moon shape, or carefully roll it up tightly like a burrito. I often find the half-moon shape works well for a panini press as it’s less prone to unrolling. Ensure the filling is compact and evenly distributed.
Pressing (3-5 minutes per wrap)
- Lightly Oil the Wrap: Before placing it on the hot press, I like to lightly brush both sides of the assembled wrap with a little olive oil. This isn’t strictly necessary, but it helps achieve that beautiful golden-brown, crispy finish.
- Place in Panini Press: Carefully place the assembled wrap onto the preheated panini press. Close the lid gently but firmly.
- Cook Until Golden and Melted: Cook for about 3-5 minutes, or until the tortilla is golden brown and crispy, and the cheese inside is thoroughly melted and bubbly. The exact time will depend on your panini press and how crispy you like your wrap.
- For Skillet Method: If using a skillet, place the wrap in the hot, lightly oiled pan. Place a heavy, oven-safe pan or foil-wrapped brick on top of the wrap. Cook for 2-3 minutes per side, pressing down occasionally, until golden brown and crispy.
- Serve Immediately: Once cooked, remove the wrap from the press. Let it cool for just a minute or two before slicing in half diagonally (this looks great for serving!) and enjoying it while it’s hot and the cheese is still gooey.
Tips & Suggestions
To ensure your Chicken Beef Bacon Pesto Mozzarella Wrap (pressed Panini Style) turns out perfectly every time, I’ve gathered a few tips and tricks that I’ve learned along the way. These will help you achieve maximum flavor and that irresistible texture.
- Don’t Overfill Your Wrap: This is probably the most crucial tip! While it’s tempting to load up on all the delicious fillings, overfilling will make it difficult to roll or fold your wrap tightly, and it might burst open in the panini press. Aim for a generous but manageable amount of ingredients. I usually stick to roughly 1/2 to 3/4 cup total filling per large tortilla.
- Spread Ingredients Evenly: Distribute your chicken, beef bacon, and cheese as evenly as possible across the tortilla. This ensures that every bite is balanced and that the wrap presses flat without creating thick, unheated spots.
- Preheat Your Panini Press Thoroughly: A properly preheated press is key to achieving that beautiful, even browning and crisp exterior, as well as melting the cheese efficiently. Don’t rush this step!
- Brush with Olive Oil (Optional but Recommended): A light brush of olive oil on the outside of your tortilla before pressing will give you a wonderfully golden, crispy crust. You can also use melted butter for a richer flavor.
- Seal the Edges: When folding or rolling your wrap, try to tuck in the ends as much as possible to create a neat package. This prevents fillings from escaping while pressing and keeps everything contained.
- Customize Your Fillings: This wrap is a fantastic base for customization. Feel free to add thinly sliced red onion, a few pickled jalapeños for a kick, or even some thinly sliced bell peppers. Just remember the “don’t overfill” rule!
- Serve Immediately: While still warm and the cheese is gloriously melted, these wraps are at their absolute best. Cut them in half diagonally for a pretty presentation and easier eating.
- Pairing Suggestions: I love serving these wraps with a simple green salad dressed with a light vinaigrette, a cup of tomato soup, or even just some crunchy potato chips on the side. They make a fantastic quick lunch or a satisfying weeknight dinner.
Storage
When it comes to the Chicken Beef Bacon Pesto Mozzarella Wrap (pressed Panini Style), my honest advice is to enjoy it fresh. Like most pressed sandwiches, they are truly at their peak right out of the panini press, when the exterior is crispy and the interior is hot and gooey. However, I understand that sometimes you need to plan ahead or deal with leftovers. Here’s how I approach storage for the best results.
Unpressed Wraps (Assemble Ahead):
- Prepare & Refrigerate: If you want to save time during a busy week, you can assemble the wraps ahead of time, but do not press them. Layer all the ingredients inside the tortilla, fold it tightly, and then wrap each individual wrap snugly in plastic wrap or aluminum foil.
- Shelf Life: Stored this way, the unpressed wraps can be kept in the refrigerator for up to 1-2 days.
- Cooking from Chilled: When you’re ready to eat, simply remove the plastic, brush with a little olive oil, and press in your panini maker as per the instructions. You might need to add an extra minute or two to the pressing time since the ingredients will be cold.
Pressed Wraps (Leftovers):
- Not Ideal for Storage: Once pressed, these wraps tend to lose their crispy texture and can become a bit soggy or tough if stored for too long. The cheese can also harden.
- Short-Term Storage: If you absolutely have leftovers, allow the wrap to cool completely. Then, wrap it tightly in plastic wrap or aluminum foil and store it in the refrigerator for no more than 1 day.
- Reheating:
- Panini Press or Skillet (Recommended): The best way to revive a leftover pressed wrap is to reheat it in a panini press or a dry skillet over medium heat until it’s warmed through and the exterior crisps up again. This might take 3-5 minutes, flipping in a skillet if needed.
- Oven/Toaster Oven: You can also reheat it in a preheated oven or toaster oven at 350°F (175°C) for about 8-10 minutes, or until warmed through and slightly crispy.
- Microwave (Least Recommended): While technically possible, I strongly advise against using a microwave, as it will almost certainly make your wrap soft and chewy, completely losing that desirable panini crispness.
Final Thoughts
There you have it! I truly believe the Chicken Beef Bacon Pesto Mozzarella Wrap (pressed Panini Style) is more than just a meal; it’s an experience. The way the savory beef bacon and tender chicken perfectly complement the vibrant pesto, all melded together by gooey mozzarella and encased in a beautifully crisp, pressed wrap… it’s simply divine. I promise you, this isn’t just another wrap recipe; it’s a symphony of textures and flavors that will tantalize your taste buds and leave you feeling utterly satisfied. Go on, give the Chicken Beef Bacon Pesto Mozzarella Wrap (pressed Panini Style) a try – you deserve this deliciousness!

Pressed Chicken Beef Bacon Pesto Mozzarella Panini Wrap
- Total Time: 25 minutes
- Yield: 4 servings
Description
Experience the ultimate flavor explosion with this Chicken Beef Bacon Pesto Mozzarella Wrap, pressed to perfection. It’s a delightful blend of savory chicken, crispy beef bacon, and creamy mozzarella, all wrapped in a golden-brown tortilla.
Ingredients
- Large Flour Tortillas (10-12 inch)
- Cooked Chicken (1/2 to 3/4 cup per wrap)
- Cooked Beef Bacon (crispy, crumbled)
- Basil Pesto (1-2 tablespoons per wrap)
- Low-Moisture Mozzarella Cheese (1/4 to 1/2 cup per wrap)
- Olive Oil (for pressing)
Instructions
- Prep Your Chicken: If your chicken isn't already cooked, bake chicken breasts at 375°F (190°C) for 20-25 minutes until cooked through, then let them cool slightly before shredding or thinly slicing.
- Cook the Beef Bacon: Fry your beef bacon in a skillet over medium heat until crispy. Remove it from the pan and place it on a paper towel-lined plate to drain excess fat. Once cooled slightly, crumble it into small pieces.
- Gather Your Remaining Ingredients: Have your pesto, shredded mozzarella, and tortillas ready. If you're adding any extra veggies like spinach or sun-dried tomatoes, prepare those too.
- Preheat Your Press: Turn on your panini press and let it preheat while you assemble the wraps.
- Lay Out the Tortilla: Place one large flour tortilla on a clean, flat work surface.
- Spread the Pesto: Take about 1-2 tablespoons of basil pesto and spread it evenly over one half of the tortilla, or across the entire surface, leaving a small border around the edges.
- Layer the Mozzarella: Sprinkle about half of your desired mozzarella (around 1/4 cup) evenly over the pesto.
- Add the Chicken: Distribute your shredded or sliced cooked chicken evenly over the mozzarella.
- Add the Beef Bacon: Sprinkle the crumbled beef bacon over the chicken layer.
- Top with More Cheese: Add the remaining mozzarella cheese over the chicken and bacon.
- Optional Veggies: If you’re adding spinach or other thin veggies, place them over the top cheese layer.
- Fold or Roll Tightly: Fold one side of the tortilla over the filling to create a half-moon shape, or carefully roll it up tightly like a burrito.
- Lightly Oil the Wrap: Brush both sides of the assembled wrap with a little olive oil.
- Place in Panini Press: Carefully place the assembled wrap onto the preheated panini press and close the lid gently.
- Cook Until Golden and Melted: Cook for about 3-5 minutes, or until the tortilla is golden brown and crispy, and the cheese inside is thoroughly melted.
- For Skillet Method: If using a skillet, place the wrap in the hot, lightly oiled pan. Place a heavy, oven-safe pan or foil-wrapped brick on top of the wrap. Cook for 2-3 minutes per side, pressing down occasionally.
- Serve Immediately: Once cooked, remove the wrap from the press and let it cool for a minute or two before slicing in half diagonally.
- Prep Time: 10 minutes
- Cook Time: 15 minutes
- Category: Lunch
- Method: Pressing
- Cuisine: American
Nutrition
- Serving Size: 1 wrap
- Calories: 450
- Sugar: 2 g
- Sodium: 800 mg
- Fat: 25 g
- Saturated Fat: 10 g
- Unsaturated Fat: 12 g
- Trans Fat: 0 g
- Carbohydrates: 40 g
- Fiber: 3 g
- Protein: 25 g
- Cholesterol: 70 mg
Keywords: Don't overfill your wrap to avoid bursting. Customize your fillings with veggies or different cheeses, and serve while warm for the best experience.

Leave a Comment