
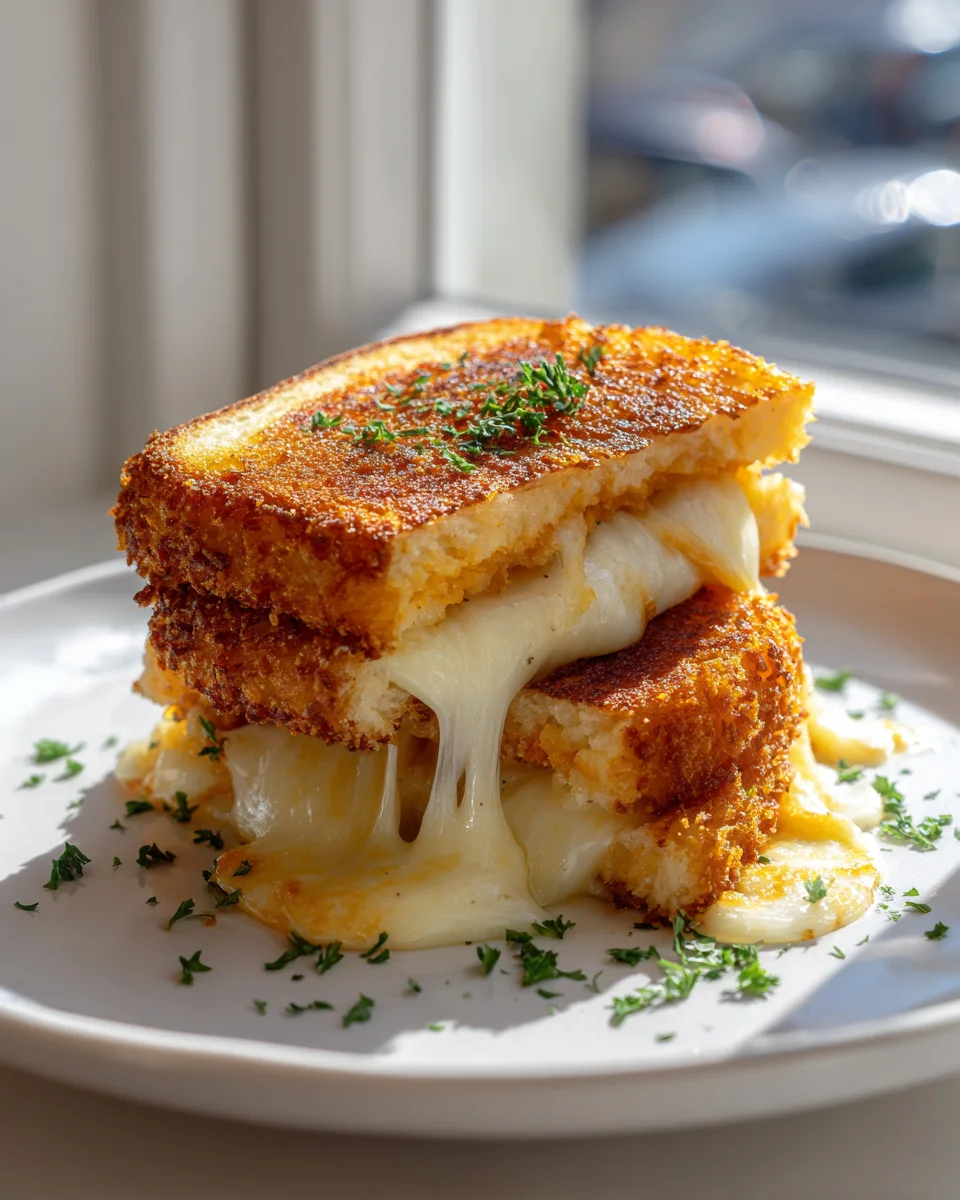
Hash Brown Grilled Cheese Sandwich
Oh boy, have I got a treat for you today! Get ready to have your mind blown and your taste buds sing with the magnificent invention that is the Hash Brown Grilled Cheese Sandwich.
You know how much I adore a classic grilled cheese – it’s pure comfort food, right? But what if I told you we could take that gooey, cheesy goodness and elevate it to legendary status? That’s exactly what we’re doing here! This isn’t just any sandwich; it’s a stroke of genius, a culinary masterpiece that replaces the traditional bread with perfectly golden, crispy hash brown patties. Yes, you heard me correctly! Imagine two perfectly griddled hash browns, forming the ultimate crispy, savory shell for a luscious, melty river of cheese. It’s the kind of dish that makes you wonder why you didn’t think of it sooner.
Readers, you are going to absolutely love this recipe because it combines everything wonderful about a breakfast favorite with everything glorious about a lunch staple. It’s special because of that incredible textural contrast – the irresistible crunch of the hash brown meeting the soft, yielding potato interior, all giving way to warm, stretchy, glorious cheese. It’s hearty, incredibly satisfying, and frankly, a little bit indulgent in the best possible way. Whether you’re whipping it up for a weekend brunch, a quick lunch that feels like a celebration, or a late-night comfort craving, this Hash Brown Grilled Cheese Sandwich is guaranteed to become your new obsession. Get ready for a symphony of flavors and textures in every single bite!

Ingredient Notes
There’s something uniquely comforting about a grilled cheese sandwich, but when you introduce a crispy, golden hash brown patty into the mix, you’re not just making a sandwich – you’re crafting an experience! For our Hash Brown Grilled Cheese, a few key players ensure success, and I’ve got some notes and substitutions to help you make it absolutely perfect.
The Hash Brown Patties
- Frozen Hash Brown Patties: These are the undisputed star of the show. I recommend using the pre-formed frozen patties for convenience and consistency. You’ll want to cook these until they are beautifully golden brown and super crispy, either in an air fryer, oven, or a skillet, before assembling your sandwich. The crispiness is crucial here; a soggy hash brown will make for a sad sandwich.
- Substitution/Alternative: If you’re feeling ambitious, you could grate your own potatoes, squeeze out all the moisture, season them, and form your own patties. Just ensure they are cooked through and very crispy before they meet the bread and cheese.
The Bread
- Sliced Bread: For a classic grilled cheese, I always lean towards a good quality white sandwich bread or a country-style sourdough. White bread gets that quintessential golden crust and soft interior, while sourdough adds a lovely tangy contrast to the rich cheese and potato. Brioche also works wonderfully for a richer, slightly sweeter profile.
- Substitution/Alternative: Feel free to experiment with other sturdy sliced breads like whole wheat, rye, or even a potato bread for an extra layer of potato goodness. Just make sure it’s not too thin, or it might struggle to hold up to the hearty filling.
The Cheese
- Good Melting Cheese: This is where the magic happens! I typically use a blend of cheeses for the ultimate melt and flavor. My go-to is often a sharp cheddar for tang and flavor, paired with Monterey Jack for superior meltiness. American cheese, while simple, melts like a dream and provides that classic gooey texture.
- Substitution/Alternative: Don’t be shy to try other cheeses! Gruyère offers a nutty, complex flavor, while pepper jack adds a gentle kick. Provolone or mozzarella can also be fantastic for their stretch and mild taste. The key is to pick cheeses that melt well and complement each other.
The Spreading Fat
- Butter or Mayonnaise: This is what gives your bread that beautiful golden crust. I’m a firm believer in using good quality unsalted butter, softened, spread generously on the outside of each slice of bread. Some folks swear by mayonnaise instead, which gives an incredibly even golden-brown crust and a slightly tangy flavor.
- Substitution/Alternative: You can certainly use olive oil for a lighter touch, but for maximum flavor and browning, butter or mayo are hard to beat.
Optional Flavor Boosters
- Cooked Beef Bacon: A few strips of crispy, cooked beef bacon tucked inside elevate this sandwich to another level. Cook it until crisp and drain excess fat before adding.
- Caramelized Onions: Sweet, jammy caramelized onions add depth and a touch of sweetness.
- Jalapeño Slices: For a bit of heat, thin slices of fresh or pickled jalapeño can be a delightful addition.
- Hot Sauce: A drizzle of your favorite hot sauce on the inside can wake up all the flavors.
Step-by-Step Instructions
Ready to make the best Hash Brown Grilled Cheese of your life? Follow these simple steps for a perfectly golden, crispy, and cheesy masterpiece. The key is to prep your hash browns first, ensuring they are beautifully crisp!
-
Prepare Your Hash Browns
- First things first, get those hash brown patties nice and crispy! If using an air fryer, preheat it to 400°F (200°C) and cook the patties for about 10-15 minutes, flipping halfway, until deeply golden and crunchy.
- Alternatively, you can bake them in an oven according to package directions, or pan-fry them in a skillet with a little oil over medium heat until golden and crisp on both sides. The goal here is a truly crispy hash brown, not soft or flimsy. Once cooked, set them aside.
-
Prepare the Bread and Cheese
- Lay out your slices of bread on a clean surface. Generously spread softened butter or mayonnaise on one side of each slice. This buttered/mayonnaised side will be the exterior of your sandwich, ensuring a beautiful golden crust.
- Flip two slices of bread over so the unbuttered side is facing up. On one slice, place a generous layer of your chosen cheese blend.
-
Assemble the Sandwich
- On top of the first layer of cheese on one slice of bread, carefully place one of your crispy hash brown patties. Don’t be shy; this is the star!
- If you’re adding any optional fillings like cooked beef bacon, caramelized onions, or jalapeños, now’s the time to layer them on top of the hash brown.
- Add another layer of cheese directly on top of the hash brown and any optional fillings. This “sandwich” of cheese helps everything melt together beautifully and secure the hash brown in place.
- Finally, place the second slice of bread, buttered-side-up, on top to complete your sandwich. You should have buttered bread, then cheese, hash brown, cheese, and then the other slice of buttered bread.
-
Grill to Perfection
- Heat a non-stick skillet or griddle over medium-low heat. You want enough heat to melt the cheese slowly and toast the bread without burning it.
- Carefully place your assembled hash brown grilled cheese sandwich into the preheated skillet. Cook for about 3-5 minutes per side, or until the bread is a deep golden brown and the cheese inside is gloriously melted and gooey.
- Don’t be afraid to press down gently on the sandwich with a spatula occasionally as it cooks. This helps flatten it slightly and ensures maximum contact with the pan for even browning and melting.
-
Serve Immediately
- Once cooked to perfection, transfer the sandwich to a cutting board. I love to slice it in half, usually diagonally, to reveal that irresistible gooey cheese and crispy hash brown interior.
- Serve hot and enjoy the crispy, cheesy, potato-ey goodness right away! It’s truly a treat.
Tips & Suggestions
Making a Hash Brown Grilled Cheese isn’t just about following steps; it’s about embracing a few key principles to truly elevate your sandwich game. Here are my favorite tips and suggestions to ensure your grilled cheese is nothing short of spectacular, every single time.
- Crisp Hash Browns are Non-Negotiable: I cannot stress this enough – your hash brown patties must be cooked until perfectly crispy before they go into the sandwich. If they’re soft or undercooked, they’ll turn soggy in the grilled cheese, and nobody wants that. Take the extra time to get them golden brown and crunchy!
- Low and Slow for the Win: When grilling your sandwich, resist the urge to crank up the heat. Medium-low heat is your best friend. This allows the bread to toast to a beautiful golden brown without burning, giving ample time for all that cheese inside to melt into a wonderfully gooey, luscious consistency. Patience here truly pays off.
- Cheese Layering Matters: To get that perfect melty interior and ensure the hash brown stays put, I always put a layer of cheese on both sides of the hash brown patty. So, it’s bread, cheese, hash brown, cheese, bread. This acts like a delicious, edible glue.
- Don’t Skimp on the Butter/Mayonnaise: Whether you’re a butter enthusiast or a mayo convert, make sure you spread a generous, even layer on the outside of your bread. This is what creates that incredible golden, crispy crust that makes grilled cheese so irresistible.
- Press Gently: As your sandwich cooks, a light press with your spatula helps maximize contact with the pan, ensuring even browning and a more compact, easier-to-eat sandwich. Just don’t squash it so hard that all the cheese oozes out!
- Experiment with Cheese Blends: While cheddar and Monterey Jack are fantastic, don’t limit yourself! Try adding a slice of American cheese for ultimate melt, some smoked gouda for a smoky flavor, or even a sprinkle of Parmesan on the outside for an extra crispy, cheesy crust.
- Add a Little Extra Something: This sandwich is amazing on its own, but a few additions can take it over the top.
- Beef Bacon: Crispy cooked beef bacon strips add a fantastic salty, savory crunch.
- Caramelized Onions: The sweetness and depth of caramelized onions are a perfect match for the savory hash brown and cheese.
- Pickled Jalapeños: For a tangy kick and a bit of heat, a few slices of pickled jalapeños can be incredible.
- Hot Sauce: A dash of your favorite hot sauce, brushed on the inside of the bread or served on the side, adds a wonderful zing.
- Serve Immediately: Grilled cheese is at its absolute best right off the skillet. The cheese is hot and gooey, and the bread is perfectly crispy. Don’t let it sit too long!
- Pairing Suggestions: This hearty sandwich pairs beautifully with a warm bowl of tomato soup. For a refreshing non-alcohol beverage, try it with a sparkling lemonade, an iced tea, or a crisp apple cider. It also makes a fantastic brunch item with a side of fresh fruit or a simple green salad.
Storage
While a Hash Brown Grilled Cheese Sandwich is undeniably best enjoyed fresh, hot, and straight from the skillet, I understand that sometimes you might have leftovers, or you might want to prep components ahead of time. Here’s my advice on how to handle storage and reheating to maintain as much of that deliciousness as possible.
Best Eaten Fresh
Let’s be clear: like most grilled cheese sandwiches, this one truly shines when eaten immediately after cooking. The bread is crisp, the hash brown is still crunchy, and the cheese is perfectly gooey. As it cools, the bread can lose its crispness, and the cheese will solidify, which diminishes the experience.
Short-Term Storage for Leftovers
If you do end up with a leftover sandwich, here’s how to store it:
- Cool Completely: Allow the sandwich to cool down to room temperature before storing. This prevents condensation from building up, which can make the bread excessively soggy.
- Airtight Container: Place the cooled sandwich in an airtight container. You can separate layers with parchment paper if storing multiple sandwiches to prevent them from sticking.
- Refrigerate: Store in the refrigerator for up to 1-2 days. Beyond that, the quality will significantly decline.
Reheating Leftover Hash Brown Grilled Cheese
Reheating a grilled cheese sandwich can be tricky, as the microwave is usually a no-go for maintaining crispness. Here are the best methods:
- Oven or Toaster Oven (Recommended): This is hands-down the best way to reheat.
- Preheat your oven or toaster oven to 350°F (175°C).
- Place the cold sandwich directly on a baking sheet or on the rack.
- Heat for about 10-15 minutes, or until the cheese is melted and bubbly again, and the bread has re-crisped. Keep an eye on it to prevent burning.
- Air Fryer: Another excellent method for crispness.
- Place the cold sandwich in the air fryer basket.
- Set the temperature to 350°F (175°C) and reheat for 5-8 minutes, checking periodically, until it’s hot and crispy again.
- Skillet: You can also reheat it in a dry non-stick skillet over medium-low heat, just like you cooked it initially.
- Place the sandwich in a dry skillet and cook for a few minutes per side until heated through and crispy. You might need to cover the skillet for a minute or two to help the cheese melt without over-browning the bread.
- Avoid the Microwave: While quick, the microwave will make your bread soggy and rubbery, and the hash brown will lose all its crispness. It’s truly not recommended for grilled cheese sandwiches.
Prepping Components Ahead (Not the Assembled Sandwich)
If you want to save time, you can prepare the individual components:
- Cook Hash Browns: Cook your hash brown patties until crispy, let them cool, and store them in an airtight container in the fridge for up to 2-3 days. Re-crisp them quickly in an air fryer or oven before assembling.
- Grate Cheese: Grate your cheese blend and store it in an airtight container in the fridge.
- Cook Beef Bacon/Caramelized Onions: Prepare any additional fillings like crispy beef bacon or caramelized onions and store them separately in the fridge.
By preparing components ahead, you can assemble and grill a fresh Hash Brown Grilled Cheese in mere minutes when the craving strikes, ensuring the best possible quality and flavor.
Final Thoughts
And there you have it – my absolute favorite way to elevate a classic! The Hash Brown Grilled Cheese Sandwich truly redefines comfort food. What makes this recipe a must-try isn’t just the gooey, melty cheese or the perfectly toasted bread; it’s the incredible addition of crispy, golden hash browns right into the sandwich itself. That unmistakable crunch and savory potato flavor create a texture and taste sensation that is simply unparalleled. It’s hearty, satisfying, and boasts a delightful contrast that will make your taste buds sing. I promise you, once you experience the crispy exterior and cheesy, potato-filled interior of a Hash Brown Grilled Cheese Sandwich, you’ll wonder how you ever lived without it. Go ahead, treat yourself and your loved ones to this culinary masterpiece. It’s more than just a sandwich; it’s an experience waiting to happen!

Crispy Hash Brown Grilled Cheese Sandwich Perfection
- Total Time: 45 minutes
- Yield: 2 servings
Description
Experience the ultimate comfort food with this Crispy Hash Brown Grilled Cheese Sandwich, where golden hash browns replace traditional bread. Indulge in the perfect blend of crispy, cheesy, and savory flavors that will elevate your lunch or brunch to legendary status.
Ingredients
- Frozen Hash Brown Patties
- Sliced Bread (white sandwich bread, country-style sourdough, or brioche)
- Good Melting Cheese (sharp cheddar, Monterey Jack, American cheese)
- Butter or Mayonnaise (for spreading)
- Cooked Beef Bacon (optional)
- Caramelized Onions (optional)
- Jalapeño Slices (optional)
- Hot Sauce (optional)
Instructions
- Prepare Your Hash Browns: Cook the frozen hash brown patties in an air fryer at 400°F (200°C) for 10-15 minutes until golden and crispy, or bake them in the oven or pan-fry in a skillet until crisp.
- Prepare the Bread and Cheese: Spread softened butter or mayonnaise on one side of each slice of bread. On two slices, place a generous layer of your chosen cheese blend on the unbuttered side.
- Assemble the Sandwich: Place one crispy hash brown patty on top of the cheese on one slice of bread. If using optional fillings like beef bacon, caramelized onions, or jalapeños, layer them on top of the hash brown. Add another layer of cheese on top of the hash brown, then place the second slice of bread, buttered-side-up, on top.
- Grill to Perfection: Heat a non-stick skillet over medium-low heat. Place the assembled sandwich in the skillet and cook for 3-5 minutes per side until the bread is golden brown and the cheese is melted. Press down gently with a spatula for even browning.
- Serve Immediately: Transfer the sandwich to a cutting board, slice in half, and serve hot to enjoy the crispy, cheesy goodness.
- Prep Time: 15 mins
- Cook Time: 30 mins
- Category: Lunch
- Method: Grilling
- Cuisine: American
Nutrition
- Serving Size: 1 sandwich
- Calories: 600
- Sugar: 2 g
- Sodium: 800 mg
- Fat: 35 g
- Saturated Fat: 15 g
- Unsaturated Fat: 10 g
- Trans Fat: 0 g
- Carbohydrates: 50 g
- Fiber: 3 g
- Protein: 20 g
- Cholesterol: 60 mg
Keywords: Ensure hash browns are perfectly crispy before assembling the sandwich. Use medium-low heat for grilling to achieve a golden crust without burning. Experiment with different cheese blends for added flavor.
Leave a Comment