
No Bake Christmas Cheesecake Bites Recipe
Oh my goodness, do I have a treat for you that’s going to make your holiday season so much easier and sweeter! If you’re anything like me, you love the magic of Christmas but sometimes feel overwhelmed by all the baking and cooking. That’s exactly why I’m absolutely thrilled to share my secret weapon: these incredible No Bake Christmas Cheesecake Bites! What makes them so special, you ask? Well, the “no-bake” part is a huge win right off the bat – no oven required means less stress and more time for festive fun. Plus, they’re perfectly portioned into adorable, bite-sized morsels, making them ideal for holiday parties, potlucks, or just a little indulgence for yourself.
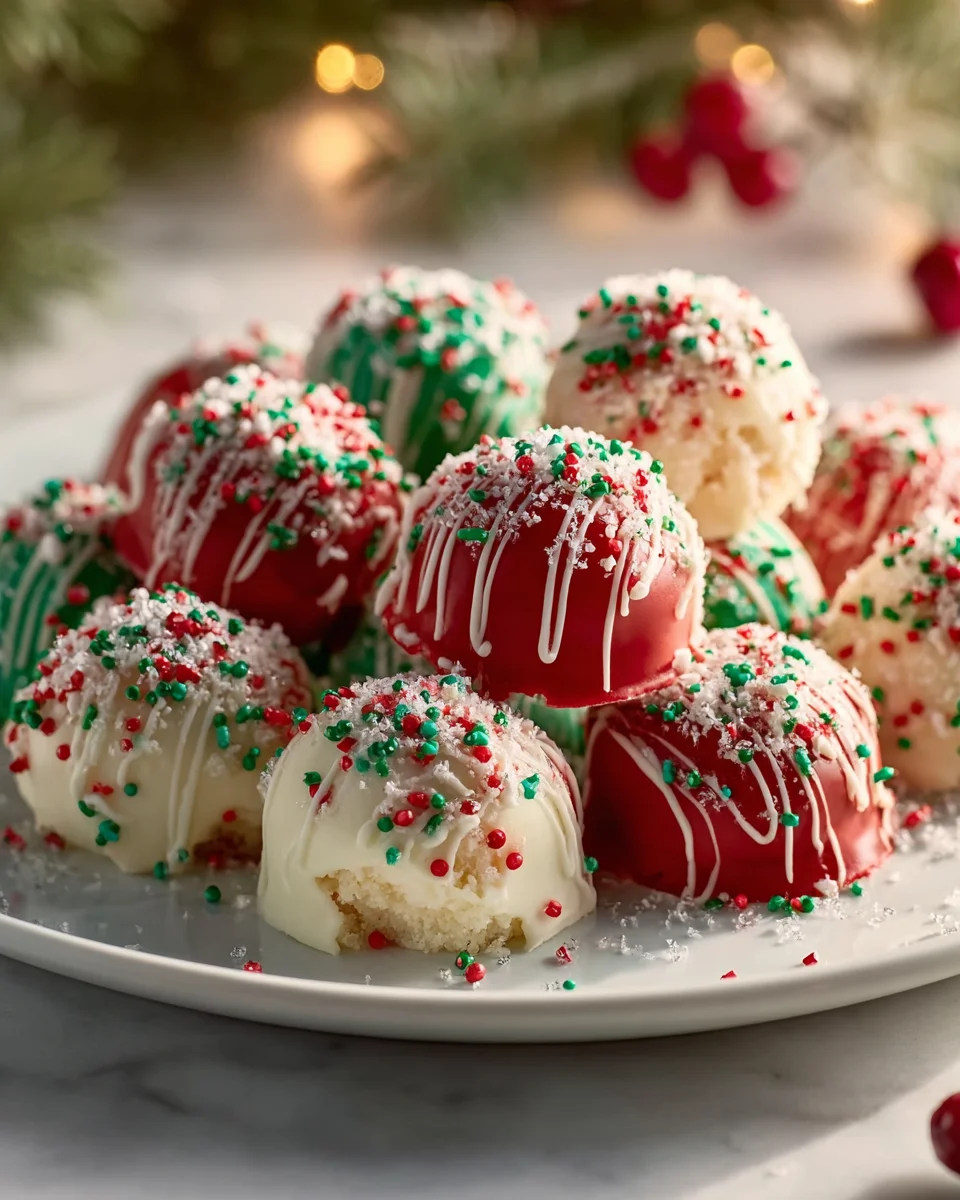
You are going to absolutely adore how simple and delightful these are. Imagine a rich, creamy cheesecake filling, bursting with festive cheer (think hints of peppermint, vanilla, or even a touch of ginger!), nestled on a crunchy cookie base, all without ever turning on your oven. They’re quick to whip up, look absolutely stunning on a dessert platter, and are guaranteed to be a massive hit with everyone who tries them. These little beauties are not just a dessert; they’re a celebration of holiday joy in every single bite. Get ready to impress your guests and save your sanity this Christmas!

Ingredient Notes
Creating these delightful No Bake Christmas Cheesecake Bites is all about using the right ingredients to achieve that perfect creamy texture and festive flavor without ever turning on your oven. Here’s what you’ll need and some handy substitutions I often use.
For the Crust:
- Graham Cracker Crumbs: These form the classic base for our cheesecake bites. I find about 1 ½ cups of finely crushed graham cracker crumbs are usually perfect for a batch. If you don’t have graham crackers, digestive biscuits or even shortbread cookies work wonderfully and can add a slightly different, delicious flavor profile to your Christmas bites. For an extra festive touch, I sometimes use crushed gingersnap cookies – they bring a lovely warmth that screams holiday season!
- Melted Unsalted Butter: This is the glue that holds our crust together. Unsalted butter allows us to control the saltiness in the recipe. Make sure it’s fully melted but not boiling hot when you mix it in.
For the Cheesecake Filling:
- Full-Fat Cream Cheese: This is the star of our show! It absolutely needs to be full-fat block cream cheese, softened at room temperature. Trust me, the texture and richness won’t be the same with low-fat varieties or cream cheese spreads from a tub. Softened cream cheese ensures a super smooth, lump-free filling.
- Powdered Sugar (Confectioners’ Sugar): This provides the sweetness and helps thicken the filling without adding a gritty texture. I always sift it to avoid any lumps in my creamy filling.
- Vanilla Extract: A staple in almost all my dessert recipes, vanilla extract enhances all the other flavors beautifully. Good quality pure vanilla extract makes a noticeable difference. For a special Christmas twist, you could try a tiny dash of peppermint extract (start with a quarter teaspoon and add more to taste) or almond extract for a different aromatic note.
- Heavy Cream (Cold): This is crucial for achieving that light, airy, and stable cheesecake filling. It needs to be very cold to whip up properly into stiff peaks. Don’t use anything less than 35% milk fat (also known as whipping cream or double cream in some regions).
- Optional Flavorings/Colorings: For that “Christmas” touch, I often divide my filling and add a few drops of red or green food coloring to create festive layers or swirls. A tiny amount of non-alcohol peppermint extract can give a lovely cool sensation, or a pinch of cinnamon and nutmeg can add a cozy spice.
For Decoration (make them extra festive!):
- Christmas Sprinkles: Red, green, silver, gold – whatever festive sprinkles you love! These instantly elevate the holiday look.
- Crushed Candy Canes: A classic Christmas topping, they add both color and a lovely minty crunch.
- Mini Chocolate Chips or Shavings: A timeless addition for a touch of chocolatey goodness.
- Fresh Cranberries or Pomegranate Seeds: For a burst of natural color and a slight tartness that complements the sweet cheesecake.
Step-by-Step Instructions
Making these No Bake Christmas Cheesecake Bites is surprisingly simple and incredibly fun. The hardest part is waiting for them to chill! Here’s how I put them together:
Step 1: Prepare Your Crust
- Crush the Graham Crackers: I start by finely crushing my graham crackers. You can do this by placing them in a Ziploc bag and crushing them with a rolling pin, or for a quicker method, pulsing them in a food processor until they resemble fine sand.
- Mix with Butter: In a medium bowl, combine the graham cracker crumbs with the melted butter. Stir well until all the crumbs are moistened and resemble wet sand.
- Form the Bases: Line a mini muffin tin with paper liners. I find this makes serving and handling so much easier! Spoon about a tablespoon of the crumb mixture into the bottom of each liner. Using the back of a small spoon or your thumb, firmly press the crumbs down to create an even, compact crust.
- Chill the Crusts: Pop the muffin tin into the refrigerator for at least 15-20 minutes while you prepare the filling. This helps the crusts set and prevents them from crumbling when you add the filling.
Step 2: Make the Creamy Cheesecake Filling
- Beat the Cream Cheese: In a large mixing bowl, beat the softened full-fat cream cheese with an electric mixer on medium speed until it’s super smooth and fluffy, with no lumps. This usually takes me about 2-3 minutes.
- Add Sweetness and Flavor: Gradually add the powdered sugar to the cream cheese, beating on low speed until fully incorporated, then increase to medium and beat until light and fluffy. Stir in the vanilla extract (and any optional flavorings like peppermint extract) until just combined. Be careful not to overmix at this stage.
- Whip the Heavy Cream: In a separate, very cold bowl, whip the cold heavy cream with clean beaters on high speed until stiff peaks form. This means when you lift the beaters, the cream stands up firmly. Be careful not to over-whip, or it will turn grainy.
- Combine Gently: Now comes the delicate part! Gently fold the whipped cream into the cream cheese mixture in two additions. Use a spatula and a light hand, folding until just combined and no streaks of whipped cream remain. Overmixing here can deflate the air you’ve built into the whipped cream, resulting in a dense filling. If you’re using food coloring, you can divide the mixture now and gently fold in the colors.
Step 3: Assemble and Chill Your Bites
- Fill the Liners: Spoon or pipe the cheesecake filling over the chilled crusts in your mini muffin tin. I often use a piping bag with a large round tip for a neater look, or just two spoons if I’m in a hurry. Fill each liner almost to the top.
- Smooth Tops: Gently tap the muffin tin on the counter a few times to settle the filling and remove any air bubbles. You can use the back of a spoon to smooth out the tops.
- The Critical Chill: This is the most important step for any no-bake cheesecake! Place the entire muffin tin back into the refrigerator and chill for a minimum of 4 hours, or ideally overnight. This allows the cheesecake to firm up properly so you can easily remove the bites from their liners without them collapsing.
Step 4: Decorate and Serve!
- Remove from Liners: Once thoroughly chilled and firm, carefully lift each cheesecake bite out of its mini muffin liner.
- Decorate Festively: This is where the “Christmas” really comes to life! Right before serving, decorate your cheesecake bites. I love sprinkling them with festive red and green Christmas sprinkles, a dusting of crushed candy canes, or a few mini chocolate chips. A tiny dollop of extra whipped cream with a fresh cranberry on top also looks beautiful and tastes delicious.
- Serve Immediately: Serve your beautiful No Bake Christmas Cheesecake Bites straight from the refrigerator for the best texture.
Tips & Suggestions
I’ve made my share of no-bake cheesecakes, and these specific tips will help you achieve perfect No Bake Christmas Cheesecake Bites every time:
- Room Temperature Cream Cheese is Key: I cannot stress this enough! Your cream cheese MUST be at room temperature and soft. If it’s cold, it won’t beat into a smooth consistency, and you’ll end up with lumps in your filling, no matter how much you beat it. Take it out of the fridge at least an hour before you start.
- Cold Heavy Cream is Equally Important: On the flip side, your heavy cream needs to be as cold as possible to whip up correctly. I often pop my mixing bowl and beaters in the freezer for 10-15 minutes before whipping the cream – it helps a lot!
- Don’t Overmix the Filling: Once you’ve folded in the whipped cream, stop mixing as soon as everything is just combined. Overmixing will deflate the whipped cream, making your cheesecake dense instead of light and airy.
- The Chill is Non-Negotiable: These are “no bake,” which means the refrigerator is doing all the work to set them. Don’t rush this step! A minimum of 4 hours is essential, but overnight chilling truly yields the best, firmest results.
- Portioning for Perfect Bites: For consistent sizes, I use a small cookie scoop or a measuring spoon to portion out both the crust mixture and the cheesecake filling. This ensures each bite is uniform and looks professional.
- Festive Flavor Variations:
- Peppermint Delight: Add ¼ to ½ teaspoon of non-alcohol peppermint extract to the cheesecake filling for a refreshing minty taste.
- Cranberry Swirl: Swirl in a tablespoon of cranberry sauce (not jelly, but with whole cranberries) into the filling just before chilling for a beautiful holiday look and tart flavor.
- Gingerbread Crust: Replace graham crackers with crushed gingersnap cookies for a spicier, more traditional Christmas flavor in your crust.
- Easy Removal: Using paper mini muffin liners is a game-changer for these bites. They make removal effortless and are perfect for serving. If you’re using a pan without liners, make sure to lightly grease it and line the bottom with parchment paper, leaving an overhang to help lift the entire chilled cheesecake out before slicing into bites.
- Decorate Just Before Serving: While the cheesecake itself needs to chill, I find it’s best to add delicate decorations like crushed candy canes or fresh berries right before serving. This keeps them looking fresh and prevents things like candy canes from getting sticky or berries from weeping.
Storage
One of the best things about these No Bake Christmas Cheesecake Bites (besides how delicious they are!) is how well they store, making them perfect for making ahead during the busy holiday season.
- In the Refrigerator: Once thoroughly chilled and set, these cheesecake bites will keep beautifully in an airtight container in the refrigerator for up to 3-4 days. I usually arrange them in a single layer or put a piece of parchment paper between layers to prevent them from sticking together. Just be sure to keep them away from anything with a strong odor, as the cheesecake can absorb smells.
- Freezing for Longer Storage: Yes, you can freeze these! No-bake cheesecakes actually freeze quite well. Once the bites are completely firm and chilled, you can place them on a baking sheet lined with parchment paper and freeze them for about an hour, or until solid. This “flash freezing” prevents them from sticking together. Then, transfer the frozen bites to a freezer-safe, airtight container or a heavy-duty freezer bag. They will keep well in the freezer for up to 1 month.
- Thawing Frozen Bites: To enjoy your frozen cheesecake bites, simply transfer them from the freezer to the refrigerator and let them thaw for at least 2-3 hours, or overnight, before serving. I find they taste best when fully thawed but still very cold.
- Make Ahead Tip: Because they store so well, I often make a big batch of these bites a day or two before a Christmas party. This cuts down on last-minute stress and ensures I have a delicious, festive dessert ready to go!
Final Thoughts
And there you have it! I truly believe the No Bake Christmas Cheesecake Bites Recipe is an absolute game-changer for your holiday season. It’s not just about whipping up a delicious treat; it’s about creating festive joy without any of the usual stress of baking. The simplicity of these bites means more time spent enjoying the magic of Christmas with loved ones, rather than being stuck in the kitchen.
I promise you, these charming little cheesecake bites will be the star of any Christmas gathering. Their vibrant appearance and delightful taste make them irresistible, and the fact that they’re no-bake is just the icing on the… well, cheesecake! Give the No Bake Christmas Cheesecake Bites Recipe a try this year; I’m confident they’ll become a beloved tradition in your home, bringing smiles and festive cheer with every single bite. Happy holidays and happy creating!

Quick No Bake Christmas Cheesecake Bites – Perfect Holiday Treat
- Total Time: 30 minutes
- Yield: 24 bites 1x
Description
These No Bake Christmas Cheesecake Bites are the ultimate stress-free holiday dessert, combining creamy cheesecake filling with a crunchy cookie base. Perfectly portioned and festive, they are sure to impress your guests this holiday season!
Ingredients
- 1 ½ cups Graham Cracker Crumbs
- ½ cup Melted Unsalted Butter
- 8 oz Full-Fat Cream Cheese, softened
- 1 cup Powdered Sugar (Confectioners' Sugar), sifted
- 1 tsp Vanilla Extract
- 1 cup Heavy Cream (Cold)
- Optional Flavorings/Colorings: red or green food coloring, non-alcohol peppermint extract, cinnamon, nutmeg
- Christmas Sprinkles
- Crushed Candy Canes
- Mini Chocolate Chips or Shavings
- Fresh Cranberries or Pomegranate Seeds
Instructions
- Step 1: Prepare Your Crust
- 1. Crush the Graham Crackers: Finely crush the graham crackers in a Ziploc bag with a rolling pin or pulse in a food processor until they resemble fine sand.
- 2. Mix with Butter: In a medium bowl, combine the graham cracker crumbs with the melted butter. Stir well until all the crumbs are moistened.
- 3. Form the Bases: Line a mini muffin tin with paper liners. Spoon about a tablespoon of the crumb mixture into each liner and press down to create an even crust.
- 4. Chill the Crusts: Refrigerate the muffin tin for at least 15-20 minutes to set the crusts.
- Step 2: Make the Creamy Cheesecake Filling
- 1. Beat the Cream Cheese: In a large mixing bowl, beat the softened cream cheese until smooth and fluffy, about 2-3 minutes.
- 2. Add Sweetness and Flavor: Gradually add the powdered sugar, beating until fully incorporated, then stir in the vanilla extract.
- 3. Whip the Heavy Cream: In a separate cold bowl, whip the heavy cream until stiff peaks form.
- 4. Combine Gently: Fold the whipped cream into the cream cheese mixture until just combined.
- Step 3: Assemble and Chill Your Bites
- 1. Fill the Liners: Spoon or pipe the cheesecake filling over the chilled crusts in the mini muffin tin.
- 2. Smooth Tops: Tap the muffin tin on the counter to settle the filling and remove air bubbles.
- 3. The Critical Chill: Chill the muffin tin in the refrigerator for a minimum of 4 hours, or ideally overnight.
- Step 4: Decorate and Serve!
- 1. Remove from Liners: Carefully lift each cheesecake bite out of its mini muffin liner.
- 2. Decorate Festively: Sprinkle with festive decorations like Christmas sprinkles, crushed candy canes, or mini chocolate chips.
- 3. Serve Immediately: Serve the cheesecake bites straight from the refrigerator.
- Prep Time: 30 mins
- Cook Time: 0 mins
- Category: Dessert
- Method: No Bake
- Cuisine: American
Nutrition
- Serving Size: 1 bite
- Calories: 120
- Sugar: 10 g
- Sodium: 50 mg
- Fat: 8 g
- Saturated Fat: 5 g
- Unsaturated Fat: 2 g
- Trans Fat: 0 g
- Carbohydrates: 12 g
- Fiber: 0 g
- Protein: 1 g
- Cholesterol: 30 mg
Keywords: Ensure cream cheese is at room temperature for a smooth filling. Use cold heavy cream for the best whipping results. Don't overmix the filling after folding in the whipped cream.

Leave a Comment