
Chocolate sorbet is a delightful treat that brings a burst of rich, velvety flavor to your palate. As a lover of all things chocolate, I can confidently say that this frozen dessert is not only a refreshing indulgence but also a testament to the art of simplicity in dessert-making. Originating from Italy, sorbet has a long-standing history as a beloved frozen delicacy, often enjoyed during warm summer months or as a light finish to a hearty meal.
What makes chocolate sorbet so irresistible is its smooth texture and intense chocolate flavor, which can satisfy even the most discerning chocolate aficionados. People adore this dish not just for its taste, but also for its convenience; it’s a dairy-free option that can be whipped up in no time, making it perfect for impromptu gatherings or a cozy night in. Join me as we explore the delightful world of chocolate sorbet, where every spoonful is a celebration of chocolatey goodness!

Ingredients:
- 1 cup unsweetened cocoa powder
- 1 cup granulated sugar
- 2 cups water
- 1 teaspoon vanilla extract
- 1/4 teaspoon salt
- 1 tablespoon corn syrup (optional, for creaminess)
Preparing the Base
1. **Combine Dry Ingredients**: In a medium mixing bowl, I start by whisking together the unsweetened cocoa powder and granulated sugar. This helps to break up any clumps in the cocoa and ensures an even distribution of sweetness throughout the sorbet. 2. **Heat the Water**: In a saucepan, I measure out 2 cups of water and place it over medium heat. I want the water to be hot but not boiling, as boiling can cause the cocoa to become grainy. 3. **Mix Cocoa and Sugar with Water**: Once the water is hot, I gradually add the cocoa and sugar mixture to the saucepan, whisking continuously. This is crucial because it helps to dissolve the cocoa and sugar completely, creating a smooth mixture. I keep whisking until there are no lumps left. 4. **Add Vanilla and Salt**: After the cocoa and sugar have dissolved, I remove the saucepan from the heat. I then stir in the vanilla extract and salt. The salt enhances the chocolate flavor, making it richer and more complex. 5. **Incorporate Corn Syrup (Optional)**: If I want my sorbet to have a creamier texture, I add the tablespoon of corn syrup at this stage. It helps to prevent ice crystals from forming, resulting in a smoother sorbet.Chilling the Mixture
6. **Cool the Mixture**: I let the chocolate mixture cool to room temperature. This usually takes about 30 minutes. If I’m in a hurry, I can place the saucepan in an ice bath to speed up the cooling process. 7. **Refrigerate**: Once cooled, I transfer the mixture to a container and place it in the refrigerator for at least 2 hours, or until it is thoroughly chilled. This step is important because a colder mixture will churn better in the ice cream maker.Churning the Sorbet
8. **Prepare the Ice Cream Maker**: While the mixture is chilling, I make sure my ice cream maker’s bowl is frozen (if required) according to the manufacturer’s instructions. This usually means placing it in the freezer for at least 24 hours before use. 9. **Churn the Mixture**: After the mixture has chilled, I pour it into the ice cream maker. I turn on the machine and let it churn for about 20-25 minutes. I keep an eye on it, and I know it’s ready when it has thickened to a soft-serve consistency. 10. **Taste Test**: At this point, I like to do a little taste test. If I feel it needs a bit more sweetness, I can add a little more sugar or a splash of vanilla extract. Just remember to mix it in well before moving on.Freezing the Sorbet
11. **Transfer to a Container**: Once the sorbet has reached the desired consistency, I carefully transfer it to a freezer-safe container. I like to use a shallow container because it helps the sorbet freeze more evenly. 12. **Smooth the Top**: I use a spatula to smooth the top of the sorbet, making it look nice and neat. If I want to get fancy, I can sprinkle a little cocoa powder or chocolate shavings on top for presentation. 13. **Cover and Freeze**: I cover the container with a lid or plastic wrap, making sure it’s airtight. I then place it in the freezer for at least 4 hours, or until it is firm. If I’m planning to serve it later, I can leave it in the freezer for up to a week.Serving the Chocolate Sorbet
14. **Scoop and Serve**: When I’m ready to serve the sorbet, I take it out of the freezer and let it sit at room temperature for about 5-10 minutes. This makes it easier to scoop. I use an ice cream scoop to serve it into bowls or cones. 15. **Garnish (Optional)**: For an extra touch, I like to garnish the sorbet with fresh mint leaves, a drizzle of chocolate sauce, or even some chopped nuts. It adds a nice contrast in flavor and texture. 16. **Enjoy**: Finally, I sit back and enjoy my homemade chocolate sorbet. It’s rich, creamy, and the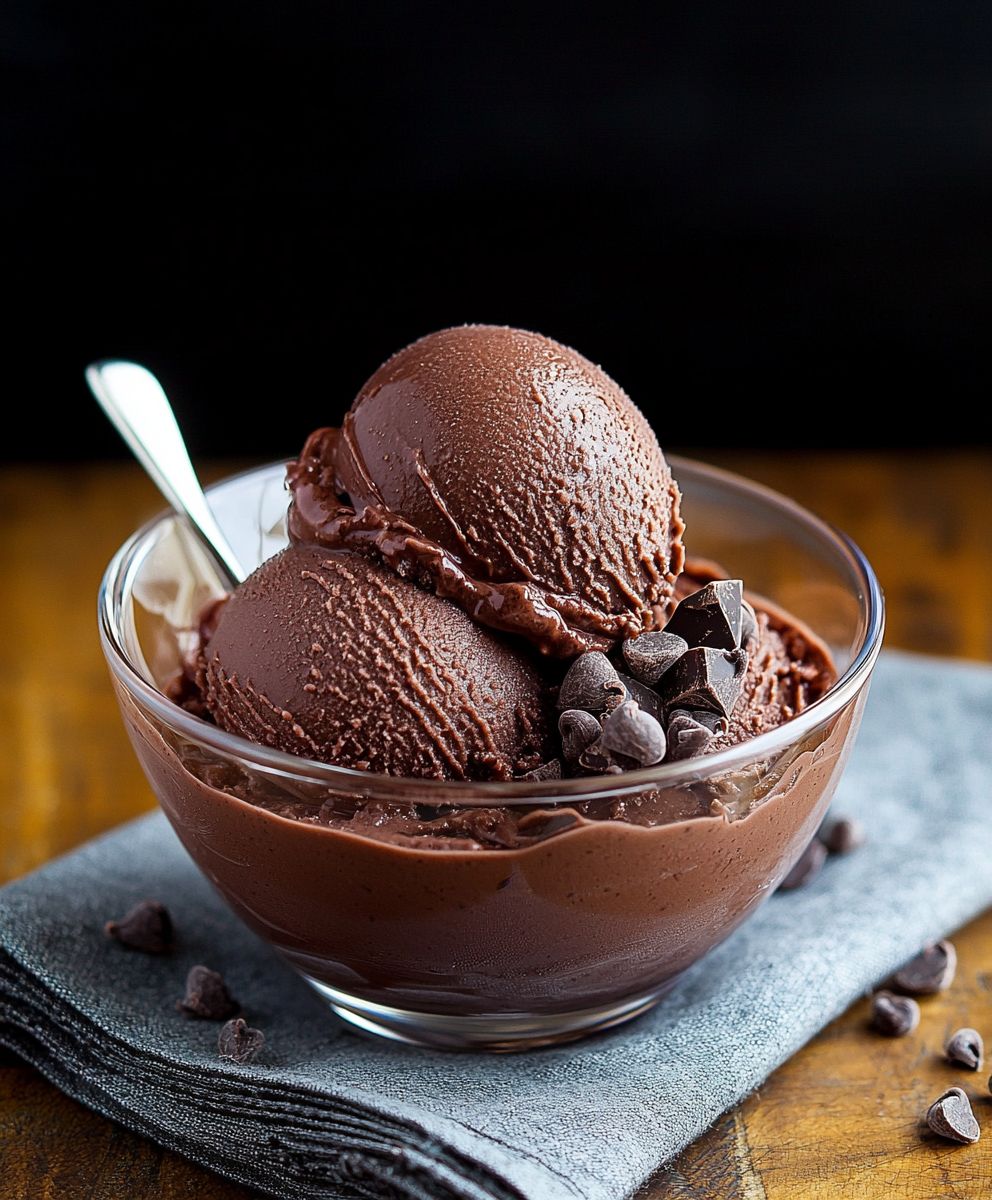
Conclusion:
In summary, this Chocolate Sorbet recipe is an absolute must-try for anyone who loves a rich, creamy dessert that’s both indulgent and refreshing. The combination of high-quality cocoa and simple ingredients creates a decadent treat that’s perfect for warm days or as a delightful end to any meal. Plus, it’s dairy-free, making it a fantastic option for those with dietary restrictions or anyone looking to enjoy a lighter dessert without sacrificing flavor. For serving suggestions, consider pairing your Chocolate Sorbet with fresh berries, a sprinkle of sea salt, or a drizzle of chocolate sauce for an extra touch of elegance. You can also experiment with variations by adding a splash of espresso for a mocha twist or incorporating a hint of mint for a refreshing flavor profile. The possibilities are endless! I encourage you to give this Chocolate Sorbet recipe a try and experience the joy of making your own frozen dessert at home. Once you’ve whipped up a batch, I’d love to hear about your experience! Share your thoughts, any variations you tried, or even a photo of your creation. Let’s celebrate the joy of homemade treats together! Print
Chocolate Sorbet: The Ultimate Guide to Making This Decadent Dessert at Home
- Total Time: 295 minutes
- Yield: 4 servings 1x
Description
Indulge in a rich and creamy homemade chocolate sorbet made with unsweetened cocoa powder, sugar, and vanilla. This refreshing dessert is easy to prepare and perfect for chocolate lovers, offering a delightful treat that can be enjoyed any time.
Ingredients
- 1 cup unsweetened cocoa powder
- 1 cup granulated sugar
- 2 cups water
- 1 teaspoon vanilla extract
- 1/4 teaspoon salt
- 1 tablespoon corn syrup (optional, for creaminess)
Instructions
- In a medium mixing bowl, whisk together the unsweetened cocoa powder and granulated sugar until well combined.
- In a saucepan, heat 2 cups of water over medium heat until hot but not boiling.
- Gradually add the cocoa and sugar mixture to the hot water, whisking continuously until completely dissolved and smooth.
- Remove the saucepan from heat and stir in the vanilla extract and salt to enhance the chocolate flavor.
- For a creamier texture, add the tablespoon of corn syrup and mix well.
- Allow the chocolate mixture to cool to room temperature, about 30 minutes. For quicker cooling, place the saucepan in an ice bath.
- Transfer the cooled mixture to a container and refrigerate for at least 2 hours, or until thoroughly chilled.
- Ensure your ice cream maker’s bowl is frozen according to the manufacturer’s instructions.
- Pour the chilled mixture into the ice cream maker and churn for 20-25 minutes until it reaches a soft-serve consistency.
- Taste the sorbet and adjust sweetness if necessary by adding more sugar or vanilla extract.
- Carefully transfer the sorbet to a freezer-safe container, smoothing the top with a spatula.
- Cover the container with an airtight lid or plastic wrap and freeze for at least 4 hours, or until firm.
- When ready to serve, let the sorbet sit at room temperature for 5-10 minutes for easier scooping.
- Garnish with fresh mint leaves, a drizzle of chocolate sauce, or chopped nuts for added flavor and texture.
- Serve and enjoy your homemade chocolate sorbet!
Notes
- For a smoother texture, consider adding corn syrup.
- The sorbet can be stored in the freezer for up to a week.
- Prep Time: 30 minutes
- Cook Time: 25 minutes

Leave a Comment