
Christmas Kitchen Sink Cookies are the delightful embodiment of holiday spirit, combining an irresistible mix of flavors into one scrumptious treat! As the name suggests, these cookies are a whimsical blend of whatever you have on hand, making them the ultimate festive baking project. Originating from the idea of using up leftover ingredients, Christmas Kitchen Sink Cookies have become a cherished tradition in many households, especially during the winter months when families gather to celebrate. What’s not to love about a cookie that welcomes creativity while ensuring every bite is a surprise? Whether you’re baking solo or involving the kids, this recipe invites everyone to join in the fun of creating something deliciously unique.
What Is Christmas Kitchen Sink Cookies
At its core, Christmas Kitchen Sink Cookies are chewy, soft-baked cookies packed with an array of ingredients that could include chocolate chips, nuts, dried fruits, and even festive sprinkles. The beauty of these cookies lies in their versatility; each batch can be tailored to suit your personal tastes or to utilize whatever pantry staples might be lurking around. Unlike traditional cookies that follow a strict recipe, these cookies are a free-for-all of flavors, making them a fun and engaging baking experience. Imagine biting into a cookie that has the sweetness of chocolate, the crunch of nuts, and the chewiness of dried fruits all in one bite—that’s the magic of Christmas Kitchen Sink Cookies.
Why You’ll Fall in Love with This Recipe
- Easy to make: No need for precise measurements—just throw in your favorites!
- Deliciously versatile: Customize them with whatever you have on hand.
- Family-friendly: Perfect for baking with kids and creating memories.
- Festive and fun: A cheerful treat that embodies the holiday spirit.
How Does It Taste?
Each bite of Christmas Kitchen Sink Cookies bursts with flavor and texture. The initial sweetness from brown sugar harmonizes beautifully with the rich, melted chocolate. As you chew, the soft, buttery cookie gives way to delightful surprises—crunchy nuts, chewy cranberries, and perhaps a sprinkle of salt that elevates the sweetness just right. The contrasting textures create a satisfying experience that keeps you reaching for one more. With hints of warm cinnamon and nutmeg, these cookies wrap you in a cozy embrace, making them the perfect indulgence on a cold winter day.
Health & Ingredient Benefits
The ingredients in Christmas Kitchen Sink Cookies not only contribute to their delightful taste but also offer some health benefits:
- Oats: High in fiber, they help keep you full and satisfied.
- Nuts: Packed with healthy fats and protein, they add a satisfying crunch.
- Dried fruits: Full of vitamins and antioxidants, they provide natural sweetness.
- Dark chocolate: Rich in antioxidants, it’s a guilt-free indulgence that can boost your mood.
So gather your ingredients, embrace the spirit of creativity, and let’s get baking some Christmas Kitchen Sink Cookies that will surely become a holiday favorite!

Ingredients You’ll Need
- 2 1/4 cups all-purpose flour – This is the base of our cookies, providing structure and chewiness.
- 1 tsp baking soda – Helps the cookies rise and become fluffy.
- 1/2 tsp salt – Enhances the flavors of the other ingredients.
- 1 cup unsalted butter, softened – Adds richness and moisture to the cookies.
- 3/4 cup granulated sugar – Sweetness and a light texture.
- 3/4 cup packed brown sugar – Adds depth of flavor and moisture.
- 1 tsp vanilla extract – A warm, aromatic essence that complements the sweetness.
- 2 large eggs – Binds the ingredients together and adds moisture.
- 1 cup chocolate chips – Provides a delicious melty texture in every bite.
- 1 cup festive mix-ins (e.g., dried cranberries, nuts, white chocolate chips, candy canes) – Adds a fun variety of flavors and textures, perfect for the holiday spirit.
Tools You’ll Need
- Large mixing bowl – For combining the wet and dry ingredients.
- Electric mixer – Makes creaming the butter and sugars easier.
- Rubber spatula – Helps in folding in the mix-ins without breaking them.
- Baking sheets – To place the cookie dough for baking.
- Parchment paper – Prevents sticking and makes for easy cleanup.
- Cookie scoop – For uniform cookie sizes.
- Wire cooling rack – Allows cookies to cool evenly.
Optional Substitutions & Additions
- Dairy-free butter – For a dairy-free option, you can substitute with a plant-based butter.
- Gluten-free flour blend – If you need a gluten-free version, use a 1:1 gluten-free flour mix.
- Dark chocolate chips – Swap out regular chocolate chips for dark chocolate for a richer flavor.
- Spices – Add a pinch of cinnamon or nutmeg for a warm holiday spice note.
How to Make Christmas Kitchen Sink Cookies
Step 1: Prepare Your Oven and Baking Sheets
Preheat your oven to 350°F (175°C) and line your baking sheets with parchment paper. This helps to prevent sticking and ensures even baking.
Step 2: Mix the Dry Ingredients
In a large mixing bowl, whisk together the flour, baking soda, and salt. This ensures that the leavening agent is evenly distributed throughout the flour.
Step 3: Cream the Butter and Sugars
In another bowl, beat the softened butter, granulated sugar, and brown sugar together using an electric mixer until the mixture is light and fluffy (about 3-4 minutes). This step is crucial as it incorporates air into the dough, making the cookies tender.
Step 4: Add Eggs and Vanilla
Add in the eggs, one at a time, mixing well after each addition. Then, mix in the vanilla extract until fully combined.
Step 5: Combine Wet and Dry Ingredients
Gradually add the dry mixture to the wet ingredients, mixing just until combined. Be careful not to overmix, as this can lead to tough cookies.
Step 6: Fold in the Chocolate Chips and Mix-ins
Using a rubber spatula, gently fold in the chocolate chips and your choice of festive mix-ins. This is where you can get creative!
Step 7: Scoop and Bake
Using a cookie scoop, drop rounded tablespoons of dough onto the prepared baking sheets, leaving space between each cookie. Bake in the preheated oven for 10-12 minutes, or until the edges are golden brown and the centers look slightly underbaked.
Step 8: Cool and Enjoy!
Remove the cookies from the oven and let them cool on the baking sheets for 5 minutes before transferring them to a wire cooling rack. This helps them set properly!
What to Serve With
These Christmas Kitchen Sink Cookies are best enjoyed with a glass of cold milk or a warm cup of hot cocoa. They also pair wonderfully with coffee or a festive eggnog latte!
Tips for Success
- Make sure your butter is at room temperature for optimal creaming.
- Don’t overmix the dough once you add the flour; this keeps cookies tender.
- Experiment with various mix-ins to customize the flavor to your liking.
- Let the cookies cool completely for the best texture and flavor.
Common Mistakes to Avoid
- Using cold butter can lead to dense cookies; always use softened butter.
- Overbaking the cookies will make them hard; take them out when they are just set.
- Not measuring flour correctly can throw off the cookie texture; spoon it into the cup rather than scooping directly.
How to Store & Reheat
Storing
Store the cookies in an airtight container at room temperature for up to one week. You can also freeze them for up to three months; just make sure to layer them with parchment paper to prevent sticking.
Reheating
To enjoy them warm, simply microwave a cookie for about 10-15 seconds. Alternatively, you can place them in a preheated oven at 350°F (175°C) for a few minutes until heated through.
Frequently Asked Questions
- Can I use different types of chocolate? Absolutely! Feel free to mix dark, milk, or white chocolate chips.
- How do I know when the cookies are done? The edges should be golden brown, and the centers should look slightly underbaked.
- Can I make the dough ahead of time? Yes! You can refrigerate the dough for up to 72 hours or freeze it for later use.
- What if I don’t have all the mix-ins? That’s fine! Use what you have on hand; it’s all about creativity.
Nutritional Info
These Christmas Kitchen Sink Cookies contain approximately 150-200 calories per cookie, depending on the ingredients used. Each cookie provides a good balance of carbohydrates, fats, and a bit of protein, making them a delightful treat in moderation.

Final Thoughts
If you’re looking for a delightful treat that embodies the spirit of the holiday season, then the Christmas Kitchen Sink Cookies are an absolute must-try! These cookies are not just any ordinary dessert; they are a joyful celebration of flavors and textures, bringing together all your favorite ingredients in one delicious bite. The combination of chocolate chips, nuts, dried fruits, and a hint of festive spices creates a mouthwatering experience that will have everyone reaching for seconds. Plus, the beauty of the Christmas Kitchen Sink Cookies is their versatility—feel free to mix and match based on what you have on hand or your personal preferences. So gather your loved ones, get into the holiday spirit, and whip up a batch of these delightful cookies. Trust me, they’ll become a cherished tradition in your home for years to come!
Christmas Kitchen Sink Cookies
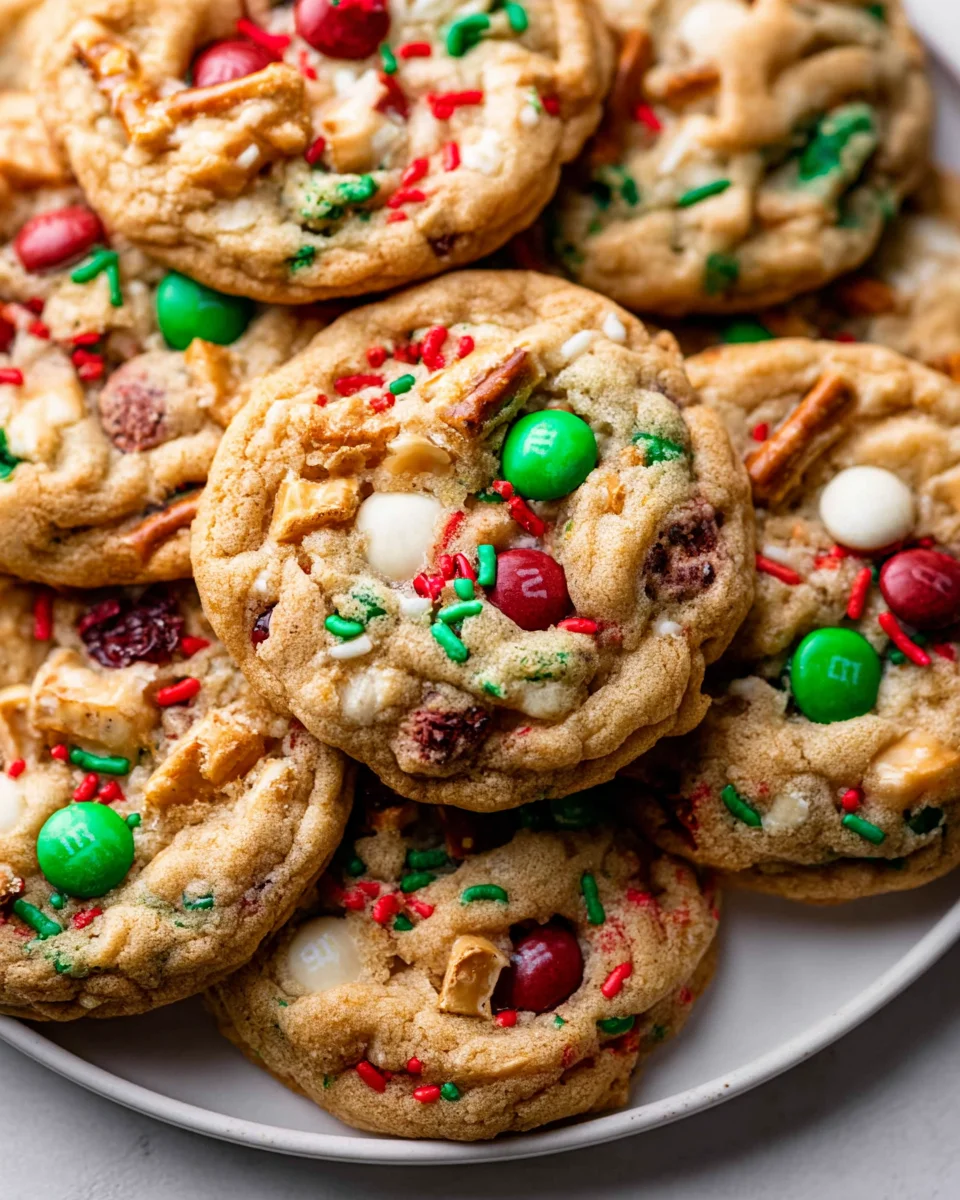
Sweet and salty Christmas cookies filled with pretzel and potato chip pieces, M&M’s, white chocolate chips, and sprinkles! These are sure to be a hit this holiday season!
Ingredients You’ll Need
- 3/4 cup salted butter, softened
- 3/4 cup light brown sugar, packed
- 1/4 cup granulated white sugar
- 2 egg yolks, at room temperature
- 2 tsp vanilla bean paste or extract
- 1 1/2 cups all-purpose flour
- 1/2 tsp baking powder
- 1/2 tsp baking soda
- 1/2 tsp salt
- 1/2 cup red and green M&M’s
- 1/3 cup white chocolate chips
- 1/3 cup pretzel pieces
- 1/3 cup potato chip pieces
- 2 tbsp red and green jimmies
Instructions
-
Step 1
Preheat oven to 350°F. Line two baking sheets with parchment paper. -
Step 2
Cream butter, light brown sugar, and granulated sugar together for 2 minutes until light and fluffy. -
Step 3
Add egg yolks and vanilla; mix for 2 minutes until pale and fluffy. -
Step 4
Mix in flour, baking powder, baking soda, and salt until combined. -
Step 5
Fold in M&M’s, white chocolate chips, pretzel pieces, potato chip pieces, and sprinkles. -
Step 6
Scoop dough into 20 balls and arrange on baking sheets, 2 inches apart. -
Step 7
Optional: Add extra mix-ins on top of dough balls. -
Step 8
Bake for 10-12 minutes (10 for chewy centers, 12 for crisper edges). -
Step 9
Optional: Use a cookie cutter to shape cookies right out of the oven. -
Step 10
Cool on baking sheets for 5 minutes, then transfer to a cooling rack for another 10 minutes. -
Step 11
Store leftovers in an airtight container for up to 3 days.
Important Information
Nutrition Facts
Per serving: ~350 calories. Based on a 2000 calorie diet.
Allergy Information
Always check labels for specific allergen information.


Leave a Comment