
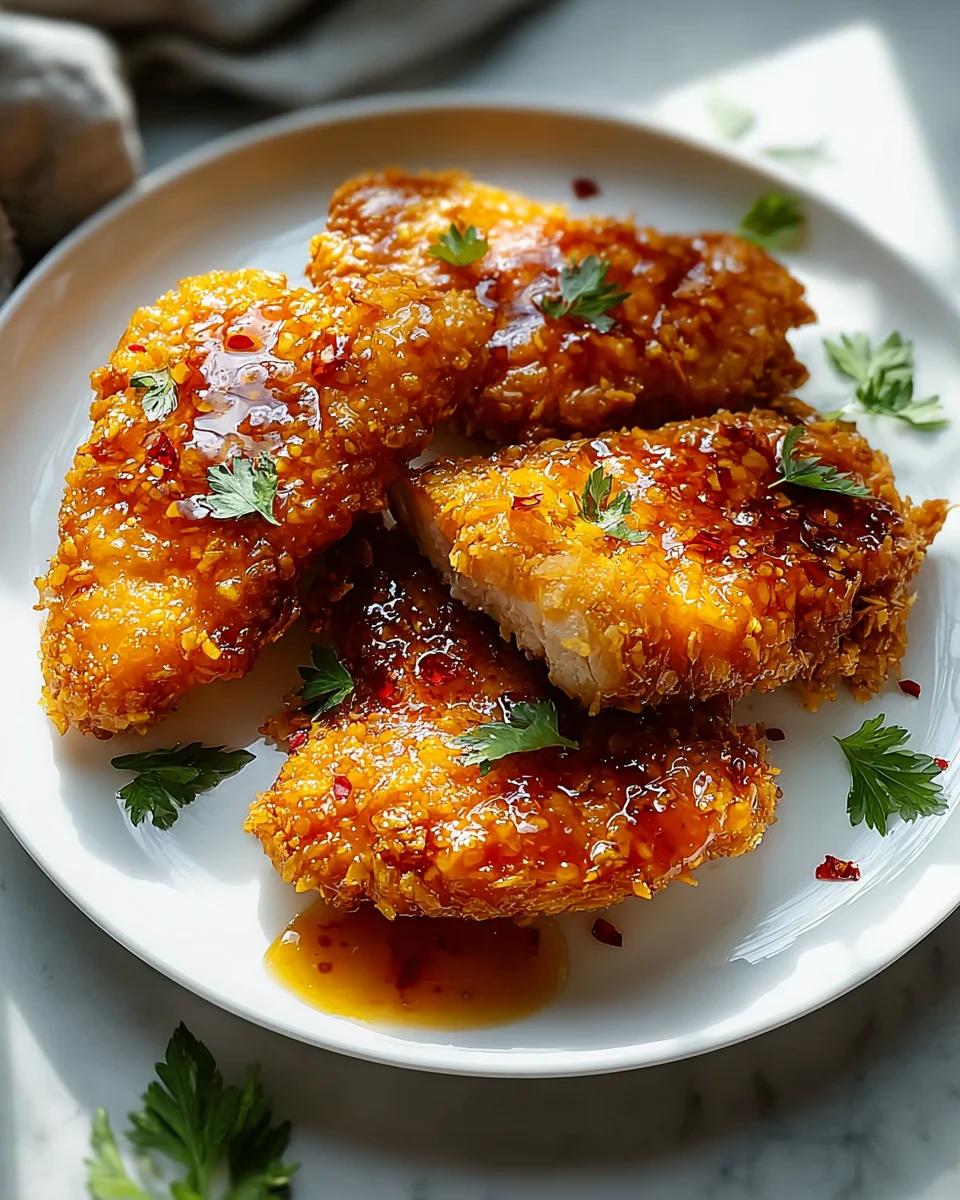
Crispy Baked Hot Honey Chicken is a revelation, promising to transform your dinner routine into an exciting culinary adventure. Imagine biting into chicken that boasts a gloriously golden, audibly crispy skin, yielding to incredibly tender and juicy meat, all enveloped in a sticky, sweet-and-spicy glaze that’s utterly irresistible. I’m thrilled to share a recipe that perfectly encapsulates this dream.
A Sweet & Spicy History Reimagined
While the allure of crispy chicken has graced tables across cultures for centuries, from Southern fried chicken to Korean fried chicken, the modern “hot honey” phenomenon brings a fresh, vibrant twist that has captivated food enthusiasts worldwide. Originating from inventive kitchens, this delightful sweet heat has quickly become a beloved flavor profile. We’re taking that incredible concept and elevating it through a healthier, baked approach, making it accessible for any home cook.
People adore this dish for countless reasons. It’s the ultimate flavor symphony: the rich sweetness of honey perfectly contrasted by a gentle, lingering chili warmth, creating an addictive, caramelized coating. Then there’s the texture – that satisfying crunch followed by tender, succulent chicken, all achieved without the fuss and mess of deep-frying. This recipe for Crispy Baked Hot Honey Chicken is designed to deliver maximum flavor with minimal effort, making it a fantastic choice for both lively dinner parties and simple, comforting weeknight meals. Get ready to experience chicken perfection!

Ingredients:
Get ready to create some truly amazing Crispy Baked Hot Honey Chicken! Here’s everything you’ll need to embark on this delicious culinary adventure. I’ve broken it down to make sure you have every component for success.
- For the Chicken:
- 2 lbs boneless, skinless chicken thighs or breasts, cut into 1.5-2 inch pieces (thighs tend to stay juicier, but breasts work beautifully too, just adjust cooking time slightly).
- 1 teaspoon kosher salt, plus more for seasoning
- ½ teaspoon black pepper, plus more for seasoning
- ½ teaspoon garlic powder
- ¼ teaspoon onion powder
- For the Crispy Coating:
- 1 cup all-purpose flour
- 1 tablespoon cornstarch (this is my secret for extra crispiness!)
- 1 teaspoon paprika (smoked paprika adds a lovely depth of flavor)
- ½ teaspoon cayenne pepper (adjust to your spice preference)
- 1 teaspoon garlic powder
- 1 teaspoon onion powder
- ½ teaspoon dried thyme
- 1 teaspoon kosher salt
- ½ teaspoon black pepper
- 2 large eggs
- ¼ cup milk (any kind works, even water in a pinch)
- 2 cups panko breadcrumbs (don’t substitute regular breadcrumbs, panko is key here!)
- 2 tablespoons olive oil or vegetable oil, for drizzling over the chicken before baking
- For the Hot Honey Glaze:
- ½ cup honey (local honey is always a treat!)
- ¼ cup hot sauce (I prefer a vinegar-based hot sauce like Frank’s RedHot, but use your favorite!)
- 2 tablespoons unsalted butter
- 1 tablespoon apple cider vinegar (this balances the sweetness and heat beautifully)
- ½ teaspoon garlic powder
- Pinch of cayenne pepper (optional, for extra kick!)
- For Garnish (Optional, but highly recommended!):
- 2 tablespoons fresh chives or cilantro, finely chopped
- 1 tablespoon sesame seeds (toasted, if you have them)
Preparing the Chicken for Ultimate Crispness
The foundation of truly amazing Crispy Baked Hot Honey Chicken starts with how we prepare the chicken. This isn’t just about seasoning; it’s about setting the stage for that incredible crispy texture we’re aiming for. Trust me, these steps make all the difference!
- Choose Your Cut and Prepare: If you’re using chicken thighs, I recommend boneless, skinless for easier eating. For breasts, I love cutting them into bite-sized pieces, roughly 1.5 to 2 inches. This ensures they cook evenly and quickly, and each piece gets maximum coating coverage.
- Pat Dry, Pat Dry, Pat Dry! This step is non-negotiable for crispiness. Using paper towels, pat every single piece of chicken as dry as humanly possible. Moisture is the enemy of crispiness, so take your time here. The drier the chicken, the better the coating will adhere, and the crispier the final result will be.
- Season the Chicken Directly: In a medium bowl, toss the dried chicken pieces with 1 teaspoon kosher salt, ½ teaspoon black pepper, ½ teaspoon garlic powder, and ¼ teaspoon onion powder. Giving the chicken its own foundational seasoning ensures every bite is flavorful, not just the coating. Make sure each piece is well coated with the seasonings.
- Optional Brining/Marinating (for extra juiciness): If you have time and want to ensure the absolute juiciest chicken, you could briefly brine your chicken pieces in a simple salt solution (about 1 tablespoon salt per 4 cups water) for 20-30 minutes, then rinse thoroughly and pat very dry. Alternatively, a quick marinade in buttermilk for 30 minutes to an hour can also yield incredibly tender results. For this recipe, I usually skip this step for speed, but it’s a pro tip if you have the foresight!
- Arrange and Chill (a game changer!): Once seasoned, if you have time, arrange the chicken pieces on a baking sheet lined with parchment paper and pop them into the refrigerator for at least 20-30 minutes, or even up to an hour. This helps the seasonings really penetrate the meat and, crucially, allows the surface of the chicken to dry out even further, creating an ideal canvas for our crispy coating. Seriously, don’t skip chilling if you want maximum crispiness!
Building the Irresistible Crispy Coating
Now for the magic that gives our chicken that satisfying crunch! This three-step breading process is tried and true, and with a few specific ingredients and techniques, we’re going to achieve a bake-friendly coating that tastes like it’s been deep-fried.
- Set Up Your Dredging Station: Get three shallow bowls ready. Think of it as an assembly line.
- Bowl 1 (Flour Mixture): In the first bowl, combine the 1 cup all-purpose flour, 1 tablespoon cornstarch, 1 teaspoon paprika, ½ teaspoon cayenne pepper, 1 teaspoon garlic powder, 1 teaspoon onion powder, ½ teaspoon dried thyme, 1 teaspoon kosher salt, and ½ teaspoon black pepper. Whisk everything together thoroughly until there are no clumps and the spices are evenly distributed. The cornstarch here is key for that extra crispness, so don’t omit it!
- Bowl 2 (Egg Wash): In the second bowl, whisk together the 2 large eggs and ¼ cup milk until well combined and slightly frothy. This egg wash acts as the glue that helps the panko stick to the chicken.
- Bowl 3 (Panko Breadcrumbs): Pour the 2 cups of panko breadcrumbs into the third bowl. Panko is non-negotiable for this recipe! Its flaky texture and larger size create a much crispier coating than standard breadcrumbs.
- Dredge Each Piece with Care: Working with one piece of chicken at a time, follow this sequence:
- First, dredge the chicken piece thoroughly in the flour mixture. Make sure it’s completely coated, shaking off any excess flour. You want a thin, even layer.
- Next, dip the floured chicken into the egg wash, ensuring all surfaces are covered. Let any excess drip off. You don’t want it dripping wet, just lightly coated.
- Finally, transfer the chicken to the panko breadcrumbs. Press the panko firmly onto all sides of the chicken. This is where you really build up that crispy layer, so be generous and make sure it’s fully coated and packed on.
- Arrange and Chill (Again!): As you finish breading each piece, place it on a clean baking sheet lined with parchment paper, making sure to leave a little space between each piece. Once all the chicken is breaded, transfer the baking sheet to the refrigerator for at least 15-30 minutes. This second chill time is another crucial step! It allows the coating to “set” and adhere firmly to the chicken, which drastically reduces the chances of it falling off during baking. Patience here will be rewarded with a superior crunch!
Baking Your Crispy Baked Hot Honey Chicken to Perfection
We’ve meticulously prepared and coated our chicken, and now it’s time for the oven to work its magic. Baking allows us to achieve that glorious crispiness without the mess and added fat of deep-frying, and it’s surprisingly effective when done right!
- Preheat the Oven and Prepare Baking Sheet: Preheat your oven to a robust 400°F (200°C). This high temperature is crucial for crispiness. Line a large baking sheet with parchment paper, then place an oven-safe wire rack on top of the parchment paper. This setup is key because it allows air to circulate around all sides of the chicken, ensuring an even crisp. Lightly spray or brush the wire rack with a little cooking oil to prevent sticking.
- Arrange the Chicken: Carefully transfer your chilled, breaded chicken pieces onto the prepared wire rack. Ensure there is plenty of space between each piece. Overcrowding the pan will steam the chicken instead of crisping it, resulting in soggy spots. We want golden perfection!
- Drizzle with Oil: Lightly drizzle the 2 tablespoons of olive oil or vegetable oil over the tops of the chicken pieces. This step is vital for achieving that beautiful golden-brown color and helps further develop the crispy texture we’re after. Don’t drench it, just a light, even drizzle.
- Initial Bake: Bake the chicken for 15 minutes. During this initial bake, the coating will start to firm up and turn a light golden color.
- Flip and Continue Baking: After 15 minutes, carefully remove the baking sheet from the oven. Using tongs, gently flip each piece of chicken to its other side. Return the baking sheet to the oven and continue baking for another 15-20 minutes, or until the chicken is deeply golden brown and cooked through.
- Check for Doneness: The best way to know if your chicken is fully cooked is to use an instant-read meat thermometer. Insert it into the thickest part of a chicken piece (avoiding the bone if using bone-in) – it should register an internal temperature of 165°F (74°C). The coating should be beautifully crispy and golden brown all over. If it’s not quite crispy enough to your liking, you can turn on the broiler for 1-2 minutes, keeping a very close eye on it, as things can go from perfectly golden to burnt in a flash under the broiler.
- Remove and Rest: Once cooked, remove the chicken from the oven and let it rest on the wire rack for 5 minutes while you prepare the hot honey glaze. This brief rest allows the juices to redistribute, ensuring moist chicken.
Crafting the Glorious Hot Honey Glaze
Now for the star of the show, the reason we’re all here: that irresistible hot honey glaze! This sweet, spicy, and tangy concoction is what elevates our crispy chicken from great to absolutely unforgettable. It comes together quickly, so have your ingredients ready.
- Combine Ingredients in a Saucepan: In a small saucepan, combine the ½ cup honey, ¼ cup hot sauce (I’m partial to Frank’s for its classic flavor and vinegar notes, which complement the honey beautifully), 2 tablespoons unsalted butter, 1 tablespoon apple cider vinegar, and ½ teaspoon garlic powder. If you’re feeling adventurous and want an extra kick, now’s the time to add that optional pinch of cayenne pepper.
- Heat and Simmer: Place the saucepan over medium-low heat. Stir constantly until the butter has melted and all the ingredients are well combined. Bring the mixture to a gentle simmer. Be careful not to boil it vigorously, as honey can scorch easily.
- Reduce and Thicken: Let the glaze simmer for about 3-5 minutes, stirring occasionally. You’ll notice it will thicken slightly as it reduces. We’re looking for a consistency that coats the back of a spoon. It shouldn’t be too thick like syrup or too thin like water; somewhere in between is perfect for clinging to our crispy chicken.
- Taste and Adjust: This is the fun part! Carefully taste a small spoonful of the glaze. Does it need more heat? Add a tiny bit more hot sauce or cayenne. Prefer it a bit sweeter? A touch more honey. Want more tang? A splash more apple cider vinegar. Adjust to your personal preference until it’s perfectly balanced. Remember, we’re aiming for that delightful interplay of sweet, spicy, and tangy.
- Keep Warm: Once the glaze reaches your desired consistency and flavor, remove it from the heat but keep it warm. If it cools too much, it will become too thick to easily coat the chicken. You can leave it on the lowest setting of your stove or simply set it aside for a few minutes while you retrieve your chicken.
The Grand Finale: Glazing and Serving Your Masterpiece
The moment of truth has arrived! Our chicken is crispy, our glaze is glorious, and now we bring them together for a symphony of flavors and textures. This final step is quick, so be ready to serve right away to enjoy the chicken at its peak crispness.
- Glaze the Chicken: You have a couple of options here, depending on how much glaze you prefer and how you like your chicken served:
- Option 1 (Toss for Full Coverage): For maximum hot honey saturation, transfer the baked crispy chicken pieces directly into a large bowl. Pour the warm hot honey glaze over the chicken and gently toss with tongs until every piece is beautifully coated. This method ensures every nook and cranny gets glazed.
- Option 2 (Brush for Lighter Glaze): If you prefer a lighter application or want to preserve slightly more of the initial crispiness, you can leave the chicken on the wire rack and use a pastry brush to liberally brush the warm hot honey glaze over each piece. You can always serve extra glaze on the side for dipping!
I usually opt for the tossing method; there’s something so satisfying about fully enveloped hot honey chicken!
- Garnish and Serve Immediately: Once glazed, transfer your Crispy Baked Hot Honey Chicken to a serving platter. For that extra flourish and pop of color and freshness, sprinkle generously with finely chopped fresh chives or cilantro and a dash of sesame seeds. The herbs add a lovely counterpoint to the richness of the chicken and glaze, while sesame seeds provide a textural element and nutty flavor.
- Serving Suggestions: This chicken is incredibly versatile! It pairs beautifully with a simple side of fluffy white rice to soak up all that delicious glaze, a fresh green salad with a light vinaigrette to cut through the richness, or even some roasted vegetables like broccoli or asparagus. For a truly indulgent meal, serve it alongside creamy mashed potatoes or a hearty mac and cheese.
- Storage Tips: While this chicken is truly best enjoyed fresh, if you happen to have any leftovers (a rare occurrence in my house!), store them in an airtight container in the refrigerator for up to 3 days. To reheat, I recommend popping them back into a preheated oven or an air fryer at 350°F (175°C) for about 10-15 minutes to help restore some of that lovely crispness. Microwaving will heat it through but will unfortunately soften the coating.
There you have it! A truly show-stopping Crispy Baked Hot Honey Chicken that will impress anyone who tries it. Enjoy every sweet, spicy, and crunchy bite!
Conclusion:
Well, my friends, we’ve journeyed through the simple yet utterly transformative steps to create something truly special. If you’re looking for a dish that perfectly balances sweet, spicy, and savory with an incredible textural contrast, then allow me to reiterate why this recipe for Crispy Baked Hot Honey Chicken absolutely deserves a prime spot in your culinary repertoire. I promise you, this isn’t just another chicken dish; it’s an experience. The way the skin crisps up beautifully in the oven, without the fuss or mess of deep-frying, yet still delivers that satisfying crunch, is nothing short of magical. Then, that glorious hot honey glaze, with its sticky, caramelized embrace, coats every succulent piece, ensuring each bite is an explosion of flavor. It’s comforting, exciting, and remarkably easy to achieve, making it perfect for a weeknight dinner, but impressive enough for company. You’ll find yourself craving that unique combination of heat and sweetness long after the last morsel is gone.
But the journey doesn’t end with the cooking; it extends to how you choose to enjoy this masterpiece! For a classic and comforting meal, I adore serving my Crispy Baked Hot Honey Chicken alongside a generous helping of creamy mashed potatoes – their smooth texture provides a wonderful counterpoint to the chicken’s crispiness and bold flavors. A simple green salad, perhaps with a light vinaigrette, also works wonders, adding a fresh, vibrant element that cuts through the richness. If you’re leaning into a more Southern-inspired theme, consider serving it with collard greens or mac and cheese. For a lighter, fresher approach, try it with fluffy quinoa or even cauliflower rice. And let’s not forget versatility! These delectable pieces aren’t just for main courses. Imagine them as a fantastic appetizer for game night, perhaps skewered or served on small slider buns with a dollop of creamy slaw. You could even slice the chicken and use it in tacos or a vibrant bowl, making for an exciting lunch the next day. The possibilities truly are endless.
And here’s where you get to play! Don’t be shy about adjusting the heat level; add a pinch more cayenne to the hot honey for an extra kick, or dial it back with less if you prefer a milder warmth. Feel free to experiment with different cuts of chicken – boneless, skinless thighs work beautifully for a quicker cook, or even wings if you’re aiming for a party snack. You could also try a sprinkle of sesame seeds or fresh cilantro right before serving for an added layer of flavor and visual appeal. This recipe is wonderfully adaptable, inviting your personal touch. It’s all about making it truly yours.
So, now it’s your turn! I genuinely hope you feel inspired to head into your kitchen and give this incredible recipe a try. Trust me, the aroma alone will be enough to get your mouth watering, and that first bite? Pure bliss. When you do make it, please don’t keep the deliciousness to yourself! I would absolutely love to hear about your experience. Snap a photo, share your serving suggestions, or tell me about any creative variations you came up with in the comments below. Your feedback and culinary adventures make this shared passion for food all the more rewarding. Happy cooking, everyone!
Crispy Baked Hot Honey Chicken
Crispy Baked Hot Honey Chicken is a revelation, promising to transform your dinner routine into an exciting culinary adventure. Imagine biting into chicken that boasts a gloriously golden, audibly crispy skin, yielding to incredibly tender and juicy meat, all enveloped in a sticky, sweet-and-spicy glaze that’s utterly irresistible. I’m thrilled to share a recipe that perfectly encapsulates this dream.
Ingredients
Instructions
Important Information
Nutrition Facts (Per Serving)
It is important to consider this information as approximate and not to use it as definitive health advice.
Allergy Information
Please check ingredients for potential allergens and consult a health professional if in doubt.

Leave a Comment