
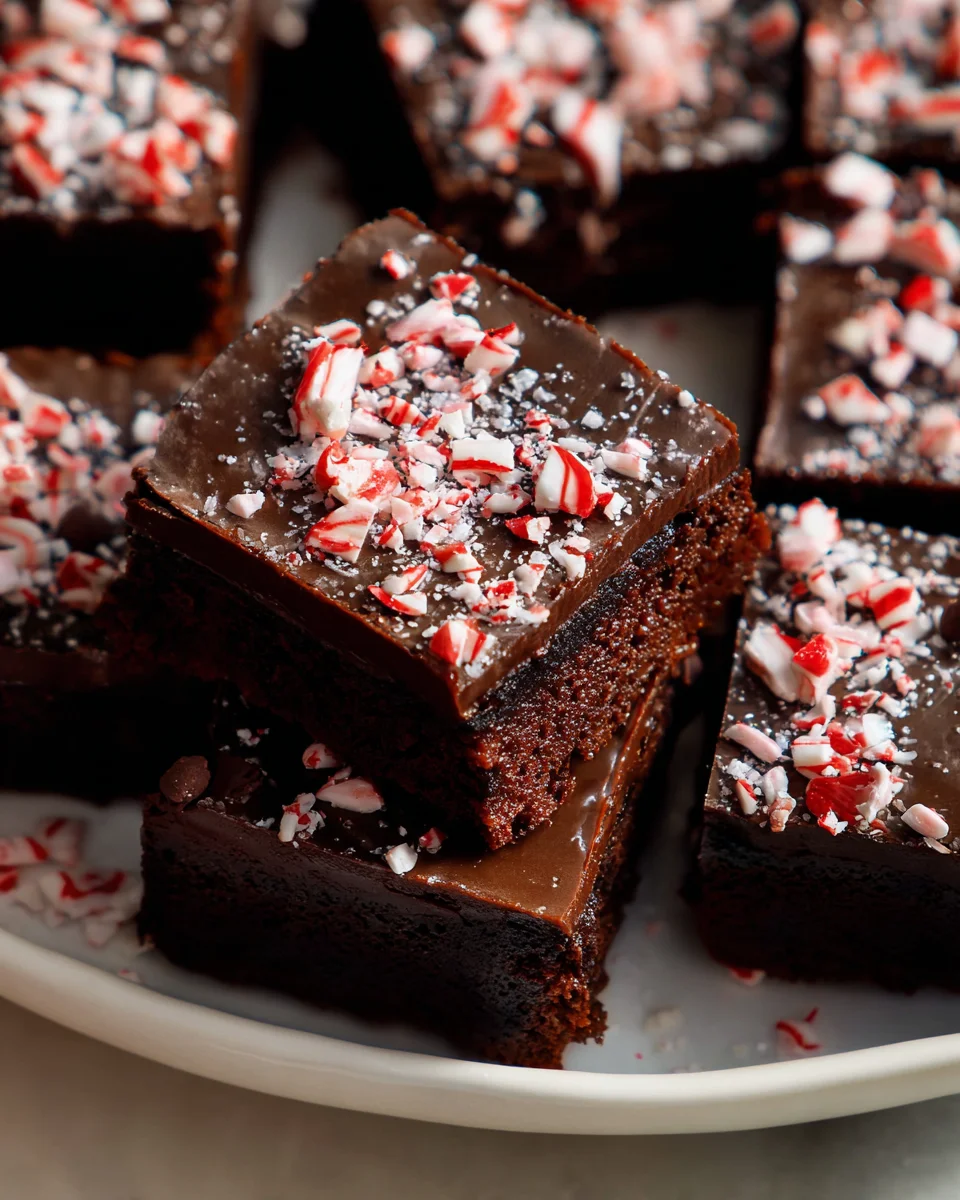
Peppermint Brownies are, in my humble opinion, the quintessential treat that effortlessly marries the luxurious depth of chocolate with the invigorating zest of mint. Seriously, imagine sinking your teeth into a square so incredibly fudgy it practically melts, followed by that unmistakable, cooling burst of peppermint. It’s a flavor combination that simply screams ‘special occasion’ and brings a festive cheer unlike any other dessert. While the beloved brownie itself boasts a fascinating American heritage dating back to the late 19th century, the magical inclusion of peppermint has transformed it into a cherished seasonal classic, especially prominent during the winter holidays. We all love these brownies not just for their irresistibly decadent taste and wonderfully chewy-fudgy texture, but also for how they achieve such a perfect harmony between rich cocoa and bright, refreshing mint. These Peppermint Brownies are truly a testament to culinary balance, guaranteeing smiles all around.

Ingredients:
For the Rich Brownie Base:
- 1 cup (2 sticks or 226g) unsalted butter, cut into 1-inch pieces. Using unsalted butter allows you to control the salt content in your baking, and two sticks ensure a wonderfully rich and moist brownie texture that’s essential for our Peppermint Brownies.
- 1 cup (170g) good quality dark chocolate chips or chopped dark chocolate (around 60-70% cacao). This will be melted into the base. The quality of your chocolate truly makes a difference in the depth of flavor of these Peppermint Brownies.
- 1 3/4 cups (350g) granulated sugar. Provides the perfect balance of sweetness and contributes to the fudgy consistency.
- 4 large eggs, at room temperature. Room temperature eggs emulsify better with the other ingredients, leading to a smoother batter and a better final texture for your brownies.
- 1 teaspoon vanilla extract. A classic flavor enhancer that complements chocolate beautifully.
- 1/2 teaspoon peppermint extract. This is absolutely crucial for our Peppermint Brownies! Be sure to use peppermint extract, not spearmint or just “mint,” as peppermint provides that distinct, refreshing flavor we’re looking for.
- 1 cup (120g) all-purpose flour, spooned and leveled. Spooning and leveling ensures you don’t use too much flour, which can lead to dry brownies.
- 3/4 cup (75g) unsweetened cocoa powder. Dutch-processed cocoa powder is highly recommended here, as it provides a darker color and a richer, less bitter chocolate flavor compared to natural cocoa.
- 1/2 teaspoon salt. A small amount of salt enhances all the other flavors, especially the chocolate and peppermint, making our Peppermint Brownies taste even more vibrant.
- Additional 1/2 cup (85g) dark chocolate chips or chopped dark chocolate (optional, for folding into the batter). These will create delicious pockets of melted chocolate within the brownies.
For the Dreamy Peppermint Buttercream Frosting:
- 1/2 cup (1 stick or 113g) unsalted butter, softened to room temperature. Again, unsalted for control, and softened butter creams up perfectly for a light, airy frosting.
- 3 cups (360g) powdered sugar (confectioners’ sugar), sifted. Sifting is key to prevent lumps and achieve a silky-smooth frosting.
- 1/4 cup (60ml) heavy cream or milk, plus more if needed. Adds richness and helps achieve the desired consistency. Heavy cream will give a richer frosting.
- 1 teaspoon vanilla extract.
- 1/2 to 1 teaspoon peppermint extract, to taste. Start with 1/2 teaspoon and add more slowly, tasting as you go. Peppermint can be quite potent!
- Pinch of salt. Balances the sweetness.
- Red or pink gel food coloring (optional, for festive color). Gel coloring is preferred as it doesn’t thin out the frosting like liquid coloring can.
For the Silky Chocolate Glaze:
- 1/2 cup (85g) good quality dark chocolate chips or chopped dark chocolate. This will form the top layer, so quality matters.
- 2 tablespoons (28g) unsalted butter. Adds richness and a beautiful sheen to the glaze.
- 1 tablespoon light corn syrup (optional, but highly recommended for shine and texture). This secret ingredient gives the glaze a professional, glossy finish and prevents it from cracking when you cut the brownies.
- 1/4 teaspoon vanilla extract.
For Garnish:
- 1/2 cup crushed candy canes (approximately 4-5 regular-sized candy canes). The ultimate festive touch, providing a delightful crunch and an extra burst of peppermint flavor to complete your Peppermint Brownies.
Instructions:
1. Preparing the Rich Brownie Base
- Preheat and Prepare Your Pan with Precision: The very first step to baking outstanding Peppermint Brownies is to properly prepare your baking environment. Preheat your oven to 350°F (175°C). This ensures the oven is at the correct, consistent temperature when your brownies go in, promoting even baking. Next, line a standard 9×13 inch baking pan with parchment paper. It’s really helpful to leave an overhang of parchment paper on the two longer sides of the pan. These overhangs will serve as convenient “handles,” allowing you to effortlessly lift the entire slab of cooled brownies out of the pan later on, which is a game-changer for clean cutting and serving. After lining, lightly grease the parchment paper with cooking spray or a thin layer of butter. While parchment paper is generally non-stick, this extra step provides a crucial layer of insurance against any sticking, especially with a rich, fudgy batter like our Peppermint Brownies.
- Master the Melt for Optimal Texture: For that signature fudgy texture in our Peppermint Brownies, the way we melt the chocolate and butter is important. In a large, microwave-safe bowl, combine 1 cup of the dark chocolate chips (or chopped dark chocolate) and 1 cup (2 sticks) of unsalted butter, cut into 1-inch pieces. If using the microwave, heat this mixture in controlled 30-second intervals. After each interval, stir the mixture thoroughly with a rubber spatula or whisk. Continue this process until the mixture is entirely melted and beautifully smooth, devoid of any lumps. It’s paramount not to overheat or scorch the chocolate, as this can lead to a grainy texture and a burnt taste. Alternatively, you can use the double boiler method: place the heatproof bowl over a saucepan of simmering water, ensuring the bottom of the bowl does not touch the water. Stir constantly until smooth. Once melted, remove the bowl from the heat and set it aside to cool slightly for about 5-10 minutes. This cooling period is important because pouring hot chocolate into the egg mixture could inadvertently cook the eggs.
- Craft the Silken Wet Mixture: In a separate, generously sized mixing bowl, whisk together the granulated sugar, the four large eggs (which should be at room temperature for optimal emulsification), 1 teaspoon of vanilla extract, and the pivotal 1/2 teaspoon of peppermint extract. Whisk vigorously until the mixture is well combined, appears a pale yellow, and is slightly frothy on top. The room temperature eggs are essential here as they incorporate more smoothly and create a more uniform batter. The peppermint extract, naturally, is what infuses these brownies with their signature holiday zest, so ensure it’s measured accurately to give our Peppermint Brownies their distinctive flavor profile.
- Gently Combine Chocolate and Egg Mixtures: Now, carefully pour the slightly cooled chocolate-butter mixture from Step 2 into the egg-sugar mixture prepared in Step 3. Using a whisk, gently combine the two mixtures until they are completely uniform and beautifully integrated. Be mindful not to overmix at this stage; your goal is simply to combine them until no visible streaks of egg or sugar remain. The resulting mixture should be thick, luxuriously glossy, and possess an incredibly rich aroma, hinting at the decadent Peppermint Brownies to come.
- The Art of Sifting Dry Ingredients: In a medium-sized bowl, whisk together the 1 cup of all-purpose flour, 3/4 cup of unsweetened cocoa powder (preferably Dutch-processed for that deep, rich color and flavor), and 1/2 teaspoon of salt. While optional, sifting these dry ingredients before adding them to the wet mixture is a highly recommended step. Sifting effectively removes any small lumps from the flour and cocoa powder, guaranteeing a smooth and consistent brownie batter. Furthermore, it helps to aerate the dry ingredients, which can contribute to a slightly more tender crumb in your fudgy Peppermint Brownies, while still maintaining their desired density.
- Fold with Finesse to Preserve Fudginess: This step requires a delicate touch. Gradually add the whisked dry ingredient mixture into the wet chocolate mixture. Using a sturdy rubber spatula, gently fold the dry into the wet until they are just combined. The key here is absolutely not to overmix! Overmixing develops the gluten in the flour, which can lead to tough, chewy, or cakey brownies – the opposite of the moist, fudgy Peppermint Brownies we are striving for. Stop folding as soon as you no longer see any visible dry streaks of flour. A few small, barely visible lumps are perfectly acceptable and often preferable to an overmixed batter.
- Enhance with Extra Chocolate (Highly Recommended): For an additional layer of chocolate bliss in your Peppermint Brownies, gently fold in the optional extra 1/2 cup of dark chocolate chips or chopped dark chocolate into the prepared batter. These delightful morsels will melt beautifully during baking, creating gooey pockets of intense chocolate flavor and adding wonderful textural contrast throughout your brownies. This simple addition elevates the overall decadence of the Peppermint Brownies.
- Bake to Perfection (But Don’t Overdo It!): Carefully pour the rich, luscious brownie batter into your prepared 9×13 inch baking pan. Use your rubber spatula to spread the batter evenly across the bottom of the pan, ensuring a consistent thickness. Bake for approximately 25-30 minutes. The ideal doneness for fudgy brownies is when a toothpick inserted into the center comes out with moist crumbs attached, but without any wet, raw batter. It is absolutely critical not to overbake these Peppermint Brownies. Overbaking is the primary culprit behind dry, cakey brownies. The edges should appear set, while the very center might still look just a tiny bit gooey or appear slightly undercooked. Remember, brownies continue to cook slightly from residual heat after being removed from the oven. Since every oven calibrates differently, keep a close eye on them during the final few minutes.
- Embrace the Chill: Once baked, remove the pan of Peppermint Brownies from the oven and transfer it directly to a wire rack. This allows air to circulate around the pan, facilitating even cooling. Now comes the most challenging part of the entire recipe: patience! The brownies must cool down completely to room temperature before you even consider applying the frosting. If you attempt to frost warm brownies, your beautifully crafted peppermint buttercream will melt into a messy puddle, ruining your hard work. This cooling process typically takes anywhere from 1.5 to 2 hours, or even longer if your kitchen is particularly warm. For the best, firm base for your frosting and glaze, once the brownies have reached room temperature, you can even pop them into the refrigerator for an additional 30-60 minutes. This will firm them up wonderfully, making them perfectly ready for the next delicious layers.
2. Crafting the Dreamy Peppermint Buttercream Frosting
- Aerate the Butter for Fluffiness: In the bowl of a stand mixer fitted with the paddle attachment, or using a sturdy hand mixer, place the 1/2 cup (1 stick) of softened unsalted butter. Beat the butter on medium speed for a good 2-3 minutes. You’ll notice a significant transformation: the butter will become incredibly light, airy, and noticeably pale in color. This process of creaming the butter incorporates air, which is fundamental for achieving a light, fluffy, and smooth buttercream frosting that will melt in your mouth and perfectly complement the richness of our Peppermint Brownies. Ensure your butter is truly at room temperature – it should be pliable enough to leave an indentation when gently pressed but not so soft that it’s oily or melted.
- Gradual Sugar Incorporation for Smoothness: With the mixer set to its lowest speed, begin gradually adding the 3 cups of sifted powdered sugar. Add it one cup at a time, allowing each addition to be fully incorporated before adding the next. This gentle approach prevents a “sugar explosion” in your kitchen, keeping your workspace clean. Once all the sugar has been incorporated and the mixture starts to look like a crumbly paste, increase the mixer speed to medium-high. Beat for an additional 2-3 minutes, making sure to stop periodically to scrape down the sides of the bowl with your spatula. This ensures all ingredients are thoroughly mixed and prevents any dry pockets of sugar from forming.
- Infuse Flavor and Achieve Velvety Texture: Reduce the mixer speed back to low. Now, add the 1/4 cup of heavy cream (or milk), 1 teaspoon of vanilla extract, the essential peppermint extract, and a pinch of salt. When adding the peppermint extract, it’s wise to start with 1/2 teaspoon. Peppermint flavor can be quite assertive, so it’s always better to begin conservatively and then taste the frosting before deciding if you’d like to add the remaining 1/2 teaspoon. Once these liquids are added, increase the mixer speed to medium-high and continue to beat the frosting for another 3-5 minutes. This extended beating time is absolutely vital for developing an incredibly light, impossibly fluffy, and exquisitely smooth buttercream. It creates a frosting with an almost whipped consistency that perfectly balances the dense Peppermint Brownies.
- Optional Festive Color for Visual Appeal: If you’re aiming for that quintessential holiday look for your Peppermint Brownies, now is the perfect moment to introduce a few drops of red or pink gel food coloring into the buttercream. Gel food coloring is highly recommended over liquid varieties because it delivers vibrant color without adding excess moisture, which could thin out your perfectly whipped frosting. Mix on low speed until the color is evenly and beautifully distributed throughout the buttercream, creating a visually stunning layer for your Peppermint Brownies.
- Frost with Care and Chill to Set: With your Peppermint Brownies completely cooled and firm, it’s time for the delightful layer of peppermint buttercream. Using an offset spatula or the back of a sturdy spoon, carefully spread the peppermint buttercream frosting evenly over the entire surface of the cooled brownies. Strive for a consistent layer across the whole pan for a professional and appealing presentation. You can even create subtle swirls or gentle peaks with your spatula for an artistic touch. Once frosted, place the pan of Peppermint Brownies back into the refrigerator for at least 30 minutes. This chilling period is crucial as it allows the buttercream frosting to set and firm up, making the subsequent application of the chocolate glaze much easier and ensuring clean, defined layers.
3. Preparing the Silky Chocolate Glaze
- Melt Glaze Ingredients for Smoothness: To prepare the glorious top layer for our Peppermint Brownies, combine the 1/2 cup of dark chocolate chips (or chopped chocolate) and 2 tablespoons of unsalted butter in a small microwave-safe bowl. Heat this mixture in short 20-second intervals in the microwave, stirring thoroughly after each interval. Continue this process until the mixture is completely melted, smooth, and homogenous. Be vigilant to avoid overheating, which can cause the chocolate to seize or burn. As an alternative, you can melt these ingredients in a small saucepan over very low heat, stirring constantly until completely smooth.
- Enhance with Flavor and Shine: Once the chocolate and butter are fully melted and combined, remove the bowl from the heat. Stir in the 1 tablespoon of light corn syrup (if you are using it) and the 1/4 teaspoon of vanilla extract. The light corn syrup, while optional, is truly a magical ingredient here; it imparts an incredible, professional-looking glossy sheen to your chocolate glaze and significantly helps prevent the glaze from cracking when you later cut into your Peppermint Brownies. Stir everything together until all ingredients are perfectly well combined, and the glaze appears smooth and uniform. Allow the glaze to cool for approximately 5-10 minutes, stirring occasionally. You want it to be slightly warm, just pourable, but not hot, as a very hot glaze could melt the peppermint buttercream below.
- Apply the Glaze with Swiftness: With your Peppermint Brownies chilling nicely and the buttercream firm, it’s time for the final chocolate layer. Carefully pour the slightly cooled chocolate glaze over the chilled, frosted Peppermint Brownies. Working with a degree of swiftness, use an offset spatula or the back of a spoon to gently spread the glaze evenly across the entire surface of the peppermint frosting. Aim for a smooth, consistent layer that covers all the visible buttercream.
4. Assembling and Finishing Your Peppermint Brownies
- Adorn with Crushed Candy Canes: This is where the magic happens for our festive Peppermint Brownies! Immediately after you have applied the chocolate glaze, and before it has a chance to set or firm up, generously sprinkle the crushed candy canes over the entire surface. The slightly wet and tacky glaze will act as the perfect adhesive, ensuring that the bright red and white candy cane pieces adhere beautifully. This creates a stunning visual contrast, adding a delightful crunch and a vibrant burst of peppermint flavor that unmistakably defines these seasonal Peppermint Brownies. Don’t be shy with the candy canes; more is often merrier for this treat!
- Chill for Perfect Setting: Return the pan of your almost-finished Peppermint Brownies to the refrigerator for at least 1 hour, or ideally until the chocolate glaze is completely set and firm to the touch. This step is absolutely critical for achieving clean, precise cuts and to ensure that all the magnificent layers—brownie, peppermint frosting, and chocolate glaze—hold together perfectly without sliding or smudging. If you attempt to cut the brownies too soon, the glaze might drag, the candy canes could fall off, and the layers could become a gooey mess. Patience here will be greatly rewarded with beautifully structured squares.
- Slice and Serve with Precision: Once your Peppermint Brownies are fully chilled and impeccably set, use the parchment paper overhangs (those convenient “handles” we created at the beginning!) to carefully lift the entire slab of brownies out of the pan and transfer it onto a sturdy cutting board. For the cleanest, most professional-looking slices, employ a large, very sharp knife. Here’s a pro tip: wipe the blade clean with a hot, damp cloth between each cut. This prevents chocolate residue from smudging subsequent slices, resulting in crisp, defined edges for every piece of your gorgeous Peppermint Brownies. Cut them into your desired squares or rectangles. For an extra touch of elegance or if you’re serving a crowd, consider cutting them into smaller, bite-sized pieces perfect for a holiday party platter.
- Storage and Enjoyment Tips: To keep your delicious Peppermint Brownies fresh and flavorful, store any leftovers in an airtight container. They will maintain their quality at room temperature for up to 3 days, or you can extend their shelf life by storing them in the refrigerator for up to a week. If you choose to refrigerate them, for the absolute best texture and flavor experience, allow them to come to room temperature for about 15-20 minutes before serving. This softens the brownie base and frosting to their optimal consistency. Furthermore, these delightful Peppermint Brownies freeze exceptionally well! You can wrap them individually or as a whole slab in plastic wrap, then aluminum foil, and store them in the freezer for up to 3 months. When you’re ready to enjoy them again, simply thaw them overnight in the refrigerator before indulging. They are truly a perfect make-ahead holiday treat!
Conclusion:
Well, my friends, we’ve reached the sweet finale of our journey, and I genuinely hope you’re feeling inspired to roll up your sleeves and dive into this delightful recipe. If there’s one thing I want you to take away from this, it’s that these brownies are more than just a dessert; they are an experience, a moment of pure, unadulterated joy that you can create right in your own kitchen. I truly believe this recipe is a must-try for anyone who appreciates the harmonious marriage of rich, fudgy chocolate and the cool, invigorating kiss of peppermint. From the very first tantalizing aroma that fills your home as they bake, to the incredible satisfaction of that first bite – a perfect balance of chewy edges and a melt-in-your-mouth center – these brownies simply deliver on every single level. They possess an almost magical quality, effortlessly transforming a regular afternoon into something special, or elevating any festive gathering into an unforgettable celebration. The ease with which such an impressive treat comes together is genuinely astounding, making it accessible even for novice bakers, while still offering the kind of profound flavor that seasoned dessert connoisseurs will rave about. You simply can’t go wrong with the classic appeal and comforting sophistication of these Peppermint Brownies. They are truly a testament to how simple ingredients, when combined with a little love and the right technique, can yield extraordinary results that bring smiles and warmth to everyone around the table.
Serving Suggestions and Creative Twists
Now, once you’ve pulled your glorious batch from the oven and allowed them to cool just enough to handle, the fun doesn’t have to stop there! While these brownies are absolutely divine on their own, especially when still slightly warm, I’m a firm believer in exploring all the delicious possibilities. For a truly decadent experience, try serving a warm brownie square with a generous scoop of vanilla bean ice cream. The cold, creamy ice cream melting into the warm, fudgy brownie creates a textural and temperature contrast that is out of this world. You could also opt for a scoop of mint chip ice cream to double down on the peppermint punch – pure bliss! Another fantastic option is to pair them with a dollop of freshly whipped cream, perhaps with a sprinkle of crushed candy canes on top for an extra festive touch and a satisfying crunch. Imagine a chilly evening, curled up with a rich mug of hot cocoa or a robust cup of coffee, and a perfectly portioned square of this fudgy goodness. It’s the kind of simple pleasure that truly nourishes the soul.
And don’t be afraid to get creative with variations! If you’re feeling adventurous, consider adding a handful of white chocolate chips to the batter before baking for an extra layer of sweetness and a different textural dimension. For an even more intense minty kick, you could swirl a tiny bit of extra peppermint extract into your frosting, or even tint a portion of the frosting a light green for a visually striking holiday treat. Another fun idea is to turn these into brownie bites by baking them in a mini muffin tin; they make for perfect bite-sized treats for parties or lunchboxes. You could even drizzle them with a contrasting chocolate ganache – perhaps white chocolate – for an elegant presentation. Remember, recipes are a starting point, a canvas for your culinary creativity. Feel free to adapt and personalize them to suit your taste and occasion.
Your Baking Adventure Awaits!
So, what are you waiting for? I sincerely encourage you to clear some space in your schedule, gather your ingredients, and embark on this incredibly rewarding baking adventure. There’s an immense sense of satisfaction that comes from creating something so delicious from scratch, and even more joy in sharing it with loved ones. Imagine the look on their faces when they bite into these moist, minty, chocolatey delights! Don’t just read about it; experience it for yourself. And please, when you do give this recipe a try, I would absolutely love to hear from you. Share your experiences, your triumphs, and any clever variations you come up with. Did you serve them warm with ice cream? Did you add extra sprinkles? Tag me in your photos, drop a comment, or simply tell me how much you and your family enjoyed them. Your feedback and creativity inspire me, and I can’t wait to see the delicious magic you conjure in your own kitchen. Happy baking, my dear friends – may your homes be filled with the sweet aroma of freshly baked brownies!
Peppermint Brownies
Peppermint Brownies effortlessly marry the luxurious depth of chocolate with the invigorating zest of mint, creating a fudgy, melt-in-your-mouth treat with a cooling burst of peppermint. A cherished seasonal classic, perfect for special occasions.
Ingredients
Instructions
Important Information
Nutrition Facts (Per Serving)
It is important to consider this information as approximate and not to use it as definitive health advice.
Allergy Information
Please check ingredients for potential allergens and consult a health professional if in doubt.

Leave a Comment