
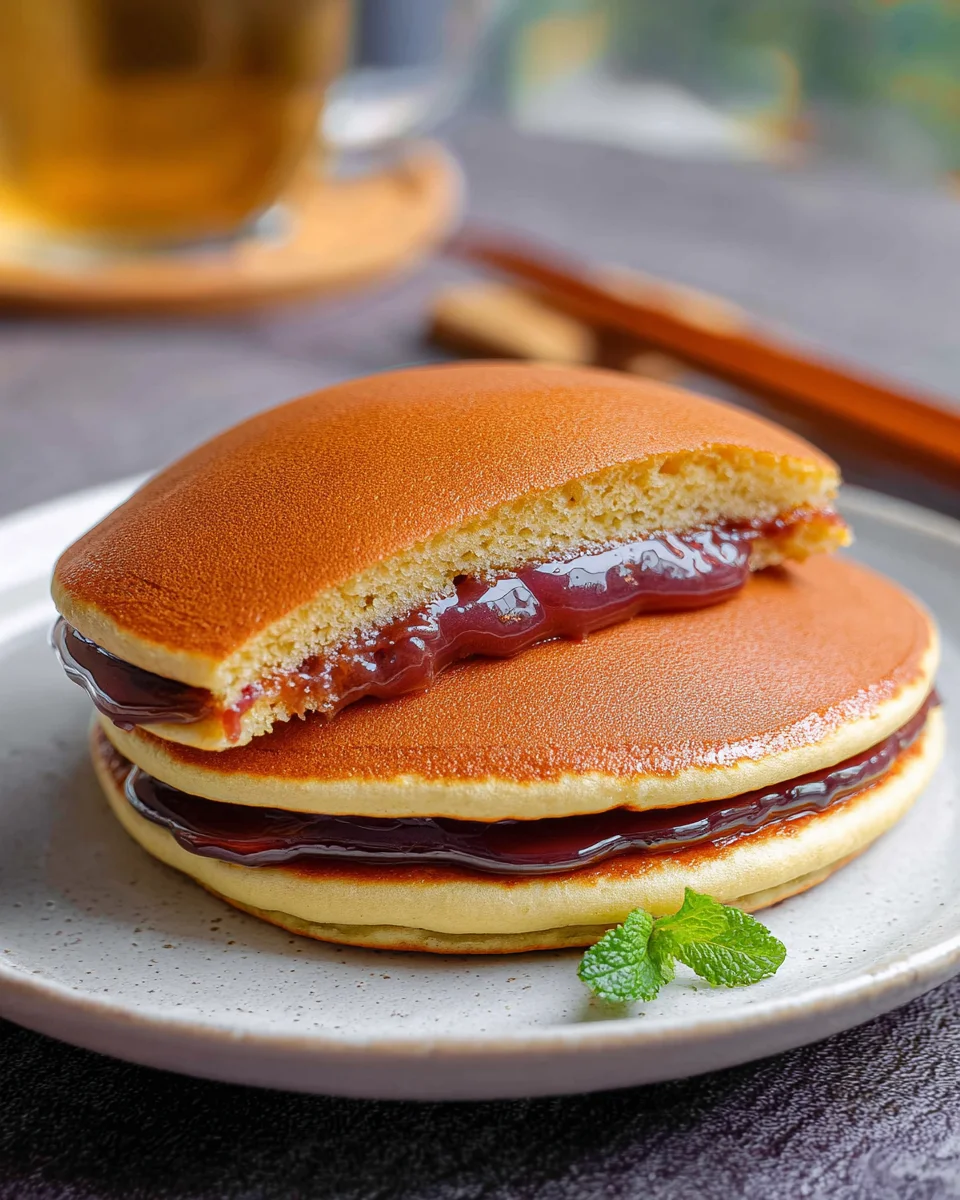
The Dorayaki Recipe is your ticket to creating one of Japan’s most beloved and iconic desserts right in your own kitchen. Imagine two perfectly golden, fluffy pancake-like patties, gently embracing a luscious filling of sweet red bean paste. This simple yet utterly delightful confection has captured hearts worldwide, and I’m thrilled to guide you through its creation. There’s a profound joy in replicating such an authentic taste at home, transforming humble ingredients into something truly special.
Tracing its charming origins, Dorayaki hails from Japan, where it’s been a cherished snack for centuries. The name “Dora” actually means “gong” in Japanese, perhaps referring to its shape, and it gained even more widespread fame as the favorite treat of the popular anime character, Doraemon. It’s more than just a sweet; it’s a taste of Japanese culinary tradition that bridges generations, often shared during tea ceremonies or as a comforting everyday snack.
People adore Dorayaki not just for its nostalgic charm but for its exquisite balance of flavors and textures. The delicate sweetness of the adzuki bean paste perfectly complements the subtly sweet and moist pancake exterior. It’s a comforting, satisfying treat that’s surprisingly easy to master once you have the right Dorayaki Recipe. Whether served with a cup of green tea or as a delightful snack any time of day, its soft, airy texture and profound taste make it an irresistible choice for both young and old.

Ingredients:
- For the Dorayaki Pancakes:
- 2 large eggs (preferably at room temperature, as this helps incorporate air more easily)
- 120g granulated sugar (about 1/2 cup + 2 tablespoons, for sweetness and structure)
- 2 tablespoons honey (liquid honey works best, adding a lovely moist texture and depth of flavor that is characteristic of a good Dorayaki)
- 1 tablespoon mirin (Japanese sweet rice wine; optional, but highly recommended for an authentic subtle savory note and to help achieve that perfect golden-brown color. If you don’t have mirin, a very small splash of sake or even just an extra teaspoon of water can substitute, though the flavor will be slightly different)
- 120g all-purpose flour (about 1 cup, sifted to ensure a smooth, lump-free batter)
- 1 teaspoon baking soda (the leavening agent responsible for those delightful fluffy pancakes)
- 2-4 tablespoons water or milk (use as needed to adjust batter consistency, starting with 2 tablespoons and adding more if the batter feels too thick)
- A tiny bit of neutral oil (like vegetable or canola oil) for greasing the pan, used very sparingly.
- For the Filling:
- About 300g (approximately 1.5 cups) Anko (sweet red bean paste). You can use either smooth (koshian) or chunky (tsubuan) based on your preference. High-quality store-bought Anko is perfectly fine and convenient for this Dorayaki Recipe, or you can make your own if you’re feeling ambitious!
Gathering Your Tools and Ingredients
Before we dive into creating these delightful Japanese pancakes, it’s incredibly helpful to have all your ingredients measured out and your tools ready. This mise en place approach makes the entire process smoother and more enjoyable. You’ll want a large mixing bowl for the batter, a whisk (either a balloon whisk or an electric hand mixer will do wonderfully), a fine-mesh sieve for sifting the flour, a non-stick frying pan or griddle, a ladle for portioning the batter, a flexible spatula for flipping, and a wire rack for cooling your beautiful pancakes. Having everything within reach minimizes stress and ensures you can focus on the delicate steps of this Dorayaki Recipe.
Crafting the Perfect Dorayaki Batter
-
Whisk Eggs and Sugar: In your large mixing bowl, crack the two large eggs. Add the granulated sugar. Begin whisking them together vigorously. If you’re using an electric hand mixer, start on a medium speed. Your goal here is to incorporate a good amount of air into the mixture. You’ll want to whisk until the mixture becomes pale yellow, thick, and almost ribbon-like when you lift the whisk. This process could take anywhere from 3 to 5 minutes with an electric mixer, or a bit longer if you’re doing it by hand. This aeration is crucial for light and fluffy Dorayaki pancakes.
-
Incorporate Wet Flavors: Once your egg and sugar mixture is beautifully airy, gently whisk in the honey and mirin. The honey adds a distinctive sweetness and helps keep the pancakes moist, while the mirin contributes a subtle, almost malty depth of flavor that is truly characteristic of an authentic Dorayaki. Mix until these are fully combined, ensuring the honey is completely dissolved into the mixture.
-
Sift Dry Ingredients: Now it’s time for the dry ingredients. Place a fine-mesh sieve over your bowl and add the all-purpose flour and baking soda into the sieve. Sift them directly into the wet mixture. Sifting is a non-negotiable step for a smooth batter; it removes any lumps from the flour and evenly distributes the baking soda, which prevents pockets of leavening agent in your finished pancake.
-
Gently Fold the Batter: After sifting, use your whisk or a rubber spatula to gently fold the dry ingredients into the wet mixture. Be very careful not to overmix! Overmixing develops the gluten in the flour, which can lead to tough, chewy pancakes instead of the tender, melt-in-your-mouth texture we’re aiming for. Fold just until no streaks of dry flour remain. A few small lumps are actually perfectly fine and will usually dissolve during the resting period. The batter will be quite thick at this stage.
-
Adjust Consistency and Rest: Now, add 2 tablespoons of water or milk to the batter and stir gently to combine. Assess the consistency. The batter should be thick but pourable, similar to a traditional pancake batter but perhaps a touch thicker. If it feels too stiff or heavy, add the remaining 1-2 tablespoons of water or milk, one tablespoon at a time, until you reach that ideal smooth, flowing consistency. Once satisfied, cover the bowl with plastic wrap and let the batter rest at room temperature for at least 30 minutes, or even up to an hour. This resting period is incredibly important as it allows the gluten to relax, the flour to fully hydrate, and the baking soda to start its magic, resulting in a more tender and evenly textured Dorayaki. You’ll notice small bubbles forming on the surface as it rests, which is a good sign!
Mastering the Dorayaki Pancake Cooking
-
Preheat Your Pan: Heat a non-stick frying pan or griddle over medium-low heat. The key to perfect Dorayaki is consistent, moderate heat. If your pan is too hot, the pancakes will burn before they cook through and develop a beautiful, even golden-brown color. If it’s too cool, they might spread too much and not brown properly. Finding the right temperature is arguably the most critical step in this Dorayaki Recipe.
-
Lightly Grease (or Not): For the most beautiful, evenly colored Dorayaki, many Japanese chefs recommend cooking on a completely dry non-stick pan. However, if you’re new to this, a very, very light greasing can prevent sticking. The trick is to apply a tiny amount of neutral oil (using a paper towel to wipe the pan clean after applying, leaving only an invisible film) before cooking your first pancake. Then, for subsequent pancakes, you usually won’t need to re-oil. Test with your pan to see what works best.
-
Portion the Batter: Using a ladle, pour about 2-3 tablespoons of batter onto the hot pan, allowing it to spread naturally into a circle about 3-4 inches (7-10 cm) in diameter. Try to pour from a consistent height to help create uniform, perfectly round pancakes. Don’t crowd the pan; cook 1-3 pancakes at a time, depending on your pan’s size, ensuring there’s enough space between them for easy flipping. Remember, consistency in size is important since we’ll be making sandwiches!
-
Observe the Bubbles: Cook the first side for about 2-3 minutes. You’ll know it’s ready to flip when bubbles start to appear on the surface of the pancake and burst, and the edges look set and slightly dry. The bottom should be a beautiful, uniform golden-brown. Resist the urge to peek or move the pancake too early! Let those bubbles do their work.
-
The Flip: With a quick, confident motion, slide your flexible spatula under the pancake and flip it over. You’re aiming for one decisive flip to avoid disturbing the structure of the pancake. Cook the second side for a shorter duration, usually about 1-1.5 minutes, until it’s also golden-brown and cooked through. This second side often doesn’t brown as deeply as the first, which is perfectly normal.
-
Cooling Process: Once cooked, transfer the Dorayaki pancakes to a wire rack to cool completely. For best results and to keep them super soft and pliable, cover the cooling pancakes with a slightly damp, clean kitchen towel. This prevents them from drying out and maintains their characteristic moist texture, making them easier to handle for assembly. Continue cooking the remaining batter, adjusting the heat as necessary to maintain that perfect golden hue.
Assembling Your Delicious Dorayaki
-
Pair the Pancakes: Once all your pancakes are cooled, lay them out and try to find similarly sized pairs. This makes for a neater, more aesthetically pleasing Dorayaki sandwich. Since they’re handmade, they might not all be exactly the same size, and that’s part of their charm!
-
Prepare the Anko: Take your sweet red bean paste (Anko). If it’s very thick, you might want to gently warm it slightly in a microwave or small pot to make it more spreadable, but be careful not to make it too runny. This step is usually optional for store-bought Anko, which typically has a good consistency straight from the package.
-
Spread the Filling: Take one Dorayaki pancake (this will be the bottom). Spoon a generous amount of Anko onto the center of the pancake. Generally, about 1 to 2 tablespoons per pancake is a good starting point, but you can adjust based on your preference for filling. Use the back of the spoon to gently spread the Anko evenly, leaving a small border (about 1/2 inch or 1 cm) around the edge of the pancake. This prevents the filling from squeezing out when you press the top on.
-
Form the Sandwich: Place a second, similarly sized Dorayaki pancake on top of the Anko-covered pancake. Gently press down on the top pancake, particularly around the edges, to lightly seal the two pancakes together and evenly distribute the Anko. You want a gentle press, not a squish, to avoid forcing the filling out. The natural stickiness of the pancakes, especially when covered and allowed to cool properly, helps them adhere to the Anko and to each other.
-
Repeat and Serve: Continue this process with the remaining pancakes and Anko until you have a stack of beautifully assembled Dorayaki. You can enjoy your homemade Dorayaki immediately, or wrap them individually for later enjoyment. These are truly a delightful treat, perfect with a cup of green tea or coffee.
Tips for Dorayaki Perfection and Storage
Achieving the Signature Even Brown Color:
Many people struggle to get that perfect, uniform golden-brown surface on their Dorayaki pancakes. A major secret is to very lightly grease your non-stick pan, then immediately wipe it almost completely clean with a paper towel. This leaves just enough residue to prevent sticking without creating uneven oil spots that can mar the color. Also, consistent low to medium-low heat is paramount. If your pan is too hot, the sugar in the batter will caramelize too quickly, resulting in dark spots. Consider using a heat diffuser if your stove runs hot, or practice with a few test pancakes to find your stove’s sweet spot. This patience and attention to detail will greatly enhance your Dorayaki Recipe results.
Preventing Sticking Without Excess Oil:
While a “dry” pan is ideal for color, a sticky situation is not. If you find your Dorayaki sticking, even slightly, a very thin wipe of oil, followed by a thorough wipe with a clean paper towel to remove almost all visible oil, should do the trick. You want the pan to be seasoned, not oily. For subsequent pancakes, you usually won’t need to re-oil, as a thin, invisible layer builds up over time. If you do re-oil, always wipe it down thoroughly. This meticulous pan preparation is vital for a successful Dorayaki Recipe.
Don’t Rush the Rest:
I cannot stress enough the importance of letting your batter rest. It truly transforms the texture of the finished pancake. The minimum 30 minutes allows the flour to fully hydrate and the gluten to relax, resulting in a much more tender and moist Dorayaki. Skipping this step often leads to tougher, less palatable pancakes. If you have time, an hour is even better! You’ll notice the batter becoming slightly thicker and developing tiny bubbles, which indicates it’s ready for cooking.
Flavor Variations for Your Dorayaki Recipe:
While Anko is the traditional and most beloved filling, don’t hesitate to experiment! You can use various fillings to cater to different tastes or seasonal ingredients. Consider a luscious custard cream, a dollop of whipped cream with fresh fruit slices (like strawberries or kiwi), Nutella, or even a mix of whipped cream and Anko. Matcha cream is another popular and delicious alternative that complements the mild sweetness of the pancakes beautifully. For a truly indulgent treat, some even combine sweet red bean paste with a slice of butter for a unique sweet and salty experience. The versatility of this Dorayaki Recipe makes it a fantastic base for creativity.
Storage for Freshness:
Homemade Dorayaki are best enjoyed the day they are made, when their texture is at its peak softness and freshness. However, they can be stored for a few days if wrapped properly. To keep them fresh, wrap each assembled Dorayaki individually in plastic wrap, ensuring it’s airtight. Then, store them in an airtight container in the refrigerator for up to 2-3 days. Bring them back to room temperature before serving for the best experience. For longer storage, you can freeze wrapped Dorayaki for up to a month. Thaw them overnight in the refrigerator and then bring them to room temperature before enjoying. This ensures you can savor your delicious Dorayaki Recipe creations whenever a craving strikes!
Making Dorayaki from scratch is a rewarding experience, producing a treat far superior to many store-bought versions. The soft, honey-infused pancakes embracing the sweet red bean paste create a harmonious balance of flavors and textures that is truly delightful. Enjoy the process of creating this classic Japanese dessert!
Conclusion:
And there you have it, friends! We’ve journeyed together through the delightful process of crafting these iconic Japanese treats. I truly believe that trying this particular Dorayaki Recipe is an absolute must for anyone who appreciates the simple elegance of Japanese confectionery, or even just a wonderfully satisfying homemade dessert. It’s not merely about combining ingredients; it’s about experiencing the joy of creating something truly special, a little piece of edible art that brings warmth and comfort. The magic of these fluffy, honey-kissed pancakes cradling a generous dollop of sweet, earthy anko (red bean paste) is something words can barely capture – you simply have to taste it to understand. I’ve found that the blend of textures, from the light, airy cake to the creamy, substantial filling, creates a harmony that makes each bite utterly memorable. It’s a recipe that resonates with tradition but is incredibly accessible for the home baker, promising a delightful reward for your efforts.
What makes this specific rendition of dorayaki so compelling, you ask? Well, it’s the meticulous balance we’ve achieved in the batter, resulting in pancakes that are incredibly soft, moist, and boast that signature golden-brown hue and slightly spongy texture. This isn’t just any pancake; it’s a pancake designed for sandwiching, engineered for a tender chew that perfectly complements the smooth red bean paste. Many store-bought versions, while convenient, often miss this delicate balance, either being too dry or too dense. But with this recipe, you’re guaranteed that authentic, melt-in-your-mouth experience that truly sets homemade dorayaki apart. It’s surprisingly straightforward to achieve, and the sheer satisfaction you’ll feel when you bite into your perfectly assembled creation, knowing you made it yourself, is unparalleled. It’s a delightful journey for your taste buds, offering a subtle sweetness that’s never overpowering, making it a treat you can enjoy without feeling heavy.
Now, let’s talk about how to enjoy your freshly made dorayaki! While traditionally served alongside a cup of green tea – and I highly recommend trying it this way for the authentic experience – these versatile treats are perfect with almost any beverage. Imagine sinking your teeth into a soft dorayaki with your morning coffee, or as an afternoon pick-me-up with a glass of cold milk. For a truly decadent dessert, try warming them slightly and serving them with a scoop of premium vanilla or matcha ice cream. The contrast of warm dorayaki against cold, creamy ice cream is simply divine! You could also add a side of fresh berries, like strawberries or raspberries, for a burst of fruity freshness that cuts through the sweetness of the anko beautifully. A light dusting of powdered sugar or a drizzle of honey can also elevate their presentation, making them perfect for entertaining guests or simply treating yourself to something special.
But the fun doesn’t stop with the classic anko filling. This recipe’s beauty lies in its adaptability! Feel free to experiment with different fillings to suit your personal preferences or seasonal availability. How about a creamy Nutella or rich chocolate ganache for the chocolate lovers out there? Or perhaps a delicate custard cream, either plain or infused with a hint of vanilla bean? For a fruity twist, consider sweetening some mashed ripe bananas or using a thick fruit jam – peach or apricot would be wonderful. During autumn, a sweet potato paste (imo-an) makes for a wonderfully seasonal and comforting variation. You could even get creative with the pancake batter itself; a small amount of matcha powder blended into the batter would yield beautiful green dorayaki with a subtle earthy flavor, perfect for pairing with more traditional fillings. Don’t be afraid to make this recipe your own; it’s a fantastic canvas for culinary creativity, ensuring that every batch can be a unique delight.
So, what are you waiting for? I wholeheartedly encourage you to roll up your sleeves, gather your ingredients, and dive into making this wonderful Japanese treat. You’ll be amazed at how simple and rewarding the process is, and the smiles it will bring to your face and the faces of anyone you share them with. This is truly a recipe that delights on multiple levels, offering a taste of tradition with every bite. Once you’ve whipped up your own batch of delicious dorayaki, please don’t keep the joy to yourself! I would absolutely love to hear about your experience. Did you stick to the classic anko, or did you venture into new filling territories? What were your favorite serving suggestions? Share your triumphs, your variations, and your thoughts. Your feedback and creations inspire me, and I can’t wait to see what wonderful dorayaki you’ll bring to life!
Authentic Dorayaki Recipe: Japanese Red Bean Pancakes
A classic Japanese dessert featuring fluffy pancake-like patties filled with sweet red bean paste. This recipe guides you through making authentic Dorayaki at home, known for its exquisite balance of flavors and textures.
Ingredients
Instructions
Important Information
Nutrition Facts (Per Serving)
It is important to consider this information as approximate and not to use it as definitive health advice.
Allergy Information
Please check ingredients for potential allergens and consult a health professional if in doubt.


Leave a Comment