
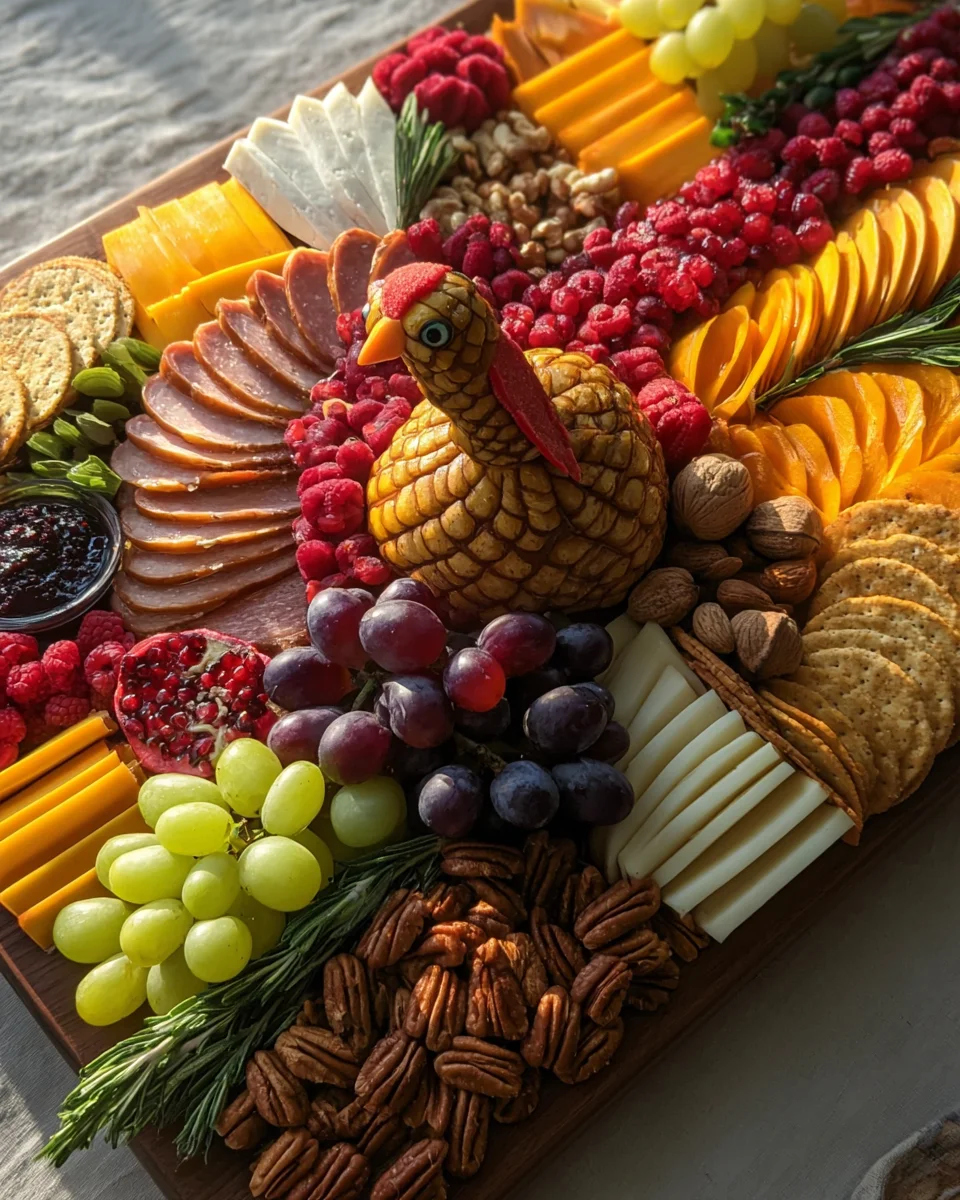
Turkey Shaped Charcuterie Boards are not just a festive centerpiece; they are a brilliant solution for stress-free holiday entertaining that truly dazzles your guests! I remember the first time I saw one – my jaw practically hit the floor at the creativity and visual appeal. While traditional charcuterie, an art form of cured meats, dates back centuries as a method of preserving and presenting food, the modern, artful arrangement of a charcuterie board, especially one whimsically shaped like our beloved Thanksgiving bird, is a contemporary take on communal dining that has quickly become a holiday staple. I find that guests absolutely adore the interactive nature of picking their favorite cheeses, cured meats, fruits, and crackers, making it an engaging start to any festive meal.
This delightful twist on a classic appetizer allows for incredible customization, catering to every palate and dietary preference at your gathering. People love these boards not only for their stunning visual impact, making them an instant conversation starter and photo opportunity, but also for their sheer convenience. Instead of slaving over multiple appetizers, you can assemble an array of delicious bites that are both elegant and incredibly simple to prepare. It truly embodies the spirit of generosity and abundance without the typical holiday cooking fuss. Creating a spectacular Turkey Shaped Charcuterie Board is a fantastic way to impress your loved ones and make your holiday table unforgettable this season.

Ingredients:
- For the “Body” of the Turkey:
- 1 (8-ounce) block of Smoked Gouda cheese, sliced into triangles or squares
- 1 (8-ounce) block of sharp Cheddar cheese, cut into small cubes or stars using a cookie cutter
- 1 (4-ounce) log of herbed goat cheese or Boursin cheese, for spreading or shaping
- For the “Head” and “Snood”:
- 1 mini bell pepper (red or orange), for the snood and beak
- 2 small candy eyes (found in baking sections) or two small black olives for eyes
- 1 small carrot stick or a sliver of yellow bell pepper for the beak
- For the “Feathers” (Meats):
- 4 ounces thinly sliced Prosciutto, folded or rolled
- 4 ounces thinly sliced Salami (Genoa or Calabrese), folded or rolled
- 4 ounces thinly sliced Turkey Breast (deli-style), rolled or stacked
- 4 ounces Pepperoni slices, for layering
- For the “Feathers” (Cheeses):
- 4 ounces Brie cheese, sliced into wedges or small pieces
- 4 ounces Swiss cheese, thinly sliced and folded
- 4 ounces Monterey Jack cheese, cubed
- For the “Feathers” (Fruits & Vegetables for Color and Texture):
- 1 cup red grapes, washed
- 1 cup green grapes, washed
- 1 cup assorted berries (strawberries, raspberries, blueberries), washed and hulled if necessary
- 1 large orange, peeled and segmented or sliced into rounds
- 1 apple (honeycrisp or Granny Smith), thinly sliced (toss with a little lemon juice to prevent browning)
- 1 cup carrot sticks or colorful bell pepper strips (red, yellow, orange)
- 1/2 cup cucumber slices or florets of broccoli/cauliflower
- For the “Feathers” (Crackers & Breads):
- 1 box assorted crackers (e.g., water crackers, whole wheat crackers, rice crackers)
- 1 small baguette, sliced into thin rounds
- 1/2 cup pretzel sticks or breadsticks
- For Filling Gaps & Extra Flavor:
- 1/2 cup mixed nuts (almonds, walnuts, pecans), lightly toasted if desired
- 1/4 cup dried cranberries or dried apricots
- Small bowls of dips:
- 1/2 cup fig jam or apricot preserves
- 1/2 cup honey mustard or Dijon mustard
- 1/2 cup olive tapenade or roasted red pepper dip
- Fresh herbs for garnish (rosemary sprigs, thyme sprigs)
Equipment You’ll Need:
To create a truly spectacular turkey shaped charcuterie board, having the right tools on hand can make all the difference in ease and presentation. You don’t need anything overly fancy, but a few basics will be incredibly helpful:
- Large Serving Board: The bigger, the better! A large, flat cutting board or serving platter (wood, slate, or ceramic) is essential to accommodate the turkey shape and all its “feathers.” Aim for at least 18×24 inches, or even larger if you’re serving a big crowd.
- Sharp Knives: A good chef’s knife and a smaller paring knife are crucial for cleanly slicing cheeses, meats, fruits, and vegetables. Dull knives can make prep work frustrating and less precise.
- Small Bowls or Ramekins: These are perfect for holding dips, nuts, and olives, allowing for easy access without spilling onto the main board. They also add visual interest and height.
- Cheese Slicer or Grater (Optional): If you prefer very thin slices of certain cheeses, a dedicated cheese slicer can be handy. A grater might be useful for some harder cheeses to add texture.
- Cookie Cutters (Optional): Fun shapes like stars, leaves, or even tiny turkey cutters can be used to cut cheese, fruit, or even bread for a more festive touch.
- Parchment Paper or Wax Paper: While not strictly necessary for the board itself, it’s useful for lining your prep area for easy cleanup.
- Small Tongs or Skewers: Useful for arranging delicate items or for guests to serve themselves neatly.
- Vegetable Peeler: For carrots, cucumbers, and creating decorative ribbons from firm vegetables.
- Toothpicks: Sometimes helpful for securing certain elements or making it easier for guests to pick up items.
Phase 1: Preparing Your Base and Components
Creating a stunning Turkey Shaped Charcuterie Boards begins with thoughtful preparation of each individual component. Taking your time in this phase will make the assembly much smoother and more enjoyable. Think of this as laying the groundwork for your masterpiece.
- Wash and Dry All Produce: Start by thoroughly washing all your fruits and vegetables under cool running water. This includes grapes, berries, apples, oranges, carrots, and bell peppers. It’s crucial that everything is completely dry before placing it on the board, especially fruits and crackers, as moisture can make crackers soggy and affect the texture of cheeses. Gently pat everything dry with a clean kitchen towel or paper towels.
- Prepare the Cheeses:
- Smoked Gouda: Slice the block of Smoked Gouda into small, manageable triangles or rectangles. You want pieces that are easy to pick up but still substantial enough to stand out. These will form part of the turkey’s body and some of the feather layers.
- Sharp Cheddar: Cut the sharp Cheddar into small cubes. For an extra festive touch, you can use a small star or leaf-shaped cookie cutter to create fun shapes. This adds visual interest and a delightful surprise for your guests.
- Herbed Goat Cheese/Boursin: If using a log, you can leave it as is for spreading, or gently shape it into a small oval or tear-drop shape to use as the turkey’s body or a prominent feather element. If it’s a spreadable variety, prepare a small ramekin for serving it alongside your board.
- Brie Cheese: Slice the Brie into elegant wedges or small squares. Brie is soft and creamy, so handle it gently to maintain its shape. You might want to let it come to room temperature for about 30 minutes before serving for optimal flavor and texture.
- Swiss Cheese: Thinly slice the Swiss cheese, then fold each slice in half or into quarters. The holes in Swiss cheese add a lovely visual texture to the “feathers.”
- Monterey Jack: Cube the Monterey Jack cheese. Its mild flavor and firm texture make it a versatile addition to the board.
- Arrange the Meats:
- Prosciutto: Take each slice of thinly sliced prosciutto and gently fold or loosely roll it. Prosciutto has a beautiful marbled texture and delicate flavor that looks fantastic when arranged in a wavy fashion.
- Salami (Genoa or Calabrese): Fold the salami slices into quarters or roll them into small cylinders. You can also fan them out slightly if you prefer. The richness of salami will add a hearty element to your turkey’s plumage.
- Turkey Breast: Roll the deli-style turkey breast slices into tight spirals or simply fold them into attractive bundles. This creates a different texture and color amongst the cured meats.
- Pepperoni: These smaller, round slices are perfect for layering or creating small rosettes. They add a vibrant red color and a slightly spicy kick.
- Prepare the Fruits and Vegetables:
- Grapes & Berries: Keep grapes on small stems for easy grabbing or separate them. Arrange berries attractively.
- Orange: Peel and segment the orange, or slice it into thin rounds. The bright citrus color is a wonderful contrast.
- Apple: Thinly slice the apple. To prevent browning, toss the slices lightly in a bowl with a tablespoon of lemon juice. This step is crucial for maintaining the fresh appearance of your fruit.
- Carrots & Bell Peppers: Cut carrots into sticks and bell peppers into thin strips. These add crunch and a rainbow of colors.
- Cucumber: Slice cucumbers into rounds or half-moons.
- Prepare Crackers and Breads:
- Assorted Crackers: Keep an assortment of crackers ready. You can arrange them in stacks or fan them out.
- Baguette: Slice the baguette into thin, diagonal rounds.
- Pretzel Sticks: Have a small pile of pretzel sticks or breadsticks ready. These add a different textural element and are great for dipping.
- Prepare Nuts and Dried Fruits:
- Measure out your mixed nuts and dried cranberries/apricots. These will be used to fill in gaps and add extra flavor and texture.
- Prepare Dips:
- Spoon your fig jam, honey mustard, and olive tapenade into separate small bowls or ramekins. These are vital for adding moisture and variety to your board.
- Establish the Turkey’s Body:
Begin by placing your chosen cheese for the turkey’s body towards the bottom center of your large serving board. I love using the Smoked Gouda slices for this. Arrange them in an oval or pear shape, overlapping slightly to create a solid, substantial base. This central body will be the anchor for all your “feather” elements. Alternatively, you could use the herbed goat cheese log, gently molded, or even stack some of the larger Cheddar cubes.
Pro Tip for the Body:
Make sure the body is large enough to be clearly distinguishable, as it will be partially covered by the “head” and the inner layers of “feathers.” The robust flavor of the Gouda is perfect here, grounding the lighter flavors.
- Create the Turkey’s Head and Facial Features:
Position the small red or orange mini bell pepper just above the body, slightly to one side, to form the turkey’s head. If it doesn’t sit perfectly, a tiny dab of goat cheese on the back can help it adhere. For the snood (the fleshy appendage hanging over a turkey’s beak), carefully cut a thin, wavy strip from another piece of the red bell pepper and tuck it under the “head” so it drapes slightly. Use two small candy eyes or tiny slivers of black olive for the eyes, gently pressing them into the bell pepper. For the beak, insert a small carrot stick or a thin sliver of yellow bell pepper into the front of the “head.” This detailed head assembly is key to truly making your charcuterie board look like a turkey.
- Begin Layering the “Feathers” (Outer Ring):
Start building the outermost layer of your turkey’s tail feathers. I typically begin with crackers and baguette slices here, as they provide a good foundation and definition for the entire shape. Arrange an assortment of crackers – whole wheat, water crackers, and rice crackers – in an arcing semi-circle above and around the turkey’s body, fanning them out like a peacock’s tail. Alternate cracker types for visual interest. Follow this with slices of baguette, slightly overlapping, creating a large, majestic fan.
Strategic Placement for Feathers:
Think about how real turkey feathers overlap and fan out. You want to create a sense of movement and abundance. The key to successful Turkey Shaped Charcuterie Boards is this fanned-out, layered effect.
- Adding the Second Layer of “Feathers” (Meats and Cheeses):
Move inward, creating the next layer of feathers. This is where your meats and some of your more robust cheeses come into play. Take your folded Prosciutto and Salami and arrange them in overlapping rows, following the curve of your cracker layer. Alternate between the different types of meat for color and texture variation. Next to these, place slices of Brie cheese, cut into wedges, and cubes of Monterey Jack. The goal is to fill in the space and create a rich tapestry of flavors and textures. Don’t be afraid to let some pieces overlap the crackers slightly to create a cohesive look.
- Incorporating the Third Layer of “Feathers” (Colorful Fruits & Veggies):
Now, let’s bring in the vibrant colors! This layer will primarily consist of your prepared fruits and vegetables. Arrange clusters of red and green grapes, creating a beautiful contrast. Scatter your apple slices (remember, the lemon juice keeps them fresh!) and orange segments in between the meats and cheeses. Add strips of bell peppers and carrot sticks. The bright hues of the produce are essential for making your Turkey Shaped Charcuterie Boards pop with festive color. Think about creating a rainbow effect if you can, or at least distributing the colors evenly.
- The Innermost “Feathers” (Delicate Elements & Fillers):
For the layer closest to the turkey’s body, use your remaining cheeses, like the folded Swiss cheese, and the rolled turkey breast slices. These can be arranged in smaller, tighter arcs. This layer should be less dense, allowing the body to remain prominent. Scatter your assorted berries here – blueberries, raspberries, and sliced strawberries – they add lovely bursts of color and sweetness. This is also a good place to tuck in some of your cubed Cheddar cheese, especially if you used cookie cutters to create fun shapes.
- Adding Texture and Filling Gaps with Nuts & Dried Fruits:
Once your main “feather” layers are established, step back and observe your turkey. You’ll likely see small gaps or areas that could use a little extra something. This is where the mixed nuts (almonds, walnuts, pecans) and dried fruits (cranberries, apricots) come in handy. Sprinkle them into these empty spaces, pushing them gently under other ingredients. They add not only texture and flavor but also a finished, abundant look to your charcuterie board. Pretzel sticks can also be tucked in here, standing upright or lying flat, adding another dimension.
- Incorporate the Dips:
Carefully place your small bowls of fig jam, honey mustard, and olive tapenade onto the board. There are a few strategic spots for these. You can place them around the lower edge of the “feathers,” or even tuck one or two closer to the turkey’s body if space allows. The contrast of the small bowls breaking up the flat expanse of food adds visual interest and also provides practical access for dipping. Ensure they are stable and won’t tip over. The variety of dips caters to different palates, offering sweet, savory, and tangy options that complement the meats, cheeses, and crackers perfectly.
- Garnish with Fresh Herbs:
Fresh herbs are like the finishing glitter on a masterpiece. Tuck small sprigs of fresh rosemary or thyme strategically around the edges of your turkey board, or even nestled between some of the “feathers.” Rosemary, with its needle-like leaves, can mimic small pine needles, adding a subtle autumnal or festive touch. Thyme sprigs are delicate and add a lovely green pop. Not only do they add a beautiful splash of green color and an aromatic fragrance, but they also give the board a professional, chef-like finish. Just a few sprigs can make a significant difference in perceived quality and aesthetic appeal.
- Fill Any Remaining Small Gaps:
Take one last look at your board. Are there any tiny, awkward spaces that still look empty? Use any remaining dried cranberries, a few extra nuts, or even some small blueberries to fill these minuscule voids. The goal is to create a sense of lush abundance, where every inch of the board is thoughtfully covered. This attention to detail ensures a truly bountiful and inviting presentation.
- Final Polish and Clean-Up:
Before presenting your Turkey Shaped Charcuterie Boards, quickly inspect the edges of your serving board. Use a clean, damp cloth to wipe away any stray crumbs, smudges, or fingerprints. A clean perimeter around your food display makes the entire presentation look much more polished and professional. This step, while simple, makes a big impact on the overall impression.
- Consider Temperature Control for Serving:
Charcuterie boards are best served at room temperature to allow the cheeses and cured meats to express their full flavor and texture. However, don’t let it sit out for too long, especially if you have soft cheeses or specific meats that need to be kept cooler. If you’re preparing this in advance, cover the board loosely with plastic wrap and refrigerate. Take it out about 30-45 minutes before serving to allow everything to come to an ideal temperature. For prolonged serving, especially at a party, consider placing the board on top of a larger platter filled with ice, if practical, to keep things fresh, or swap out components periodically.
Chef’s Tip for Prep:
Think about variety in color, shape, and texture for each category. This is what makes a charcuterie board visually appealing and exciting to eat. Lay out all your prepped ingredients on separate plates or in small bowls before you begin assembly; it makes the next phase much more efficient and enjoyable.
Phase 2: Assembling Your Turkey Shaped Charcuterie Board
Now for the fun part – bringing your magnificent Turkey Shaped Charcuterie Boards to life! This is where all your careful preparation comes together. Remember, there’s no single “right” way to do this; allow your creativity to shine through, focusing on the overall turkey silhouette and a pleasing arrangement of colors and textures.
Visualizing the Turkey:
Throughout this assembly process, constantly step back and look at your board from a distance. Does it clearly resemble a turkey? Are the “feathers” fanned out appealingly? Are the colors balanced? Don’t be afraid to rearrange items gently until you’re happy with the overall silhouette and composition. A well-composed Turkey Shaped Charcuterie Board is a feast for the eyes before it’s a feast for the palate.
Phase 3: Adding the Finishing Touches and Presentation
You’re almost there! The final phase is all about those small but impactful details that elevate your Turkey Shaped Charcuterie Boards from good to absolutely magnificent. These touches ensure both visual appeal and a delightful eating experience for your guests.
Presentation is Key:
Remember, the goal of a Turkey Shaped Charcuterie Boards is to be a visual showstopper as much as a delicious array of snacks. By meticulously arranging your ingredients, paying attention to color, texture, and shape, and adding these final elegant touches, you’re not just serving food; you’re presenting an experience. Your guests will be delighted by both the creativity and the deliciousness of your holiday masterpiece!
Conclusion:
So, there you have it – my absolute favorite recipe, shared with you! I truly believe this dish is more than just a meal; it’s an experience. From its incredibly rich and complex flavors to its surprisingly simple preparation, it’s a recipe that consistently delivers a “wow” factor without the stress. I adore how it manages to feel both gourmet and comforting at the same time, making it perfect for anything from a cozy family dinner to an elegant holiday feast. What really sets this recipe apart, in my opinion, is its versatility and the sheer joy it brings to the table. The aroma alone is enough to get everyone excited, and that first bite? Pure bliss. You’ll find yourself reaching for this recipe time and time again, not just because it tastes amazing, but because it’s a proven crowd-pleaser that always leaves a lasting impression. It’s the kind of dish that sparks conversation, creates memories, and truly warms the soul. Trust me, this isn’t just another recipe; it’s a cornerstone dish that you’ll be proud to share with everyone you love. Its ability to transform simple ingredients into something truly extraordinary is what makes it a genuine must-try. You’re not just cooking; you’re crafting happiness in a dish.
Now, let’s talk about how to make this dish even more spectacular or adapt it to your liking. While it shines beautifully on its own, I love serving it alongside a crisp, vibrant green salad with a light vinaigrette to cut through the richness. Roasted root vegetables – think carrots, parsnips, and sweet potatoes – also make an excellent accompaniment, adding an extra layer of sweetness and earthiness. For a more casual affair, consider serving it with some crusty artisan bread to soak up every last drop of that incredible sauce. If you’re looking to lighten things up, you could try substituting a leaner protein or using vegetable broth instead of a richer stock. For those who enjoy a bit of heat, a pinch of red pepper flakes during cooking can add a delightful kick. And for a truly show-stopping spread, especially during the festive season, imagine presenting this stunning dish alongside a beautifully arranged array of appetizers, perhaps complementing it with creative
Turkey Shaped Charcuterie Boards
. The savory elements of our recipe would be a fantastic counterpoint to the cheeses, fruits, and cured meats, creating a magnificent spread that’s both visually appealing and incredibly diverse in flavor. You can also easily scale this recipe up or down depending on your guest count, making it perfect for intimate dinners or larger holiday gatherings where you want to impress without overwhelming your kitchen. Don’t be afraid to experiment with your favorite herbs too – a sprig of fresh rosemary or thyme can elevate the aroma and taste even further, customizing it perfectly for your palate. This recipe truly offers endless possibilities for enjoyment.
So, what are you waiting for? I wholeheartedly encourage you to roll up your sleeves and give this incredible recipe a try. You won’t regret it! It’s a journey of flavors that promises to delight your taste buds and earn you rave reviews from anyone lucky enough to try it. I’m genuinely excited for you to experience the magic of this dish firsthand. And when you do, please don’t keep it a secret! I absolutely love hearing about your culinary adventures, so once you’ve whipped up this masterpiece, please share your experience with me. What did you pair it with? Did you add your own unique twist? Did your family love it as much as mine does? Your feedback and photos truly make my day and inspire me to keep sharing. Happy cooking, my friends, and get ready to create something truly delicious and memorable that will become a treasured part of your kitchen repertoire!
Wow Guests! Easy Turkey Shaped Charcuterie Boards Recipe
Turkey Shaped Charcuterie Boards are not just a festive centerpiece; they are a brilliant solution for stress-free holiday entertaining that truly dazzles your guests! This delightful twist on a classic appetizer allows for incredible customization, catering to every palate and dietary preference. Guests adore the interactive nature and stunning visual impact, making it an instant conversation starter and a fantastic way to impress your loved ones this holiday season.
Ingredients
Instructions
Important Information
Nutrition Facts (Per Serving)
It is important to consider this information as approximate and not to use it as definitive health advice.
Allergy Information
Please check ingredients for potential allergens and consult a health professional if in doubt.


Leave a Comment