
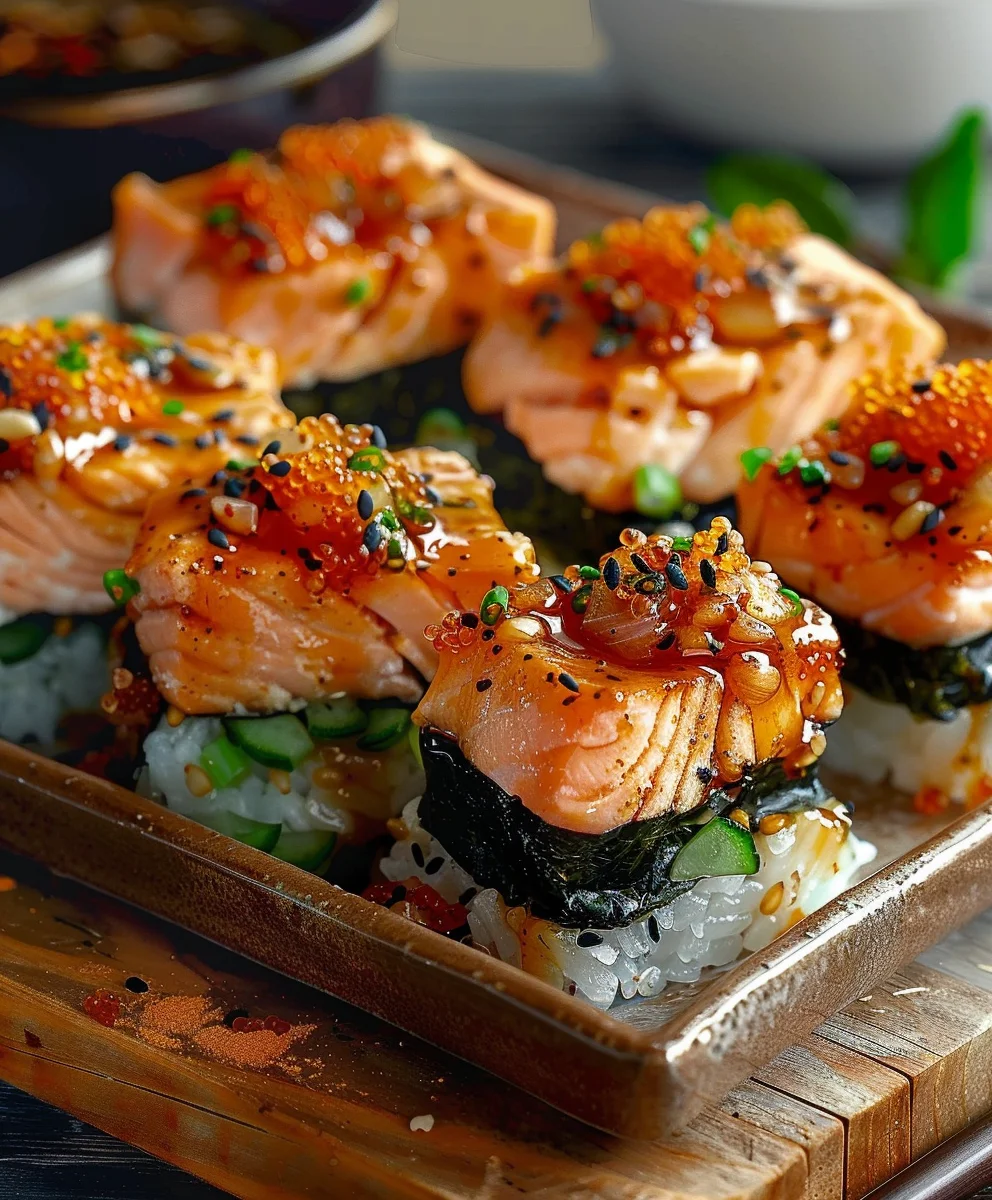
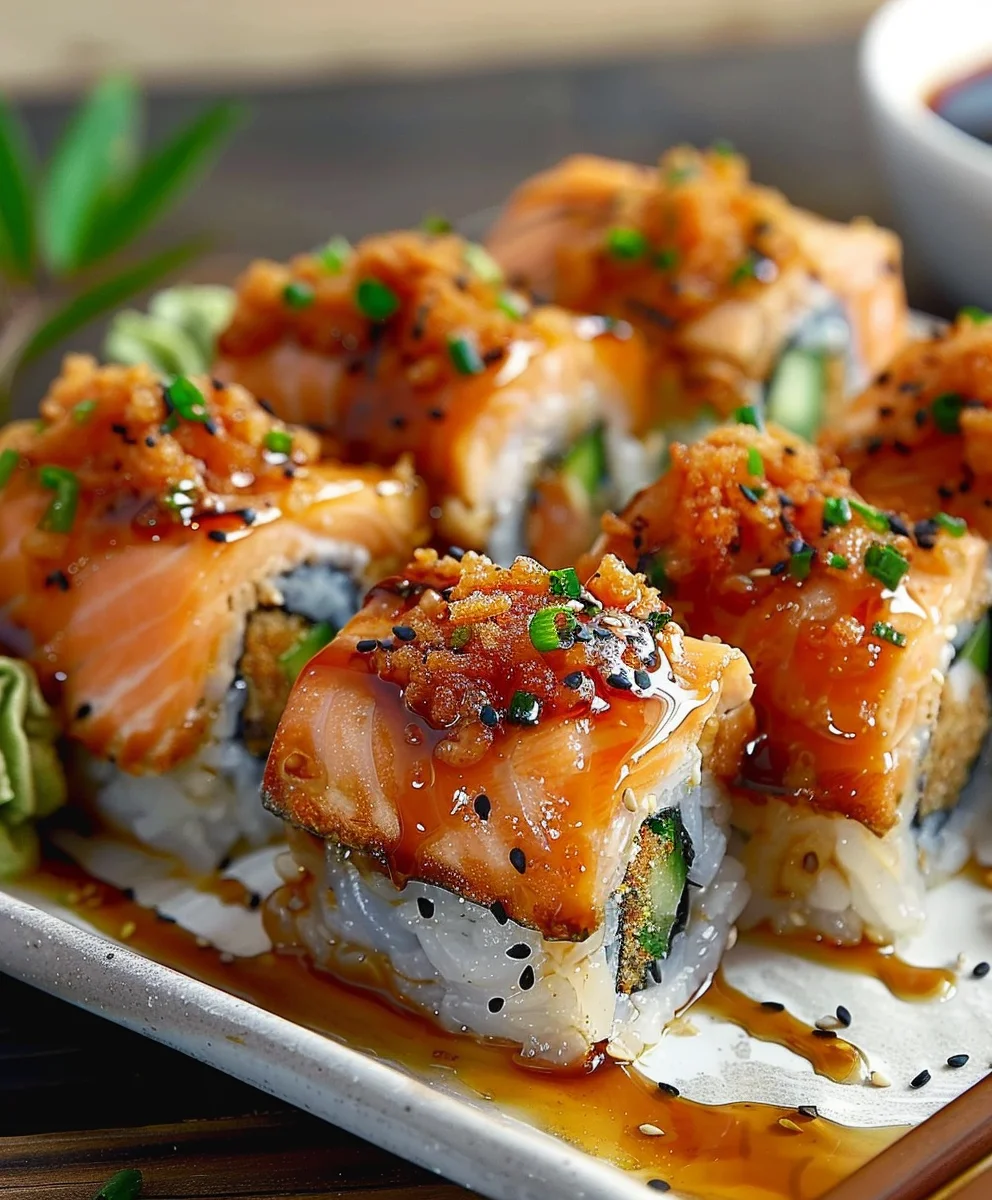
Spicy Salmon Sushi Bake Recipe has taken the culinary world by storm, offering a delightful and accessible way to enjoy all the vibrant flavors of your favorite sushi rolls without the intricate art of rolling. I remember first encountering the concept during the surge of home cooking trends, and it immediately captivated me with its genius simplicity. Originating and gaining immense popularity within Filipino-American communities, especially through social media during recent years, this dish quickly evolved from a viral sensation into a beloved staple. It’s truly a testament to culinary innovation, transforming complex sushi into a comforting, casserole-style meal perfect for sharing and creating memorable dining experiences right at home.
What makes a good Spicy Salmon Sushi Bake Recipe so universally adored? It’s the irresistible combination of textures and tastes that truly sets it apart. Imagine succulent, flaky salmon infused with a creamy, spicy sauce, layered generously over perfectly seasoned sushi rice, all baked to golden, aromatic perfection. Every spoonful delivers that sought-after umami richness, a satisfying warmth, and a gentle kick that makes your taste buds sing. Whether you’re a sushi aficionado looking for a deconstructed delight or a home cook eager to try something new and impressive with minimal fuss, this bake promises to be a crowd-pleaser, delivering all the deliciousness with none of the rolling stress. It’s perfect for casual gatherings, potlucks, or simply a comforting weeknight meal, proving that culinary magic can indeed be simple and incredibly satisfying.

Ingredients:
- For the Salmon:
- 1 pound salmon fillet: Opt for a fresh, high-quality salmon fillet, preferably wild-caught or sustainably farmed. Make sure the skin is removed for easier preparation, or you can remove it yourself after cooking. This is the star of our Spicy Salmon Sushi Bake Recipe!
- 1 tablespoon olive oil (or avocado oil): A neutral oil helps keep the salmon moist during baking and prevents sticking.
- 1/2 teaspoon salt: Fine sea salt or kosher salt works perfectly to season the salmon.
- 1/4 teaspoon black pepper: Freshly ground black pepper adds a lovely aromatic kick.
- For the Spicy Mayo Mixture:
- 1/2 cup mayonnaise: I highly recommend using Japanese Kewpie mayonnaise if you can find it. Its rich, slightly sweeter, and umami-packed flavor truly elevates the spicy mayo. If not, your favorite good-quality full-fat mayonnaise will work.
- 2-4 tablespoons Sriracha: This is where the “spicy” in our Spicy Salmon Sushi Bake Recipe comes from! Adjust to your personal heat preference. I usually lean towards 3-4 tablespoons for a noticeable kick.
- 1 tablespoon soy sauce: Low-sodium soy sauce is a great choice here, or use Tamari if you need a gluten-free option. It adds a crucial layer of umami.
- 1 teaspoon toasted sesame oil: Don’t skip this! Toasted sesame oil brings an incredible nutty aroma and depth of flavor that is quintessential to Asian-inspired dishes.
- 1 teaspoon rice vinegar (unseasoned): A small touch of acidity brightens the whole mixture and balances the richness of the mayo.
- 1/2 teaspoon sugar: Just a touch of sweetness helps to balance the spice and acidity, creating a more harmonious flavor profile.
- For the Sushi Rice:
- 2 cups sushi rice: This is short-grain Japanese rice, specifically formulated to be sticky and hold its shape – essential for any sushi dish, including our bake. Do not substitute with long-grain or medium-grain rice.
- 2.5 cups water: For cooking the rice. The ratio is important for perfect sushi rice.
- 1/4 cup rice vinegar (unseasoned): This is for seasoning the cooked rice, giving it that distinct sushi tang.
- 2 tablespoons sugar:
To sweeten the vinegar mixture. - 1 teaspoon salt: To season the vinegar mixture.
- For Assembly and Topping:
- 2-3 sheets nori: Roasted seaweed snacks are perfect for this. You’ll cut them into strips or squares for serving, acting as edible wrappers for your sushi bake bites.
- 1/4 cup green onions, thinly sliced: For a fresh, mild oniony garnish and a pop of color.
- 1 tablespoon toasted sesame seeds: White or black sesame seeds, or a mix of both, add a lovely visual appeal and a delicate nutty crunch.
- Optional Garnishes: Sliced avocado, finely diced cucumber, masago or tobiko (fish roe) for an extra burst of flavor and texture, or a drizzle of extra Sriracha or unagi (eel) sauce for those who love it. These really complete the Spicy Salmon Sushi Bake Recipe experience!
Preparing the Flavorful Salmon for Your Sushi Bake
Let’s kick things off with the star of our dish: the salmon. Getting this right is crucial for a truly delectable Spicy Salmon Sushi Bake Recipe. We want beautifully cooked, flaky salmon that’s moist and bursting with flavor before we even introduce it to the spicy mayo.
- Preheat Your Oven: Begin by preheating your oven to a comfortable 375°F (190°C). This ensures your oven is at the optimal temperature for even cooking when the salmon goes in. While the oven preheats, line a baking sheet with parchment paper or a silicone baking mat. This simple step makes cleanup a breeze and prevents the salmon from sticking.
- Prepare the Salmon Fillet: Take your beautiful 1-pound salmon fillet and gently pat it dry with paper towels. Removing excess moisture is important because it helps the salmon achieve a nicer sear (even in the oven) and allows the seasonings to adhere better. Place the dried fillet onto your prepared baking sheet.
- Season the Salmon: Drizzle the salmon with 1 tablespoon of olive oil. Using your fingers or a pastry brush, spread the oil evenly over the surface of the fish. This not only adds a touch of richness but also helps the seasonings stick. Next, sprinkle the salmon generously with 1/2 teaspoon of salt and 1/4 teaspoon of freshly ground black pepper. Don’t be shy here; proper seasoning is key to bringing out the natural deliciousness of the fish.
- Bake the Salmon to Perfection: Transfer the baking sheet with the seasoned salmon to your preheated oven. Bake for 12-18 minutes. The exact timing will depend on the thickness of your salmon fillet and your oven’s calibration. You’re looking for the salmon to be cooked through, opaque throughout, and to flake easily with a fork. A good indicator is an internal temperature of 145°F (63°C) if you have a meat thermometer. Be careful not to overcook the salmon, as dry salmon can detract from our amazing Spicy Salmon Sushi Bake Recipe.
- Cool and Flake the Salmon: Once cooked, remove the salmon from the oven and let it cool slightly on the baking sheet for about 5-10 minutes. This resting period allows the juices to redistribute, keeping the salmon wonderfully moist. After cooling, transfer the salmon to a medium-sized mixing bowl. Using a fork, gently flake the salmon into small, bite-sized pieces. Aim for tender flakes, not a mushy consistency. Remove any small bones you might encounter, though most skinless fillets are bone-free.
- Prepare the Spicy Mayo Mixture: While the salmon is cooling, let’s create the incredible spicy mayo that will bind and flavor our salmon. In a separate bowl, combine 1/2 cup of mayonnaise (preferably Kewpie mayo for that authentic taste!), 2-4 tablespoons of Sriracha (remember to adjust this to your desired spice level – I often go for the higher end!), 1 tablespoon of soy sauce, 1 teaspoon of toasted sesame oil, 1 teaspoon of unseasoned rice vinegar, and 1/2 teaspoon of sugar. Whisk all these ingredients together thoroughly until the mixture is smooth, creamy, and beautifully orange in color. Taste and adjust the seasoning now – this is your chance to add more Sriracha for heat, a pinch more sugar for balance, or a dash more soy sauce for umami.
- Combine Salmon and Spicy Mayo: Pour the prepared spicy mayo mixture over the flaked salmon in the bowl. Using a spatula or spoon, gently fold the sauce into the salmon, ensuring every flake is beautifully coated. You want it well mixed but still retaining the flaky texture of the salmon. Cover the bowl and set it aside. This mixture is now ready to be layered into our Spicy Salmon Sushi Bake Recipe.
Mastering the Sushi Rice Base
The foundation of any great sushi dish, including our Spicy Salmon Sushi Bake Recipe, is perfectly cooked and seasoned sushi rice. It needs to be sticky enough to hold together but individual enough to have a pleasant texture. This step requires a little attention to detail, but I promise it’s worth it!
- Wash the Sushi Rice: Place 2 cups of sushi rice in a fine-mesh sieve. Rinse the rice thoroughly under cold running water, agitating it with your fingers, until the water runs clear. This process removes excess starch, which is essential for achieving that ideal sticky-but-separate sushi rice texture. It might take several minutes, but don’t rush it!
- Cook the Sushi Rice: Transfer the rinsed rice to a medium saucepan with a tight-fitting lid. Add 2.5 cups of cold water. Bring the water to a rolling boil over medium-high heat. As soon as it boils, reduce the heat to the lowest setting, cover the pot tightly, and simmer for exactly 15 minutes. Resist the urge to lift the lid during this time! Peeking lets out steam, which is crucial for proper cooking.
- Steam the Rice: After 15 minutes, turn off the heat but leave the pot covered and undisturbed for another 10 minutes. This steaming period allows the rice to absorb any remaining moisture and become perfectly tender. Again, no peeking!
- Prepare the Sushi Vinegar Seasoning: While the rice is steaming, prepare your seasoning mixture. In a small microwave-safe bowl or saucepan, combine 1/4 cup of unseasoned rice vinegar, 2 tablespoons of sugar, and 1 teaspoon of salt. Heat this mixture gently until the sugar and salt have completely dissolved. You can do this in the microwave for 30-60 seconds or over very low heat on the stovetop. Stir well to ensure everything is dissolved. Set aside to cool slightly.
- Season the Cooked Rice: Once the rice has finished steaming, transfer it immediately to a large, wide, non-metallic bowl or a traditional Japanese hangiri if you have one. A wide surface area helps the rice cool down quickly and evenly. Pour the prepared sushi vinegar seasoning mixture evenly over the hot rice.
- Fold and Cool the Rice: Using a rice paddle or a flat wooden spoon, gently fold and “cut” the seasoning into the rice. A helpful tip here: don’t mash the rice! Use a cutting motion with your paddle to gently separate the grains while incorporating the seasoning. This prevents crushing the individual rice grains, which is crucial for achieving that delightful, slightly sticky yet separate texture characteristic of good sushi rice. Continue to gently fold the rice for a few minutes, allowing it to cool down slightly. You can fan it gently with a piece of cardboard or a hand fan to speed up the cooling process if you wish. The rice should be warm, not hot, when you layer it. This seasoned sushi rice is now ready to form the base of your Spicy Salmon Sushi Bake Recipe.
Assembling and Baking Your Spicy Salmon Sushi Bake
Now comes the exciting part – bringing all these delicious components together to create our show-stopping Spicy Salmon Sushi Bake Recipe! The layering is simple, but the result is truly spectacular.
- Prepare Your Baking Dish: Lightly grease a 9×13 inch (23×33 cm) baking dish with a little bit of neutral oil or line it with parchment paper for effortless removal. This ensures nothing sticks and makes serving much easier.
- Lay the Sushi Rice Base: Transfer all the seasoned sushi rice into the prepared baking dish. Using the back of a spoon or your rice paddle, gently and evenly spread the rice across the bottom of the dish, creating a uniform layer. Don’t press it down too hard; you want it slightly compacted but still fluffy. This forms the essential base for our Spicy Salmon Sushi Bake.
- Layer the Spicy Salmon Mixture: Carefully spoon the spicy salmon mixture over the rice layer. Spread it out evenly, ensuring the salmon covers the entire rice surface. Gently smooth the top with your spatula. This layer is full of flavor and will become beautifully golden and slightly caramelized in the oven.
- Bake to Golden Perfection: Place the baking dish into your preheated 375°F (190°C) oven. Bake for 15-20 minutes, or until the top of the salmon mixture is nicely golden brown, slightly bubbly around the edges, and the entire dish is heated through. You might see some crispy bits forming on top, which are absolutely delicious! This baking time allows the flavors to meld and creates that wonderful baked texture.
Finishing Touches and Serving Your Spicy Salmon Sushi Bake
The baking is done, and your kitchen is undoubtedly filled with enticing aromas! Now for the final flourishes that make this Spicy Salmon Sushi Bake Recipe truly irresistible.
- Garnish Generously: Once baked, carefully remove the dish from the oven. Immediately sprinkle the entire surface of your Spicy Salmon Sushi Bake with the thinly sliced green onions and a generous scattering of toasted sesame seeds. The heat from the dish will slightly warm the green onions, releasing their fresh aroma.
- Add Optional Toppings: This is where you can truly customize your sushi bake! If you’re using them, arrange slices of fresh avocado or finely diced cucumber over the top for added creaminess, crunch, and a refreshing contrast. A sprinkle of masago or tobiko will add a delightful burst of briny flavor and vibrant color. For an extra kick, a delicate drizzle of additional Sriracha or a sweet and savory unagi sauce can be added just before serving.
- Rest and Serve: Let the Spicy Salmon Sushi Bake rest for 5-10 minutes before serving. This brief resting period helps it set slightly, making it easier to scoop and enjoy. To serve, I like to use a large spoon or a spatula to scoop generous portions directly from the dish.
- Enjoy with Nori: The traditional and most delicious way to enjoy this Spicy Salmon Sushi Bake Recipe is by scooping a portion onto a piece of roasted nori (seaweed snack). The crispy nori acts like a mini wrapper, providing a fantastic textural contrast and that iconic sushi flavor. Encourage your friends and family to make little “tacos” or “burritos” with their nori pieces – it’s fun, interactive, and incredibly tasty! This dish is perfect for sharing at gatherings or enjoying as a comforting family meal.
Conclusion:
As we reach the culmination of our culinary journey, I truly hope you’re feeling as excited and inspired as I am about this incredible dish. This isn’t just another recipe; it’s an invitation to experience a burst of flavors and textures that will undoubtedly become a staple in your kitchen. I genuinely believe that this particular creation, the one we’ve explored together, stands out as a true game-changer for anyone who loves the vibrant tastes of sushi but perhaps wants a more accessible, less intimidating, and utterly satisfying experience.
What makes this recipe an absolute must-try, you ask? Well, for starters, it perfectly encapsulates that crave-worthy blend of creamy, savory, and subtly spicy elements that dance on your palate with every bite. Imagine perfectly cooked rice forming a comforting base, topped with a rich, flaky salmon mixture that’s been infused with a tantalizing blend of spices and creamy mayonnaise, all baked to a golden-brown perfection. The magic truly happens when that slightly crispy rice meets the tender, flavorful salmon, creating an irresistible textural contrast that keeps you coming back for more. It’s a dish that effortlessly marries comfort food appeal with gourmet flair, making it suitable for a cozy weeknight dinner yet impressive enough to steal the show at any potluck or gathering. There’s a beautiful simplicity in its preparation that belies the complex and deeply satisfying flavors it delivers. Trust me, once you experience the joy of diving into this particular rendition, you’ll understand why it has become such a beloved sensation and why I’m so passionate about sharing it with you. It takes all the delightful elements of a traditional sushi roll and transforms them into an effortlessly shareable, easy-to-make casserole that utterly eliminates the fuss of rolling. This accessibility alone makes it a remarkable addition to your cooking repertoire, allowing you to enjoy those fresh, vibrant sushi-inspired tastes without any specialized equipment or advanced techniques.
Unleash Your Creativity: Serving Suggestions & Variations
Now that you’re convinced of its inherent deliciousness, let’s talk about how to truly make this recipe your own. One of my favorite aspects of this dish is its incredible versatility. While it’s absolutely phenomenal straight out of the oven, there are so many ways to customize and enhance your experience. For serving, I always recommend a platter of crisp nori seaweed sheets – they act as the perfect edible scoop, adding a delightful umami crunch to each bite. Fresh lettuce cups also work wonderfully for a lighter, refreshing alternative. Don’t forget a side of thinly sliced cucumbers or ripe avocado to complement the richness, offering a cool contrast. A sprinkle of toasted sesame seeds, chopped fresh scallions, or a drizzle of extra sriracha mayo on top adds both visual appeal and an extra layer of flavor. And of course, no sushi-inspired meal is complete without a small bowl of pickled ginger and a splash of soy sauce or ponzu for dipping.
But the fun doesn’t stop there! Don’t be afraid to get creative and experiment with variations to suit your taste or what you have on hand. If salmon isn’t your preferred protein, consider swapping it out for cooked imitation crab meat, flaked canned tuna, or even cooked shrimp. For a vegetarian twist, firm tofu or tempeh, crumbled and seasoned, could make a fantastic substitute. You can adjust the spice level to your heart’s content – add more sriracha for a fiery kick, or a dollop of gochujang for a different kind of warmth. Incorporating other vegetables, such as finely diced bell peppers, shredded carrots, or even thawed frozen edamame, can add extra nutrients and crunch. Some people love adding a touch of cream cheese to the salmon mixture for an even creamier texture, while others prefer a lighter hand with the mayonnaise. You could even experiment with different types of rice – brown rice for a nuttier flavor and added fiber, or even quinoa for a gluten-free option. The possibilities are truly endless, allowing you to iterate and perfect your own signature version of this extraordinary dish. Every slight alteration can lead to a new favorite, making this an endlessly adaptable culinary canvas.
Your Culinary Adventure Awaits!
So, there you have it. This isn’t just a recommendation; it’s a heartfelt plea for you to try this amazing dish. I truly can’t emphasize enough how much joy and deliciousness this Spicy Salmon Sushi Bake Recipe will bring to your table. It’s simple enough for beginners, yet packed with complex flavors that will impress even the most discerning palates. I promise you, once you take that first bite of your very own homemade version, you’ll understand exactly why it’s become such a runaway success. My hope is that you feel empowered and excited to recreate this recipe in your own kitchen, to savor every mouthwatering morsel, and to share the experience with those you love.
I’d absolutely love to hear about your culinary adventures! Please don’t hesitate to try this fantastic recipe and share your creations and experiences. Did you add a unique twist? Was it a hit at your dinner party? Tag us, share your photos, and let us know what you think. Your feedback and personal touches are what truly make cooking a shared, vibrant community experience. Get ready to bake, indulge, and fall head over heels for your new favorite go-to meal. Happy cooking!
Spicy Salmon Sushi Bake Recipe
The Spicy Salmon Sushi Bake has become a beloved dish, combining the vibrant flavors of sushi rolls in a comforting, casserole-style meal. Originating and popularized within Filipino-American communities, this dish offers succulent, flaky salmon infused with a creamy, spicy sauce over seasoned sushi rice, all baked to golden perfection. It’s a crowd-pleaser for any occasion, delivering deliciousness without the fuss of rolling.
Ingredients
-
2 cups sushi rice, uncooked
-
2.5 cups water
-
¼ cup rice vinegar
-
2 tablespoons sugar
-
1 teaspoon salt
-
1 lb fresh salmon fillet, skinless and diced
-
½ cup mayonnaise
-
2 tablespoons Sriracha sauce, or to taste
-
1 teaspoon sesame oil
-
½ cup green onions, chopped, plus extra for garnish
-
1 sheet nori, cut into small strips
-
to taste tobiko, optional for garnish
Instructions
-
Step 1
Preheat oven to 375°F (190°C). Place 1 lb salmon fillet on a lined baking sheet. Bake for 12-18 minutes until cooked through and flaky. Let cool slightly, then flake into small pieces in a bowl. -
Step 2
In a separate bowl, combine ½ cup mayonnaise, 2 tablespoons Sriracha sauce (adjust to taste), and 1 teaspoon sesame oil. Whisk until smooth. -
Step 3
Gently fold the prepared spicy mayo mixture into the flaked salmon until all pieces are well coated. Set aside. -
Step 4
Wash 2 cups sushi rice under cold running water until water runs clear. In a medium saucepan, combine washed rice and 2.5 cups water. Bring to a boil, then reduce heat to low, cover tightly, and simmer for 15 minutes. Turn off heat and let steam, covered, for another 10 minutes without lifting the lid. -
Step 5
While rice steams, gently heat ¼ cup rice vinegar, 2 tablespoons sugar, and 1 teaspoon salt in a small bowl until sugar and salt are dissolved. Transfer hot rice to a large, wide bowl, pour the seasoning mixture evenly over, and gently fold to season and cool slightly. -
Step 6
Lightly grease a 9×13 inch baking dish. Spread the seasoned sushi rice evenly across the bottom, forming a uniform base. Carefully spoon the spicy salmon mixture over the rice layer, spreading it out evenly. -
Step 7
Place the baking dish in the preheated 375°F (190°C) oven. Bake for 15-20 minutes, or until the top of the salmon mixture is golden brown and bubbly. -
Step 8
Remove from oven. Immediately sprinkle with ½ cup chopped green onions and optional tobiko. Let rest for 5-10 minutes before serving. Scoop generous portions onto pieces of nori (seaweed snacks) for an interactive and delicious meal.
Important Information
Nutrition Facts (Per Serving)
It is important to consider this information as approximate and not to use it as definitive health advice.
Allergy Information
Please check ingredients for potential allergens and consult a health professional if in doubt.

Leave a Comment