
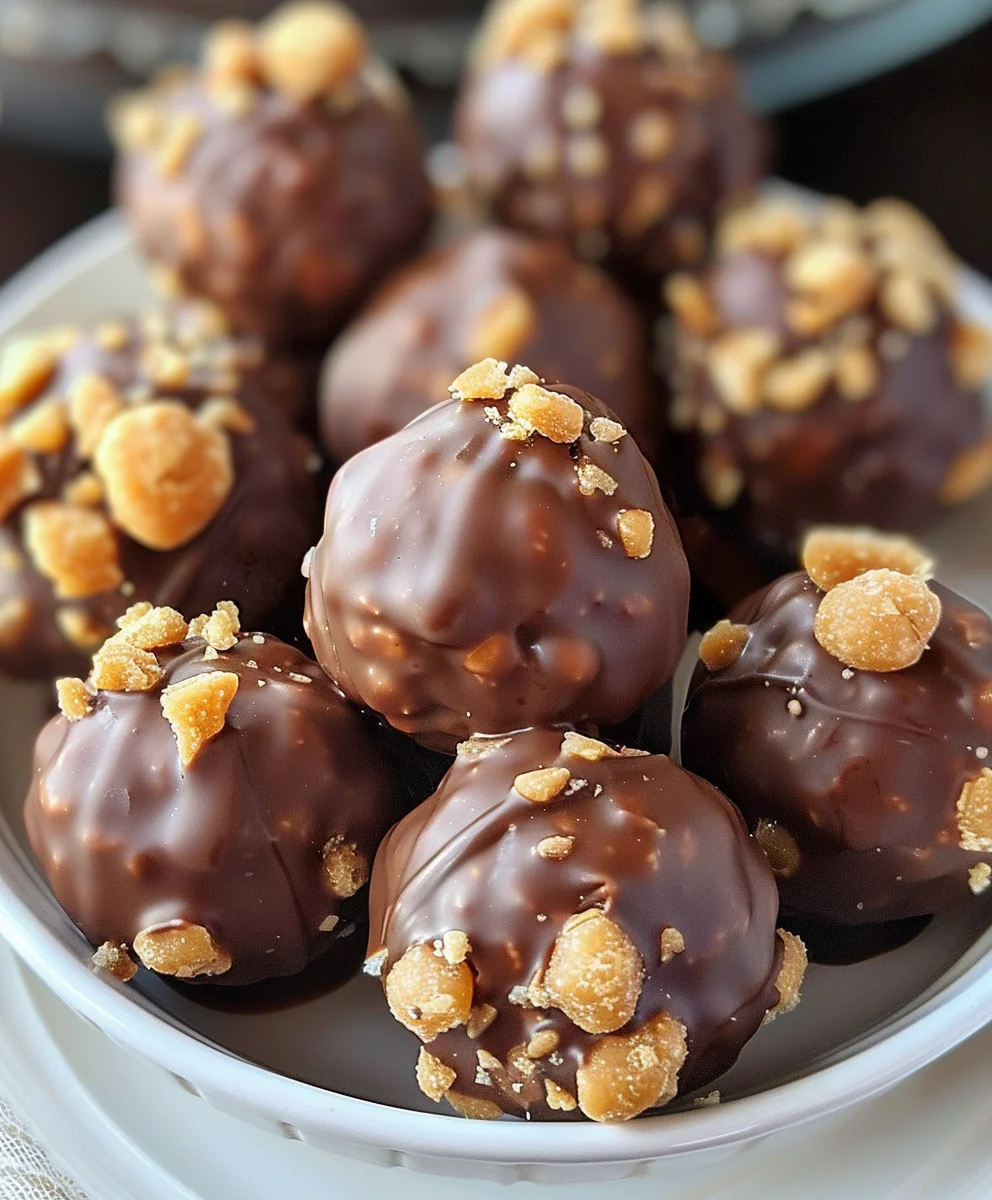
Butterfinger Balls are an absolute game-changer when it comes to no-bake treats, promising an explosion of flavor and texture that will undoubtedly become a new family favorite. Imagine the classic, irresistible crispy, peanut-buttery crunch of your beloved Butterfinger candy bar, expertly transformed into a delightful, bite-sized sphere, generously coated in a luxurious layer of smooth, decadent chocolate. It’s pure bliss in every bite, I assure you!
While these specific confections don’t boast centuries of history, their foundation, the iconic Butterfinger candy bar, has been a beloved American staple since the 1920s, renowned for its unique flaky texture and rich peanut butter flavor. This recipe pays a delicious homage to that enduring appeal, elevating it into a simple yet sophisticated dessert that consistently delights both young and old, tapping into a shared sense of nostalgic joy.
Why Everyone Loves These Irresistible Treats
People adore these delightful Butterfinger Balls for myriad reasons. Firstly, their incredible combination of sweet, salty, and wonderfully crunchy texture is utterly irresistible, creating a truly satisfying snacking experience that’s hard to beat. Then there’s the sheer convenience; they’re incredibly easy to whip up with no baking required, making them absolutely perfect for last-minute gatherings, holiday cookie exchanges, or simply satisfying a spontaneous sweet craving without any fuss. Plus, they’re surprisingly versatile, serving as fantastic edible gifts or a stunning addition to any dessert platter. Get ready to impress with minimal effort!

Ingredients:
- 16 ounces (approximately 10-12 standard size bars, or 4 king-size bars) Butterfinger candy bars
- 8 ounces (1 block) full-fat cream cheese, softened to room temperature
- 2 cups powdered sugar (also known as confectioners’ sugar)
- For the Chocolate Coating:
- 12 ounces (about 2 cups) good quality semi-sweet chocolate chips, melting wafers, or chopped chocolate baking bars
- 1 tablespoon coconut oil or vegetable shortening (optional, but highly recommended for a smoother, glossier finish)
- Optional Garnish: Extra crushed Butterfinger pieces, sprinkles, or a drizzle of white chocolate
Equipment You’ll Need:
- Food processor (recommended) or a large, sturdy Ziploc bag and a rolling pin
- Large mixing bowl
- Electric mixer (handheld or stand mixer with paddle attachment)
- Small cookie scoop (1-tablespoon size) or two small spoons
- Two large baking sheets
- Parchment paper or wax paper for lining the baking sheets
- Microwave-safe bowl or a double boiler setup for melting chocolate
- Small, deep bowl for dipping
- Fork or a specialized chocolate dipping tool
- Air-tight containers for storage
Phase 1: Preparing the Butterfinger Mixture
This is where the magic begins, combining that delightful crunch of Butterfinger with a creamy, sweet base. It’s a simple process, but paying attention to a few details will make all the difference for your perfect Butterfinger Balls.
- Ensure Your Cream Cheese is Softened: Before you even think about mixing, take your block of full-fat cream cheese out of the refrigerator. It absolutely needs to be at room temperature. This isn’t just a suggestion; it’s a critical step! When cream cheese is cold, it’s hard to mix smoothly, and you’ll end up with lumps in your mixture. A lumpy base means lumpy Butterfinger Balls, and we definitely want a silky-smooth foundation. If you’re short on time, you can carefully unwrap it and microwave it for 10-15 seconds, just until it’s slightly soft to the touch, but not melted. You want it pliable enough to easily incorporate with the sugar.
-
Crush Those Butterfinger Bars: This is arguably the most fun part! There are two main ways to achieve perfectly crushed Butterfingers.
- Food Processor Method (Recommended): Break your Butterfinger bars into smaller pieces and place them in the bowl of your food processor. Pulse a few times until you have a mixture of fine crumbs and slightly larger, pebble-like pieces. Don’t over-process! We don’t want a fine powder; the small chunks are essential for that signature Butterfinger crunch within the balls. If you turn it into dust, you’ll lose a lot of that textural joy. I usually set aside a couple of tablespoons of these crushed pieces to use later as a garnish for an extra visual and textural pop on top of the finished chocolate coating.
- Ziploc Bag & Rolling Pin Method: If you don’t have a food processor, no worries! Place the Butterfinger bars in a large, heavy-duty Ziploc bag. Seal it, making sure to remove as much air as possible. Lay the bag flat on a sturdy surface and use a rolling pin (or even the bottom of a heavy skillet) to crush the candy bars. Be gentle at first, then apply more pressure, aiming for that same mix of fine crumbs and small crunchy bits. This method might require a bit more arm work but is equally effective.
- Combine Cream Cheese and Powdered Sugar: In your large mixing bowl, place the softened cream cheese. Using your electric mixer, beat the cream cheese on medium speed for about 1-2 minutes until it’s light and fluffy, and completely smooth with no lumps whatsoever. Then, gradually add the 2 cups of powdered sugar, about half a cup at a time, mixing on low speed to incorporate. Be careful when adding powdered sugar! It loves to create a “sugar cloud” if you start the mixer too high. Once incorporated, increase the speed to medium-high and beat for another 2-3 minutes until the mixture is thick, smooth, and wonderfully creamy. Scrape down the sides of the bowl occasionally to ensure everything is well combined. This is your sweet, tangy, and rich base for the Butterfinger Balls.
- Fold in Crushed Butterfingers: Now, for the star of the show! Add your crushed Butterfinger pieces (reserving any for garnish if you choose) to the cream cheese and powdered sugar mixture. Using a sturdy spatula, gently fold the crushed candy into the cream cheese mixture until it’s evenly distributed. You want to make sure every spoonful of the mixture has those delightful Butterfinger bits. Be careful not to overmix, just fold until combined. The mixture should be thick, a little sticky, but ultimately pliable and ready to be shaped.
Phase 2: Forming and Chilling the Butterfinger Balls
This phase is all about getting those perfect little spheres ready for their chocolate bath. Proper chilling here is non-negotiable for easy dipping later on.
- Prepare Your Baking Sheets: Grab your two large baking sheets and line them generously with parchment paper or wax paper. This will prevent your formed balls from sticking and make them easy to lift off once chilled and coated.
- Scoop the Mixture: Using a small cookie scoop (a 1-tablespoon size works perfectly for bite-sized treats), scoop out portions of the Butterfinger mixture. If you don’t have a scoop, two small spoons can work – use one to scoop and the other to push the mixture off. Aim for consistent sizes so they look uniform and set at similar rates.
- Form the Balls: Take each scooped portion and gently roll it between your palms to form a smooth, uniform ball. Don’t press too hard, just enough to create a nice, round shape. If the mixture feels a bit too sticky, you can lightly dampen your hands with water or dust them with a tiny bit of extra powdered sugar. As you form each ball, place it onto your prepared baking sheets, leaving a small space between each one. You should get approximately 40-50 balls, depending on the size you make them.
- Chill Thoroughly: This step is absolutely critical. Do not skip or rush it! Once all your Butterfinger Balls are formed and on the baking sheets, place them in the refrigerator for at least 1-2 hours, or until they are very firm. This chilling time allows the cream cheese mixture to firm up completely, making the balls much easier to handle and dip in chocolate without falling apart. If you try to dip them when they are too soft, they will likely melt into the warm chocolate, creating a messy situation. For a faster chill, you can place them in the freezer for about 15-30 minutes, keeping a close eye on them to ensure they don’t freeze solid (though even if they do, they’ll still be delicious once thawed slightly). They need to be cold and firm, trust me on this!
Phase 3: Preparing the Chocolate Coating
A beautiful, smooth chocolate coating is the crown jewel of these Butterfinger Balls. Let’s make sure it’s perfect.
-
Choose Your Chocolate Wisely: The type of chocolate you use can significantly impact the taste and ease of coating.
- Semi-sweet chocolate chips: A good, reliable choice. Look for good quality brands.
- Melting wafers (candy melts): These are formulated to melt smoothly and set quickly, often without needing extra oil. They come in various colors too!
- Chopped chocolate baking bars: If you want truly gourmet taste, a high-quality chocolate bar chopped finely will yield fantastic results, but it can be more temperamental to melt.
I personally love semi-sweet chocolate chips with a little coconut oil for a classic taste and easy handling.
-
Melt the Chocolate (Choose Your Method):
- Double Boiler Method (Recommended for controlled melting): Fill a saucepan with about an inch or two of water and bring it to a gentle simmer over medium-low heat. Place a heat-proof bowl (glass or metal) on top of the saucepan, ensuring the bottom of the bowl does not touch the simmering water. Add your chocolate (and the optional coconut oil/shortening, if using) to the bowl. Stir occasionally as the chocolate melts, until it’s completely smooth and glossy. This method offers gentle, even heat, reducing the risk of scorching.
- Microwave Method (Quicker, but requires vigilance): Place your chocolate (and optional coconut oil/shortening) in a microwave-safe bowl. Microwave on 50% power in 30-second intervals, stirring thoroughly after each interval. Chocolate can hold its shape even when melted, so stirring is crucial to prevent scorching the bottom. Continue until the chocolate is almost completely melted, with just a few small lumps remaining. Remove from the microwave and stir continuously until these last lumps dissolve, using the residual heat of the bowl and chocolate. Never overheat chocolate in the microwave! It can seize and become unusable.
- Add Coconut Oil or Vegetable Shortening (Optional, but Recommended): If you’re not using candy melts, I highly recommend adding 1 tablespoon of coconut oil or vegetable shortening to your chocolate as it melts. This little addition does wonders! It thins the chocolate slightly, making it smoother and easier to dip your Butterfinger Balls, and it also gives the finished coating a lovely glossy shine. It helps the chocolate set nicely without cracking too. Stir it in thoroughly until completely combined and the chocolate is silky smooth.
Phase 4: Coating the Butterfinger Balls
Now for the satisfying part: transforming those chilled balls into beautiful, chocolate-covered delights! Work efficiently, but without rushing.
- Retrieve Chilled Balls: Take your very firm, chilled Butterfinger Balls out of the refrigerator. It’s best to work with only a few at a time, keeping the rest cold until you’re ready to dip them. This ensures they remain firm and don’t soften while you’re dipping, which could lead to them breaking apart in the warm chocolate.
- Dip the Balls: Transfer your melted chocolate into a small, deep bowl. This makes dipping much easier than using a wide, shallow bowl. Using a fork (or a specialized dipping tool if you have one), gently drop one Butterfinger Ball into the melted chocolate, submerging it completely.
- Remove Excess Chocolate: Carefully lift the ball out of the chocolate with your fork. Gently tap the handle of the fork against the rim of the bowl. Allow any excess chocolate to drip off. You can also lightly scrape the bottom of the fork against the edge of the bowl to remove extra drips. This helps create a smooth, even coating without thick puddles of chocolate at the base. We want just enough chocolate to encase the ball beautifully.
- Place on Prepared Sheets: Carefully slide the coated Butterfinger Ball off the fork onto your parchment-lined baking sheet. The chocolate will still be wet and tacky.
- Garnish Immediately (Optional): If you plan to add extra crushed Butterfinger pieces, sprinkles, or any other decorative elements, do so now, while the chocolate coating is still wet. This ensures your garnish adheres securely before the chocolate sets.
- Repeat: Continue this dipping process with the remaining Butterfinger Balls, working methodically and keeping an eye on your chocolate. If your chocolate starts to thicken too much, you can gently reheat it for a few seconds using your chosen melting method, stirring well.
- Allow to Set: Once all your Butterfinger Balls are coated and placed on the baking sheets, allow the chocolate to set. You can let them set at room temperature if your kitchen isn’t too warm (this might take 1-2 hours), or, for faster setting, place the baking sheets back into the refrigerator for about 20-30 minutes, or until the chocolate is completely firm to the touch.
Phase 5: Final Touches and Storage
Almost there! A few finishing touches and knowing how to store them will ensure your Butterfinger Balls are perfect from start to finish.
- Drizzle for Decoration (Optional): If you’re feeling fancy, you can melt a small amount of white chocolate or even a contrasting dark chocolate. Transfer the melted chocolate to a piping bag with a very small hole cut in the tip, or simply use a spoon to drizzle artistic patterns over your set Butterfinger Balls. This adds an extra layer of visual appeal.
- Chill to Firm: Once fully coated and any drizzles have been applied, return the Butterfinger Balls to the refrigerator to ensure the chocolate is completely set and firm. This usually takes another 20-30 minutes. A fully set chocolate coating means they’ll be easy to handle and won’t get messy.
- Store Properly: Once the chocolate is completely firm, gently transfer your beautiful Butterfinger Balls into an airtight container. Store them in the refrigerator. The cold temperature helps maintain their shape and freshness, and keeps the chocolate firm. They will stay fresh and delicious for up to 1-2 weeks in the refrigerator. You can even freeze them for longer storage (up to 1-2 months); just make sure to thaw them in the refrigerator before serving.
Tips for Perfect Butterfinger Balls:
-
The Importance of Room Temperature Cream Cheese:
I cannot stress this enough! Cold cream cheese will inevitably lead to a lumpy mixture, no matter how much you beat it. Plan ahead and take it out an hour or two before you start. A smooth cream cheese base is the secret to perfectly smooth and decadent Butterfinger Balls.
-
Don’t Over-Process the Butterfingers:
That signature Butterfinger crunch is key! Aim for a mix of fine crumbs and small, recognizable pieces. If you turn it into too fine a powder, you lose some of that wonderful texture.
-
Chilling is Your Best Friend:
Whether it’s the initial chill after forming or the final chill after coating, patience with chilling pays off. Firm balls are easy to dip and won’t fall apart in the warm chocolate. Cold chocolate sets faster and looks glossier.
-
Patience with Melting Chocolate:
Chocolate is finicky. Low and slow is always the best approach, especially when using the double boiler method. If using the microwave, short bursts and frequent stirring are essential to prevent scorching or seizing. Scorched chocolate tastes bitter and seized chocolate becomes a clumpy, unusable mess.
-
Thinning the Chocolate:
If your chocolate feels too thick after melting, adding that tablespoon of coconut oil or vegetable shortening (if you didn’t already) can really help. It creates a thinner, more manageable consistency for dipping, resulting in a sleeker, professional-looking coating.
-
Dipping Technique Matters:
A good dipping technique makes a huge difference. Submerge fully, lift, tap, and scrape gently. This ensures an even coating and prevents too much chocolate accumulating at the bottom, which can look messy.
-
Flavor and Coating Variations:
- Different Candy Bars: This recipe is incredibly versatile! Try it with other crunchy candy bars like Heath bars (toffee crunch), Skor bars, crushed Oreos, or even Reese’s Peanut Butter Cups for different flavor profiles.
- White Chocolate Coating: For a different look and taste, use white chocolate melting wafers. White chocolate can be a bit trickier to melt without seizing, so be extra gentle with the heat. A white chocolate drizzle over a dark chocolate coating (or vice-versa) also looks stunning.
- Nut Butter Infusion: For an even richer, more decadent treat, try adding 1-2 tablespoons of smooth peanut butter to the cream cheese mixture along with the powdered sugar. This will enhance the peanut butter notes already present in Butterfingers.
- Powdered Sugar Coating: If you prefer a no-chocolate version, after the initial chilling, simply roll the firm balls in extra powdered sugar until evenly coated. These are equally delicious and have a delightful melt-in-your-mouth texture.
-
Make-Ahead Marvels:
These Butterfinger Balls are fantastic for making ahead! You can prepare the mixture, form the balls, and chill them for up to 2-3 days before dipping. Just keep them well-covered in the refrigerator. Once dipped and set, they store beautifully for up to two weeks, making them perfect for parties, gifts, or just having a delicious treat on hand.
-
Troubleshooting:
- Mixture too sticky to roll: If your cream cheese mixture feels too sticky, try adding another ¼ cup of powdered sugar and mixing it in until it’s more manageable. Ensure your hands are lightly dusted with powdered sugar or slightly damp as you roll.
- Chocolate seized: If your chocolate suddenly turns thick, grainy, and unworkable, it means it’s seized, usually due to overheating or a tiny bit of water getting into it. Unfortunately, seized chocolate is very difficult to salvage for dipping purposes. It’s best to discard it and start fresh, being extra careful with heat and moisture.
- Chocolate too thick for dipping: If your melted chocolate is too thick and clumpy, try adding a little more coconut oil or shortening (about ½ teaspoon at a time) and stirring until it reaches the desired consistency.
Conclusion:
And there you have it, my friends! We’ve journeyed together through the delightful process of creating what I genuinely believe will become one of your new favorite confections. This recipe isn’t just about combining a few ingredients; it’s about crafting a moment of pure, unadulterated joy that’s incredibly easy to achieve. I’ve made these countless times for family gatherings, potlucks, and even just for a quiet evening treat, and they never fail to disappear almost as quickly as they appear on the plate. The exquisite balance of crunchy, creamy, sweet, and salty makes them utterly irresistible. If you’re looking for a fuss-free dessert that delivers maximum impact with minimal effort, you simply must add this to your repertoire.
Why This Recipe is a True Must-Try
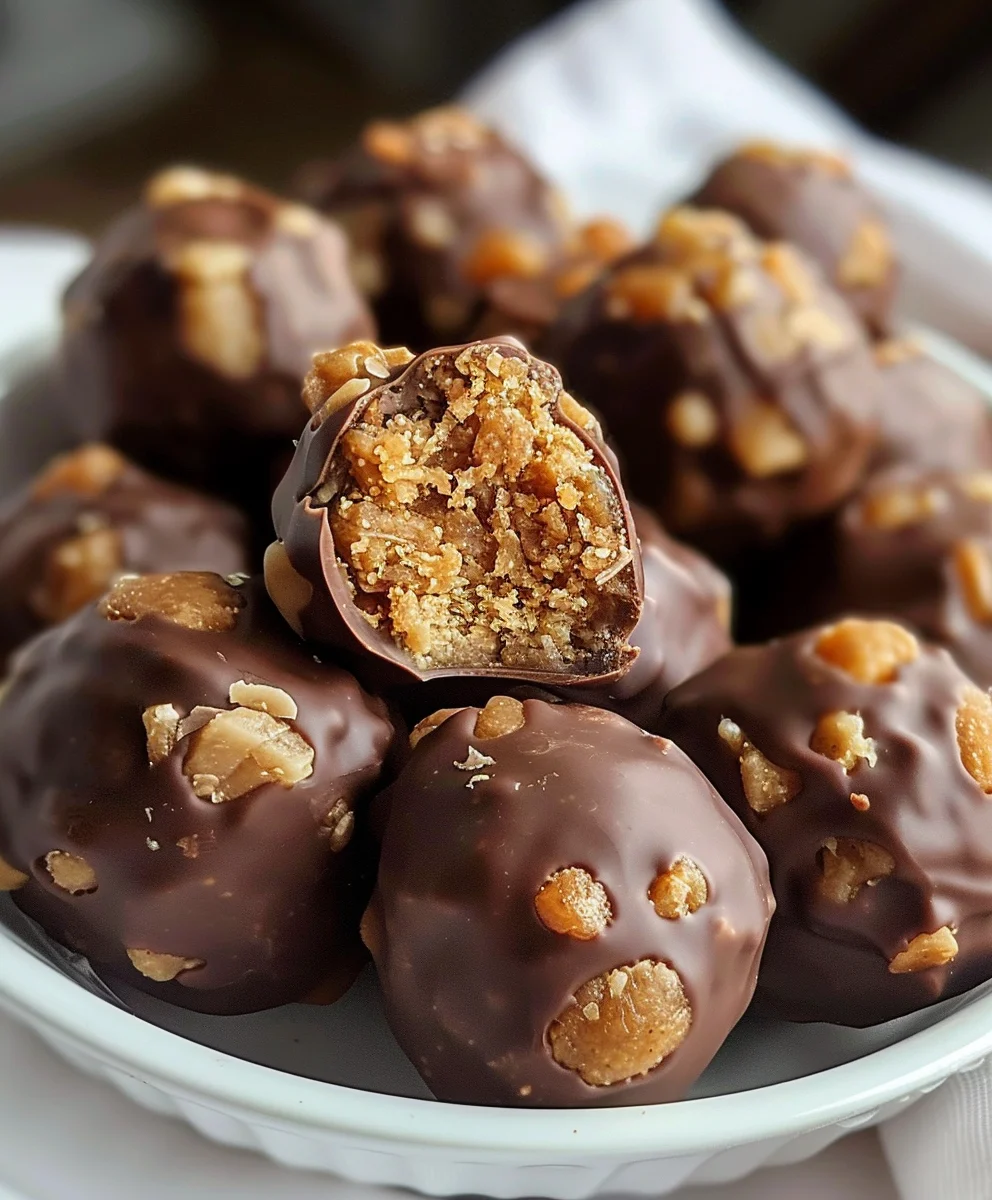
What sets these delectable treats apart? It’s the ingenious combination of textures and flavors that dance on your palate. Imagine the satisfying crunch of a classic candy bar, perfectly enrobed in a smooth, rich chocolate coating, all held together by a creamy, delightful interior. There’s a wonderful nostalgia to the flavor, yet it feels fresh and exciting every single time. Beyond the incredible taste, the sheer simplicity of this no-bake wonder is a game-changer. No oven preheating, no delicate timing, just a few straightforward steps that yield spectacular results. This makes it an ideal project for busy weeknights, a fun activity with the kids, or an impressive contribution to any holiday spread when time is of the essence. Plus, the minimal cleanup is an added bonus that we can all appreciate!
Serving Suggestions and Creative Variations to Explore
While these treats are absolutely perfect just as they are, there’s a whole world of possibilities to explore once you’ve mastered the basic recipe. For a festive touch, try coating them in white chocolate and sprinkling with holiday-themed nonpareils or crushed candy canes during the winter months. For an adult twist, a tiny splash of a complementary liqueur like Kahlua or a hazelnut cordial could be mixed into the creamy base before rolling – just be sure to start with a very small amount and adjust to taste. You could also experiment with different types of chocolate for the coating; a dark chocolate ganache would offer a sophisticated, slightly bitter contrast, while milk chocolate would lean into a sweeter profile. Consider serving them chilled for an extra firm bite, or at room temperature for a softer, melt-in-your-mouth experience. They make fantastic additions to a dessert charcuterie board, nestled amongst fruit, nuts, and other sweet bites. Or, for a truly decadent pairing, enjoy them alongside a scoop of vanilla bean ice cream or a warm cup of coffee after dinner. The versatility is truly one of its strongest suits, allowing you to tailor them to any occasion or craving. These
Butterfinger Balls
are also an excellent option for edible gifts; package them in a pretty box with a ribbon, and you’ve got a thoughtful, homemade present that’s sure to be appreciated.
So, my friends, don’t just read about it; experience the magic for yourself! I wholeheartedly encourage you to carve out a little time this week, gather your ingredients, and whip up a batch of these extraordinary treats. I promise you won’t be disappointed. And once you’ve had a chance to savor every glorious bite, I would absolutely love to hear from you. What did you think? Did you try any exciting variations? What was your favorite part? Your feedback and shared experiences are what make this culinary journey so much fun for all of us. Happy cooking, and even happier eating!
Sweet & Crunchy Butterfinger Balls – No-Bake Treat
These no-bake Butterfinger Balls are a delightful treat, featuring the crispy, peanut-buttery crunch of Butterfinger candy bars combined with a rich peanut butter and graham cracker base, all enrobed in smooth chocolate. Perfect for any occasion!
Ingredients
-
4 tablespoons (1/2 stick) softened butter
-
1 cup peanut butter (avoid all-natural varieties)
-
1 teaspoon vanilla extract
-
1 cup powdered sugar
-
¾ cup graham cracker crumbs
-
½ cup Butterfinger bars, crushed
-
8 ounces chocolate bark or chocolate chips
-
Optional garnishes: additional crushed Butterfinger bars, festive sprinkles, or coarse sea salt
Instructions
-
Step 1
In a large mixing bowl, beat softened butter, peanut butter, vanilla extract, and powdered sugar until the mixture is smooth and creamy. -
Step 2
Stir in the graham cracker crumbs and ½ cup of crushed Butterfinger bars until evenly distributed. The mixture should be pliable. -
Step 3
Roll the mixture into approximately 1-inch (2.5 cm) balls. Place them onto a parchment-lined baking sheet and refrigerate for at least 1 hour, or until thoroughly firm. -
Step 4
Melt the chocolate bark or chocolate chips using a microwave (in 30-second intervals, stirring) or a double boiler until smooth and glossy. Avoid overheating. -
Step 5
Using a fork or dipping tool, carefully dip each chilled Butterfinger ball into the melted chocolate. Lift, tap gently to remove excess chocolate, and then place it back on the parchment-lined baking sheet. -
Step 6
Immediately garnish the chocolate-coated balls with additional crushed Butterfinger bars, festive sprinkles, or coarse sea salt, if desired, while the chocolate is still wet. Return to the refrigerator for about 30 minutes, or until the chocolate coating is completely firm. -
Step 7
Once set, transfer the Butterfinger Balls to an airtight container. Store in the refrigerator for up to 1-2 weeks. For longer storage, they can be frozen for up to 2 months; thaw in the refrigerator before serving.
Important Information
Nutrition Facts (Per Serving)
It is important to consider this information as approximate and not to use it as definitive health advice.
Allergy Information
Please check ingredients for potential allergens and consult a health professional if in doubt.
Leave a Comment