
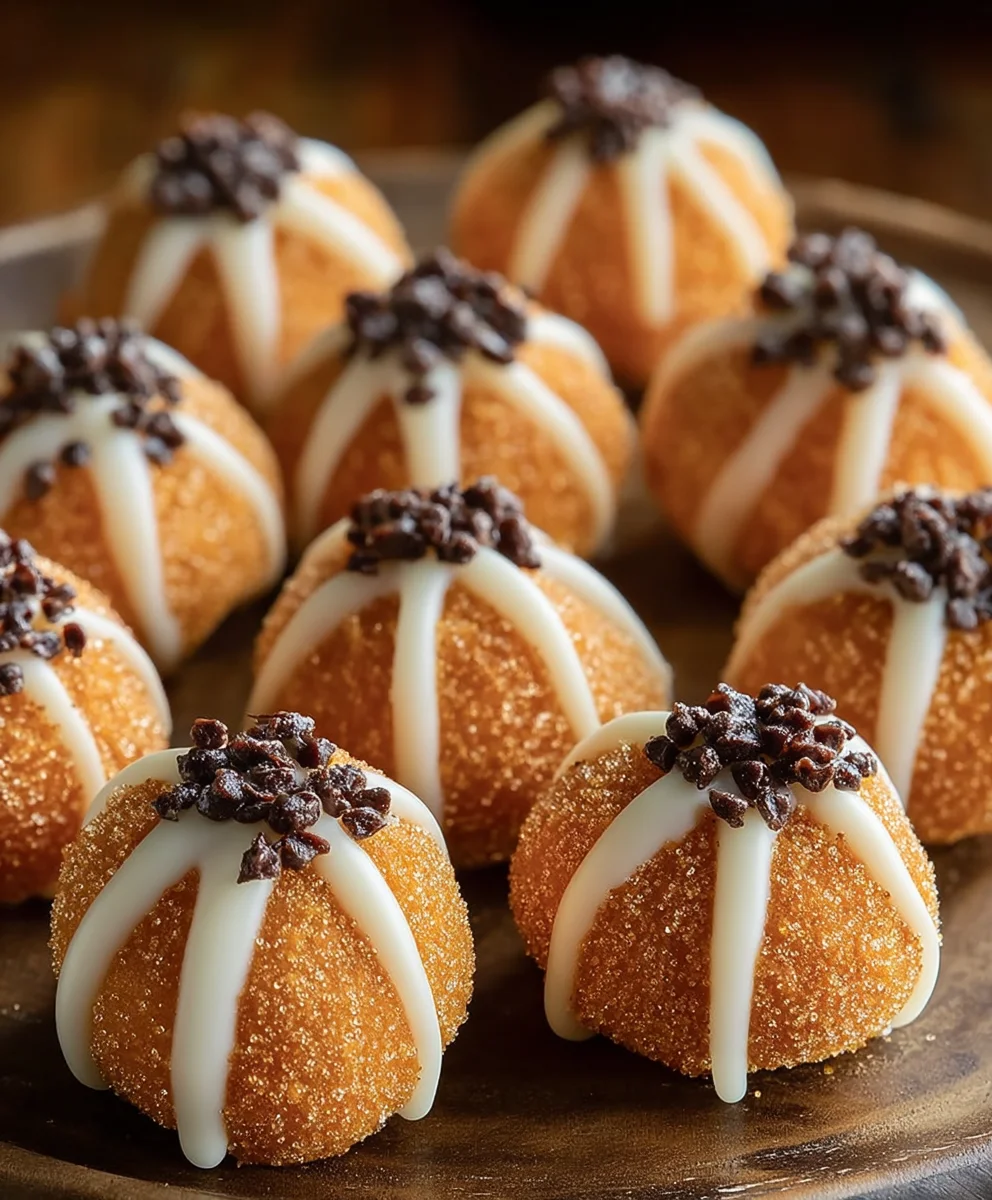
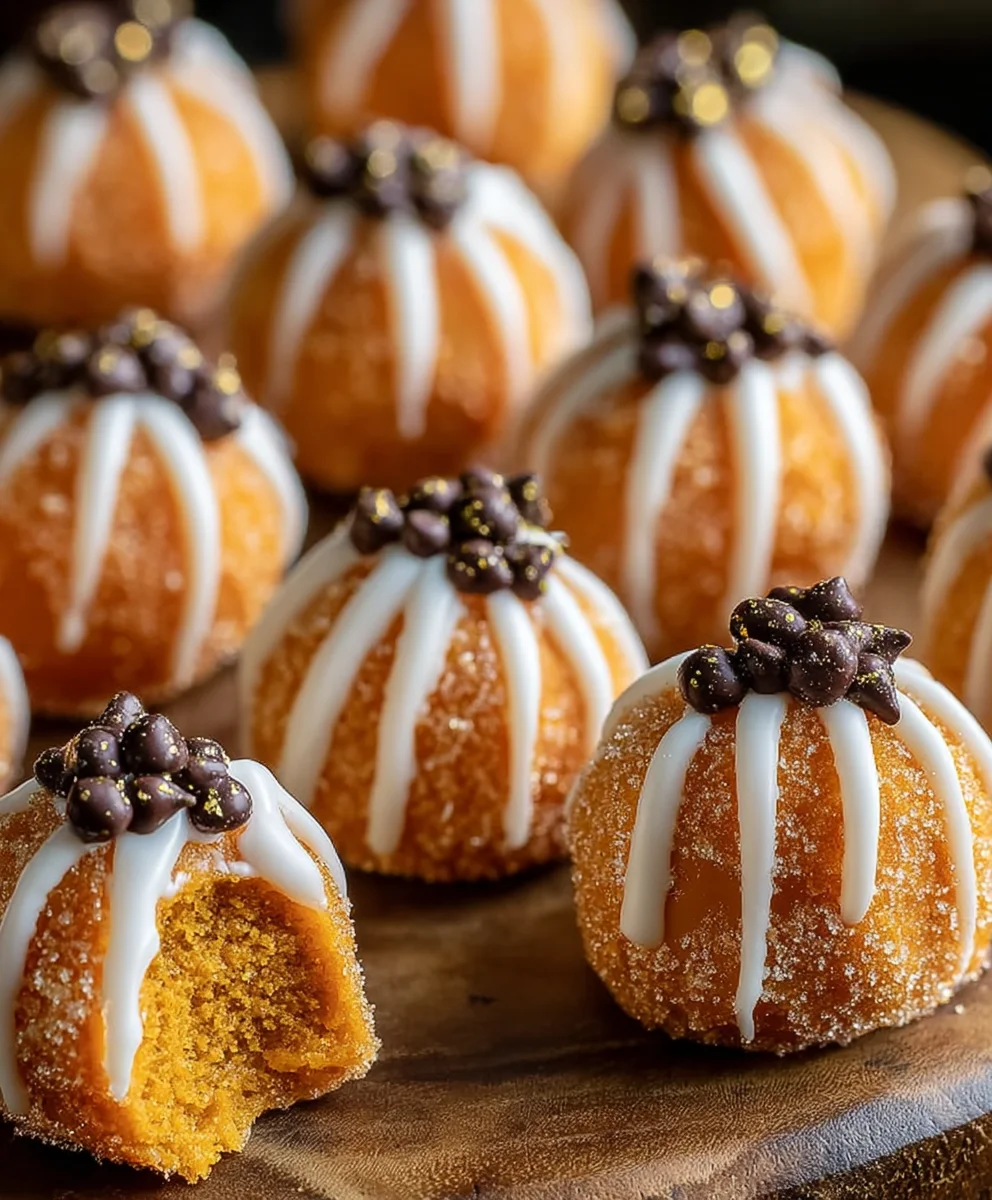
Pumpkin Cheesecake Truffles are truly a revelation, especially as the crisp autumn air begins to settle. Imagine the rich, creamy essence of a classic pumpkin cheesecake, perfectly transformed into a delightful, bite-sized confection that melts effortlessly in your mouth. These aren’t just treats; they are miniature masterpieces that encapsulate the very spirit of the autumn season.
While the concept of a “truffle” often evokes images of European chocolate artistry, the idea of rolling a decadent filling into a small, portable delight has a universal appeal. This particular creation, blending the cherished flavors of pumpkin pie—a staple of North American harvest celebrations for centuries—with the smooth tang of cream cheese, offers a modern, luxurious twist on beloved traditions. It’s a delightful fusion of a classic American dessert with the refined elegance of a confectionery truffle.
People absolutely adore these truffles because they offer all the comforting, spiced warmth of pumpkin season without the need for a fork. Their perfectly portioned size makes them ideal for entertaining, a thoughtful homemade gift, or simply a luxurious personal indulgence. The exquisite combination of sweet pumpkin, subtle spice, and the irresistible creaminess of cheesecake, all enrobed in a delicate shell, creates a flavor experience that is both familiar and exciting. I find myself reaching for another one of these exquisite Pumpkin Cheesecake Truffles time and time again!

Ingredients:
- For the Pumpkin Cheesecake Base:
- 16 ounces (2 blocks) full-fat cream cheese, softened to room temperature
- 1 cup pumpkin puree (not pumpkin pie filling), thoroughly drained if excessively watery
- 1/2 cup powdered sugar (confectioners’ sugar), sifted
- 1 teaspoon ground cinnamon
- 1/2 teaspoon ground nutmeg
- 1/4 teaspoon ground ginger
- Pinch of ground cloves (optional, but highly recommended for depth)
- 1/2 teaspoon pure vanilla extract
- 1 cup fine graham cracker crumbs (approximately 8-10 full graham cracker sheets, crushed)
- For the Coating:
- 12 ounces white chocolate melting wafers or high-quality white chocolate, finely chopped
- 1 tablespoon coconut oil or shortening (optional, for smoother consistency)
- 6 ounces milk chocolate or dark chocolate melting wafers or high-quality chocolate, finely chopped (for optional drizzle)
- Optional Garnishes:
- Extra ground cinnamon or pumpkin pie spice for dusting
- Chopped pecans or walnuts
- Decorative sprinkles (autumn-themed or plain)
- Crushed graham cracker crumbs
Preparing the Pumpkin Cheesecake Base
- Begin with Softened Cream Cheese: My first step, and it’s a crucial one for velvety smooth Pumpkin Cheesecake Truffles, is to ensure your cream cheese is truly at room temperature. This usually takes about 30-60 minutes on the counter, depending on your kitchen’s warmth. If it’s too cold, you’ll end up with lumps, and nobody wants lumpy truffles! In a large mixing bowl, using an electric mixer fitted with the paddle attachment (or a hand mixer), beat the softened cream cheese on medium speed for about 2-3 minutes until it’s incredibly light, fluffy, and completely smooth. Make sure to scrape down the sides of the bowl halfway through to incorporate everything.
- Incorporate the Pumpkin Puree: Now, let’s bring in that lovely pumpkin flavor! Add the pumpkin puree to the cream cheese mixture. It’s important to use pure pumpkin puree, not pumpkin pie filling, as pie filling already contains spices and sugar which will throw off our carefully balanced recipe. If your pumpkin puree seems particularly watery, I often press it between a few layers of paper towels or fine-mesh sieve for a few minutes to remove excess moisture. This prevents our truffle mixture from becoming too loose. Beat on medium-low speed until the pumpkin puree is fully incorporated and the mixture is a uniform orange color, about 1-2 minutes. Again, scrape down the sides of the bowl.
- Sweeten and Spice it Up: Next, we’ll add the sifted powdered sugar. Sifting is important here to prevent clumps and ensure a smooth texture. Gradually add the powdered sugar to the pumpkin-cream cheese mixture, beating on low speed until just combined. Overmixing at this stage can incorporate too much air, which we don’t necessarily want for a dense truffle base. Then, it’s time for the warming spices that make these Pumpkin Cheesecake Truffles truly shine! Add the ground cinnamon, nutmeg, ginger, and the optional pinch of cloves. Don’t forget the pure vanilla extract for that extra layer of flavor. Mix on low speed until all the spices and vanilla are evenly distributed throughout the mixture, about 30 seconds. The aroma in your kitchen right now should be absolutely heavenly!
- Add Graham Cracker Crumbs for Structure: To give our truffle base a little more body and stability, we’re going to add the fine graham cracker crumbs. These crumbs not only help to firm up the mixture, making it easier to roll, but they also contribute a subtle, buttery flavor that complements the pumpkin cheesecake beautifully. Gently fold in the graham cracker crumbs using a spatula until just combined. You don’t want to overmix here; just make sure the crumbs are evenly distributed. The mixture should now be thick enough to hold its shape fairly well.
- Chill the Mixture Thoroughly: This is another non-negotiable step for perfect Pumpkin Cheesecake Truffles. Cover the bowl tightly with plastic wrap and refrigerate the mixture for at least 4 hours, or preferably overnight. The longer it chills, the firmer it will become, and the easier it will be to scoop and roll into uniform truffle balls. Don’t try to rush this step; patience now will save you a lot of frustration later when shaping. A well-chilled mixture is key to preventing sticky, messy truffle formation.
Chilling and Shaping the Truffles
- Prepare for Shaping: Once your pumpkin cheesecake mixture is thoroughly chilled and firm, line a baking sheet with parchment paper or a silicone baking mat. This will prevent your shaped truffles from sticking. You’ll also want to have a small bowl of warm water and a clean towel nearby for cleaning your scooper or hands as you go.
- Scoop and Roll the Truffles: Using a small cookie scoop (about 1-inch diameter or 1.5 tablespoons capacity) is my secret to making consistently sized Pumpkin Cheesecake Truffles. Scoop out portions of the chilled mixture and then, using your clean hands, gently roll each portion into a smooth, round ball. Aim for uniformity so they all look lovely and professional. If the mixture starts to get too sticky, pop it back into the fridge for 15-20 minutes to firm up again. I usually work in batches, keeping the rest of the mixture chilled. Place the shaped truffle balls onto your prepared baking sheet as you finish them.
- Second Chill for Firmness: Once all your Pumpkin Cheesecake Truffles are shaped and resting on the baking sheet, it’s time for another chill. This step is vital to ensure they are firm enough to withstand the warmth of the chocolate coating without losing their shape. Place the baking sheet with the truffles back into the refrigerator or freezer for at least 30 minutes. If you put them in the freezer, 15-20 minutes should suffice. They need to be quite firm, almost frozen, to make the coating process smoother and prevent the chocolate from cracking later. This helps create that crisp outer shell we all love.
Preparing the Coating
-
Melt the White Chocolate: Now for the delicious coating! We want a smooth, dippable chocolate. There are two main methods I recommend.
- Double Boiler Method (Recommended for best results): Fill a saucepan with about 1-2 inches of water and bring it to a gentle simmer. Place a heatproof bowl (make sure it’s larger than the saucepan and won’t touch the water) over the simmering water. Add your white chocolate melting wafers or finely chopped white chocolate to the bowl. Stir frequently with a dry rubber spatula until the chocolate is completely melted and smooth. Be extremely careful not to let any water or steam get into the chocolate, as this will cause it to seize and become thick and grainy. Once melted, remove the bowl from the heat. If using, stir in the coconut oil or shortening to help achieve an even smoother, thinner consistency, which makes dipping much easier.
- Microwave Method: Place the white chocolate melting wafers or finely chopped white chocolate in a microwave-safe bowl. Microwave on 50% power in 30-second intervals, stirring thoroughly after each interval. Continue until the chocolate is almost completely melted, then stir until it’s entirely smooth. This method requires a bit more vigilance to prevent burning. Again, if using, stir in the coconut oil or shortening.
Keep the chocolate warm enough to remain fluid, but not hot, as excessive heat can melt your truffles too quickly.
- Prepare Optional Drizzle Chocolate (if using): If you plan to drizzle your Pumpkin Cheesecake Truffles with an additional chocolate, prepare the milk or dark chocolate in a separate small bowl using the same melting method as above. Keep this chocolate melted and ready for decorating.
Coating the Truffles
- Dip the Truffles: This is where your chilled truffles and perfectly melted chocolate come together. Working with one truffle at a time, drop a firm, chilled pumpkin cheesecake ball into the melted white chocolate. Use a dipping tool or a fork to completely submerge the truffle.
- Tap Off Excess: Carefully lift the truffle out of the chocolate with your dipping tool or fork. Gently tap the tool against the side of the bowl to allow any excess chocolate to drip off. This creates a thin, even coating and prevents pooling at the bottom. You want just enough chocolate to fully encase the truffle.
- Place and Set: Transfer the coated truffle to your prepared parchment-lined baking sheet. The chocolate will start to set fairly quickly, especially if your truffles are very cold. Work efficiently but carefully.
- Garnish Immediately (if desired): If you’re planning to add any sprinkles, crushed graham crackers, or chopped nuts, do so immediately after placing each coated truffle on the baking sheet, before the white chocolate sets. This ensures your chosen garnish adheres properly. For a simple and elegant touch, a light dusting of cinnamon or pumpkin pie spice is always lovely.
- Apply Chocolate Drizzle (if desired): Once all your Pumpkin Cheesecake Truffles are coated in white chocolate and are starting to set, take your melted milk or dark chocolate (if using for a drizzle). You can transfer it to a piping bag with a tiny snipped corner, a Ziploc bag with a small corner cut off, or simply use a fork. Drizzle the chocolate decoratively over the white chocolate-coated truffles. You can do zigzags, straight lines, or even swirls – get creative!
- Final Setting: After all your truffles are coated and decorated, place the baking sheet back into the refrigerator for at least 30 minutes to allow the chocolate coating to fully set and harden. This ensures a crisp, satisfying bite. A fully set coating is essential for the best texture and presentation of your Pumpkin Cheesecake Truffles.
Storage and Enjoyment
- Store Properly: Once the chocolate is completely set, transfer your beautiful Pumpkin Cheesecake Truffles to an airtight container. They need to be stored in the refrigerator due to the cream cheese base. They will keep well for up to 1 week in the fridge.
- Serving Suggestions: For the absolute best flavor and texture, I like to take these delightful Pumpkin Cheesecake Truffles out of the refrigerator about 15-20 minutes before serving. This allows the cheesecake filling to soften just slightly, enhancing its creamy texture, while the chocolate coating remains firm. They are perfect as a festive dessert bite for holidays, a thoughtful edible gift, or simply a special treat for yourself and your loved ones. Each bite is a little explosion of autumn flavors!
Conclusion:
And there you have it, my friends! We’ve reached the sweet finale of our journey into creating what I truly believe are some of the most delightful bites you’ll ever encounter. These Pumpkin Cheesecake Truffles aren’t just another dessert; they are a celebration of fall flavors, a testament to the magic that happens when creamy, tangy cheesecake meets the warm, comforting embrace of pumpkin spice. I’ve poured my heart into perfecting this recipe, ensuring that each little sphere is an explosion of taste and texture that will leave you utterly enchanted.
What makes these truffles a non-negotiable addition to your baking repertoire, you ask? Well, for starters, they offer an incredible depth of flavor that manages to be both rich and surprisingly light, avoiding the heaviness that sometimes accompanies traditional pumpkin desserts. The smooth, velvety interior, infused with just the right amount of cinnamon, nutmeg, ginger, and cloves, is perfectly complemented by the crisp, sweet exterior. They are wonderfully adaptable, making them perfect for any occasion – from an elegant holiday gathering to a cozy night in with a good book and a warm cup of cider. Plus, let’s be honest, who can resist a bite-sized treat that delivers all the joy of a full slice of pumpkin cheesecake without the need for a fork?
I genuinely believe that once you try these, you’ll understand why I’m so passionate about them. They’re relatively simple to make, yet they present beautifully, looking like they came straight from a gourmet bakery. They’re the kind of dessert that elicits gasps of delight and immediate requests for the recipe, trust me! They are truly special, capturing the essence of autumn in a way that feels both luxurious and approachable. Preparing them fills your kitchen with the most intoxicating aromas, setting the perfect mood for the season. It’s a small effort for a truly spectacular reward, promising to become a new favorite tradition in your home.
Serving Suggestions & Creative Variations:
While these truffles are absolutely divine on their own, don’t shy away from experimenting to make them even more “you”! For a simple yet elegant presentation, arrange them on a platter dusted lightly with cocoa powder or a sprinkle of extra cinnamon. They are phenomenal served alongside a strong espresso, a creamy chai latte, or even a glass of sparkling wine for a sophisticated touch. Consider packaging a small box of them with a beautiful ribbon as a thoughtful homemade gift for friends, neighbors, or as a host/hostess present – they always receive rave reviews!
Feeling adventurous? Here are a few ideas to spark your creativity:
- Double Chocolate Dream: Instead of a white chocolate coating, try dipping some in melted dark chocolate. A drizzle of white chocolate over the dark ones creates a stunning contrast. Or, for a truly decadent experience, use milk chocolate!
- Nutty Crunch: Before the chocolate sets, roll the truffles in finely chopped toasted pecans, walnuts, or even crushed graham cracker crumbs for an added layer of texture and flavor.
- Spice It Up: Gently mix in a pinch of finely ground black pepper or a tiny dash of cayenne into the pumpkin cheesecake base for a subtle, intriguing warmth that elevates the spice profile.
- Coconut Cloud: For a tropical twist, roll your freshly dipped truffles in unsweetened shredded coconut. The combination of pumpkin and coconut is surprisingly delightful.
- Boozy Bliss: A very small splash (think ½ to 1 teaspoon) of spiced rum, bourbon, or Grand Marnier can be folded into the cheesecake mixture before chilling for an adult-friendly version. Be careful not to add too much liquid!
- Mini Marvels: For a more petite bite, make smaller truffles. Adjust chilling time accordingly.
I truly hope this recipe brings as much joy to your kitchen and your taste buds as it has to mine. There’s something incredibly satisfying about creating something so delicious from scratch, and I promise you, the aroma alone is worth the effort. Now, it’s your turn! I urge you to roll up your sleeves, gather your ingredients, and dive into making these incredible Pumpkin Cheesecake Truffles. You won’t regret it! Once you’ve made them, please come back and share your experience with me. Did you try a fun variation? What did your family and friends think? I absolutely love hearing about your culinary adventures and seeing your creations. Happy baking, and enjoy every single delightful bite!
Pumpkin Cheesecake Truffles: Easy No-Bake Dessert!
Imagine the rich, creamy essence of a classic pumpkin cheesecake, perfectly transformed into a delightful, bite-sized confection that melts effortlessly in your mouth. These miniature masterpieces encapsulate the spirit of autumn.
Ingredients
-
1 tablespoon butter
-
4 ounces cream cheese, softened
-
1/2 cup canned pumpkin puree
-
1 (14-ounce) can sweetened condensed milk
-
1 1/2 teaspoons pumpkin pie spice
-
1/2 cup graham cracker crumbs
-
1/3 cup white chocolate chips
-
Optional: Orange food coloring
-
Optional: Granulated sugar for rolling
Instructions
-
Step 1
Prepare Truffle Base: In a large bowl, beat softened cream cheese until light and fluffy. Add pumpkin puree, sweetened condensed milk, and pumpkin pie spice; beat until smooth. -
Step 2
Add Graham Crackers: Gently fold in the graham cracker crumbs until evenly distributed. -
Step 3
Chill Base: Cover the mixture and refrigerate for at least 4 hours, or preferably overnight, until firm. -
Step 4
Shape Truffles: Line a baking sheet with parchment paper. Scoop out portions (about 1.5 tablespoons each) and roll into smooth balls. (Optional: Roll in granulated sugar at this stage). Place truffles on the prepared baking sheet. -
Step 5
Second Chill: Refrigerate or freeze shaped truffles for at least 30 minutes (15-20 minutes if freezing) until very firm. -
Step 6
Melt Coating: Melt white chocolate chips with butter using a double boiler or microwave (in 30-second intervals at 50% power), stirring until smooth. (Optional: Stir in orange food coloring if desired). -
Step 7
Coat Truffles: Dip each firm, chilled truffle into the melted white chocolate, ensuring it’s fully coated. Tap off excess chocolate and place on the parchment-lined baking sheet. -
Step 8
Final Set & Store: Refrigerate coated truffles for at least 30 minutes to fully set the chocolate. Store in an airtight container in the refrigerator for up to 1 week. For best texture, let them sit at room temperature for 15-20 minutes before serving.
Important Information
Nutrition Facts (Per Serving)
It is important to consider this information as approximate and not to use it as definitive health advice.
Allergy Information
Please check ingredients for potential allergens and consult a health professional if in doubt.

Leave a Comment